Page is loading ...

English
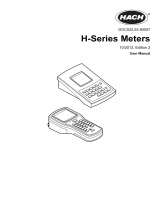
User Manual SevenExcellence™
Français
Guide de l'utilisateur SevenExcellence™
Español
Manual de usuario SevenExcellence™
Polski
Podręcznik użytkownika SevenExcellence™
30046976I12.03.2021 06:42- Schema ST4 PDF engine -Layout by Victor Mahler


Table of Contents
1 Introduction 3
2 Safety information 4
2.1 Definitions of signal words and warning symbols ............................................... 4
2.2 Product specific safety notes ............................................................................ 4
3 Design and Function 6
3.1 Description of the instrument ............................................................................ 6
3.2 Overview........................................................................................................ 7
3.3 Module connections ........................................................................................ 9
3.4 User interface ................................................................................................. 12
3.4.1 Homescreen ................................................................................... 12
4 Putting into Operation 16
4.1 Scope of delivery ............................................................................................ 16
4.2 Connecting and removing modules................................................................... 16
4.3 Mounting uPlace™ electrode arm..................................................................... 18
4.4 Installing power supply.................................................................................... 19
4.5 Switching the instrument on and off................................................................... 19
4.6 Connecting sensors......................................................................................... 20
4.7 Connecting autosampler .................................................................................. 20
4.8 Connecting stirrers .......................................................................................... 20
4.9 Connecting PnP devices .................................................................................. 20
4.10 Connecting computers..................................................................................... 20
5 Operating the Instrument 21
5.1 Direct calibration............................................................................................. 21
5.2 Direct measurement ........................................................................................ 21
5.3 Starting a method ........................................................................................... 21
6 Maintenance and Care 22
6.1 Cleaning the Instrument ................................................................................... 22
6.2 Maintenance of electrodes................................................................................ 22
6.3 Transporting the instrument.............................................................................. 23
6.4 Disposal ........................................................................................................ 23
7 Accessories 24
8 Technical Data 27
Table of Contents 1SevenExcellence™
en

Table of Contents2 SevenExcellence™

1 Introduction
The METTLER TOLEDO SevenExcellence™ is a modern, professional instrument suitable for use in a wide
variety of application areas and segments. It can be used, for example, in quality control as well as in research
and development and meets the most demanding requirements.
This flexible meter perfectly combines easy-to-understand operation with a high level of measurement accuracy
and outstanding reliability. Thanks to the plug & play capability, the detection of external devices and ISM
®
sensors occurs automatically, in this way supporting the comfortable handling of SevenExcellence™.
Straightforward user guidance on the large color touch screen makes the operation particularly intuitive. User-
definable shortcuts allow methods to be activated directly from the home screen with a single tap.
About this document
This document provides you with the information you need to get started with your METTLER TOLEDO
instrument.
The instructions in this document refer to running firmware version 4.3.0 or higher.
For a full description of the instrument and its functions, refer to the Reference Manual, supplied as
PDF file online.
u www.mt.com/library
u http://mt.com/pHLabsupport
If you have any additional questions, contact your authorized METTLER TOLEDO service representative or
dealer.
u www.mt.com/contact
Conventions and symbols
Note
For useful information about the product.
Elements of instructions
Instructions always contain action steps and can contain prerequisites, intermediate results and results. If an
instruction contains more than one action step, the action steps are numbered.
Prerequisites that must be fulfilled before the individual action steps can be executed.
1 Action step 1
Intermediate result
2 Action step 2
Result
en
Introduction 3SevenExcellence™

2 Safety information
Two documents named "User Manual" and "Reference Manual" are available for this instrument.
The User Manual is printed and delivered with the instrument.
The electronic Reference Manual contains a full description of the instrument and its use.
Keep both documents for future reference.
Include both documents if you transfer the instrument to other parties.
Only use the instrument according to the User Manual and the Reference Manual. If you do not use the
instrument according to these documents or if the instrument is modified, the safety of the instrument may be
impaired and Mettler-Toledo GmbH assumes no liability.
User Manual and Reference Manual are available online.
u www.mt.com/library
2.1 Definitions of signal words and warning symbols
Safety notes contain important information on safety issues. Ignoring the safety notes may lead to personal
injury, damage to the instrument, malfunctions and false results. Safety notes are marked with the following
signal words and warning symbols:
Signal words
WARNING
A hazardous situation with medium risk, possibly resulting in death or severe injury if
not avoided.
NOTICE
A hazardous situation with low risk, resulting in damage to the instrument, other
material damage, malfunctions and erroneous results, or loss of data.
Warning symbols
Electrical shock
2.2 Product specific safety notes
Intended use
This instrument is designed to be used by trained staff. The SevenExcellence™ is intended for measuring pH,
mV, ion, conductivity, DO/BOD.
Any other type of use and operation beyond the limits of use stated by Mettler-Toledo GmbH without consent
from Mettler-Toledo GmbH is considered as not intended.
Responsibilities of the instrument owner
The instrument owner is the person holding the legal title to the instrument and who uses the instrument or
authorizes any person to use it, or the person who is deemed by law to be the operator of the instrument. The
instrument owner is responsible for the safety of all users of the instrument and third parties.
Mettler-Toledo GmbH assumes that the instrument owner trains users to safely use the instrument in their
workplace and deal with potential hazards. Mettler-Toledo GmbH assumes that the instrument owner provides
the necessary protective gear.
Safety information4 SevenExcellence™

Safety notes
WARNING
Death or serious injury due to electric shock
Contact with parts that carry a live current can lead to death or injury.
1 Only use the METTLER TOLEDO AC/DC adapter designed for your instrument.
2 Keep all electrical cables and connections away from liquids and moisture.
3 Check the cables and the plugs for damage and replace damaged cables and plugs.
NOTICE
Damage to the instrument or malfunction due to the use of unsuitable parts
Only use parts from METTLER TOLEDO that are intended to be used with your instrument.
FCC Rules
This device complies with Part 15 of the FCC Rules and Radio Interference Requirements of the Canadian
Department of Communications. Operation is subject to the following conditions: (1) this device may not cause
harmful interference, and (2) this device must accept any interference received, including interference that may
cause undesired operation.
This equipment has been tested and found to comply with the limits for a Class A digital device, pursuant to
Part 15 of the FCC rules. These limits are designed to provide reasonable protection against harmful inter-
ference when the equipment is operated in a commercial environment. This equipment generates, uses, and
can radiate radio frequency energy and, if not installed and used in accordance with the instruction manual,
may cause harmful interference to radio communications. Operation of this equipment in a residential area is
likely to cause harmful interference in which case the user will be required to correct the interference at his own
expense.
en
Safety information 5SevenExcellence™

3 Design and Function
3.1 Description of the instrument
The SevenExcellence™ bench meters are based on precise electrochemical measuring technique. Modular
expansion units, automatically recognized ISM
®
sensors and the plug & play function for external devices
make SevenExcellence a comfortable instrument for reliable measurement.
For the optimal use of your SevenExcellence™ bench meters, the following devices can be connected:
Modules
METTLER TOLEDO pH/mV module
METTLER TOLEDO pH/Ion module
METTLER TOLEDO conductivity module
METTLER TOLEDO DO/BOD module
Sensors
Select from the wide range of METTLER TOLEDO electrodes, the electrode value box supports you to find
the right tool. www.electrodes.net.
ISM
®
sensors are detected automatically.
Temperature probes can be connected separately.
Rondolino sample changer allows fully automatic analysis of up to 9 samples. The optional Power-
Shower™ perfectly rinses contaminated electrodes.
InMotion sample changer allows fully automatic analysis of up to 303 samples in different beaker sizes
(only if operated by LabX).
Computer for operation with LabX or EasyDirect pH software.
uMix™ magnetic stirrer to optimize workflows and to enhance the reproducibility of results.
Barcode reader for scanning sample data.
Logstraight™ fingerprint reader for user identification.
Compact printer (USB-P25), to print out results.
USB stick to store and transfer data.
LAN for printing with network printer.
Additional compact printers, including RS-P25, RS-P26, RS-P28.
Design and Function6 SevenExcellence™

3.2 Overview
Front view
1
2
3
4
5
6
1
On/Off button
2
USB A interface
3
USB A interface
4
Touch screen
5 Info
Opens a screen with information about the
instrument and the attached modules.
6 Home
Brings you back to the homescreen.
Rear view
1 2 3 4 5
1 LAN
Network connection
2 USB USB B interface for PC connection (LabX or EasyDirect pH software)
3 Data
RS232 interface
4 Stir
Socket for METTLER TOLEDO stirrer (Mini-DIN)
5 DC
Power supply socket
en
Design and Function 7SevenExcellence™

Pin Assignments
Below the PIN assignments for the RS-232 interface are shown. METTLER TOLEDO printers such as RS-P25
can be connected to this interface.
Design and Function8 SevenExcellence™

3.3 Module connections
Instrument connection
In the lower area you find the socket for connecting the module to the instrument.
A guide rail on the backside of the housing supports attaching the module.
Connections on the pH/mV module
The type of module is identified by a colored tag. Yellow for pH/mV.
Digi
Mini-LTW socket for digital sensors
ISFET
Mini-DIN socket for ISFET sensors
ATC int
RCA (Cinch) socket for internal temperature input (NTC30k)
pH
BNC socket for mV/pH sensors
en
Design and Function 9SevenExcellence™

Connections on the conductivity module
The type of module is identified by a colored tag. Purple for conductivity.
Digi
Mini-LTW socket for digital sensors
ATC ext
RCA (Cinch) socket for external temperature input (NTC30k or
PT1000)
Cond
Mini-DIN socket for conductivity sensors
Connections on the pH/Ion module
The type of module is identified by a colored tag. Orange for pH/Ion.
Digi
Mini-LTW socket for digital sensors
ATC ext
RCA (Cinch) socket for external temperature input (NTC30k or
PT1000)
ref
2mm banana socket for reference electrode
ATC int
RCA (Cinch) socket for internal temperature input (NTC30k)
pH
BNC socket for mV/pH sensors
Design and Function10 SevenExcellence™

Connections on the DO/BOD module
The type of module is identified by a colored tag. Blue for DO/BOD.
Digi
Mini-LTW socket for digital sensors
ATC ext
RCA (Cinch) socket for external temperature input (NTC22k)
ATC int
RCA (Cinch) socket for internal temperature input (NTC22k)
DO
BNC socket for the DO sensorss
en
Design and Function 11SevenExcellence™

3.4 User interface
NOTICE
Danger of damaging the touch screen with pointed or sharp objects!
Pressing on the touch screen with pointed or sharp objects may be damaged it.
Operate the touch screen by applying gentle pressure with the pad of your finger.
3.4.1 Homescreen
Home
Administrator 06/05/2020 09:13
User data ReadLog out
Methods
Series
Results
Setup
Sensors
pH/mV
Cond.
DO
1
2
3 4 5
6
9
78
Name Explanation
1 Shortcuts
User-specific shortcuts for frequently used methods. Shortcuts are saved in the
user profile and can be defined, changed and deleted by the user.
2 Modules
Attached modules and connected electrodes are shown.
3 Status bar
The status bar contains the current menu item, user name as well as date and
time.
4 News
Indicates important changes of the system like expiration of resources etc. or
disconnected PnP devices.
5 Tasks
Shows the current working status of the instrument. The list of tasks can be
accessed.
6 Read
Initiate a direct measurement from the Home Screen, without the need to first set
up a measurement method.
7 User data
Access an overview of the currently logged in user, the user group, and the time
since the current user has been logged in.
8 Log out
Allows you to log out of the instrument, change user levels, or lock the instrument
with a personalized password.
Design and Function12 SevenExcellence™

Name Explanation
9 Menus Methods
Create and handle methods for every measurement type.
Series
Create and manage series of individual samples
Results
Display all measurement results, print out or export them. Find detail information
about every single result.
Setup
Define all system settings in this menu, e.g, hardware settings, user management
or user preferences. These settings are usually made during installation of the
instrument.
Sensors
Modify and manage sensors.
en
Design and Function 13SevenExcellence™

Footer buttons
Depending on the selected submenu there are specific buttons in the footer.
AddToHome
Create a shortcut of a quick analysis.
Back
Go back one step in the menu structure.
Cancel
Cancel the current input without saving.
Delete method
Delete the selected method. Shortcuts and series which reference to this method
will also be deleted.
Expired resources
Shows the expired resources connected to this instrument.
Insert
Insert a method function in an existing method.
Log out
Log out the current user.
New
Creates a new method, sample series, sensor etc.
OK
Confirm the entered settings.
Preview
When entering a text with an alphanumeric keypad, you can preview your input.
Print
Print out the currently shown screen in tabular form. A printer must be connected
to the instrument.
Samples
Open the list with your defined samples.
Read
Start a quick analysis directly from the homescreen.
Start
Start a selected method.
User data
Access an overview of the currently logged in user
Input field types
In the single menus you have different kinds of parameter-fields to enter information, values or names or to
choose an option in a drop-down list. Depending on the input field (value or name) you will get a numeric or
alphabetic keypad for entering your values.
Text input field
Any text comprised of letters (up tp 30 characters), numbers and symbols can be entered
into these fields.
Text input field (extended)
Any text comprised of letters (up to 500 characters), numbers and symbols can be
entered into these fields.
Number input field
Numbers and formulas can be entered into these fields.
Drop-down list
A drop-down list opens from which you can select an entry.
Shortlist
A shortlist opens from which you can select an entry.
Formula field
A formula must be entered in these fields.
Info field
The displayed content is only for information (read only).
Design and Function14 SevenExcellence™

Keypads
Alphabetic keypad Numeric keypad
Cancel Preview OK
Enter method ID
1
2
3
4
6
5
Cancel
OK
Enter duration
1
2
Tap (1) to preview the entry.
Tap (2) to enter capital letters.
Tap (3) to enter lowercase letters.
Tap (4) to switch to a numeric keypad and
(2) to turn back to alphanumeric.
Tap (5) to delete all entered letters or
numbers.
Tap (6) to delete the last entered letter or
number.
Tap (1) to delete all entered numbers.
Tap (2) to delete the last entered number.
If the user language is set to Chinese, an additional button CN appears in the alphabetic keypad at the end of
the input field. Tab it to enter Chinese character in Pinyin and select the character from the list below the input
field. Be aware that Chinese characters cannot be printed on compact printers.
en
Design and Function 15SevenExcellence™

4 Putting into Operation
4.1 Scope of delivery
Unpack the instrument and check the scope of delivery. Keep the calibration certificate in a safe place.
SevenExcellence™ is delivered with:
uPlace™ electrode arm
Measurement modules and blank modules (according to your order)
Sensors (kit version or according to your order)
Universal AC adapter
User Manual
Declaration of conformity
Calibration certificate
EasyDirect pH PC software
4.2 Connecting and removing modules
Note
Before connecting or removing modules switch off the instrument.
METTLER TOLEDO offers different types of modules. The type of module is identified by a colored tag.
The instrument can be equipped with up to three modules. The modules can be combined in any composition
and order according to your requirements.
With less than three modules installed, protect the open sockets against moisture or contamination by
installing a blank module.
Connecting modules
1 Insert the expansion unit into the slot. The guide
rails simplify the connecting.
2 Attach the cover.
Putting into Operation16 SevenExcellence™
/