Page is loading ...

1
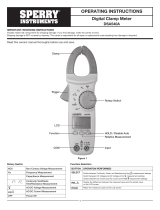
I. DISPLAY FUNCTIONS & SYMBOLS
OPERATING INSTRUCTIONS
9 Function, Auto Range Digital
Multi-Meter DM6450
68
9
14
7
11
10
Read this owner’s manual thoroughly before use and save.
1. 3.5” digit LCD display
2. Test Lead icons on display indicate
proper input terminals for easy
attachment of test leads
3. Durable drop resistant housing
4. 10 position Function dial
5. AC Volts
6. DC Volts
7. AC Amps
8. DC Amps
9. Resistance
10. Audible Continuity Test
11. Diode Test
12. Capacitance
13. Frequency
14. Low impedance button
15. Relative change
16. Positive input jack
17. Common input jack
18. Range select button
1.0 METER FUNCTIONS
Meter type: Auto-Ranging
Functions: 9
Ranges: 10 (Auto)
Display Count: 3999
Test Lead Icons: Display indicates proper terminal placement of test leads.
Input Impedance: 10 Meg Ohm
AC Volt Ranges: 4V, 40V, 400V, 750V, best accuracy (1.0%+5)
DC Volt Ranges: 400mV, 4V, 40V, 400V and 1000V, best accuracy (0.8%+1)
AC Amps: 400µA, 4000µA, 40mA, 400mA, 4A and 10A, best accuracy (1.2%+2)
DC Amps: 400µA, 4000µA, 40mA, 400mA, 4A and 10A, best accuracy (1.0%+2)
Resistance Ranges: 400ohm, 4kohm, 40kohm, 400kohm, 4Mohm, 40Mohm, best accuracy (1.0%+2)
Over Range Indication: Displayed value > 1999, displays OL (The safety and accuracy will only be guaranteed within the specification range) by
the input.
Polarity Indication: “-“ is displayed for negative polarity
Auto Off: 30 minutes
Electro-Magnetic: When it is under 1V/m frequency : total accuracy = assigned accuracy +5% of the range. When it is over 1V/m frequency:
there is no assigned accuracy.
Agency Approvals: ETL, CE (IEC/EN61010:, CAT III 600V, Pollution Degree 2
Operating Temperature: 32°F - 104°F (0°C_40°C)
Relative Humidity: 32°F - 86°F below <75%, 86°F - 104°F<50%
Storage Temperature: 14°F - 122°F(-10°C - 50°C)
Dimension: 179mm x 88mm x 39mm
Weight: Around 380g (including battery)
Altitude: Maximum 2000m

2
2.0 READ FIRST: IMPORTANT SAFETY INFORMATION
Read this operators manual thoroughly before using this multimeter. This manual is intended to provide basic
information regarding this meter and to describe common test procedures which can be made with this unit. Many
types of appliance, machinery and other electrical circuit measurements are not addressed in this manual and
should be handled by experienced service technicians.
Use extreme caution when using this multimeter. Improper use of this meter can result in severe damage,
personal injury or death. Follow all instructions and suggestions in this operators manual as well as observing
normal electrical safety precautions. Do not use this meter if you are unfamiliar with electrical circuits and proper
test procedures.
2.1 FOR YOUR SAFETY
WARNING 1. Use extreme caution when checking electrical circuits.
WARNING 2. Do not stand in wet or damp work areas when working with electricity. Wear rubber soled boots or
shoes.
WARNING 3. Do not apply more voltage or current than the set range of the multimeter will allow.
WARNING 4. Do not touch the metal probes of the test leads when making a measurement.
WARNING 5. Replace worn test leads. Do not use test leads with broken or tattered insulation.
Replace damaged test leads with identical model number or electrical specifications before using the Meter.
WARNING 6. Before you carrying out any measurement, make sure the display is normal after you turning on the
meter.
WARNING 7. Before using to check hazardous voltage, always test this Digital Multimeter on a known live circuit to
verify that this Digital Multimeter is working properly.
WARNING 8. Use the Meter only as specified in this operating manual, otherwise the protection provided by the
Meter may be impaired.
Equipment protected throughout by double insulation or reinforced insulation
Caution, Risk of Danger (See note)
9. Discharge a capacitor before measuring it.
10. Remove the test leads from the circuit being measured as soon as the test is completed. Never reset the
function/range switch to
another range while the leads are still in contact with a circuit.
11. Do not measure voltage when the function/range switch is set on the resistance (ohms) settings. Do not
measure current when the
meter is set on the resistance range. Never measure AC voltage when the meter is set on DC voltage. Setting
the meter on the
incorrect function may burn out some of the internal circuitry and may pose a safety hazard.
12. Damaged meters are not repairable nor is calibration possible. Damaged meters should be disposed of properly.
2.2 OPERATING INSTRUCTIONS
1. Set the function/range switch to the proper position before making a measurement. When the voltage is not
known, it MUST be determined that the capacity of the selected range will handle the amount of voltage in the
circuit (see #3 under “For Your Safety”).
2. Avoid placing the meter in areas where vibration, dust or dirt are present. Do not store the meter in excessively
hot, humid or damp places. This meter is a sensitive measuring device and should be treated with the same
regard as other electrical and electronic devices.

3
3. When the meter is not in use keep the meter turned off to keep the battery from discharging.
4. When disconnecting the test leads from the unit, always grasp the leads where the input jacks meet the tester
housing. Do not pull the leads out of the jacks by the insulated wire or transport the tester using the test leads as
a carrying strap.
5. Do not immerse the meter in water or solvents. To clean the housing use a damp cloth with a minimal amount of
mild soap.
NOTE: With any measurement made by this meter, there will be some fluctuation of the digital display. This is
due to the meter’s sampling method. This unit samples at a rate of 2 times per second, thus the fluctuation of
the readout.
3.0 FUNCTION BUTTONS
3.1 REL ∆ BUTTON
1. Press REL ∆ button to enter relative change mode and automatically enter manual ranging mode.
2. The present measurement value is saved as a stored value.
3. Take a second measurement and the meter will display the difference or change between the initial stored
measurement value and the new measurement value.
4. Pressing the REL button again or turning the rotary switch will exit the Relative mode and enter the normal
measurement mode.
Note: The meter can not enter the relative mode when it displays OL.
3.2 LOW IMPEDANCE BUTTON
WARNING To avoid damage to the meter do not use this button when the measured voltage is higher than 250V.
Do not press this button for more than 3 seconds.
1. Press and hold Low imp. 400KΩ button to switch input impedance from 10MΩ to 400kΩ. Do not press this
button for more than 3 seconds.
2. When this button is released the meter returns to the default input impedance of 10MΩ
3.3 AUTO OFF
1. To conserve battery life the meter powers off automatically after 15 minutes of non use.
To disable auto off press the select button while turning the meter on.
DIAL SETTINGS
4.0 DIAL SETTINGS
WARNING To avoid personal injury or damage to the Meter, do not attempt to measure voltages higher than
750V AC.
4.1 AC VOLTS V~
1. Set the function/range switch to V~.
2. Insert the black test lead into the COM input terminal.
3. Insert the red test lead into the V input terminal.
4. Touch the test leads to the circuit under test. With AC voltage, the polarity of the test leads is not a factor.
NOTE: It is best to touch one of the test leads to ground or Neutral first and then touch the 2nd test lead to the
hot wire.
5. Read the value of the measurement displayed.
6. Typical AC Voltage measurements include wall outlets, appliance outlets, motors, light fixtures and switches.

4
4.2 DC VOLTS
V
V
WARNING To avoid personal injury or damage to the Meter, do not attempt to measure voltages higher than
1000V DC.
1. Set the function/range switch to the appropriate
V
V
DC range.
2. Insert the black (negative) test lead into the COM inputterminal.
3. Insert the red (positive) test lead into the V input terminal.
4. Touch the test leads to the circuit under test. With DC voltage, the polarity of the test leads is a factor. Touch the
black (common) test lead to the negative DC source (ground) first and red (positive) test lead to the “live” source
second.
5. Read the value of the measurement displayed. If the leads are reversed a “-“ indicator will appear on the display.
6. Typical DC Voltage measurements include car batteries, motors, automotive switches and household batteries.
~
4.3 AC OR DC AMPS A
VV
WARNING To avoid possible damage to the Meter or to the equipment under test, check the Meter’s fuses before
measuring current. Use the proper terminals, function, and range for the measurement. Never place the
test leads in parallel with any circuit or component when the leads are plugged into the current
terminals.
WARNING Do not attempt to measure current exceeding 10Amps AC or DC. If you are not sure if the current
exceeds 10Amps do not attempt to measure current with this meter.
There are three positions on the meter for measuring current: A~ , mA~ or, µA~ . The A~ position has a 4.0 A and
a 10A range and is auto ranging. Start with this 10A setting if the measured current is between 1A-10A. Use the
mA~ setting if the measured current is ≤400mA. Use the µA setting if the measured current is <4000µA.
1. Set the rotary switch to A~ , mA~ or, µA~
2. Insert the black test lead into the COM input terminal.
3. Insert the red test lead into the 10A max terminal.
4. DC Amp measurement is the default. Press SELECT if ~AC Amp measurement mode is desired.
5. Turn off power to the circuit to be measured.
6. Open the circuit to be measured.
7. Touch the red test lead to the positive side of the break in circuit and the black test lead to the negative side
of the break in circuit for DC Amp measurement. For AC Amp measurement the polarity of the leads does not
matter.
8. Return power to the circuit.
9. Read the amps on the display.
Notes: When measuring AC Amps this meter displays the mean (sine wave effective value).
When the measured current is <5 amps continuous measurement is acceptable.
WARNING When the measured current is 5-10 amps do not exceed 10 seconds of continuous measurement. Wait
15 minutes between current measurements when measured current is between 5-10 amps.
Always start with the highest A~ Measurement range and reduce the range in steps once you know that the current
does not exceed the next lower range. Once the measurement is complete, immediately remove the test leads from
the circuit under test and remove the test leads from the input terminals of the meter.
4.4 RESISTANCE Ω
WARNING To avoid damages to the Meter or to the devices under test, disconnect circuit power and discharge all
the high-voltage capacitors before measuring resistance.
WARNING Do not input 60V DC or 30V AC to avoid personal harm.

5
When measuring resistance always make sure the power to the circuit is off.
1. Set the function/range switch to the appropriate resistance setting to measure Ω (ohms).
2. Insert the black (negative) test lead into the COM input terminal.
3. Insert the red (positive) test lead into the VΩ input terminal.
4. Touch the test leads to the resistor or non-energized component to be measured. Use the 20 M Ohm range when
testing for resistance values in electronic components such as resistors and potentiometers. If the value of the
component falls within the range of a lower setting, reset the function/range switch to that setting for a more
accurate reading.
5. Read the value of the measurement displayed. With resistance measurements, the polarity of the test leads is not
a factor.
6. Typical resistance/continuity measurements include resistors, potentiometers, switches, extension cords and
fuses.
Note: The test leads can add 0.1 Ω to 0.2 Ω of error to the resistance measurement. To obtain precise readings
while using the 400k_ low impedance setting, touch the tips of the test probes together and press REL ∆ button
first. Then make the resistance measurement so that the normal resistance of the test leads is automatically
removed from the measurement.
4.5 CONTINUITY
WARNING T o avoid damages to the Meter or to the devices under test, disconnect circuit power and discharge all
the high-voltage capacitors before measuring resistance.
WARNING Do not input 60V DC or 30V AC to avoid personal harm.
1. Insert the red test lead into VΩ terminal and the black test lead into the COM terminal.
2. Set the function switch to and press select button until appears.
3. Connect the test leads across the object being measured.
4. The buzzer sounds continuously if the resistance of a circuit under test is°‹10Ω, it indicates the circuit is in good
connection.
5. The buzzer does not sound if the resistance of a circuit under test is ≥70Ω, which indicates a possible broken
circuit.
6. Read the resistance value on the display.
Note:
The LCD displays “OL” to indicate the resistance of the circuit being tested is higher than 400Ω.
4.6 DIODE TESTING
Use the diode test to check diodes, transistors, and other semiconductor devices. The diode test sends a current
through the semiconductor junction, and then measures the voltage drop across the junction. A good silicon
junction drops between 0.5V and 0.8V.
To test out a diode while removed from a circuit, connect the meter as below :
1. Insert the black (negative) test lead into the COM input terminal.
2. Insert the red (positive) test lead into the VΩ input terminal.
3. Set the function switch to diode position “ “
4. For forward voltage drop readings on any semiconductor component, place the red test lead on the component’s
anode and place the black test lead on the component’s cathode.
5. Read the nearest value of the diode’s forward voltage drop as displayed.

6
Notes
• In a circuit, a good diode should still produce a forward voltage drop reading of 0.5V to 0.8V; however; the
reverse voltage drop reading can vary depending on the resistance of other pathways between the probe tips.
• Connect the test leads to the proper terminals to avoid error display. The LCD displays OL indicating open-
circuit for improper connection.
• Open circuit voltage is approximately 3V.
4.7 CAPACITANCE
WARNING To avoid damage to the meter or to the equipment under test disconnect circuit power and discharge
capacitors before measuring capacitance.
The beeper sounds continuously for open conditions
1. Insert the red test lead into the terminal and the black test lead into the COM terminal.
2. Set the rotary switch to measurement mode, the Meter may display a fixed reading which is an internal
distributed capacitor value.
3. To improve the measurement accuracy of small value capacitors (less than 10nF) press REL∆ with the test leads
open to subtract the residual capacitance of the Meter and test leads.
Notes:
• If “OL” displays this indicates that the tested capacitor is shorted or it exceeds the maximum range.
4.8 FREQUENCY Hz
WARNING To avoid personal injury do not attempt to measure voltage higher than 60V DC 30V AC during frequency
measurement.
The measurement ranges for frequency are between 10Hz and 10MHz auto ranging on this meter.
1. Insert the red test lead into the Hz terminal and the black test lead into the COM terminal.
2. Set the rotary switch to Hz.
3. Connect the test leads across the component being measured.
4. Read the value on the display.
5.0 BATTERY REPLACEMENT
WARNING To avoid false readings, which could lead to possible electric shock or personal injury, replace the
battery as soon as the low battery indicator appears.
1. Disconnect the connection between the test leads and the circuit under test, and remove the test leads from the
input terminals of the meter.
2. Turn the Meter power off.
3. Remove the rubber boot from the meter.
4. Remove the 3 screws from the case bottom, and separate the case top from the case bottom.
5. Remove the battery from the contacts, noting the polarity of the battery terminals and contacts.
6. Replace with one fresh 9 volt battery. (NEDA 1604 6F22 006P)
Note: Do not use rechargeable batteries in this unit.
7. Carefully rejoin the case bottom and case top. Do not overtighten the screws as this may strip the threads in the
meter housing.
8. Reinstall rubber boot.

7
6.0 FUSE REPLACEMENT
WARNING To avoid personal injury or damage to the Meter, use specified fuses ONLY in accordance with the
following procedure.
TO REPLACE THE METER’S FUSE:
1. Turn the Meter off and remove test leads from the input terminals.
2. Remove the rubber boot from the Meter.
3. Remove the 3 screws from the case bottom, and separate the case top from the case bottom.
4. Remove the fuse by gently prying one end loose, then remove the fuse from its bracket.
5. ONLY install replacement fuses of the identical type and specification as follows and make sure that all fuses are
inserted firmly into the fuse holder brackets.
Fuse 1: 10A, 600V, fast type, 6.4x32 mm.
Fuse 2: 500mA, 600V, fast type, 6.4x32 mm.
6. Rejoin the case bottom and case top, and reinstall the 3 screws. Be carefull not to overtighten the screws.
Reinstall the rubber boot.
Replacement of the fuses is seldom required. A burned fuse suggests improper operating procedures.
A. GENERAL SERVICE
• Periodically wipe the case with a damp cloth and mild detergent. Do not use abrasives or solvents.
• To clean the terminals use a cotton swab and detergent, as dirt and moisture in the terminals can affect readings.
• Turn the Meter power off when it is not in use.
• Take out the battery when it is not used for a long time.
• Do not use or store the Meter in a place of humidity, high temperature.
SPERRY INSTRUMENTS LIMITED LIFETIME WARRANTY
Subject to the exclusions and limitations detailed below, Sperry Instruments provides a limited lifetime warranty on products
of its manufacture will be free from defects in materials and workmanship under normal use and service.
Limited
Limited means that Sperry Instruments warrants to the original purchasers of products from Sperry Instruments authorized distributors at the time of
shipment such products shall be free of defects in material and workmanship while the tool is used under normal working conditions. Standard wear
and tear, dulling over time, overloading, misuse, and acts of God are not covered under warranty. This warranty does not cover batteries, fuses, or test
leads.
When a warranty claim arises, the purchaser must contact Sperry Instruments. If the defect comes under the terms of this
limited warranty, Sperry Instruments will arrange, at its sole discretion, one of the following options:
• Product will be replaced
The purchaser is solely responsible for determining the suitability of Sperry products for the purchaser’s use or resale, or for incorporating them into
articles or using them in the purchaser’s applications. The distributor is authorized to extend the foregoing limited warranty to its original purchasers in
connection with the sales of Sperry products, provided that such products shall not have been altered by the distributor. The distributor shall be fully
responsible for any warranties the distributor makes to its purchasers which are broader or more extensive than Sperry’s limited warranty.
Lifetime Warranty
Warranty Limitation: The forgoing warranties are exclusive and are in lieu of all other express and implied warranties whatsoever, including but
not limited to implied warranties of merchantability and fitness for a particular purpose. The foregoing warranties do not cover ordinary wear and
tear, abuse, misuse, overloading, alterations, products which have not been installed, operated or maintained in accordance with Sperry’s written
instructions. Test leads, fuses, batteries and calibration are not covered under any implied warranty. “Lifetime” of products that are no longer offered
by Sperry will be either repaired or replaced with an item of Sperry Instruments choice of similar value. Lifetime is defined as 5 years after Sperry
discontinued manufacturing the product, but the warranty period shall be at least ten years from date of purchase. Original proof of purchase is
required to establish original ownership of product.
No warranty will be honored unless an invoice or other proof of purchase date is provided to Sperry Instruments. Hand written receipts or invoices will
not be honored.
©2016 Product Power, LLC All rights reserved.
- See more at: https://www.sperryinstruments.com/en/Resources/Warranty-Information
Sperry Instruments
800-645-5398
Menomonee Falls, WI 53051
sperryinstruments.com SPR_TL_068_0117
/