Page is loading ...

EPSON, Instant Off, and Quick Corner are registered trademarks and EPSON Exceed Your Vision is a registered logomark of Seiko Epson
Corporation.
PrivateLine is a registered trademark of Epson America, Inc.
Mac and macOS are trademarks of Apple Inc., registered in the U.S. and other countries.
Windows is a registered trademark of Microsoft Corporation in the United States and/or other countries.
General Notice: Other product names used herein are for identification purposes only and may be trademarks of their respective owners.
Epson disclaims any and all rights in those marks.
This information is subject to change without notice.
© 2022 Epson America, Inc., 12/22
CPD-63060
Printed in XXXXXX
Display the Home screen
Open menus assigned
by user
Hold down and use numeric
buttons to enter numbers
Return the selected setting to
default value
Turn the projector on or off
Open projector menus
Navigate through
menu settings
Temporarily turn off display
and audio
Zoom in or out on part of
an image
Select color mode
Change the aspect ratio
Split the screen between
two inputs
*The Computer button is not used with these projectors.
Control volume
Cancel current operation or
return to previous menu
Switch image sources
Select a source*
Hold down and use numeric
buttons to select which projector
to control
Freeze the image
Remote Control Map
Note: Product availability varies by country and region.
EB-L570U/EB-L770U/EB-L775U
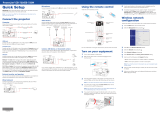
Quick Reference
This Quick Reference card gives brief instructions on connecting your
projector and using common features. For details, see the online
User’s Guide.
IMPORTANT: Before using this product, make sure you read these
instructions and the safety instructions in the online User’s Guide.
Ethernet cable
Stereo mini jack cable
USB cable
USB device
HDMI cable

Displaying a Test Pattern
1. Press the down arrow/ button on
the projector.
2. Press the Enter button to change
the test pattern.
3. When you’re done, press the Esc
button to clear the test pattern.
Note: See the online User’s Guide for
instructions on displaying a test pattern using
the remote control.
Changing Screen Type
Set the Screen Type setting to the
screen’s aspect ratio.
1. Press the Menu button.
2. Select Extended > Display >
Screen > Screen Type.
3. Select the screen’s aspect ratio.
Note: The displayed image should match
the screen’s size and aspect ratio.
4. When you’re done, press the Menu
button to exit.
Note: After changing the screen type, you
may need to change the aspect ratio of the
projected image depending on the input
signal. Press the Aspect button on the
remote control to change the aspect ratio,
if necessary.
Note: See the online User’s Guide for
instructions on adjusting the image using the
projector menus.
Correcting Image Shape
If your image is uneven on the sides or
you are projecting on a corner, you can
use the projector’s distortion correction
features to adjust the shape. See the
online User’s Guide.
Making Other Image
Adjustments
For help on using the projector’s
features to improve the image quality,
see the online User’s Guide.
Turning the Projector Off
Press the power button on the
projector or remote control. If you see a
confirmation message, press the
power button again.
Note: If the Direct Power On function is
enabled, you can flip the switch controlling
the outlet to which the projector is connected
instead. To turn on this feature, see the
online User’s Guide.
With Epson’s Instant Off® technology,
you don’t have to wait for the projector
to cool down; just turn it off or unplug it
when you’re done.
Troubleshooting
If you see a blank screen or the
message No signal
• Make sure the status light on the
projector is blue and not flashing.
• Make sure the cables are connected
correctly. See the online User’s
Guide.
• You may need to change the image
source. See “Switching Between
Image Sources.” Also, make sure the
source device is turned on.
Turning the Projector On
1. Turn on your computer or image
source.
2. Press the power button on the
projector or remote control. After the
status light stays blue, the projector
is ready.
Note: If the Direct Power On function is
enabled, you can turn the projector on
without pressing the power button;
just plug it in or flip the switch controlling
the outlet to which the projector is
connected. If the Auto Power On function
is enabled, you can turn the projector on
by connecting an HDMI cable. For more
information, see the online User’s Guide.
3. If your image does not appear, see
“Switching Between Image Sources”
or “Troubleshooting.”
Changing the Language of
the Projector Menus
The default language of the projector’s
menu system is English, but you can
change it as necessary.
1. Press the Menu button to access
the projector’s menu system.
2. Select Extended > Language.
3. Select your language.
4. When you’re done, press the Menu
button to exit.
Switching Between Image
Sources
Press the Source Search button or one
of the source buttons on the remote
control.
Internet support
Visit http://epson.com/support (U.S.),
http://epson.ca/support (Canada),
or http://latin.epson.com (Latin
America) and search for your product
to download software and utilities, view
manuals, get FAQs and troubleshooting
advice, or contact Epson.
Speak to a support representative
To use the Epson® PrivateLine®
Support service, call (800) 637-7661
(U.S. and Canada). This service is
available for the duration of your
warranty period. You may also speak
with a projector support specialist by
dialing (562) 276-4394 (U.S.) or
(905) 709-3839 (Canada).
Support hours are 7 a.m. to 4 p.m.,
Pacific Time, Monday through Friday.
Days and hours of support are subject
to change without notice. Toll or long
distance charges may apply.
In Latin America, see the online User’s
Guide for technical support information.
Purchase supplies and accessories
You can purchase an air filter
(V13H134A56), screens, or other
accessories from an Epson
authorized reseller. To find the nearest
reseller in the U.S. or Canada, call
800-GO-EPSON (800-463-7766).
Or you can purchase online at
http://epsonstore.com (U.S. sales) or
http://epsonstore.ca (Canadian sales).
To find the nearest reseller in Latin
America, go to http://latin.epson.com.
For a list of optional accessories, see
the online User’s Guide.
Adjusting Image Position
Using Lens Shift
1. Turn the vertical and horizontal lens
shift dials on the projector to adjust
the position of the projected image.
2. If the projector is on a table, you can
level the image by turning any of the
projector’s adjustable feet.
Note: See the online User’s Guide for
instructions on adjusting the image position
using the projector menus.
Focusing and Zooming
Turn the focus ring to sharpen the
image.
Turn the zoom ring to reduce/enlarge
the image.
If the projector and the laptop don’t
display the same image
Windows®
Press the function key on your keyboard
that lets you display on an external
monitor. It may be labeled CRT/LCD or
have an icon such as . You may
have to hold down the Fn key while
pressing it (such as Fn + F7). Wait a
moment for the display to appear.
On Windows 7 or later, hold down the
Windows key and press P at the same
time, then click Duplicate.
Mac
On macOS 13, select System Settings
> Displays. Press the + pop-up menu
button, then choose a display to mirror.
On macOS 12, select System
Preferences > Displays > Display
Settings. Select the projector, then
choose the mirror option for your
display from the drop-down menu.
On macOS 11 and older, open System
Preferences and select Displays. Click
the Arrangement tab and select the
Mirror Displays checkbox.
Registration
Register today to get product updates
and exclusive offers. You can register
online at http://epson.com/webreg.
Where to Get Help
Manuals
For more information about using the
projector, you can view or download the
online manuals from the Epson website,
as described below.

EPSON, Instant Off, and Quick Corner are registered trademarks and EPSON Exceed Your Vision is a registered logomark of Seiko Epson
Corporation.
PrivateLine is a registered trademark of Epson America, Inc.
Mac and macOS are trademarks of Apple Inc., registered in the U.S. and other countries.
Windows is a registered trademark of Microsoft Corporation in the United States and/or other countries.
General Notice: Other product names used herein are for identification purposes only and may be trademarks of their respective owners.
Epson disclaims any and all rights in those marks.
This information is subject to change without notice.
© 2022 Epson America, Inc., 12/22
CPD-63060
Printed in XXXXXX
Display the Home screen
Open menus assigned
by user
Hold down and use numeric
buttons to enter numbers
Return the selected setting to
default value
Turn the projector on or off
Open projector menus
Navigate through
menu settings
Temporarily turn off display
and audio
Zoom in or out on part of
an image
Select color mode
Change the aspect ratio
Split the screen between
two inputs
*The Computer button is not used with these projectors.
Control volume
Cancel current operation or
return to previous menu
Switch image sources
Select a source*
Hold down and use numeric
buttons to select which projector
to control
Freeze the image
Remote Control Map
Note: Product availability varies by country and region.
EB-L570U/EB-L770U/EB-L775U
Quick Reference
This Quick Reference card gives brief instructions on connecting your
projector and using common features. For details, see the online
User’s Guide.
IMPORTANT: Before using this product, make sure you read these
instructions and the safety instructions in the online User’s Guide.
Ethernet cable
Stereo mini jack cable
USB cable
USB device
HDMI cable
/