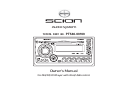
Scion PT546-00100 User manual
- Category
- Car media receivers
- Type
- User manual


2
This device complies with Part
15 of the FCC Rules.
Operation is subject to the
following two conditions:
(1) This device may not cause
harmful interference, and (2)
this device must accept any
interference received, including
interference that may cause
undesired operation.
Information to User
Alteration or modifications
carried out without appropriate
authorization may invalidate
the user’s right to operate the
equipment.
WARNING
Handling the cord on this
product or cords associated
with accessories sold with
the product may expose
you to chemicals listed on
proposition 65 known to the
State of California and other
governmental entities to cause
cancer and birth defects or
other reproductive harm.
Wash hands after handling.
Features
CD playback
Music CD/CD-R/CD-RW playback is
possible.
MP3 file playback
You can play back MP3 files
recorded on CD-ROM/CD-R/CD-RW
(ISO9660 Level 1/Level 2 standard
recordings) or USB portable audio
player/USB memory.
Supply of this product only con-
veys a license for private, non-
commercial use and does not
convey a license nor imply any
right to use this product in any
commercial (i.e. revenue-gen-
erating) real-time broadcasting
(terrestrial, satellite, cable and/or
any other media), broadcasting/
streaming via internet, intranets
and/or other networks or in other
electronic content distribution
systems, such as pay-audio or
audio-on-demand applications.
An independent license for such
use is required. For details,
please visit
http://www.mp3licensing.com.
•
WMA file playback
You can play back WMA files
recorded on CD-ROM/CD-R/CD-RW
(ISO9660 Level 1/Level 2 standard
recordings) or USB portable audio
player/USB memory.
AAC file playback
You can play back AAC files
recorded on CD-ROM/CD-R/CD-RW
(ISO9660 Level 1/Level 2 standard
recordings) or USB portable audio
player/USB memory.
iPod
®
compatibility
When you use this unit, you can
control an iPod, iPod classic, iPod
nano, iPod touch, iPhone. (Refer to
page 17.)
iPod is a trademark of Apple Inc.,
registered in the U.S. and other
countries.
About WMA
Windows Media
TM
and the Windows
logo are trademarks or regis-
•

3
tered trademarks of Microsoft
Corporation in the United States
and/or other countries.
NOTICE
This unit may not operate
correctly depending on the
application used to encode
WMA files.
About iPod
Reproducing and playing back
non-copyrighted material and
material that can legally be
reproduced and played back for
private use is permitted with the
iPod. Infringement of copyright is
legally prohibited.
•
Important information
about this manual
For safety reasons, this manual
indicates items requiring particular
attention with the following marks.
NOTICE
This is a warning against
anything which may cause
damage to the vehicle or its
equipment if the warning is
ignored. You are informed about
what you must or must not do in
order to avoid or reduce the risk
of damage to your vehicle and
its equipment.
CAUTION
This is a warning against any-
thing which may cause injury to
people if the warning is ignored.
You are informed about what
you must or must not do in
order to reduce the risk of injury
to yourself and others.
USE OF CONTROL OR ADJUST-
MENT OR PERFORMANCE OF
PROCEDURES OTHER THAN
THOSE SPECIFIED HEREIN MAY
RESULT IN HAZARDOUS RADI-
ATION EXPOSURE. THE USE
OF OPTICAL INSTRUMENTS
WITH THIS PRODUCT WILL
INCREASE EYE HAZARD.
To ensure the correct
audio system operation
Be careful not to spill beverages
over the audio system.
Do not put anything other than a
Compact Disc into the slot.
The use of cellular phones inside
or near the vehicle may cause
noise from the audio system
speakers you are listening to.
However, this does not indicate a
malfunction.
•
•
•

4
Contents
Features . . . . . . . . . . . . . . . . . . . . . . . . . . . . . . . . . . . . . . . . . . . . . . . . . . . . . . . . . . . . . . . . . . . . . . . . . . . . . . . . . . . . . . . . . . . . 2
About WMA . . . . . . . . . . . . . . . . . . . . . . . . . . . . . . . . . . . . . . . . . . . . . . . . . . . . . . . . . . . . . . . . . . . . . . . . . . . . . . . . . . . . . . . . 2
About iPod . . . . . . . . . . . . . . . . . . . . . . . . . . . . . . . . . . . . . . . . . . . . . . . . . . . . . . . . . . . . . . . . . . . . . . . . . . . . . . . . . . . . . . . . . 3
Important information about this manual . . . . . . . . . . . . . . . . . . . . . . . . . . . . . . . . . . . . . . . . . . . . . . . . . . . . . . . . . . . . . . . . 3
To ensure the correct audio system operation . . . . . . . . . . . . . . . . . . . . . . . . . . . . . . . . . . . . . . . . . . . . . . . . . . . . . . . . . . . . 3
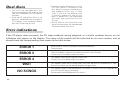
Display and Multi Selector . . . . . . . . . . . . . . . . . . . . . . . . . . . . . . . . . . . . . . . . . . . . . . . . . . . . . . . . . . . . . . . . . . . . . . . . . . . . 5
Basic Operation . . . . . . . . . . . . . . . . . . . . . . . . . . . . . . . . . . . . . . . . . . . . . . . . . . . . . . . . . . . . . . . . . . . . . . . . . . . . . . . . . . . . 6-8
Listening to the RADIO . . . . . . . . . . . . . . . . . . . . . . . . . . . . . . . . . . . . . . . . . . . . . . . . . . . . . . . . . . . . . . . . . . . . . . . . . . . 10-11
Listening to a CD . . . . . . . . . . . . . . . . . . . . . . . . . . . . . . . . . . . . . . . . . . . . . . . . . . . . . . . . . . . . . . . . . . . . . . . . . . . . . . . . 12-13
Listening to MP3/WMA/AAC DISC and USB portable audio player/USB memory . . . . . . . . . . . . . . . . . . . . . . . . . . 14-16
About handling the iPod . . . . . . . . . . . . . . . . . . . . . . . . . . . . . . . . . . . . . . . . . . . . . . . . . . . . . . . . . . . . . . . . . . . . . . . . . . 16-17
Connecting the iPod . . . . . . . . . . . . . . . . . . . . . . . . . . . . . . . . . . . . . . . . . . . . . . . . . . . . . . . . . . . . . . . . . . . . . . . . . . . . . . 17-18
Disconnecting the iPod . . . . . . . . . . . . . . . . . . . . . . . . . . . . . . . . . . . . . . . . . . . . . . . . . . . . . . . . . . . . . . . . . . . . . . . . . . . . . . 18
Listening to songs on the iPod . . . . . . . . . . . . . . . . . . . . . . . . . . . . . . . . . . . . . . . . . . . . . . . . . . . . . . . . . . . . . . . . . . . . . 20-21
ABC SEARCH on an iPod . . . . . . . . . . . . . . . . . . . . . . . . . . . . . . . . . . . . . . . . . . . . . . . . . . . . . . . . . . . . . . . . . . . . . . . . . . . . . 22
About handling the USB portable audio player/USB memory . . . . . . . . . . . . . . . . . . . . . . . . . . . . . . . . . . . . . . . . . . . . . . 23
Connecting the USB portable audio player/USB memory . . . . . . . . . . . . . . . . . . . . . . . . . . . . . . . . . . . . . . . . . . . . . . . . . . 23
Listening to USB portable audio player/USB memory . . . . . . . . . . . . . . . . . . . . . . . . . . . . . . . . . . . . . . . . . . . . . . . . . . . . . 24
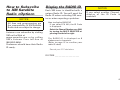
How to Subscribe to XM Satellite Radio <Option> . . . . . . . . . . . . . . . . . . . . . . . . . . . . . . . . . . . . . . . . . . . . . . . . . . . . . . . . 27
Display the RADIO ID . . . . . . . . . . . . . . . . . . . . . . . . . . . . . . . . . . . . . . . . . . . . . . . . . . . . . . . . . . . . . . . . . . . . . . . . . . . . . 27-28
Listening to a XM Satellite Radio broadcast . . . . . . . . . . . . . . . . . . . . . . . . . . . . . . . . . . . . . . . . . . . . . . . . . . . . . . . . . . 30-31
Using the AUX . . . . . . . . . . . . . . . . . . . . . . . . . . . . . . . . . . . . . . . . . . . . . . . . . . . . . . . . . . . . . . . . . . . . . . . . . . . . . . . . . . 32-33
Changing the Opening Screen . . . . . . . . . . . . . . . . . . . . . . . . . . . . . . . . . . . . . . . . . . . . . . . . . . . . . . . . . . . . . . . . . . . . . 34-35
Initial Setting . . . . . . . . . . . . . . . . . . . . . . . . . . . . . . . . . . . . . . . . . . . . . . . . . . . . . . . . . . . . . . . . . . . . . . . . . . . . . . . . . . . . . . . 36
Connecting an external amplifier . . . . . . . . . . . . . . . . . . . . . . . . . . . . . . . . . . . . . . . . . . . . . . . . . . . . . . . . . . . . . . . . . . . . . . 37
Using the Steering Controller . . . . . . . . . . . . . . . . . . . . . . . . . . . . . . . . . . . . . . . . . . . . . . . . . . . . . . . . . . . . . . . . . . . . . . 37-38
MP3, WMA and AAC files . . . . . . . . . . . . . . . . . . . . . . . . . . . . . . . . . . . . . . . . . . . . . . . . . . . . . . . . . . . . . . . . . . . . . . . . . . . . 38
MP3 additional information . . . . . . . . . . . . . . . . . . . . . . . . . . . . . . . . . . . . . . . . . . . . . . . . . . . . . . . . . . . . . . . . . . . . . . . . . . 39
WMA additional information . . . . . . . . . . . . . . . . . . . . . . . . . . . . . . . . . . . . . . . . . . . . . . . . . . . . . . . . . . . . . . . . . . . . . . . . . 39
AAC additional information . . . . . . . . . . . . . . . . . . . . . . . . . . . . . . . . . . . . . . . . . . . . . . . . . . . . . . . . . . . . . . . . . . . . . . . . . . 39
About folders and MP3/WMA/AAC files . . . . . . . . . . . . . . . . . . . . . . . . . . . . . . . . . . . . . . . . . . . . . . . . . . . . . . . . . . . . . . . . 40
USB portable audio player/USB memory compatibility . . . . . . . . . . . . . . . . . . . . . . . . . . . . . . . . . . . . . . . . . . . . . . . . . . . 41
Terms . . . . . . . . . . . . . . . . . . . . . . . . . . . . . . . . . . . . . . . . . . . . . . . . . . . . . . . . . . . . . . . . . . . . . . . . . . . . . . . . . . . . . . . . . . . . . 42
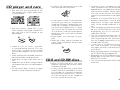
CD player and care . . . . . . . . . . . . . . . . . . . . . . . . . . . . . . . . . . . . . . . . . . . . . . . . . . . . . . . . . . . . . . . . . . . . . . . . . . . . . . . . . . 43
CD-R and CD-RW discs . . . . . . . . . . . . . . . . . . . . . . . . . . . . . . . . . . . . . . . . . . . . . . . . . . . . . . . . . . . . . . . . . . . . . . . . . . . . . . 43
Dual discs . . . . . . . . . . . . . . . . . . . . . . . . . . . . . . . . . . . . . . . . . . . . . . . . . . . . . . . . . . . . . . . . . . . . . . . . . . . . . . . . . . . . . . . . . 44
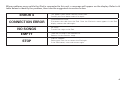
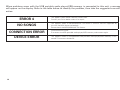
Error indications . . . . . . . . . . . . . . . . . . . . . . . . . . . . . . . . . . . . . . . . . . . . . . . . . . . . . . . . . . . . . . . . . . . . . . . . . . . . . . . . . 44-47
Changing or disconnecting your battery . . . . . . . . . . . . . . . . . . . . . . . . . . . . . . . . . . . . . . . . . . . . . . . . . . . . . . . . . . . . . . . 48
Specifications . . . . . . . . . . . . . . . . . . . . . . . . . . . . . . . . . . . . . . . . . . . . . . . . . . . . . . . . . . . . . . . . . . . . . . . . . . . . . . . . . . . . . . 48

5
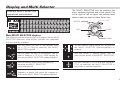
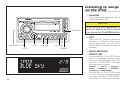
Display and Multi Selector
Possible MULTI SELECTOR
operations are indicated.
RIGHT
LEFT
UP
DOWN
CENTER
The MULTI SELECTOR can be pressed five
ways: up/down/right/left and in the center. Turn
to the right or left to adjust the volume level,
select a menu or select an item from a list.
You can select the next or the previous track
on a CD or iPod by pressing the MULTI
SELECTOR right/left.
You can select the next or the previous track or
select a folder on a CD or in a USB memory by
pressing the MULTI SELECTOR up/down/right/left.
You can tune or seek a radio frequency by
pressing the MULTI SELECTOR
up/down/right/left.
You can tune the Satellite Radio broadcasting
frequency or display and switch the category by
pressing the MULTI SELECTOR up/down/right/left.
You can select a setting option, etc. by pressing
the MULTI SELECTOR up/down/right/left or
up/down.
You can select a setting option, etc. by
pressing the center of the MULTI SELECTOR.
You can navigate a list or edit the OPENING
TITLE by pressing the MULTI SELECTOR in
the center or up/down/right/left.
Main MULTI SELECTOR displays
The following are the main displays that appear during MULTI
SELECTOR operation. Each display indicates the operations
that are currently available.
or

6
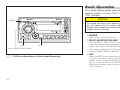
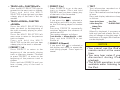
Basic Operation
Your audio system works when the
ignition switch is in the “ACC” or
“ON” position.
NOTICE
To avoid draining the battery,
do not leave the car audio on
longer than necessary when the
engine is not running.
1 POWER
Press to turn the unit on or off.
2 MULTI SELECTOR/VOLUME
Turn the MULTI SELECTOR to raise/
lower the volume levels (total volume
step is 64). MULTI SELECTOR oper-
ation varies depending on the audio
source or Menu. (Refer to page 5.)
3 SSP
Press the SSP button when the unit
is “ON” position to select a sound
mode. Press and hold the SSP but-
ton to switch to AUDIO CONTROL
and select settings when the unit is
“ON” position.
3 SSP is an abbreviation of Scion Sound Processing.
2MULTI SELECTOR/VOLUME
1POWER
3SSP
4ESC

7
SSP (Scion Sound Processing)
SSP is a modified DSP (Digital Signal
Processing) system that provides a
customized sound for your vehicle.
Press the SSP button to display the
current SSP mode setting. While the
setting is displayed, press repeatedly
to switch to the following modes.
NEUTRAL: Natural and smooth sound
that gives no listening
fatigue but comfort.
HEAR: A powerful, energetic, live
sound.
FEEL: Player’s sound –> reproduc-
es the sound on the stage
that musicians hear.
For more details, please visit the SCION
Web site at
http://www.scion.com/.
Each time you press it, the SSP changes
in the following order:
NEUTRAL HEAR FEEL NEUTRAL
AUDIO CONTROL
When the MULTI SELECTOR is
turned, the setting item of the
AUDIO CONTROL menu will switch
in the following order:
FADER/BALANCE BASS TREBLE ASL
(Automatic Sound Levelizer) SW (Subwoofer)
AUDIO BOOK SPEED IPOD DIRECT CONT
ASR (Advanced Sound Retriever)
•
•
FADER/BALANCE:
Press the MULTI SELECTOR up or
down to adjust the sound balance
between the rear and front speak-
ers. The display ranges from R7 to F7.
Press the MULTI SELECTOR right or left
to adjust the sound balance between
the left and right speakers. The display
ranges from L7 to R7.
BASS: Press the MULTI SELECTOR up or down
to adjust low-pitched tones. The display
ranges from –5 to 5.
TREBLE: Press the MULTI SELECTOR up or
down to adjust high-pitched tones. The
display ranges from –5 to 5.
ASL: During driving, noise in the car changes
according to the driving speed and road
conditions. The automatic sound levelizer
(ASL) monitors such varying noise and
automatically increases the volume
level. If this noise becomes greater, the
sensitivity (variation of volume level to
noise level) of ASL can be set to one of
three levels. Press the MULTI SELECTOR
changes the ASL setting as follows:
LOW MID HIGH OFF
SW: Subwoofer output phase can be
switched between normal and reverse by
pressing the MULTI SELECTOR, Press
the MULTI SELECTOR up or down to
adjust the output level of the subwoofer.
Each time MULTI SELECTOR is pushed
up or down, subwoofer level increases
or decreases, +6 to –24 is displayed
as the level is increased or decreased.
• The output level and output phase of
the subwoofer can be adjusted only
when "SUBWOOFER CONT" on the
SETUP MENU is set to ON. While
"SUBWOOFER CONT" is set to OFF, the
output level and output phase cannot be
adjusted. (Refer to page 36.)
AUDIO BOOK SPEED:
You can change the iPod Audiobook
playback speed.
Pressing the MULTI SELECTOR repeat-
edly switches the setting in the follow-
ing order:
FASTER SLOWER NORMAL
• The speed can only be changed in
iPod mode.
• While IPOD DIRECT CONT is set to
ON, the speed cannot be changed.

8
IPOD DIRECT CONT:
A menu for turning on or off iPod
direct control. If you select ON, you
can control iPod operations on the
iPod. If you select OFF, you can con-
trol iPod operations from this unit.
When the MULTI SELECTOR is pressed,
switches in the following order:
OFF
ON
• The speed can only be changed in
iPod mode.
NOTICE
iPod (5th generation) and iPod
nano (1st generation) do not
support iPod direct control.
ASR: The ASR (Advanced Sound Retriever)
function provides a wide, deep and rich
quality to MP3/WMA/AAC sound, which
gives the user a lively impression. Pressing
the MULTI SELECTOR repeatedly
switches the setting in the following
order:
MODE1
MODE2
OFF
MODE1: Effective for low-compression
audio media.
MODE2: Effective for high-compression
audio media.
NOTICE
The ASR function can only
be selected when playing
MP3/WMA/AAC from CD
and iPod, USB portable
audio player/USB memory.
The ASR function does not
support external compressed
audio media.
BASS function and TREBLE
function values can be set for
each of the modes (AM, FM,
CD/MP3/WMA/AAC, iPod/
USB portable audio player/
USB memory, XM Satellite
Radio, AUX). When you
switch modes, the settings
change to the BASS and
TREBLE values set for the
selected mode.
The ASL function is only
effective when the vehicle is
moving.
•
•
•
•
4 ESC (Escape)
Press the ESC button to exit from
the AUDIO CONTROL menu, the
SETUP menu and the SSP mode
select menu that is displayed by
pressing the SSP button.
Press the ESC button to exit from a
list that was displayed by pressing
the LIST button.

9

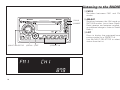
10
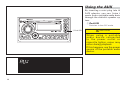
Listening to the RADIO
1 FM1/2
Switches between FM1 and FM2
modes.
2 AM•SAT
Switches between the AM mode and
SAT1/2/3 modes. (must have Satellite
Radio receiver and antenna installed at
an additional charge to listen to Satellite
Radio.)
3 LIST
Press to display the registered broad-
casting station list in PRESET1-6.
Use the MULTI SELECTOR to select a
station from the list.
6SCAN
1FM1/2
2AM•SAT
5PRESET1-6
4MULTI SELECTOR
3LIST

11
4 MULTI SELECTOR
SELECT LIST
Turn the MULTI SELECTOR clock-
wise or counterclockwise or press
the MULTI SELECTOR up/down to
select a station. Press the MULTI
SELECTOR to set the station. If
you press and hold the MULTI
SELECTOR in the center until you
hear a beep, the currently tuned sta-
tion is stored as a preset channel in
the preset channel list.
TUNE <UP>
Press the MULTI SELECTOR right
to manually select (one step at
a time) the station with the next
higher frequency.
Press and hold
the MULTI SELECTOR to the right to
fast-forward to a higher frequency.
Press the MULTI SELECTOR up to
select the next higher station.
TUNE <DOWN>
Press the MULTI SELECTOR left
to manually select (one step at
a time) the station with the next
lower frequency. Press and hold
the MULTI SELECTOR to the left to
fast-forward to a lower frequency.
Press the MULTI SELECTOR down
to select the next lower station.
•
•
•
5 PRESET 1-6
Press to recall previously stored sta-
tions (Preset Channels).
Press and hold until you hear a
beep, and the station you are cur-
rently tuned to is stored as a Preset
Channel.
NOTICE
You can store up to 6 stations
per band.
6 SCAN
If you press, SCAN is indicated in
the display and SCAN begins search-
ing for stations with good reception.
If you press and hold until you hear
a beep, SCAN is indicated in the dis-
play and SCAN of preset channels
begins.

12
Listening to a CD
NOTICE
Never try to disassemble or
oil any part of the compact
disc player. Do not insert
anything except a compact
disc into the slot.
You can load an 8 cm disc
without using an adaptor.
Never use an adaptor.
•
•
Load a CD in the CD slot.
9SCAN
0TEXT
2EJECT
1DISC
5 2
6 3 7Random4MULTI SELECTOR
8Repeat
3LIST
No title name is displayed when playing back a CD containing
no te xt information.

13
1 DISC
Switches to the CD mode. (Only
effective if a disc is loaded.)
2 0 (EJECT)
Press to eject the disc.
3 LIST
Press to display a CD List.
Use the MULTI SELECTOR to select
a CD from the list.
4 MULTI SELECTOR
SELECT LIST
Turn the MULTI SELECTOR clock-
wise or counterclockwise or press
the MULTI SELECTOR up/down to
select the desired title. Press the
MULTI SELECTOR in the center
or to the right to start playback.
• No CD List is displayed when play-
ing back a CD containing no text
information.
TRACK <UP>
Press the MULTI SELECTOR to the
right to proceed to the next track.
Press and hold the MULTI
SELECTOR to the right until you hear
a beep, play of the track is fast for-
warded. (There is sound.)
•
•
TRACK <DOWN>
Press the MULTI SELECTOR to the
left takes you back to the start of
the track currently playing. Press the
MULTI SELECTOR to the left once
more to return to the previous track.
Press and hold the MULTI
SELECTOR to the left until you hear
a beep, play of the track is reversed.
(There is sound.)
5 PRESET 1 (2)
Pressing PRESET 1 takes you back
to the start of the track currently
playing. Press PRESET 1 once more
to return to the previous track.
Press and hold PRESET 1 until you
hear a beep, play of the track is
reversed. (There is sound.)
6 PRESET 2 (3)
Press PRESET 2 to proceed to the
next track.
Press and hold PRESET 2 until you
hear a beep, play of the track is fast
forwarded. (There is sound.)
7 PRESET 5 (Random)
If you press this, is indicated in
the display and starts to play tracks
on the disc being played in random
order. Press again to cancel.
•
8 PRESET 6 (Repeat)
If you press this, is indicated in
the display and starts to repeat the
track being played. Press again to
cancel.
9 SCAN
If you press this, is indicated in
the display and starts to play the first
10 seconds of each track on the CD
being played. Press again to cancel.
0 TEXT
Press, and display indications change
as follows (TEXT CD only):
Upper: Artist Name
Lower: Track Title
Track Title
ELAPSED TIME
Disc Title
Track Title
When 3 is displayed, if you press
and hold until you hear a beep, the
display will change to the next page.
A maximum of 2 pages (32 charac-
ters) can be displayed.
CAUTION
Compact disc players use an
invisible laser beam which
could cause hazardous radiation
exposure if directed outside
the unit. Be sure to operate the
player correctly.

14
-SCAN
=TEXT
56
9Random
0Repeat
1DISC
2iPod•USB
7
8
4MULTI SELECTOR
3LIST
Listening to MP3/WMA/
AAC DISC and USB
portable audio player/
USB memory
1 DISC
2 iPod•USB
3 LIST
Press to display an MP3/WMA/AAC List.
Use the MULTI SELECTOR to select an
item from the list.
4 MULTI SELECTOR
SELECT LIST
Turn the MULTI SELECTOR clock-
wise or counterclockwise or
press the MULTI SELECTOR
up/down to select a file or folder.
Press the MULTI SELECTOR
in the center or to the right to
play the selected file or fold-
er. Use the MULTI SELECTOR
to select an item from the list.
(When a folder is selected, the
first track in the folder is played.)
Press the MULTI SELECTOR to the
right to select the folder or press
the MULTI SELECTOR to the left
to return to the preceding folder.
The MP3/WMA/AAC List is dis-
played when the top folder in the
root directory or the file or folder
name is selected.
•

15
TRACK <UP>
Press the MULTI SELECTOR to the
right to proceed to the next file. Press
and hold the MULTI SELECTOR to
the right until you hear a beep, play
of the file is fast forwarded.
(There is no sound.)
TRACK <DOWN>
Press the MULTI SELECTOR to the
left takes you back to the start of
the file currently playing. Press the
MULTI SELECTOR to the left once
more to return to the previous file.
Press and hold the MULTI
SELECTOR to the left until you hear
a beep, play of the file is reversed.
(There is no sound.)
FOLDER <UP>
Press the MULTI SELECTOR up to
proceed to the next folder.
FOLDER <DOWN>
Press the MULTI SELECTOR down
to return to the previous folder.
Press the MULTI SELECTOR
down and hold until you hear
a beep to jump to HOME.
HOME means returning back to play
the first file in the first folder on the
CD being played.
5 PRESET 1 (2)
Press PRESET 1 takes you back to
the start of the file currently playing.
•
•
•
•
Press PRESET 1 once more to return
to the previous file.
Press and hold PRESET 1 until
you hear a beep, play of the file is
reversed. (There is no sound.)
6 PRESET 2 (3)
Press PRESET 2 to proceed to the
next file.
Press and hold PRESET 2 until you
hear a beep, play of the file is fast
forwarded. (There is no sound.)
7 PRESET 3 (∞)
Press PRESET 3 to return to the pre-
vious folder.
Press PRESET 3 and hold until you
hear a beep to jump to HOME.
HOME means returning back to play
the first file in the first folder on the
CD being played.
8 PRESET 4 (5)
Press PRESET 4 to proceed to the
next folder.
9 PRESET 5 (Random)
If you press this, is indicated in
the display and starts to play files in
the folder being played in random
order. Press again to cancel.
If you press and hold until you hear a
beep,
is indicated in the display
and starts to play files in all folders
on the disc being played in random
order. Press again to cancel.
0 PRESET 6 (Repeat)
If you press this, is indicated in
the display and starts to repeat the
file being played. Press again to can-
cel.
If you press and hold until you hear a
beep,
is indicated in the display
and starts to repeat the folder being
played. Press again to cancel.
- SCAN
If you press this, is indicated in
the display and starts to play the first
10 seconds of each file in the folder
being played. Press again to cancel.
If you press and hold until you hear a
beep,
is indicated in the display
and starts to play the first 10 sec-
onds of the first file of each folder.
Press again to cancel.
= TEXT
Press and display indications change
as follows:
Upper: Artist Name
Lower: Track Title
Track Title
ELAPSED TIME
Folder Name
File Name
When 3 is displayed, if you press
and hold until you hear a beep, the
display will change to the next page.
A maximum of 2 pages (32 charac-
ters) can be displayed.

16
NOTICE
When playing back a disc
recorded with the Multi
Session system, the first
session only is played back.
If the first session combines
MP3, WMA and AAC files
and music data (CD-DA), this
product only plays the music
data. (Refer to page 41.)
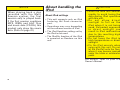
About handling the
iPod
About iPod settings
This unit supports only an iPod
featuring the Dock connector
port.
Operations may vary depending
on the software version of iPod.
The iPod Equalizer setting set by
the iPod is not used.
The Shuffle function of the iPod
is operated as Random on this
unit.
•
•
•
•
CAUTION
Store the data into another
media, to avoid losing the
data during iPod operation
with this unit.
Do not allow direct
sunlight to fall on the
iPod when it is not being
used. Extended exposure
to direct sunlight can
result in iPod malfunction
due to the resulting high
temperatures.
Do not leave the iPod in
high temperatures or direct
sunlight.
Fix the iPod securely when
using with this unit. Do not
let the iPod fall onto the floor,
where it may become jammed
under the brake or accelerator
pedal.
•
•
•
•
For details, refer to your iPod
Owner’s Manual.

17
About iPod software version
The iPod software versions that
can be used with this unit are as
follows (operations verified as of
August 2008):
iPod (5th generation) ver: 1.3
iPod classic ver: 2.0
iPod nano (1st generation) ver: 1.3.1
iPod nano (2nd generation) ver: 1.1.3
iPod nano (3rd generation) ver: 1.1.2
iPod nano (4th generation) ver: 1.0.0
iPod touch ver: 2.0
iPhone 3G ver: 2.0
* Please note that no guarantee applies to iPod
operations and future updated versions of iPod
software.
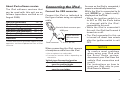
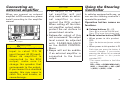
Connecting the iPod
Connect the USB connector.
Connect the iPod as indicated in
the figure below using an optional
cable.
To the vehicle's
USB connector
*2
*1
USB port
iPod with Dock connector port
Dock connector 1 ft. 6 in. (45 cm)
When connecting the iPod, remove
a headphone cable from the iPod.
*1 Use an optional car audio cable.
*2 Connection location differs depending on
the vehicle.
Vehicle type Connection location
xB Connect to the USB connector
near the parking brake.
xD Connect to the USB connector
near the cup holder.
As soon as the iPod is connected, its
power is automatically turned on.
While the iPod is connected to this
unit, SCION (or (check mark)) is
displayed on the iPod.
When the ignition switch is set
to ACC or ON, the iPod's battery
is charged while the iPod is
connected to this unit.
While the iPod is connected to
this unit, the iPod itself cannot be
turned on or off.
The iPod connected to this unit
is turned off about two minutes
after the ignition switch is set to
OFF.
NOTICE
To resolve most problems
when using your iPod with
the Scion Audio system,
disconnect your iPod from the
vehicle iPod connection and
reset it.
For instructions on how to
reset your iPod, refer to your
iPod Owner’s Manual.
•
•
•

18
NOTICE
Push in until you hear a click
to connect firmly. If it does
not go in smoothly, it may
be upside down so do not
force it in as this may result
in damage.
Connect the Dock connector
directly to the iPod with
Dock connector port. Do not
connect it via the iPod Dock
or other connection.
When the iPod is connected
to this unit, sound will
also be heard from the
headphone of the iPod. Use
without the headphone.
If you install an audio system
other than a Scion Genuine
Audio, you will not be able
to use the USB connector.
•
•
•
•
If the iPod does not operate
with Scion Audio system,
disconnect the connector
from the iPod and re-connect
again.
To reset the iPod, disconnect
the connector from the iPod,
and then re-connect to the
iPod when the operation
screen displays.
•
•
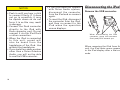
Disconnecting the iPod
Remove the USB connector.
When disconnecting the iPod
connector, grasp the connector
firmly and pull it towards you.
When removing the iPod from this
unit, the iPod main menu appears
in the iPod display after a few sec-
onds.

19

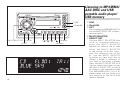
20
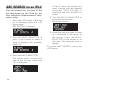
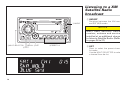
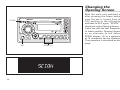
Listening to songs
on the iPod
1 iPod•USB
Press the button repeatedly until the
source becomes iPod.
NOTICE
If an iPod is not connected, it
will not switch to iPod even if
you press the iPod•USB button.
2 LIST
Press the LIST button to display the
category list (Playlist is the first cat-
egory displayed). Use the MULTI
SELECTOR to change or select the
category.
3 MULTI SELECTOR
SELECT LIST
Turning the MULTI SELECTOR while
the list is displayed switches the cat-
egories in the following order. Press
the MULTI SELECTOR in the center
or to the right to finalize.
Playlist Artists Albums
Songs Podcasts GENRES
Composers Audio Book
Turn the MULTI SELECTOR to select
an item from the selected category,
and press the MULTI SELECTOR in
the center or to the right to finalize.
•
4 2 5 3 6Random
7Repeat
8TEXT
1iPod•USB
3MULTI SELECTOR
2LIST
Page is loading ...
Page is loading ...
Page is loading ...
Page is loading ...
Page is loading ...
Page is loading ...
Page is loading ...
Page is loading ...
Page is loading ...
Page is loading ...
Page is loading ...
Page is loading ...
Page is loading ...
Page is loading ...
Page is loading ...
Page is loading ...
Page is loading ...
Page is loading ...
Page is loading ...
Page is loading ...
Page is loading ...
Page is loading ...
Page is loading ...
Page is loading ...
Page is loading ...
Page is loading ...
Page is loading ...
Page is loading ...
-
 1
1
-
 2
2
-
 3
3
-
 4
4
-
 5
5
-
 6
6
-
 7
7
-
 8
8
-
 9
9
-
 10
10
-
 11
11
-
 12
12
-
 13
13
-
 14
14
-
 15
15
-
 16
16
-
 17
17
-
 18
18
-
 19
19
-
 20
20
-
 21
21
-
 22
22
-
 23
23
-
 24
24
-
 25
25
-
 26
26
-
 27
27
-
 28
28
-
 29
29
-
 30
30
-
 31
31
-
 32
32
-
 33
33
-
 34
34
-
 35
35
-
 36
36
-
 37
37
-
 38
38
-
 39
39
-
 40
40
-
 41
41
-
 42
42
-
 43
43
-
 44
44
-
 45
45
-
 46
46
-
 47
47
-
 48
48


Scion PT546-00100 User manual
- Category
- Car media receivers
- Type
- User manual
Ask a question and I''ll find the answer in the document
Finding information in a document is now easier with AI
