Funai TB110MW9 - Digital to Analog TV Converter Box User manual

Category
TV set-top boxes
Type
User manual

This manual is also suitable for

O
wn
e
r's M
a
n
ual
T
B
11
0
MW
9
DTV Digita
l
to Ana
l
og Converte
r
(
Set To
p
Box
)
© 2010 Funai E
l
ectric Co., Lt
d.
THANK YOU FOR CHOOSING MAGNAVOX
.
N
EED HELP FAST
?
READ YOUR OWNER'S MANUAL FIRST FOR
Q
UICK TIPS
THAT MAKE USING YOUR MAGNAVOX PRODUCT MORE ENJOYABLE
IF YOU HAVE READ YOUR INSTRUCTIONS AND STILL NEED ASSISTANCE
,
YOU
MAY ACCE
SS
OU
R
O
NLINE HELP AT
W
WW.MAGNAVOX.COM
/
SUPPOR
T
O
R WWW.FUNAISERVICE.COM
/
O
R CALL 1-
800
-
605
-
86
1
0
WHILE WITH YOUR PRODUCT
.
INSTRUCCIONES EN ESPAÑOL INCLUIDAS.
2
E
N
Be
f
ore Usin
g
1
.
Re
ad
in
s
tr
u
cti
o
n
s
-
All the safet
y
and operating instructions
should be read before the a
pp
liance is o
p
erated
.
2. Reta
i
n Instruct
i
ons -
T
he sa
f
et
y
and operating
i
nstructions should be retained
f
or
f
uture re
f
erence
.
3
. Hee
d
Warnings
-
All
warnings on t
h
e app
l
iance an
d
in
t
h
e operating instructions s
h
ou
ld
b
e a
dh
ere
d
to.
4.
F
o
ll
o
w In
s
tr
u
cti
o
n
s
- All operatin
g
and use
i
n
st
r
uct
i
o
n
s
s
h
ou
l
d
be
f
o
ll
o
w
ed.
5. C
l
eaning -
U
nplug this product
f
rom the wall outlet
be
f
ore cleaning. Do not use liquid cleaners or aerosol
cleaners. Use a damp cloth
f
or cleaning
.
EX
C
EPTI
O
N
:
A product that is meant
f
or uninterrupted
service and, that
f
or some speci
c reason, such as
the possibility o
f
the loss o
f
an authorization code
f
or
a CATV converter, is not inten
d
e
d
to
b
e unp
l
ugge
d
b
y
the user
f
or cleaning or an
y
other purpose, ma
y
exclude the re
f
erence to unplugging the appliance in
t
h
e c
l
eaning
d
escription ot
h
erwise require
d
in item 5
.
6
. Attac
h
ments - Do not use attac
h
ments not
recommended by this product manu
f
acturer as they
may cause
h
azar
d
s
.
7
.
W
a
ter
a
n
d
M
o
i
s
t
u
re - Do not use this
p
roduct near
water-for exam
p
le, near a bath tub, wash bowl, kitchen
sink, or laundr
y
tub, in a wet basement, or near a
swimmin
g
pool, and the like.
8
. Accessor
i
es -
D
o not p
l
ace t
h
is pro
d
uct on an
unsta
bl
e cart, stan
d
, tripo
d
,
b
rac
k
et, or ta
bl
e.
T
his product ma
y
f
all, causing serious injur
y
to someone, an
d
serious
d
amage to t
h
e
app
l
iance. Use on
ly
wit
h
a cart, stan
d
,
tripo
d
,
b
rac
k
et, or ta
bl
e recommen
d
e
d
b
y
the manu
f
acturer, or sold with this
product. An
y
mounting o
f
the appliance
s
h
ou
l
d
fo
ll
o
w
t
h
e
m
a
n
ufactu
r
e
r’
s
in
st
r
uct
i
o
n
s
a
n
d
s
h
ou
ld
use a mounting accessor
y
recommen
d
e
d
by
the manu
f
acturer. An appliance and cart combination
should
be
m
o
v
ed
wi
th
ca
r
e.
Quick stops, excessive
f
orce, and uneven sur
f
aces ma
y
cause t
h
e app
l
iance an
d
cart com
b
ination to
o
v
e
r
tu
rn
.
AMEUBLE
S
-
Cet apparei
l
ne
d
oit être
p
l
acé que sur un meu
bl
e (avec ou sans
roulettes) recommandé par le
f
abricant. Si
vous
l
insta
ll
ez sur un meu
bl
e à rou
l
ettes,
W
ARNIN
G:
T
O
REDUCE THE RISK
O
F FIRE
O
R ELECTRIC SH
O
CK, D
O
N
O
T EXP
O
SE THIS
A
PPLIANCE T
O
RAIN
O
R M
O
ISTURE
.
The caution markin
g
is located on the bottom of the cabinet.
C
A
U
TI
ON
RISK OF ELECTRIC SHOCK
DO NOT OPEN
C
A
U
TI
O
N
:
T
O REDUCE THE RISK OF ELECTRIC SHOCK
,
DO NO
T
REMOVE COVER
(
OR BACK
)
. NO USER SERVICEABLE
PARTS INSIDE. REFER SERVICING T
O
Q
UALIFIED
S
ERVI
C
E PER
SO
NNEL
.
THI
S
S
YMB
O
L INDI
C
ATE
S
THA
T
DANGER
OUS
V
O
LTAGE
CO
N
S
TIT
U
TING
A RI
S
K
O
F ELE
C
TRI
C
S
H
OC
K I
S
PRE
S
EN
T
WITHIN THI
S
U
NIT
.
THI
S
S
YMB
O
L INDI
C
ATE
S
THAT THERE
ARE IMP
O
RTANT
O
PERATING AND
MAINTENAN
C
E IN
S
TR
UC
TI
O
N
S
IN THE
LITERAT
U
RE A
CCO
MPANYING THE
APPLIAN
C
E
.
I
mportant Sa
f
eguard
s
p
lacez les deux ensembles avec
p
récaution. Un
arrêt brus
q
ue, l’utilisation d’une force excessive et des
surfaces irré
g
ulières risquent de déstabiliser l’ensemble
et
de
l
e
r
e
nv
e
r
se
r
.
9
.
Venti
la
ti
o
n -
Sl
ots an
d
openings in t
h
e ca
b
inet an
d
t
h
e
back or bottom are provided
f
or ventilation and to ensure
reliable operation o
f
this product and to protect it
f
rom
over
h
eating, an
d
t
h
ese openings must not
b
e
bl
oc
k
e
d
or covere
d
. T
h
e openings s
h
ou
ld
never
b
e
bl
oc
k
e
d
by
placing this product on a bed, so
f
a, rug, or other similar
sur
f
ace. This product should never be placed near or
over a ra
d
iator or
h
eat register. T
h
is pro
d
uct s
h
ou
ld
not
b
e p
l
ace
d
in a
b
ui
l
t-in insta
ll
ation suc
h
as a
b
oo
k
case
or rac
k
un
l
ess proper venti
l
ation is provi
d
e
d
or t
h
e
manu
f
acturers instructions have been adhered to
.
10. Power
S
ources -
Th
is pro
d
uct s
h
ou
ld
b
e operate
d
only
f
rom the type o
f
power source indicated on the
marking label. I
f
you are not sure o
f
the type o
f
power
supp
l
y to your
h
ome, consu
l
t your app
l
iance
d
ea
l
er or
l
oca
l
power company. For t
h
is pro
d
ucts inten
d
e
d
to
operate
f
rom battery power, or other sources, re
f
er to
t
h
e operating instructions.
11. Groundin
g
or Polarization - This
p
roduct is e
q
ui
pp
ed
with a polarized alternatin
g
-current line plu
g
(a plu
g
havin
g
one blade wider than the other). This plu
g
will
t into the power outlet onl
y
one wa
y
. This is a safet
y
feature. If
y
ou are unable to insert the plug full
y
into
the outlet, tr
y
reversing the plug. If the plug should
still fail to  t, contact
y
our electrician to replace
y
our
obsolete outlet. Do not defeat the safet
y
purpose of
the polarized plu
g
.
12. Power-Cor
d
Protection
-
Power-supp
ly
cor
d
s s
h
ou
ld
b
e
route
d
so t
h
at t
h
e
y
are not
l
i
k
e
ly
to
b
e wa
lk
e
d
on or pinc
h
e
d
by
items p
l
ace
d
upon or against t
h
em, pa
y
ing particu
l
ar
attention to cor
d
s at p
l
u
g
s, convenience receptac
l
es, an
d
the point where they exit
f
rom the appliance
.
13. Out
d
oor Antenna groun
d
in
g
-
I
f
an outside antenna
or ca
bl
e system is connecte
d
to t
h
is pro
d
uct,
b
e
sure t
h
e antenna or ca
bl
e system is groun
d
e
d
so
as to provi
d
e some protection against vo
l
tage
surges and built-up static charges. Article 810 o
f
the
Nationa
l
E
l
ectrica
l
Co
d
e, ANSI/NFPA No. 70, provi
d
es
in
f
ormation with respect to proper grounding o
f
the
mast and supporting structure, grounding o
f
the lead-
in wire to an antenna discharge unit, size o
f
grounding
3
EN
Before Usin
g
c
onductors, location of antenna-dischar
g
e unit,
c
onnection to
g
roundin
g
electrodes, and requirements
f
or the
g
roundin
g
electrode. (Fi
g
. A)
14. Lig
h
tning - For added protection
f
or this product
receiver during a lightning storm, or when it is le
f
t
unattended and unused
f
or long periods o
f
time,
unplug it
f
rom the wall outlet and disconnect the
antenna or ca
bl
e s
y
stem. T
h
is wi
ll
prevent
d
amage to
t
h
is pro
d
uct
d
ue to
l
i
gh
tnin
g
an
d
power-
l
ine sur
g
es
.
15. Power L
i
nes -
A
n outsi
d
e antenna system s
h
ou
ld
not
be located in the vicinity o
f
overhead power lines or
o
t
h
er e
l
ectric
l
ig
h
t or power circuits, or w
h
ere it can
f
all into such power lines or circuits. When installing an
o
utsi
d
e antenna system, extreme care s
h
ou
ld
b
e ta
k
en
to keep
f
rom touching such power lines or circuits as
c
ontact with them might be
f
atal.
1
6.
Overloadin
g
- D
o
n
ot
o
v
e
rl
oad
w
a
ll
out
l
ets
a
n
d
e
x
te
n
s
i
o
n
co
r
ds
as
t
hi
s
ca
n r
esu
l
t
in
a
ri
s
k
o
f  r
e
o
r
e
l
ect
ri
c
s
h
oc
k
.
17. O
b
ject an
d
Liqui
d
Entr
y
-
N
ever push objects o
f
an
y
k
in
d
into t
h
is pro
d
uct t
h
roug
h
openings as t
h
e
y
ma
y
touc
h
d
an
g
erous vo
l
ta
g
e points or s
h
ort out parts t
h
at
c
ould result in a
re or electric shock. Never spill liquid
o
f an
y
kind on this product
.
18. Serv
i
c
i
ng - Do not attempt to service t
h
is pro
d
uct
y
oursel
f
as opening or removing covers may expose
y
ou to dangerous voltage or other hazards. Re
f
er all
s
ervicing to quali
ed service personnel
.
19. Dama
g
e Requirin
g
Service -
U
nplu
g
this product from
the wall outlet and refer servicin
g
to quali ed service
personnel under the followin
g
conditions:
a. When the power-suppl
y
cord or plug is damaged
or fra
y
ed
.
b. I
f
liquid has been spilled, or objects have
f
allen into
t
h
is pro
d
uct.
c. I
f
this product has been exposed to rain or water
.
d. If this product does not operate normall
y
b
y
following the operating instructions. Adjust onl
y
those controls that are covered b
y
the operating
instructions, as improper ad
j
ustment of other
controls ma
y
result in damage and will often
require extensive work b
y
a quali ed technician to
restore this
p
roduct to its normal o
p
eration
.
e. If this product has been dropped or dama
g
ed in
any
w
ay.
f
. When this product exhibits a distinct change in
per
f
ormance-this indicates a need
f
or service
.
2
0. Re
p
lacement Parts - When re
p
lacement
p
arts are
re
q
uired, be sure the service technician has used
replacement parts speci ed b
y
the manufacturer that
have the same characteristics as the ori
g
inal part.
Unauthorized substitutions ma
y
result in  re, electric
shock, injur
y
to persons or other hazards
.
2
1. Safet
y
Check - Upon completion of an
y
service or
repairs to t
h
is pro
d
uct, as
k
t
h
e service tec
h
nician to
perform routine safet
y
checks to determine that this
pro
d
uct is in proper operating con
d
ition
.
2
2.
H
eat - This product should be situated away
f
rom heat
sources suc
h
as ra
d
iators,
h
eat registers, stoves, or ot
h
er
products (including ampli
ers) that produce heat
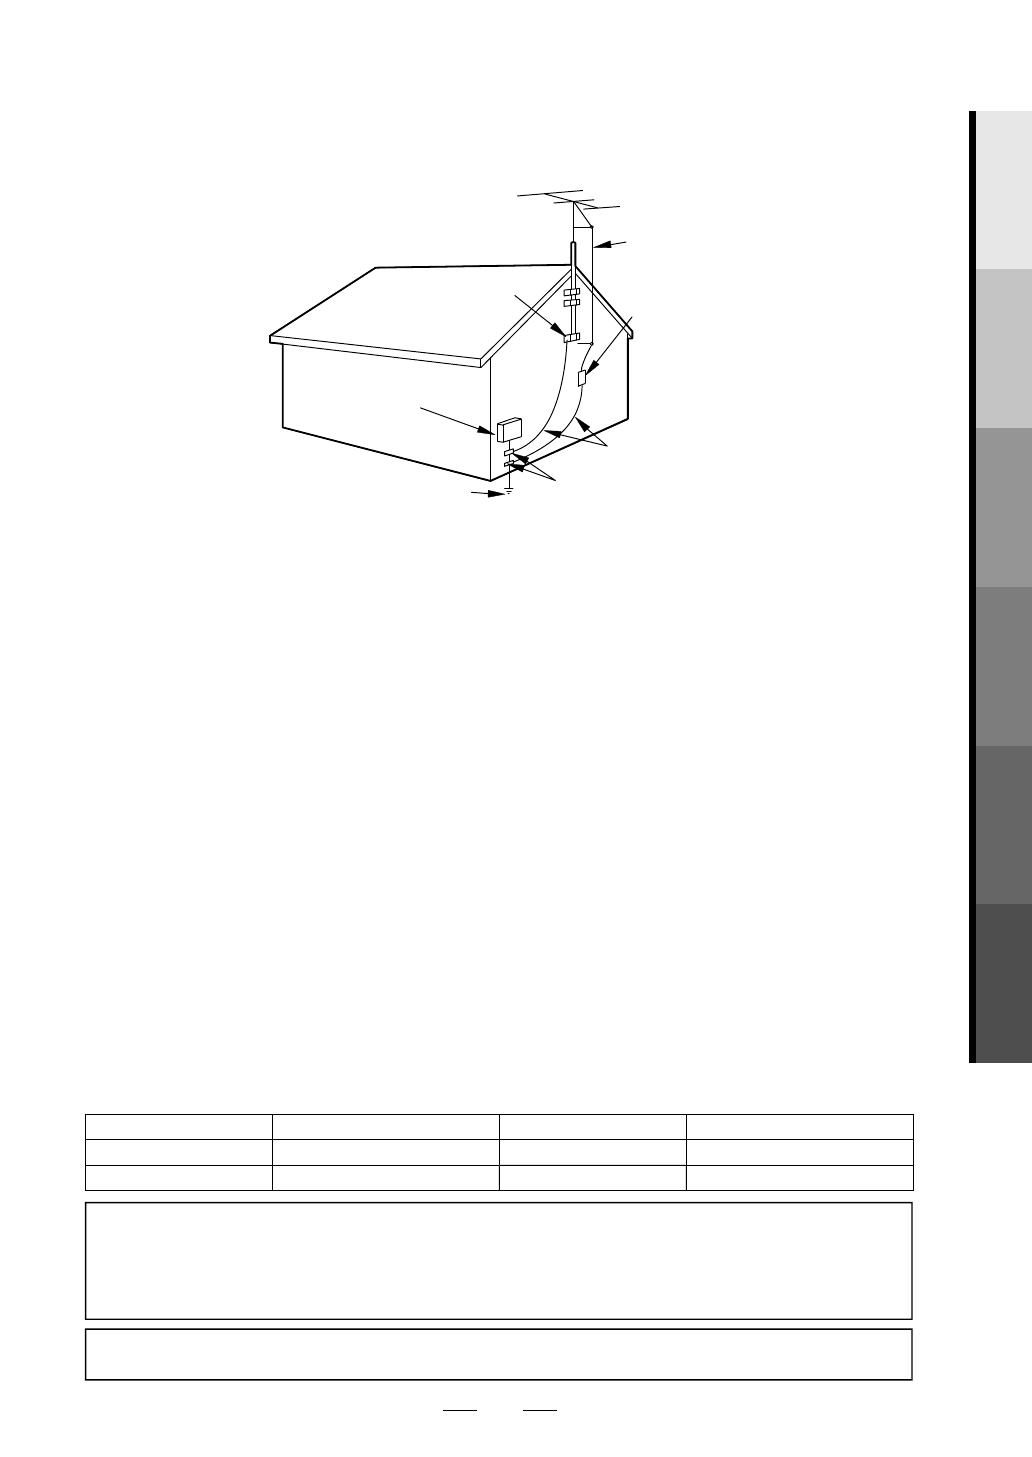
.
GROUND CLAMPS
NEC - NATIONAL
ELECTRICAL CODE
FIGURE A
EXAMPLE OF ANTENNA GROUNDING AS PER
NATIONAL ELECTRICAL CODE
GROUNDING
CONDUCTORS
(NEC SECTION 810-21)
ANTENNA LEAD
IN WIRE
ANTENNA
DISCHARGE UNIT
(NEC SECTION 810-20)
POWER SERVICE GROUNDING ELECTRODE
SYSTEM (NEC ART 250, PART H)
GROUND CLAMP
ELECTRIC SERVICE
EQUIPMENT
T
he serial number o
f
this product may be
f
ound on the bottom o
f
the unit. You should record the number and
other vital in
f
ormation here and retain this book as a permanent record. Serial numbers are not kept on
le
.
D
ate
of
P
u
r
c
h
ase
Deale
r P
ho
n
e
N
o.
D
ea
l
e
r P
u
r
c
h
ase
fr
om
Model
N
o.
D
ea
l
e
r A
dd
r
ess
Se
ri
a
l N
o.
CAUTION: TO PREVENT ELECTRIC SHOCK
,
MATCH WIDE BLADE OF PLUG TO WIDE SLOT
,
FULLY
INSERT
.
A
TTENTION: POUR ÉVITER LES CHOCS ÉLECTRIQUES
,
INTRODUIRE LA LAME LA PLUS LARGE DE
LA FICHE DANS LA BORNE CORRESPONDANTE DE LA PRISE ET POUSSER JUS
Q
U
AU
F
O
ND
.
Do not place the unit on the furniture that is capable of being tilted b
y
a child and an adult leaning, pulling,
standing or climbing on it. A falling unit can cause serious injur
y
or even death
.
4
E
N
Before Using
ng
L
o
c
a
t
ion
For sa
f
e operation and satis
f
actor
y
per
f
ormance
of this product, keep the followin
g
in mind when
selectin
g
a place for its installation
:
Shield it from direct sunlight and keep it awa
y
f
r
o
m
sou
r
ces
o
f in
te
n
se
h
eat.
A
void dust
y
or humid places
.
A
void places with insu
ff
icient ventilation
f
or
proper
h
eat
d
issipation. Do not
bl
oc
k
t
h
e
ventilation holes at the top and bottom o
f
the
pro
d
uct. Do not p
l
ace t
h
e pro
d
uct on a carpet
because
th
i
s
wi
ll
block
the
v
e
n
t
i
lat
i
o
n
holes.
I
nsta
ll
t
h
e pro
d
uct in a
h
orizonta
l
position
.
A
void locations sub
j
ect to strong vibration
.
Do not p
l
ace t
h
is pro
d
uct near strong magnetic
f
ields.
A
voi
d
moving t
h
is pro
d
uct to
l
ocations w
h
ere
temperature di
ff
erences are extreme
.
Avoid the Hazards o
f
Electrical
S
h
oc
k
an
d
Fir
e
Do not
h
an
dl
e t
h
e
p
ower cor
d
wit
h
wet
h
an
d
s.
Do not pu
ll
on t
h
e power cor
d
w
h
en
disconnecting it
f
rom an AC wall outlet. Grasp it
b
y t
h
e p
l
ug
.
I
f b
y
accident, water is spilled on
y
our the
product, unplug the power cord immediatel
y
and take the
p
roduct to our Authorized Service
Center for servicin
g.
Do not place an
y
thing directl
y
on top o
f
the
p
ro
d
uct
.
A Note a
b
out Rec
y
c
l
in
g
T
his product’s packaging materials are rec
y
clable
and can be reused. Please dispose of an
y
materials in
accordance with
y
our local rec
y
cling regulations
.
Batteries s
h
ou
ld
never
b
e t
h
rown away or
incinerated but disposed o
f
in accordance with your
l
oca
l
regu
l
ations concerning c
h
emica
l
wastes
.
I
mportant Copyright In
f
ormation
U
nauthorized recordin
g
or use of broadcast
t
elevision pro
g
rammin
g
, video tape,  lm or other
c
op
y
righted material ma
y
violate applicable
c
op
y
right laws. We assume no responsibilit
y
for the
u
nauthorized du
p
lication, use or other acts which
i
nfringe upon the rights of cop
y
right owners.
F
CC WARNING - This equipment ma
y
generate
o
r use radio frequenc
y
energ
y
. Changes or
m
odi cations to this equipment ma
y
cause
ha
rmf
u
l interference
u
nle
ss
the m
od
i c
a
ti
o
n
s
a
re expressl
y
approved in the instruction
m
anual. The user could lose the authorit
y
to
op
erate this e
q
ui
p
ment if an unauthorized
c
han
g
e or modi cation is made.
P
recaut
i
ons
5
EN
Before Usin
g
Tab
l
e
o
f
Co
n
te
n
ts
Before Usin
g
I
mportant Safe
g
uard
s
.
.
.
.
.
.
.
.
.
.
.
.
.
.
.
.
.
.
.
.
.
.
.
.
.
.
.
.
.
2
Pr
ecaut
i
o
n
s
.
.
.
.
.
.
.
.
.
.
.
.
.
.
.
.
.
.
.
.
.
.
.
.
.
.
.
.
.
.
.
.
.
.
.
.
.
.
.
4
O
v
e
rvi
ew
.
.
.
.
.
.
.
.
.
.
.
.
.
.
.
.
.
.
.
.
.
.
.
.
.
.
.
.
.
.
.
.
.
.
.
.
.
.
.
.
.
6
I
nformation on Di
g
ital Broadcastin
g
.
.
.
.
.
.
.
.
.
.
.
.
.
.
.
7
A
ccesso
ri
es
.
.
.
.
.
.
.
.
.
.
.
.
.
.
.
.
.
.
.
.
.
.
.
.
.
.
.
.
.
.
.
.
.
.
.
.
.
.
.
7
I
nstallin
g
Batterie
s
.
.
.
.
.
.
.
.
.
.
.
.
.
.
.
.
.
.
.
.
.
.
.
.
.
.
.
.
.
.
.
.
7
Locat
i
o
n
o
f
Co
n
t
r
o
l
s
.
.
.
.
.
.
.
.
.
.
.
.
.
.
.
.
.
.
.
.
.
.
.
.
.
.
.
.
.
.
.
8
Connect
i
ons
C
onnecting to a TV wit
h
out A/V Jac
ks
.
.
.
.
.
.
.
.
.
.
.
.
10
C
onnecting to a TV wit
h
A/V Jac
ks
.
.
.
.
.
.
.
.
.
.
.
.
.
.
.
.
10
C
onnecting to a Ca
bl
e Box (Optiona
l
)
.
.
.
.
.
.
.
.
.
.
.
.
.
11
C
onnecting to Ot
h
er Device
s
.
.
.
.
.
.
.
.
.
.
.
.
.
.
.
.
.
.
.
.
.
12
Initia
l
Setup (Setup Wizar
d)
I
nitia
l
Setup
.
.
.
.
.
.
.
.
.
.
.
.
.
.
.
.
.
.
.
.
.
.
.
.
.
.
.
.
.
.
.
.
.
.
.
.
.
.
13
Bas
i
c Operat
i
o
n
Se
l
ecting C
h
anne
l
s on t
h
e ST
B
.
.
.
.
.
.
.
.
.
.
.
.
.
.
.
.
.
.
.
15
A
d
vance
d
Operatio
n
Autoscan (Receiving C
h
anne
l
s
)
.
.
.
.
.
.
.
.
.
.
.
.
.
.
.
.
.
.
.
18
A
dd
ing/De
l
eting C
h
anne
ls
.
.
.
.
.
.
.
.
.
.
.
.
.
.
.
.
.
.
.
.
.
.
.
18
A
d
justing Antenn
a
.
.
.
.
.
.
.
.
.
.
.
.
.
.
.
.
.
.
.
.
.
.
.
.
.
.
.
.
.
.
.
20
Se
l
ecting Disp
l
a
y
Mo
de
.
.
.
.
.
.
.
.
.
.
.
.
.
.
.
.
.
.
.
.
.
.
.
.
.
.
20
Setting t
h
e Time Zone an
d
D.S.
T
(Day
l
ig
h
t Saving Time)
.
.
.
.
.
.
.
.
.
.
.
.
.
.
.
.
.
.
.
.
.
.
.
.
.
.
.
2
1
V-c
h
ip Option
s
.
.
.
.
.
.
.
.
.
.
.
.
.
.
.
.
.
.
.
.
.
.
.
.
.
.
.
.
.
.
.
.
.
.
.
22
C
l
ose
d
Caption Option
s
.
.
.
.
.
.
.
.
.
.
.
.
.
.
.
.
.
.
.
.
.
.
.
.
.
.
25
Auto
P
ower
D
ow
n
.
.
.
.
.
.
.
.
.
.
.
.
.
.
.
.
.
.
.
.
.
.
.
.
.
.
.
.
.
.
.
2
6
Viewing Analog TV
.
.
.
.
.
.
.
.
.
.
.
.
.
.
.
.
.
.
.
.
.
.
.
.
.
.
.
.
.
.
.
V
2
7
O
t
h
er
s
Trou
bl
es
h
ootin
g
.
.
.
.
.
.
.
.
.
.
.
.
.
.
.
.
.
.
.
.
.
.
.
.
.
.
.
.
.
.
.
.
.
30
Speci
cation
s
.
.
.
.
.
.
.
.
.
.
.
.
.
.
.
.
.
.
.
.
.
.
.
.
.
.
.
.
.
.
.
.
.
.
.
.
3
1
W
arrant
y
.
.
.
.
.
.
.
.
.
.
.
.
.
.
.
.
.
.
.
.
.
.
.
.
.
.
.
.
.
.
.
B
ack
Co
v
er
©
2010 Funai E
l
ectric Co.
,
Lt
d
.
All rights reserved. No part of this manual may be reproduced, copied, transmitted, dissemina
ated, transcribed,
downloaded or stored in any storage medium, in any form or for any purpose without the exp
press prior written
consent of Funai. Furthermore, any unauthorized commercial distribution of this manual or an
ny revision hereto
i
s strict
l
y pro
h
i
b
ite
d
.
I
nformation in this document is sub
j
ect to change without notice. Funai reserves the right to change the
content herein without the obligation to notif
y
an
y
person or organization of such changes.
wi
th
the
design is a registered trademark o
f
Funai Electric Co., Ltd and ma
y
not be used in an
y
wa
y
without the express written consent o
f
Funai. All other trademarks used herein remain the exclusive propert
y
o
f
their respective owners. Nothing contained in this manual should be construed as granting, b
y
implication
or otherwise, an
y
license or right to use an
y
o
f
the trademarks displa
y
ed herein. Misuse o
f
an
y
trademarks or
an
y
other content in this manual is strictl
y
prohibited. Funai shall aggressivel
y
en
f
orce its intellectual propert
y
rights to the
f
ullest extent o
f
the law
.
Manufactured under license from Dolb
y
Laboratories. Dolb
y
and the double-D s
y
mbol are trademarks of Dolb
y
Labo
r
ato
ri
es.
6
E
N
Before Using
ng
Overv
i
e
w
CO
NNE
C
TI
O
N
A
Connectin
g
t
o
a TV without A/V jacksa TV without A/V jacks
Conexión a un TV sin tomas de A/V
P
10
TV without
A/V jacks
SET TOP BOX
B
Connect
i
ng t
o
a TV with A/V jacksa TV with A/V jacks
Conexión a un TV con tomas de A/V
P
10
TV with
A/V jacks
SET TOP BOX
C
Connect
i
ng t
o
a Cable Boxa Cable Box
Conexión a una caja de
cable
P
11
Cable Box
TV with
A/V jacks
SET TOP BOX
D
Connect
i
n
g
t
o
Other DevicesOther Devices
Conexión a otros
dispositivos
P
12
DVD or VCR
TV with
A/V jacks
SET TOP BOX
1. Language
f
or TV screen
Idioma para la pantalla
2
. Connection
f
or audio outpu
t
Conexión para salida de audio
3
. T
i
me zon
e
Husos horarios
4
. Day
l
ig
h
t savings time (D.S.T
)
Hora de verano (D.S.T)
5. Disp
l
ay mo
de
modo de indicaciones
6
. C
h
anne
l
scannin
g
Búsqueda de canales
P
14
V
i
ew
i
ng Analog T
V
Viendo TV Analógica
P
27
7
EN
Before Usin
g
I
n
f
ormation on Digital Broadcasting
Digital terrestrial
antenna
Digital
terrestrial signals
STB (Set Top Box)
converts the ATSC signal
to analog signal
TV
Receives
ATSC
ATSC
Th
is STB ma
k
es it possi
bl
e to view t
h
e
d
igita
l
TV
p
rograms on your ana
l
og TV
b
y converting t
h
e
d
igita
l
signa
l
to t
h
e ana
l
og signa
l
. You can use
m
ost
f
eatures provided by the digital broadcast,
e
xcept that the resolution o
f
the image is always
o
utput in 480i (stan
d
ar
d
reso
l
ution)
.
A
ccesso
r
ies
C
heck the
f
ollowing accessories when unpacking the STB
:
R
e
m
ote
co
n
t
r
ol:
NA386UD
(
x1
)
O
wn
e
r’
s
m
a
n
ual:
1VMN25977
(
x1
)
A
A
b
atter
y
(1.5V) x
2
RF
cable:
WPZ0901TM002
/
WPZ0901TM005
(
x1
)
Install
i
n
g
Batter
i
e
s
Instalación de pilas
1 Unsnap the batter
y
cover from the
ba
ck
o
f the rem
o
te c
o
ntr
o
l
.
Abra la cubierta de pilas de la parte
trasera del mando a distancia.
2 Install two AA batteries makin
g
sure the polarit
y
(+
/
-
)
is correct.
Instale dos pilas AA asegurándose que
la polaridad (+ /
-
) sea la correcta.
3 S
Snap the battery
c
cover back.
Cierre la cubierta de
pilas.
CAUTI
O
N
:
D
o not mix alkaline, standard (carbon-zinc), or rechar
g
eable (ni-cad,
ni-mh
,
etc) batteries.
No mezcle baterías alcalinas, estándar (zinc-carbono) o recargables (ni-cad, ni-mh, etc.).
D
o not mix new and old batteries to
g
ether.
No mezcle pilas nuevas con antiguas.
D
o not rechar
g
e, short-circuit, heat, burn or disassemble batteries.
No recargue, caliente, queme o desarme baterías ni provoque un corto circuito
con ellas.
R
emove batteries from batter
y
compartment that is not going to be
used
f
o
r
a
m
o
n
t
h
o
r m
o
r
e.
Quite las pilas del compartimento de pilas si no se va a utilizar durante un mes o más.
N
O
TE
:
W
h
en rep
l
acing
b
atteries,
rep
l
ace t
h
em in pairs
.
Cuando cambie las pilas,
hágalo por pares.
8
E
N
Before Using
ng
L
ocation o
f
Controls
Ubicación del control
Remote Control
Mando a distancia
9
1
2
4
3
6
5
7
8
10
11
13
12
1 STANDBY-ON
b
utto
n
: Turns STB on and o
.
Conecta y desconecta el STB.
2 Num
b
er
b
utton
s
3 OK
b
utto
n
4 SETUP
b
utto
n
:
Disp
l
ays “SETUP” menu.
Switc
h
es “RF OUT” setting
b
y
h
o
ld
ing t
h
is
b
utton
d
own over 3 secon
d
s
.
Despliega el menú AJUSTE”.
Cambia la con guración de “SALIDA RF” al mantenerse
presionado durante 3 segundos.
5 ALT.
CH
:
Returns to t
h
e
l
ast se
l
ecte
d
c
h
anne
l.
Regresa al último canal seleccionado.
6 AUDIO
b
utto
n
:
Se
l
ects a
l
ternative au
d
io
languages (i
f
available)
.
Selecciona idiomas de audio alternativos (si existen).
7 . (Con
rm) butto
n
: Press to con
rm the channel
se
l
ection ma
d
e
b
y [t
h
e Num
b
er
b
uttons
]
.
Presione para con rmar la selección del canal, hecha
con [los botones de Números].
8 DISPLAY
b
utto
n
:
Disp
l
ays t
h
e c
h
anne
l
b
anner.
Despliega el banner del canal.
9 RETURN
b
utto
n
: Returns to t
h
e previous menu
screen.
Regresa a la pantalla de menú anterior.
10 Navigation
b
uttons
K
/
L
/
s
/
B
11 EPG
bu
tt
on
:
Disp
l
a
y
s t
h
e E
l
ectronic Program
G
u
i
de.
Despliega la Guía Electrónica de Programas.
12
C
H
K
/
L
bu
tt
o
n
s
1
3
STILL
bu
tt
on
:
Freezes t
h
e image on t
h
e T
V
screen.
Congela la imagen de la pantalla del TV.
T
o operate this STB with a universal remote, check the instruction manual
f
or remote and
f
ind
M
agnavox brand STB code. I
f
you do not
f
ind the code or the code does not work, try to use Sylvania
b
ran
d
STB co
d
e instea
d.
9
EN
Before Usin
g
Front Panel
Panel frontal
12
1 Rem
o
te c
o
ntr
ol
s
en
so
r
2
P
O
WER in
d
ic
a
t
o
r
:
T
urns
g
reen w
h
en t
h
e STB is in operation
.
Se vuelve verde cuando el STB está en operación.
Rear Panel
Panel trasero
21345
1 AC
p
ower cor
d
2
AUDIO OUT jacks (Right-red / Le
f
t-white
)
:
Connect your TV, stereo system or VCR etc. wit
h
s
tan
d
ar
d
au
d
io ca
bl
es
.
Conecte su TV, sistema estéreo o VCR, etc., con cables
de audio estándares.
3 VIDEO OUT jac
k
(ye
ll
ow)
:
Connect your TV or VCR etc. wit
h
a stan
d
ar
d
vi
d
eo ca
bl
e
.
Conecte su TV o VCR, etc., con un cable estándar de
video.
4 ANT. IN
j
ac
k
:
Co
nn
ect
a
n
a
n
te
nn
a.
Conecte una antena.
5
ANT. OUT
j
ac
k
:
Connect to the ANT. IN jack on
n your TV.
Conecte a la toma ANT. IN de su TV.
1
0
E
N
Connections
ns
1
Disconnect the AC
p
ower cords of the devices from the AC outlet.
Desconecte los cables de alimentación de los aparatos del tomacorriente CA.
2
Disconnect RF coaxial cable from antenna input jack of
y
our TV
.
Desconecte el cable coaxial de RF del conector hembra de entrada de antena de su televisor.
3
M
a
k
e
t
h
e
co
nn
ect
i
o
n
s
as
ill
ust
r
ated
be
l
o
w
.
Efectúe las conexiones tal como se ilustra a continuación.
4
Plu
g
all AC power cords into AC outlets, then turn all devices on
.
Enchufe todos los cables eléctricos de CA en los tomacorrientes de CA y conecte la alimentación de todos los equipos.
A
Connectin
g
to a TV without A/V Jack
s
Conexión a un TV sin tomas de A/V
RF cable
(supplied)
cable de RF
(se incluye)
STB
TV antenna
Antena de TV
Does not send
the analog TV signal.
No envía la señal analógica
TV
Select ch3 to
view digital TV.
Seleccione c3 para
ver TV digital.
B
Connect
i
ng to a TV w
i
th A/V Jack
s
Conexión a un TV con tomas de A/V
TV
STB
TV antenna
Antena de TV
Audio cable
cable de audio
Video cable
cable de
video
Select AUX to
view digital TV.
Seleccione AUX
para ver TV digital.
yellow
y
ello
w
yellow
yel
lo
w
y
ello
w
yel
lo
w
whit
e
whit
e
whit
e
whit
e
whit
e
whit
e
red
re
d
red
red
re
d
red
N
O
TE
:
If your TV has only one audio jack, connect the AUDIO OUT jack (L) (white) on the STB to the audio input
y one audio jack, connect the AUDI
j
ac
k
on t
h
e TV.
Si su TV sólo tiene una toma de audio, conecte la toma AUDIO OUT (L) (blanco) del STB, a la toma de entrada de audio
del TV.
11
EN
C
onnections
C
Connect
i
ng to a Cable Box (Opt
i
onal)
Conexión a una caja de cable (opcional)
TV
STB
Incoming
cable signals
Señales del cable
de entrada
Cable box (optional)
caja de cable (opcional)
cable de RF (se incluye)
cable de video
TV antenna
Antena de TV
cable de audio
Seleccione AUX para ver TV digital.
Seleccione c3 para ver CATV.
RF cable (supplied)
Video cable
Audio cable
empresa de
TV por cable
Cable TV
company
yellow
ye
llow
yellow
white
whit
e
white
red
re
d
red
yellow
ye
llow
yellow
whit
e
whit
e
whit
e
red
re
d
red
Select AUX to view digital TV.
Select ch3 to view CATV.
N
ote to t
h
e Ca
bl
e TV System Insta
ll
er:
T
his reminder is provided to call the Cable TV s
y
stem installer’s attention to Article 820-40 o
f
the National
Electrical Code, which provides guidelines
f
or proper grounding - in particular, speci
fy
ing that the cable
ground shall be connected to the grounding system of the building, as close to the point of cable entry as
entry as
possi
bl
e.
Observación para el instalador del sistema de cable de TV:
Este recordatorio se provee para alertar al instalador del sistema de cable de TV sobre el Artículo 820-40 del Código
Eléctrico Nacional, el cual proporciona pautas para una puesta a tierra adecuada, y en particular especi ca que la puesta
a tierra del cable debe estar conectada al sistema de puesta a tierra del edi cio, lo más cerca posible del punto de entrada
del cable.
1
2
E
N
Connections
ns
D
Connect
i
ng to Other Dev
i
ce
s
Conexión a otros dispositivos
TV
STB
Does not send
the analog TV signal.
No envía la señal analógica
TV antenna
Antena de TV
DVD Recorder or VCR
DVD Recorder or VCR
DVD Recorder or VCR
Grabador de DVD o videograbador
RF cable
cable de RF
RF cable
(supplied)
cable de RF
(se incluye)
Audio cable
cable de audio
Seleccione c3 para ver TV digital.
Seleccione AUX para ver la imagen
desde el otro dispositivo.
Video cable
cable de video
cable de audio
Audio cable
yellow
y
ello
w
yellow
whit
e
whit
e
whit
e
re
d
re
d
re
d
ye
l
lo
w
y
ello
w
ye
l
lo
w
whit
e
whit
e
whit
e
re
d
re
d
re
d
yellow
y
ello
w
yellow
whit
e
whit
e
whit
e
red
re
d
red
Splitter
Divisor
Select ch3 to view digital TV.
Select AUX to view the image
from the other device.
N
O
TE
:
I
f
your DVD recorder or VCR has only one audio jack, connect the AUDIO OUT jack (L) (white)
o
n t
h
e STB to t
h
e au
d
io input jac
k
on t
h
e DVD
.
Si su grabador de DVD o videograbador sólo tiene una toma de audio, conecte la toma AUDIO OUT (L)
(blanco) del STB, a la toma de entrada de audio del DVD.
1
3
EN
Initial Setu
p
(
Setu
p
Wizard
)
Initial Setup
(Setup Wizard)
In
i
t
i
al Setu
p
Ajùste inicial
1 Press [STANDBY-ON] on t
h
e remote contro
l
to activate t
h
e STB.
Presione [STANDBY-ON] en el mando a distancia para activar el STB.
lights up in green
se vuelve verde
2 Turn on the TV, and select the viewin
g
channel (ch3 or external input channel) on
y
our TV. (Re
f
er to
y
our TV’s manual.
)
Encienda el TV, y seleccione el canal que quiera ver (canal 3 o uno de entrada externo) en su TV. (Véase el
manual del TV.)
1
2
3
4
5
6
C
H
.
C
H
.
7
8
9
0
1
2
Appropriate Viewin
g
Channel
Con guración apropiada de el Canal de Visión
Viewin
g
Co
nn
ect
i
on
S
TB
Cab
l
e
B
ox
D
VD
o
r V
CR
A
(p
.10
)
“C
H
3
-
-
B
(p
.10
)
External in
p
ut channe
l
Canal de entrada externo
-
-
C
(p
.11
)
External in
p
ut channe
l
Canal de entrada externo
C
h
3
-
D
(p
.12
)
“C
H
3
-
External in
p
ut channe
l
Canal de entrada externo
If your TVs ch3 is already occupied, select ch4, and set the STB’s output channel to ch4. You can
h4 You can
switc
h
c
h
3 / c
h
4
by
h
o
ld
ing
[
SETUP
]
do
wn
o
v
e
r
3
seco
n
ds.
Si el c3 de su TV ya está ocupado, seleccione el c4 y luego ajuste el canal de salida del STB a c4. Puede alternar
entre el c3 y 4 manteniendo presionado [SETUP] durante 3 segundos.
”SETUP WIZARD” screen automatica
ll
y appears
.
Follow the directions shown on the TV screen to set the each settin
g.
14
E
N
Initial Setup (Setup Wizard)
up (Setup W
3
Select CONTINUE” usin
g
[
s
/
B
]
,
then
p
ress [OK].
Seleccione “CONTINÚE” utilizando [s / B] y presione
[OK].
“CONTINUE”:
“CANCEL
”:
CONTINUE
CANCEL
To continue setup
To cancel to leave pre-arranged
setup
This SETUP WIZARD will help you with the initial
setup on your own.
4 Select the lan
g
ua
g
e usin
g
[
K
/
L
]
,
then
p
ress [OK].
Seleccione el idioma utilizando [K / L] y presione [OK].
Select the language for setup display.
Elija idioma de preparación.
Sélectionner langue écran config.
ESPAÑOL
ENGLISH
FRANÇAIS
5
Select the c
o
nnecti
o
n
fo
r
aud
i
o
output us
i
ng [
s
/
B
], t
h
en
p
ress [OK]
.
Seleccione la conexión para salida de audio mediante
[s / B] y luego presione [OK].
AUDIO OUT :
RF OUT
:
Connecting STB and TV via AUDIO
Cable
Connecting STB and TV via RF
Cable
AUDIO OUT
RF OUT
Select the connection for Audio output.
Select AUDIO OUT” i
f
..
.
- you are using t
h
e stan
d
ar
d
au
d
io ca
bl
e to
connect t
h
e STB to your TV. (Connection
B
or
C
on pages 10 an
d
11.
)
Seleccione AUDIO FUERA si...
- está utilizando el cable de audio normal para
conectar el STB a su TV. (conexión
B
o
C
en las
páginas 10 y 11.)
Select “RF OUT i
f
..
.
- you are using t
h
e RF ca
bl
e to connect t
h
e STB
to your TV.
(
Connection
A
or
D
on pages 1
0
an
d
12.
)
Seleccione “RF FUERA si...
- está utilizando el cable RF para conectar el STB a su
TV. (conexión
A
o
D
en las páginas 10 y 12.)
6
Se
l
ect your time zone using [
K
/
L
]
,
th
en press [OK].
Seleccione su huso horario con [K / L] y presione [OK].
Select Time Zone.
ATLANTIC
CENTRAL
MOUNTAIN
PACIFIC
ALASKA
HAWAII
EASTERN
7
Select ON” or OFF” for Da
y
light
S
avin
g
Time (D.S.T) usin
g
[
s
/
B
]
,
t
hen
p
ress [OK]
.
Seleccione “ON” u “OFF” para la hora de verano. (D.S.T)
utilizando [s / B] y presione [OK].
Select Daylight Saving Time.
NOTE:
2:00AM of the second Sunday in
March until 2:00AM of the first
Sunday in November.
OFFON
8
Select the desired displa
y
mode
u
sin
g
[
K
/
L
]
, then
p
ress [OK] (refer
t
o pa
g
e 20).
Seleccione el modo de indicación deseado utilizando
[K / L] y presione [OK].
Select display mode.
ZOOM
FULL
LETTERBOX
9
Select AUTOSCAN” usin
g
[
K
/
L
]
,
t
hen
p
ress [OK]
.
Seleccione “AUTOEXPLO. mediante [K / L] y luego
presione [OK].
AUTOSCAN will rescan all channels.
This may take a while to complete.
EXIT
AUTOSCAN
The system is now scanning.
12%
Channel Found
EXIT
STB starts receiving avai
l
a
bl
e
d
igita
l
c
h
anne
l
s
an
d
stores t
h
em in t
h
e c
h
anne
l
map
.
When the scannin
g
is complete,
“A
U
T
OSC
AN
CO
MPLETED” will
be
in
d
i
cated.
A
f
ter autoscan is com
p
lete, use
[
CH
K
/
L
]
to veri
f
y whether STB is receiving channels
proper
ly.
Th
e “SETUP WIZARD is now comp
l
ete.
El ASISTENTE DE PREP. ahora ha  nalizado.
To cance
l
d
uring scannin
g
:
P
r
ess
[
SETUP
]
or
[O
K
]
.
Para cancelar durante la exploración: Presione [SETUP] o [OK].
If autoscan is canceled, some channels not
y
et
scanned ma
y
not be received. We recommend
completin
g
autoscan
.
You can
d
o autoscan an
d
a
dd
ing /
d
e
l
eting
channel later. Re
f
er to pa
g
e 18
.
1
5
EN
Basic
Op
eration
Basic Operation
About Sub-channel Broadcastin
g
Di
g
ital broadcastin
g
o ers a service that enables
multiple si
g
nals, called “sub-channels”, to be sent
simultaneousl
y
on one main channel b
y
using its
high compression technolog
y
.
ATSC
18:00
18:30
19:00
19:30
20:00
CH4-1
(Soccer)
CH4-2
(News)
CH4-2 (News)
CH4-3
(Tennis)
CH4-1 (Soccer)
CH4-1 (Soccer)
CH4-1 (Soccer)
: Can be changed by
using [CH
K
/
L
].
Select
i
ng Channels on the ST
B
1
Enter t
h
e main c
h
anne
l
num
b
er.
If
the main channel number is 1 digit, press
[
.
]
w
hen
nish entering.
2
Enter the
sub
-ch
a
nnel n
u
m
b
er
.
If
the sub-channel number is 1 digit, press
[O
K
]
w
hen
nish entering.
E.g., selecting 6.1
E.g., selecting 26.12
N
O
TE
:
If you do not have a particul
ar sub-channel
number you want to select, e
enter the main
channel number and then pr
ress
[O
K
]
. (I
f
the
main channel number is 1 dig
git, you should
press
[O
K
]
twice.) The STB aut
tomatically tunes
into the lowest sub-channel f
for the selected
main c
h
anne
l.
Pr
ess
[
ALT. CH
]
to return to th
e previously
vi
e
w
ed
c
h
a
nn
e
l
.
“NO SIGNAL appears after the
sub-channel
b
r
oadcast
i
s
o
v
e
r
.
16
E
N
Basic Operation
ration
Choosing Audio Language
You can c
h
ange
l
anguages w
h
en t
h
e c
h
anne
l
provi
d
es a
l
ternate
l
anguages
.
Press [AUDIO] repeatedl
y.
ENGLISH 1/4
OTHER 4/4
SPANISH 2/4
FRENCH 3/4
Audio lan
g
ua
g
e chan
g
es as
f
ollows
.
N
O
TE
:
O
THER” i
s
in
d
i
cated
w
he
n
the
l
anguage is not Eng
l
is
h
, Spanis
h
n
o
r Fr
e
n
ch.
For internationa
l
stations au
d
io
l
anguage wi
ll
sti
ll
b
e
d
isp
l
aye
d
as
Eng
l
is
h.
Picture Still
You can
f
reeze the image on the TV screen
.
P
ress
[
STILL
].
T
he ima
g
e on the TV screen will be paused
.
To
c
a
ncel
s
till m
ode
:
Press an
y
button except
[
STANDBY-ON
]
.
N
O
TE
:
T
h
e soun
d
output wi
ll
not
b
e
pause
d
.
I
f
no signal” is detected or protected
signa
l
is receive
d
d
uring sti
ll
mo
d
e,
t
h
e image remains pause
d
an
d
t
h
e
soun
d
output wi
ll
b
e mute
d
.
If the TV is left on STILL for a lon
g
period of time, the still image ma
y
cause a burn-in effect dama
g
in
g
the
TV
sc
r
ee
n
.
17
EN
Basic Operation
Channel Banner
The channel banner provides
y
ou with the information on the selected channel.
P
ress
[
DISPLAY
]
.
CC
3.1
50
SIGNAL
ENGLISH 1/2
TV-Y7 FV
SMILE ABC-XXX
RESTRICTED PROGRAM
TV-Y7 FV
Program title
Channel number :
Audio language
Station name
Signal strength :
Indicates the signal strength of
the current channel.
Program ratings :
Displays all the available ratings.
Active ratings are highlighted in
red.
Information Icons
LOCK:
Indicates that the current program
is blocked according to your V-chip
setting.
Indicates that the program being
broadcast is available with closed
captioning.
CC (Closed Caption):
To remove t
h
e c
h
anne
l
b
anner:
P
res
s
[
DISPLAY
]
.
Electronic Program Guide (EPG)
Electronic Program Guide (EPG) is the electronic equivalent o
f
a printed TV program guide.
You can view a list o
f
programs scheduled
f
or the next
f
ew hours up to the next seven da
y
s.
To displa
y
the correct information on “EPG”, TIME ZONE” and ”D.S.T must be set correctl
y.
1 Press [EPG] w
h
i
l
e watc
h
ing TV
.
CC
PREV NEXT
SMILE 2-1
SMILE 2-2
SMILE 2-3
12:00PM-1:00PM
3.1
EPG
SMILE Prog 2 ABC-XXX
Closed Caption :
Indicates that the program being
broadcast is available with closed
captioning.
Channel number
Program title
Time segment for the program.
“NOW” icon will be displayed on
the right for the current program.
Program description
Indicates that there is a program
information available for next or
previous program.
2
Se
l
ect t
h
e
d
esire
d
program using [
s
/
B
].
T
o
rem
o
ve t
h
e EPG
:
Pr
ess
[
EPG
]
.
N
O
TE
:
“EPG” will
be
c
l
ea
r
ed
a
f
te
r
5
min
utes.
F
or c
h
anne
l
num
b
ers wit
h
bl
an
k
d
escription, t
h
e
b
roa
d
casting station may not
p
rovide signals for “EPG”.
W
hen the program description consists o
f
more than 4 lines, use
[
K
/
L
]
to scro
ll
u
p /
d
own in t
h
e
l
ist
.
1
8
E
N
Advanced Operation
Operation
A
utoscan
(Rece
i
v
i
ng Channels
)
Autoscan receives available di
g
ital channels and
stores them in a channel ma
p.
CAUTI
O
N
:
I
f autoscan is skipped, digital channels ma
y
not
be received correctl
y
.
1 Press
[
SETUP
].
2
Se
l
ect CHANNEL using [
K
/
L
]
,
t
h
en press [OK].
3
Select AUTOSCAN” usin
g
[
K
/
L
]
,
then
p
ress [OK].
CHANNEL
EXIT
CHANNEL
TIME
DETAIL
INITIAL
ADD/DELETE
ANTENNA
AUTOSCAN
RF OUT
4 Se
l
ect AUTOSCAN” using [
K
/
L
]
,
t
h
en press [OK].
AUTOSCAN
EXIT
CHANNEL
TIME
DETAIL
INITIAL
AUTOSCAN will rescan all channels.
This may take a while to complete.
BACK
AUTOSCAN
AUTOSCAN
The system is now scanning.
12% Channel Found
EXIT
STB starts receiving avai
l
a
bl
e
d
igita
l
channels and stores them in the channel
nel
map.
When the scan
nning is complete,
AUTOSCAN CO
OMPLETED” will be indicated.
After autoscan
is complete, use
[
CH
K
/
L
]
to verify whethe
er STB is receiving channels
properl
y.
To cancel durin
g
scannin
g:
P
ress
[
SETUP
]
or
[O
K
]
.
N
O
TE
:
If canceled, some channels not
y
et scanned ma
y
not be received. We recommend completin
g
autosca
n
.
When
y
ou want to completel
y
re
f
resh the
c
h
anne
l
map,
d
e
l
ete a
ll
t
h
e c
h
anne
l
s, t
h
en
d
o
t
h
e autoscan again. See A
dd
ing/De
l
eting
Channels” on this page
f
or details
.
W
h
en “NO SIGNAL a
pp
ears on t
h
e TV screen
:
Verif
y
the antenna connection, then scan again
.
T
h
e STB tunes in c
h
anne
l
2-1 an
d
“NO SIGNAL
appears i
f
the STB could not receive any channels
.
A
dd
i
ng/Delet
i
ng Channels
Add or delete desired channels in the channel ma
p.
C
AUTI
O
N:
Y
ou
ca
nn
ot
r
eco
v
e
r
t
h
e
de
l
eted
c
h
a
nn
e
l
s
o
n
ce
the
y
are deleted unless
y
ou perform the
autoscan a
g
ain
.
1
Press
[
SETUP
]
.
2
Se
l
ect “CHANNEL usin
g
[
K
/
L
],
th
en
p
ress [OK]
.
SETUP
EXIT
CHANNEL
TIME
DETAIL
INITIAL
ADD/DELETE
ANTENNA
AUTOSCAN
RF OUT
3
Se
l
ect ADD/ DELETE” using [
K
/
L
]
,
th
en press [OK]
.
CHANNEL
EXIT
CHANNEL
TIME
DETAIL
INITIAL
ADD/DELETE
ANTENNA
AUTOSCAN
RF OUT
19
EN
Advanced
Operation
Add
4 With ADD” selected
,
enter the main
channel number
y
ou want to add,
then
p
ress [OK] or wait for a few
s
ec
o
n
ds
t
o
x the n
u
m
b
er
.
I
f
the main channel number is 1 digit, press
[
0
]
rst
.
N
O
TE
:
Enterin
g
su
b
-c
h
anne
l
num
b
er is not require
d.
5 Press [OK] a
g
ain to add the channel
to the channel ma
p.
E.g., a
dd
ing c
h
anne
l
6
(or leave for
a few seconds)
ADD/DELETE
6
10
20
58
EXIT
CHANNEL
TIME
DETAIL
INITIAL
ADD
DELETE
6.X
E.
g
., addin
g
channel 26
.
(or leave for
a few seconds)
ADD/DELETE
6
10
20
26
EXIT
CHANNEL
TIME
DETAIL
INITIAL
ADD
DELETE
26.X
Th
e se
l
ecte
d
c
h
anne
l
is now a
dd
e
d.
To continue addin
g:
Repeat steps 4 an
d
5
.
6 Press
[
SETUP
]
to exit
.
Delete
4
Select “DELETE” usin
g
[
K
/
L
]
,
then
p
ress [OK].
ADD/DELETE
10
20
26
56
EXIT
CHANNEL
TIME
DETAIL
INITIAL
ADD
DELETE
10.1
5
Select the channel number
y
ou want
to
d
elete
f
r
o
m the ch
a
nnel li
s
t
o
n the
r
i
gh
t usin
g
[
K
/
L
], t
h
en
p
ress [OK]
.
E
.g.,
d
e
l
eting c
h
anne
l
26.
ADD/DELETE
10
20
26
58
EXIT
CHANNEL
TIME
DETAIL
INITIAL
ADD
DELETE
26.1
ADD/DELETE
10
20
58
60
EXIT
CHANNEL
TIME
DETAIL
INITIAL
ADD
DELETE
58.1
The selected channel is no
ow deleted.
To continue
d
e
l
eting
:
R
e
p
eat ste
p
5
.
6
Press
[
SETUP
]
to exit.
20
E
N
Advanced Operation
Operation
Ad
j
ust
i
ng Antenn
a
You can verif
y
the signal strength of each channel
.
1 Se
l
ect a c
h
anne
l
to a
d
just using [t
h
e
Num
b
er
b
uttons] or [CH
K
/
L
].
2
Press
[
SETUP
].
3
Select CHANNEL usin
g
[
K
/
L
]
,
then
p
ress [OK].
4 Se
l
ect ANTENNA using [
K
/
L
]
,
t
h
en press [OK].
CHANNEL
EXIT
CHANNEL
TIME
DETAIL
INITIAL
ADD/DELETE
ANTENNA
ADD/DELETE
RF OUT
STB starts receiving the signal
f
or the
c
h
anne
l
.
5 By re
f
erring to the on-screen
in
d
ication, a
d
just t
h
e antennas
d
irection to get t
h
e
b
est reception
.
WEAK
STRONG
NOW
10
PEAK
50
ANTENNA
EXIT
CHANNEL
TIME
DETAIL
INITIAL
10.1
BACK
St
a
t
us
ba
r
:
Stretches to the ri
g
ht as the si
g
nal
stren
g
th
g
ets stron
g
er
.
Pea
k
in
d
icator
:
I
n
d
icates t
h
e
h
ig
h
est strengt
h
ever
reac
h
e
d.
T
o a
d
just ot
h
er c
h
anne
l
s
:
Select the channel usin
g
[
CH
K
/
L
]
, then ad
j
ust it
.
6
Press
[
SETUP
]
to exit
.
Select
i
ng D
i
splay Mod
e
You can ad
j
ust the aspect ratio of the digital T
V
program to  t
y
our 4:3 TV monitor
.
Display Mode
1
Press
[
SETUP
]
.
2
Select “DETAIL usin
g
[
K
/
L
]
,
then
p
ress [OK]
.
SETUP
EXIT
CHANNEL
TIME
DETAIL
INITIAL
CLOSED CAPTION
DISPLAY MODE
AUTO POWER DOWN
V-CHIP
4 HOURS
LETTERBOX
3
Select “DISPLAY MODE” usin
g
[
K
/
L
],
t
hen
p
ress [OK]
.
DETAIL
EXIT
CHANNEL
TIME
DETAIL
INITIAL
CLOSED CAPTION
DISPLAY MODE
AUTO POWER DOWN
4 HOURS
LETTERBOX
V-CHIP
4
Se
l
ect t
h
e
d
esire
d
d
isp
l
ay mo
d
e
u
s
i
ng [
K
/
L
]
, t
h
en press [OK].
*
Descriptions of each settin
g
s are explained
in the “Information on Displa
y
Mode” on the
next pa
g
e
.
Select display mode.
ZOOM
FULL
LETTERBOX
5
Press
[
SETUP
]
to exit.
  • Page 1 1
  • Page 2 2
  • Page 3 3
  • Page 4 4
  • Page 5 5
  • Page 6 6
  • Page 7 7
  • Page 8 8
  • Page 9 9
  • Page 10 10
  • Page 11 11
  • Page 12 12
  • Page 13 13
  • Page 14 14
  • Page 15 15
  • Page 16 16
  • Page 17 17
  • Page 18 18
  • Page 19 19
  • Page 20 20
  • Page 21 21
  • Page 22 22
  • Page 23 23
  • Page 24 24
  • Page 25 25
  • Page 26 26
  • Page 27 27
  • Page 28 28
  • Page 29 29
  • Page 30 30
  • Page 31 31
  • Page 32 32

Funai TB110MW9 - Digital to Analog TV Converter Box User manual

Category
TV set-top boxes
Type
User manual
This manual is also suitable for

Ask a question and I''ll find the answer in the document

Finding information in a document is now easier with AI