Page is loading ...

Assembly/User Guide
MVe
®
Chair
Single Pedal
Split Pedal

Recommended Use
Peak Pilates
®
strongly recommends consulting a physician for a complete medical exam before beginning any exercise program. Having a
complete medical exam is particularly important if the user has a family history of high blood pressure, has heart disease, is over the age of
45, smokes, has high cholesterol, is obese, or has not exercised regularly in the past year.
If, at any time while exercising, the user feels faint, dizzy, pain, or is short of breath, he or she must stop immediately.
Important: This manual contains important safety and usage information. Before beginning exercise, read the entire manual paying spe-
cific attention to all cautions and warnings. Obtain qualified instruction on the use of the Peak Pilates
®
MVe
®
Chair. Use only for the
intended exercise. Do not modify the machine. Modifying the machine in any way will nullify your warranty. Keep this guide handy for future
reference.
Unsafe or improper use of this equipment due to failure to read and comply with all requirements and warnings could result in serious
injury. Because Peak Pilates
®
cannot anticipate every situation and condition that can occur while using the Peak Pilates
®
MVe
®
Chair, we
make no representation concerning the safety of this equipment.
There are risks associated with the use of any exercise equipment. The user assumes the responsibility for those risks.
Congratulations on the purchase of your new MVe
®
Chair.
The Peak Pilates
®
MVe
®
Chair is a lightweight
and durable product that can be stacked as
tall as 5 high. Weighing just over 30 pounds, it
is easily moved and stored. To prevent damage
to the Chairs while stacking, place the Spring
Adjustment Slider in hole 4 (the top hole) and
rotate the Foot Pedal to the forward position (see
instructions for stacking and unstacking). Once
removed from the stack, the Foot Pedal must
be rotated back to the exercise position before
using. The Springs can then be adjusted to the
desired resistance level, 1-4.

Safety Statement
I
t is the responsibility of the purchaser of Peak Pilates
®
products to instruct all individuals, whether they are end users or supervising personnel, on the proper use
of the equipment.
Inspect the machine including Springs, Pull Pin, and Release Pins before use. DO NOT exercise on the machine if signs of excessive wear or other defects are
evident. DO NOT attempt to fix a defective machine. Instead, notify Peak Pilates
®
immediately.
DO NOT remove labels for any reason. They contain important information. If the labels are illegible or missing, contact your service representative for
replacements.
NOTE: We strongly recommend that all users of Peak Pilates
®
exercise equipment be informed of the following information prior to use:
Proper Use
1
. This equipment is only to be used as described by the manufacturer. It is imperative that the MVe
®
Chair be used properly to avoid injury.
2. Use only components provided by the manufacturer. DO NOT use parts or accessories or modify the machine in any way not approved by Peak Pilates
®
.
3. Keep a three foot area (about one meter) around the equipment clear of obstructions.
4. Make sure the machine is used on a level surface.
5. DO NOT use the machine with the Foot Pedal in the stacking position (base of Foot Pedal rotated toward the front of the Chair. See the instructions for stacking/
unstacking). Only use the machine when the Foot Pedal is in the functional (exercise) position (base of the Foot Pedal rotated toward the rear of the Chair).
Specific Operating Warnings
1. Keep your body and loose items such as clothing, hair, and jewelry away from moving parts.
2. Be certain that the Pull Pin for the Spring Adjustment Slider and the Release Pins for the Foot Pedal are fully engaged before beginning to exercise. If you are not
sure how to verify proper engagement, seek assistance.
3. Do not tip the machine during use.
4. Children must not be allowed near this machine. Teenagers and/or physically challenged individuals require supervision.
5. It is the purchaser’s sole responsibility to instruct end users and supervising personnel on the proper operating procedures of the MVe
®
Chair. We strongly
recommend that the end user’s physical condition be evaluated prior to beginning any exercise program.
N
ote: Understanding each and every warning to the fullest is critical. If any of these warnings are unclear, ask for clarification from
Peak Pilates
®
personnel.
Warranty
Congratulations on the purchase
of your new MVe
®
Chair. We warrant this machine to be free of manufacturing defects. Any parts that are repaired or replaced
under the terms of this agreement will be warranted for the remainder of the term of the original warranty.
This product carries a two year limited warranty on the frame structural components effective as of the invoice date of the original purchase.
All other components, with the exception of the upholstery and Foot Pedal foam and cover, are covered by a one year limited warranty effective as of the invoice date
of the original purchase. If a failure due to workmanship and/or materials occurs, we will, at our discretion, repair or replace the defective components. Upholstery
and the Foot Pedal foam and cover are warranted against defects in workmanship and/or materials for 60 days effective as of the invoice date of the original
purchase.
This warranty refers to the Peak Pilates
®
MVe
®
Chair and covers materials only. It remains in effect only under the following conditions:
1. This machine is not modified in any way.
2. The machine is only used as specified in the manual and in accordance with generally accepted Pilates exercise practices. Accidents, abuse, misuse or improper
service will not be covered under the provisions of this warranty.
This warranty only applies to the original purchaser of this equipment and is not transferable. All claims must be made within the relevant warranty period speci-
fied above. Warranties outside the U.S. may vary.

1. Carefully unpack and inspect the contents of the box. Use extreme care when cutting away
the packing materials as the cutting tool/tools can scratch the surface of the parts.
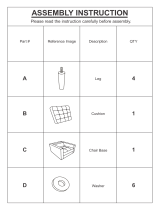
2. Verify that you have received all parts and hardware by checking what is included in the box
against the packing list below.
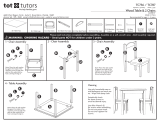
3. Place the Seat Cushion upside down on a protected surface. Lay the Spring Bracket in
the notch in the bottom of the seat with the short leg of the ‘L’ shape facing up. Fasten the
Spring Bracket using the (4) M6 x 1.0p x 20mm long socket head cap screws and Allen Wrench
provided. Start all screws first then go back and fully tighten.
4. With the legs of the ‘U’ shape facing up, place the Rear Leg over the Spring Bracket and
align its three holes with the respective holes in the bottom of the Seat Cushion. Note that the
Leg is symetric and does not have a specific left/right orientation.
5. Start one M10 x 1.5p x 25mm long socket head cap screw in each of the left and right side
holes of the Rear Leg. Also start the one M6 x 1.0p x 30mm long washer head socket head cap
screw in the center hole. Thread the screws but do not fully tighten at this time.
Assembly Instructions
Package Contents:
a. Base (Single Pedal or Split-Pedal)
b. Seat Cushion
c. Spring Bracket
d. Front Leg (the leg with the 2 Striker Plates)
e. Rear Leg
f. 2 Chair Springs
g. Hardware Pack including:
i. (4) M6 x 1.0p x 20mm long, socket head cap
screw
ii. (5) M10 x 1.5p x 25mm long socket head
cap screw
iii. (1) M6 x 1.0p x 30mm long washer head
socket head cap screw
iv. (4) M10 x 1.5p x 61mm long socket head cap
screws
v. (2) Long Spring Retaining Pin
Note: Split-Pedal option includes (2) Short and
(1) Long Spring Retaining Pins
vi. (2) E-Clips
Note: Split-Pedal option includes (3) E-Clips
vii. Assembly Tools
Split-Pedal Base
Assembly
Single Pedal Base
Assembly
a.
b.
e.
f.
i.
ii.
iii.
iv.
v.
vi.
vii.
c.
d.

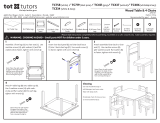
6. Place the Front Leg over its holes near the front edge of the Seat. Again the Leg is sy-
metric. Start one M10 x 1.5p x 25mm long sockethead cap screw in each of its three holes.
Thread the screws but do not fully tighten at this time.
7. Pick up the Base being careful to not allow the Foot Pedal to swing freely.
8. Place the Base upside down on top of the Legs. Be sure that the Base lies in the notches
at the ends of each of the Legs. Align the holes of the Base with the threaded inserts located
inside of the ends of the Legs. Fasten using the (4) M10 x 1.5p x 61mm long socket head cap
screws. Do not fully tighten any of the screws until all four are started.
9. Fully tighten the 6 screws securing the Legs to the Seat Cushion and the 4 screws secur-
ing the Base to the Legs.
10. While holding the Foot Pedal, carefully turn the Chair over on to its Base.
Note: Before assembling the Springs, verify that the Foot Pedal is in the exercise position
and not the stacking position. If you are not sure how to check the position of the Foot
Pedal, see the “Users Guide” below. Also, move the Spring Adjustment Slider/Silders to
Position 4, the top hole on the Slider Guide Bar.
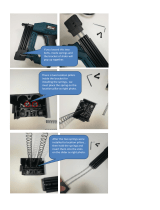
11. The Springs will be assembled to the Spring Adjustment Slider first. With the Foot Pedal
all of the way down against the floor, insert the loop at the end of each of the Springs into a
notch in the flange of the Spring Adjustment Slider. Insert the Retaining Pin into the cylindri-
cal end of the flange in the direction shown.
Note: The Split-Pedal option uses (1) short Retaining Pin for each Spring Adjustment Slider.
12. Locate the groove at the end of the Retaining Pin. Place the E-Clip so that its “ears” are
within the groove.
Note: The Split-Pedal option uses two E-Clips.

13. Tap the end of the E-Clip with the back of a screw driver, small hammer or other tool until
the clip snaps over and is fully seated within the groove of the Pin.
14. While holding the free ends, pull up on the Springs (the Foot Bar will follow) placing the
loops into the notches in the Spring Support Bracket located under the Seat. Insert the Spring
Retaining Pin.
15. To insert the E-Clip, repeat steps 12 and 13 above.
Warning: Verify that all E-Clips are fully engaged in their slots in the respective Spring
Retaining Pins before beginning any exercise.
Note: If you have to remove a Spring for any reason, simply use the tip of a flat blade
screwdriver and pry the E-Clip out of its groove (see photo).
The assembly of the Chair is now complete. If you have any questions or concerns,
please contact our Customer Service Representative at 800-847-7746.

TO ADJUST THE SPRING TENSION:
1. While holding the Spring Adjustment Slider cylinder with your left hand, pull the Pull Pin
with your right.
2. Slide the cylinder to the desired location on the Foot Pedal vertical tube. Note: The num-
ber for the locating hole will appear directly above the top edge of the cylinder.
3. Let go of the Pin allowing it to engage the desired locating hole.
Warning: Be sure that the Pin fully engages the locating hole before beginning exercise.
Note: The two Spring Adjustment Sliders on the Split-Pedal model can be adjusted inde-
pendantly providing a greater variety of resistance levels.
Adjusting the spring position
TO ENGAGE SINGLE PEDAL MODE (acts as a Single Pedal):
Note: “Right” and “Left” are defined as the user’s right or left when sitting on the Chair
with feet on the Foot Pedal.
1. Make sure that the two exercise springs are adjusted to the same postiion 1, 2, 3, or 4.
2. Completely withdraw the gray knob located on the left side of the Foot Pedal.
3. Rotate Clockwise (when facing the knob) as far as possible and release the knob.
Caution: Verify that the pin connecting the 2 halves of the Split-Pedal is fully engaged
before beginning exercise.
TO DISENGAGE SINGLE PEDAL MODE (Split-Pedal mode):
1. Completely withdraw the gray knob located on the left side of the Foot Pedal.
2. Rotate counterclockwise (when facing the knob) as far as possible and release knob.
Caution: Verify that the pin connecting the 2 halves of the Split-Pedal is fully retracted
into the left side of the Foot Pedal before before beginning exercise.
User Guide

Note: Before stacking a Split-Pedal Chair, verify that the pedals are engaged (see “TO ENGAGE
SINGLE PEDAL MODE” above).
1. Place the Spring Adjustment Slider/Sliders in position #4, the top hole in the Spring Adjust-
ment Slider Guide.
2. Pull the black handles located on the left and right sides of the Foot Pedal Pivot Bar
toward the center of the Chair and lift the Foot Pedal Assembly.
3. Rotate the Foot Pedal Pivot Bar toward the front of the Chair and drop it down against the
Pivot Bar Stops.
Caution: Be sure that the release pins on either side of the Foot Pedal Pivot Bar fully engage
their respective slots before stacking the chair.
TO STACK THE MVe CHAIR:

4. While standing in front, lift the Chair by grabbing the left and right
sides of the Seat.
5. Stack each Chair squarely on top of the one below. The base of the top unit
should contact the rubber strip on all 4 legs of the lower Chair.
TO UNSTACK AND PREPARE THE MVe CHAIR FOR USE:
1. While standing in front, lift the Chair by grabbing the left and right
sides of the Seat.
2. Lift the Chair off a base unit and place it on the floor.
3. Verify that the Spring Adjustment Slider/Sliders is in position #4, the top hole in
the Spring Adjustment Slider Guide.
4. Pull the black handles located on the left and ride sides of the Foot Pedal Pivot
Bar toward the center of the Chair and lift the Pivot Bar.
5. Rotate the Pivot Bar toward the rear of the Chair and drop it down against the
Pivot Bar Stops.
Caution: Be sure that the Release Pins on either side of the Pivot Bar fully engage
their respective slots before beginning exercise.
The Chair is now ready for use.
PERIODIC MAINTENANCE:
The Peak Pilates
®
MVe
®
Chair is manufactured using the highest grade materials and requires no periodic maintenance other than
cleaning. We recommend a mild detergent and water solution to clean the vinyl of the seat and the aluminum frame.
The Springs on the MVe
®
Chair must be inspected a minimum of once per month. If the coils show any signs of separating, they must be
im-mediately replaced. Regardless of whether the Spring coils show any signs of separation, the Springs need to be replaced by a
maximum of 12 months in use.
TO STACK THE MVe CHAIR:

Copyright © 2017 Mad Dogg Athletics, Inc. All rights reserved.
Peak Pilates
®
and the
MAD DOGG ATHLETICS, INC.
2111 Narcissus Court
Venice, CA 90291 USA
800.847
.7746
310.823.7008
MAD DOGG ATHLETICS EUROPE
Scheldeweg 3
3144 ES Maassluis
The Netherlands
+31.1059.04508
www.maddogg.com
www.peakpilates.com
/