Page is loading ...

OPERATIONS
MANUAL
pH1200
LABORATORY pH/mV/Temp Instrument
English, Español, Português

Item #601204REF
Rev A
October 2012
©2012 YSI Incc/Xylem Inc.
The YSI logo, YSI and Xylem are registered trademarks.
CONTENTS
Warranty ........................................................................................2
Getting started ..............................................................................3
Display ......................................................................................3
Keys ...........................................................................................4
Buffer Set Selection ......................................................................5
pH Calibration ...............................................................................6
Calibration with an ATC/Temp probe in the
pH-AUTOLOCK mode .............................................................6
Calibration with manual temperature compensation
in the pH-AUTOLOCK mode ..................................................7
Calibration with an ATC/Temp probe in the
pH-NON-AUTOLOCK mode ..................................................8
Calibration with manual temperature compensation
n the pH-NON-AUTOLOCK mode ......................................... 9
pH Measurements ........................................................................9
Measurement with an ATC/Temp probe in the
pH-AUTOLOCK mode .............................................................9
Measurement with manual temperature
compensation in the pH-AUTOLOCK mode ......................10
Measurement with an ATC/Temp probe
in the pH-NON-AUTOLOCK mode ......................................10
Measurement with manual temperature
compensation in the pH-NON-AUTOLOCK mode ............10
Temperature Measurements .....................................................11
mV Measurements ......................................................................11
Measurement in the mV-AUTOLOCK mode .......................11
Measurement in the mV NON-AUTOLOCK mode .............11
Troubleshooting .........................................................................12
Specifications ..............................................................................13
Accessories/Spare Parts .............................................................14
Recycling .....................................................................................14
Battery Disposal .....................................................................14
Contact Information ...................................................................15
Ordering and Technical Support .........................................15
Service Information ...............................................................15

1
2
WARRANTY
The YSI pH1200 instrument is warranted for two (2) year from date of purchase
by the end user against defects in materials and workmanship, exclusive of
batteries and any damage caused by defective batteries. pH1200 cable/
sensor assemblies are warranted for one (1) year from date of purchase by the
end user against defects in material and workmanship. pH1200 instruments &
cables are warranted for 90 days from date of purchase by the end user against
defects in material and workmanship when purchased by rental agencies for
rental purposes. Within the warranty period, YSI will repair or replace, at its
sole discretion, free of charge, any product that YSI determines to be covered
by this warranty.
To exercise this warranty, call your local YSI representative, or contact YSI
Customer Service in Yellow Springs, Ohio at +1 937 767-7241, 800-897-
4151 or visit www.YSI.com for a Product Return Form. Send the product and
proof of purchase, transportation prepaid, to the Authorized Service Center
selected by YSI. Repair or replacement will be made and the product returned,
transportation prepaid. Repaired or replaced products are warranted for the
balance of the original warranty period, or at least 90 days from date of repair
or replacement.
LIMITATION OF WARRANTY
This Warranty does not apply to any YSI product damage or failure
caused by:
• Failure to install, operate or use the product in accordance with
YSI’s written instructions;
• Abuse or misuse of the product;
• Failure to maintain the product in accordance with YSI’s written
instructions or standard industry procedure;
• Any improper repairs to the product;
• Use by you of defective or improper components or parts in
servicing or repairing the product;
• Modification of the product in any way not expressly authorized
by YSI.
THIS WARRANTY IS IN LIEU OF ALL OTHER WARRANTIES, EXPRESSED
OR IMPLIED, INCLUDING ANY WARRANTY OF MERCHANTABILITY
OR FITNESS FOR A PARTICULAR PURPOSE. YSI’S LIABILITY UNDER
THIS WARRANTY IS LIMITED TO REPAIR OR REPLACEMENT OF THE
PRODUCT, AND THIS SHALL BE YOUR SOLE AND EXCLUSIVE REMEDY
FOR ANY DEFECTIVE PRODUCT COVERED BY THIS WARRANTY.
IN NO EVENT SHALL YSI BE LIABLE FOR ANY SPECIAL, INDIRECT,
INCIDENTAL OR CONSEQUENTIAL DAMAGES RESULTING FROM
ANY DEFECTIVE PRODUCT COVERED BY THIS WARRANTY.

3
4
GETTING STARTED
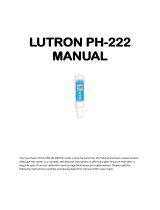
DISPLAY
1. HOLD
This will indicate that the
reading is frozen during
AUTOLOCK mode.
8. C°/F°
Temperature units.
2. WAIT
This will be displayed when
the unit is still waiting
for a stable reading.
9. AUTO
AUTOLOCK mode indicator.
(If the difference between a
reading at the first second
and tenth second is less
than 0.01 pH or 0.2 mV
then the instrument will
“lock” the tenth reading).
3. LOBAT
Low battery indicator. pH1200
uses 4 C-cell alkaline batteries.
The battery compartment is on
the bottom of the instrument
and can be accessed by
sliding the cover according to
the direction of the arrows.
10. mV
Measurement unit and
mode indicators.
4. MAN
Displayed if a temperature
probe is not connected.
11. pH
Measurement unit and
mode indicators.
5. ATC
ATC (Automatic Temperature
Compensation) indicator will
be displayed if a temperature
probe is connected.
12. EFF. / %
This will be displayed if the user
is viewing the efficiency of the
electrode. It is recommended to
use a new electrode when the
efficiency value is less than 75%.
6. CAL
This will be displayed
when the instrument enters
the calibration mode.
13. Buffer selection
This indicator will flash if the
unit is not yet calibrated. This
indicator will remain lit-up if
the unit has been calibrated.
7. SECONDARY DISPLAY
For temperature in
C° or F° display.
KEYS
Key
Description
On/Off
Press and hold this key for 5 seconds to power
on or turn off the instrument. Once the unit is
powered up, press the same key to turn on or off
the backlight.
Mode
Selects display mode. Pressing this key changes
the display sequentially to display pH-AUTO,
mV-AUTO, pH and mV. The calibration values will
not be affected by changing the display modes.
During pH calibration, press Mode key to exit
calibration mode.

5
6
Clear (not active in mV mode)
Used to clear the unit when an error signal
appears. It clears all calibration values stored in
the internal memory. Under normal use, the key
will not be activated unless pressed and held for
2 seconds to prevent accidentally erasing stored
memory.
When the “Clear” key is pressed, all segments
of the LCD will be on. After about 2 seconds the
unit will enter the pH-AUTO mode. The “AUTO”
and “CAL” will be on and one of the buffers in the
pre-selected buffer set will start to flash. The unit
must be calibrated again before use.
Up/Down
The two keys are used to manually enter the
temperature values. They have no effect on the
unit when operating in ATC mode.
Stand/Slope
The “Stand” and “Slope” keys are used for pH
calibration of the unit. Pressing and holding
the Stand key while turning on the power, will
change the buffer set.
Meas. / Effic.
This key is used to bring the unit out of the AUTO
condition when operating in the pH-AUTOLOCK
or mV-AUTOLOCK mode.
Press and hold this key for 3 seconds, the LCD
will display the efficiency of the electrode.
BUFFER SET SELECTION
The pH1200 has two buffer sets: 7.00, 4.01, 10.01 and 6.86, 4.00, 9.18.
The meter is factory pre-set to 7.00, 4.01 and 10.01. To change the
buffer set, turn off the unit, then press and hold the “Stand” key while
turning on the unit again.
Note: There is no need to repeat this procedure every time the unit is
powered up unless the buffer settings need changed.
p H CALIBRATION
The pH1200 can perform a one, two or three point calibration.
Note: If the unit uses two or three point calibration, the first point must
be 6.86/7.00. The second point can either be 4.00/4.01 or 9.18/ 10.01.
CALIBRATION WITH AN ATC/TEMP PROBE
IN THE PH-AUTOLOCK MODE
1. Turn the unit on. Press “Clear” key for 2 seconds, all LCD elements
will light up. The meter clears all calibration values stored in internal
memory.
2. Connect the pH electrode to the BNC connector and the ATC/Temp
probe to the ATC/Temp connector of the unit: “ATC” will light up.
“pH” and “AUTO” will light up. One of the buffers in the buffer set
will flash.
3. Rinse the pH and ATC/Temp probes in distilled water and immerse
them in the first buffer solution (6.86/7.00 if doing a multipoint
calibration). Allow temperature reading to stabilize, then press and
hold “Stand” key for 2 seconds to calibrate. The “WAIT” icon will
flash until the unit detects a stable reading. Once the unit calibrates
the first point, the selected buffer remains lit up while the remaining
two buffers flash. The unit is ready to be sloped at the second buffer.
Note: If the first buffer solution is 6.86/7.00, at this moment,
press the “Mode” key. The instrument will save the calibration and
exit the calibration mode. Single point calibration is complete. If
the first buffer solution is 4.00/4.01, 9.18/10.00, at this moment,
the instrument will save the calibration and automatically exit the
calibration mode. Single point calibration is complete.
4. Rinse the pH and ATC/Temp probe in distilled water and immerse
them in the second buffer solution (either 4.00/4.01 or 9.18/10.01).
Allow temperature reading to stabilize, then press “Slope” key to
calibrate. The “WAIT” icon will flash until the unit detects a stable
reading. Once the unit calibrates the second point, the selected two
buffers light up and the remaining buffer starts to flash. The unit is
ready to be sloped at the third buffer.
Note: At this moment, press the “Mode” key and the instrument will
save the calibration and exit the calibration mode. 2-point calibration
is complete.

7
8
5. Rinse the pH and ATC/Temp probe in distilled water and immerse
them in the third buffer solution (either 9.18/10.01 or 4.00/4.01).
Allow temperature reading to stabilize, then press “Slope” key to
calibrate. The “WAIT” icon will flash until the unit detects a stable
reading. Once the instrument calibrates the third point, the unit will
save the calibration and automatically exit the calibration mode.
3-point calibration is complete.
6. The unit calculates and compensates for the pH electrode slope
deviation corresponding to the values of the three calibration
buffers. After calibration, press and hold “Meas. / Effic.” key for
about 3 seconds to display the new electrode efficiency.
CALIBRATION WITH MANUAL TEMPERATURE
COMPENSATION IN THE PH-AUTOLOCK MODE
1. Turn the unit on. Press “Clear” key for 2 seconds, all LCD elements
will light up. The meter clears all calibration values stored in internal
memory.
2. Connect the pH electrode to the BNC connector of the unit, “MAN”
will light up. “pH” and “AUTO” will light up. One of the buffers in the
buffer set will flash.
3. Rinse the pH probes in distilled water and immerse it in the first
buffer solution (6.86/7.00 if doing a multipoint calibration). Adjust
the temperature reading to that of the first buffer using the “up”
or “down” keys (0.0 to 60.0 °C). Then press and hold “Stand” key
for 2 seconds to calibrate. The “WAIT” icon will flash until the unit
detects a stable reading. Once the unit calibrates the first point, the
selected buffer remains lit while the remaining two buffers flash. The
unit is ready to be sloped at the second buffer.
Note: If the first buffer solution is 6.86/7.00, at this moment, Press
the “Mode” key, the unit will save the calibration and exit calibration
mode. Single point calibration is complete. If the first buffer solution
is 4.00/4.01, 9.18/10.00, at this moment, the unit will automatically
exit the calibration mode. Single point calibration is complete.
4. Repeat steps 4-6 of “Calibration with an ATC/Temp probe in the
pH-AUTOLOCK mode” for dual and three point calibration.
CALIBRATION WITH AN ATC/TEMP PROBE
IN THE PH-NON-AUTOLOCK MODE
1. Turn the unit on. Press “Clear” key for 2 seconds, all LCD elements
will light up. The meter clears all calibration values stored in internal
memory.
2. Connect the pH electrode to the BNC connector and the ATC/
Temp probe to the ATC/Temp connector of the unit: “ATC” will light
up. Press “Mode” key to select “pH” mode. “pH” is on. One of the
buffers in the buffer set will flash.
3. Rinse the pH and ATC/Temp probes in distilled water and immerse
them in the first buffer solution (6.86/7.00 if doing a multipoint
calibration). Allow temperature and pH readings to stabilize, then
press and hold “Stand” key for 2 seconds to calibrate, the unit
immediately calibrates the first point, the selected buffer remains lit
while the remaining two buffers flash. The unit is ready to be sloped
at the second buffer.
Note: If the first buffer solution is 6.86/7.00, at this moment, press the
“Mode” key, the unit will save the calibration and exit the calibration.
Single point calibration is complete. If the first buffer solution is
4.00/4.01, 9.18/10.00, at this moment, the unit will automatically exit
the calibration mode. Single point calibration is complete.
4. Rinse the pH and ATC/Temp probe in distilled water and immerse
them in the second buffer solution (either 4.00/4.01 or 9.18/10.01).
Allow temperature and pH readings to stabilize, then press “Slope”
key to calibrate. The unit immediately calibrates the second point,
the other buffer solution will flash. The unit is ready to be sloped at
the third buffer.
Note: At this moment, press the “Mode” key, the unit will save the
calibration and exit the calibration. Dual point calibration is complete.
5. Rinse the pH and ATC/Temp probe in distilled water and immerse
them in the third buffer solution (either 9.18/10.01 or 4.00/4.01).
Allow temperature and pH readings to stabilize, then press “Slope”
key to calibrate. The unit immediately calibrates the third point and
the unit will automatically save and exit the calibration mode. Three
point calibration is complete.
6. The unit calculates and compensates for the pH electrode slope
deviation corresponding to the values of the three calibration
buffers. After calibration, press and hold “Meas. / Effic.” key for
about 3 seconds to display the new electrode efficiency.

9
10
CALIBRATION WITH MANUAL TEMPERATURE
COMPENSATION IN THE PH-NON-AUTOLOCK MODE
1. Turn the unit on. Press “Clear” key for 2 seconds, all LCD elements
will lit up. The meter clears all calibration values stored in internal
memory.
2. Connect the pH electrode to the BNC connector of the unit, “MAN”
will light up. Press “Mode” key to select “pH” mode. “pH” is on. One
of the buffers in the buffer set will flash.
3. Rinse the pH probes in distilled water and immerse it in the first
buffer solution (6.86/7.00 if doing a multipoint calibration). Adjust
the temperature reading to that of the first buffer using the “up” or
“down” keys (0.0 to 60.0 °C). Then press and hold “Stand” key for 2
seconds to calibrate. The unit immediately calibrates the first point,
the selected buffer remains lit while the remaining two buffers flash.
The unit is ready to be sloped at the second buffer.
Note: If the first buffer solution is 6.86/7.00, at this moment, Press the
“Mode” key, the unit will save the calibration and exit the calibration
mode. Single point calibration is complete. If the first buffer solution
is 4.00/4.01, 9.18/10.00, at this moment, the unit will immediately
save and exit the calibration mode. Single point calibration is
complete.
4. Repeat steps 4-6 of “Calibration with an ATC/Temp probe in the
pH-NON- AUTOLOCK mode” for dual and three point calibration.
p H MEASUREMENTS
To take pH measurements, the pre-selected buffer solution set must
light up, indicating the unit is single-, dual-, or three-point calibrated
and ready for measurements. If buffer solution set flashes, perform a
pH calibration before taking measurements.
MEASUREMENT WITH AN ATC/TEMP PROBE
IN THE PH-AUTOLOCK MODE
1. Connect the pH electrode to the BNC connector and the ATC/Temp
probe to the ATC/Temp connector of the unit. “ATC” will light up.
2. Press “Mode” key until “pH” and “AUTO” light up.
3. Rinse the pH electrode and ATC/temp probe with distilled water
and immerse in the sample. Remove air bubbles by shaking/stirring
the probe.
4. Press the “Meas.” key. “WAIT” will flash. The unit is waiting for a
stable reading. The display will track the pH value as sensed by the
pH electrode and the ATC/Temp probe.
5. When “WAIT” disappears, the reading is then in “HOLD” mode
and will not respond to further changes from the sample. The pH
value shown is the pH value of the sample at the displayed sample
temperature. Note: For samples that are inherently unstable, the
unit will not AUTOLOCK. In this case, use the pH-NON-AUTOLOCK
mode for measurements.
MEASUREMENT WITH MANUAL TEMPERATURE
COMPENSATION IN THE PH-AUTOLOCK MODE
1. Connect the pH electrode to the BNC connector of the unit. “MAN”
will light up. Set unit to display the sample temperature by pressing
the up and down keys (0.0 to 100.0 °C).
2. Repeat steps 2-5 of “Measurement with an ATC/Temp probe in
the pH- AUTOLOCK mode”.
MEASUREMENT WITH AN ATC/TEMP PROBE
IN THE PH-NON-AUTOLOCK MODE
1. Connect the pH electrode to the BNC connector and the ATC/Temp
probe to the ATC/Temp connector of the unit. “ATC” will light up.
2. Press “Mode” key until “pH” lights up.
3. Rinse the pH electrode and ATC/temp probe with distilled water
and immerse in the sample. Remove air bubbles by shaking/stirring
the probe.
4. Allow sufficient time for the display to stabilize. The instrument
will display the pH value of the sample at the displayed sample
temperature.
MEASUREMENT WITH MANUAL TEMPERATURE
COMPENSATION IN THE PH-NON-AUTOLOCK MODE
1. Connect the pH electrode to the BNC connector of the unit. “MAN”
will light up. Set unit to display the sample temperature by pressing
the “up” and “down” keys (0.0 to 100.0 °C).
2. Repeat steps 2-4 of “Measurement with an ATC/Temp probe in
the pH NON- AUTOLOCK mode”.

11
12
TEMPERATURE MEASUREMENTS
The pH1200 can measure temperature independently with the ATC/
temp probe without using the pH electrode. Place the ATC/temp
probe in the sample. The unit will display the measured temperature.
m V MEASUREMENTS
MEASUREMENT IN THE MV-AUTOLOCK MODE
1. Connect the optional combination ORP electrode to the BNC
connector of the unit.
2. Press “Mode” key until “mV” and “AUTO” light up.
3. Rinse electrode with distilled water and immerse in the sample.
Remove air bubbles by shaking/stirring the probe.
4. Press the “Meas.” key. “WAIT” will flash. The unit is waiting for a
stable reading. The display will track the mV value as sensed by the
ORP electrode
5. When “WAIT” disappears, the reading is then in “HOLD” mode and
will not respond to further changes from the sample. The mV value
is the sample reading.
Note: For samples that are inherently unstable, the unit will not
AUTOLOCK. In this case, use the mV-NON-AUTOLOCK mode for
measurements.
MEASUREMENT IN THE MV NON-AUTOLOCK MODE
1. Connect the optional combination ORP electrode to the BNC
connector of the unit.
2. Press “Mode” key until “mV” lights up.
3. Rinse electrode with distilled water and immerse in the sample.
4. Allow sufficient time for the display to stabilize. The instrument will
display the mV value of the sample.
TROUBLESHOOTING
Error on
Main
Display
Display
Possible cause(s)
Corrective Action(s)
"Er1" 1. “Stand” was pressed
before the electrode
and ATC/Temp probe
settled to within +/-1.5
pH of the buffer value.
2. pH electrode offset is
greater or less than +/-
1.5 pH.
3. pH electrode is faulty.
1. Press “Clear” key, allow
sufficient time for the
electrode and ATC/Temp
probe to stabilize, press
“Stand” again to start the
calibration procedure.
2. Replace the buffer and/
or the pH electrode.
Press “Clear” key to
recalibrate meter.
3. Replace electrode.
"Er2" 1. “Slope” was pressed
before the electrode
and ATC/Temp probe
settled to within 30%
of the buffer value.
2. Buffer 4.00, 4.01,
9.18 and 10.01
are incorrect.
3. pH electrode slope
is off by more than
30% of ideal slope.
1. Allow sufficient time for the
electrode and ATC/Temp
probe to stabilize, press
“Slope” key to continue the
calibration procedure.
2. Check if the correct
buffer is used.
3. Replace the buffer and/
or the pH electrode.
Press “Clear” key to
recalibrate meter.
"Er3" 1. Temperature is
out of the 0.0 to
60.0°C range.
1. Bring the buffer or sample
temperature within range.
"over" /
”undr”
1. Measured pH is
out of the 0.00 to
14.00 pH range.
2. Measured mV is out
of the –1999.9 to
1999.9 mV range.
3. Measured
temperature is
out of the 0.0 to
100.0°C range.
1. Bring sample pH into the
correct measuring range.
2. Bring sample ORP into the
correct measuring range.
3. Bring sample temperature
into the correct
measuring range.

13
14
ACCESSORIES/SPARE PARTS
Item Description
601201 pH Electrode, Lab, 1M
601202 Temperature Probe, Stainless Steel
601203 pH/ATC Temp Combination Probe, Lab, 1M
605170 Electrode stand
603824 pH buffer, assorted case of US buffers. 2 pints ea of
buffer 4, 7 and 10
RECYCLING
YSI is committed to reducing the environmental footprint in the course
of doing business. Even though materials reduction is the ultimate
goal, we know there must be a concerted effort to responsibly deal
with materials after they’ve served a long, productive life-cycle. YSI’s
recycling program ensures that old equipment is processed in an
environmentally friendly way, reducing the amount of materials going
to landfills.
• Printed Circuit Boards are sent to facilities that process and reclaim
as much material for recycling as possible.
• Plastics enter a material recycling process and are not incinerated
or sent to landfills.
• Batteries are removed and sent to battery recyclers for dedicated
metals.
When the time comes for you to recycle, follow the easy steps outlined
at ysi.com.
BATTERY DISPOSAL
The 1200 is powered by alkaline batteries which the user must remove
and dispose of when the batteries no longer power the instrument.
Disposal requirements vary by country and region, and users are
expected to understand and follow the battery disposal requirements
for their specific locale.
SPECIFICATIONS
Display Range Accuracy Resolution
pH 0.00 to 14.00 +/- 0.01 (instrument
only)
0.01 unit
Temperature 0.0 to 100°C +/- 0.2°C 0.1°C
mV -1999 to 1999
mV
+/- 0.05% +/- 1 digit 0.1 mV
Operating Temperature
Range
0 to 50°C (32 to 122°F)
Operating Relative
Humidity Range
up to 85%
Water resistance IP-65 water resistant, splash resistant
Size 150 mm x 203 mm x 72 mm
5.9 in. x 8 in. x 2.8 in.
Weight with batteries 504 grams (1.1 lb)
Input impedance
>10
13
Power Four 1.5 v C-size alkaline batteries
or 115/230V AC adapter
pH temp compensation Auto/Manual 0.0 to 100.0°C
pH buffer recognition Automatic recognition
US (4.01, 7.00, 10.01) or
NIST (4.00, 6.86, 9.18)
pH offset recognition +/- 1.50 pH
pH slope recognition 30%
Connector (pH/temp) BNC/8 pin DIN
Autolock feature Yes
Backlit Display Yes

15
16
CONTACT INFORMATION
ORDERING AND TECHNICAL SUPPORT
Telephone: 800 897 4151 (USA)
+1 937 767 7241 (Globally)
Monday through Friday, 8:00 AM to 5:00 ET
Fax: +1 937 767 9353 (orders)
+1 937 767 1058 (technical support)
Mail: YSI Incorporated
1725 Brannum Lane
Yellow Springs, OH 45387, USA
Internet: ysi.com
When placing an order please have the following available:
1.) YSI account number (if available)
2.) Name and phone number
3.) Purchase Order or Credit Card number
4.) Model Number or brief description
5.) Billing and shipping addresses
6.) Quantity
SERVICE INFORMATION
YSI has authorized service centers throughout the United States and
Internationally. For the nearest service center information, please
visit www.ysi.com and click ‘Support’ or contact YSI Technical Support
directly at 800-897-4151 (+1 937-767-7241).
When returning a product for service, include the Product Return form
with cleaning certification. The form must be completely filled out for a
YSI Service Center to accept the instrument for service. The form may
be downloaded from www.ysi.com by clicking on the ‘Support”.
ÍNDICE
GarantÍa .......................................................................................17
Cmo Empezar ...........................................................................18
Pantalla ...................................................................................18
Teclas ......................................................................................19
Seleccin del Juego de Soluciones Buffer ..............................21
Calibracin de pH ......................................................................21
Calibración con Sonda De ATC/Temp en el Modo
de Autobloqueo de pH ........................................................21
Calibración con Compensación de Temperatura
manual en el Modo de Autobloqueo de pH ......................22
Calibración con Sonda de ATC/Temp en el Modo
Sin Autobloqueo de pH ........................................................23
Calibración con Compensación de Temperatura
manual en el Modo sin Autobloqueo de pH ......................24
Mediciones De pH......................................................................25
Medición Con Sonda De ATC/Temp en el Modo
de Autobloqueo de pH ........................................................25
Medición Con Compensación De Temperatura
Manual en el Modo de Autobloqueo de pH ......................26
Medición Con Sonda De ATC/Temp en el Modo
sin Autobloqueo de pH .......................................................26
Medición con Compensación ce Temperatura Manual
en el Modo sin Autobloqueo de pH ....................................26
Mediciones de Temperatura .....................................................27
Mediciones de mV .....................................................................27
Medición en el Modo de Autobloqueo de mV ..................27
Medición en el Modo sin Autobloqueo de mV ..................27
Solucin de Problemas ..............................................................28
Especificaciones .........................................................................29
Lista de Piezas de Recambio Recomendadas .........................30
Reciclaje ......................................................................................30
Eliminacin de BaterÍas ........................................................30
Informacin de Contacto ..........................................................31
Pedidos y Servicio Técnico ...................................................31
Informacin De Mantenimiento y Reparaciones................31

Item #601204REF
Rev A
October 2012
©2012 YSI Inc./Xylem Inc.
/