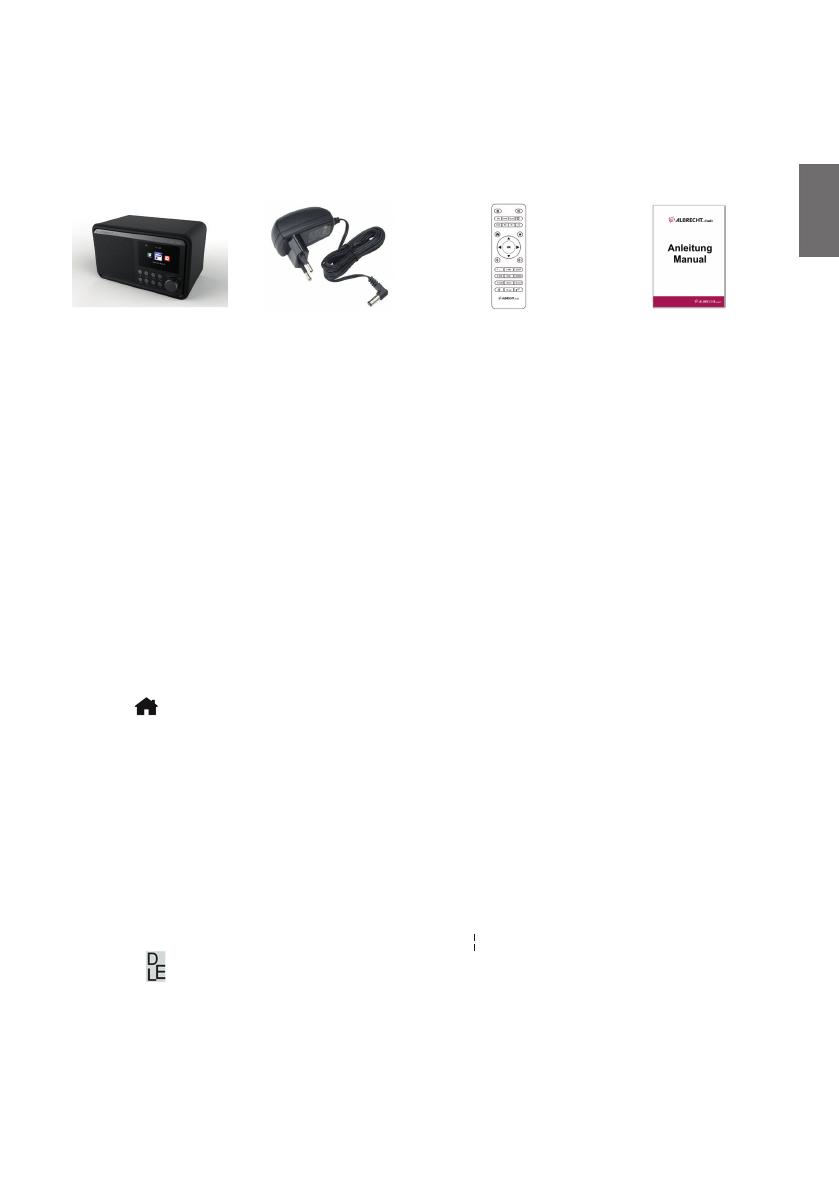
Instruction Manual
English
ALBRECHT DR 490
Internet and Digital Radio
28 English
English
1. Remote control
On/Off Turn the radio on or off (Standby)
Mute Mute the sound of the radio
EQ Equalizer Choose an equalizer setting
Local Local Stations
Shows the at the location available
stations
SCAN Search Automatic scan in DAB+ or FM mode
Alarm Open the alarm menu
DAB DAB Radio Start the DAB Radio
FM FM Radio Start the FM Radio
IR Internet Radio Start the Internet Radio
Weather Open the weather menu
HOME Go to the main menu
Favorites
Show favorite list
Long press: save favorite
Navigation up Move up through menus
Navigation left Go back to previous menu
OK
Enter Con rm a selection in the menu
Navigation right
Con rm a selection in the menu and go
to the next submenu
Navigation down Move down in menus
Volume - Decrease the volume
Volume + Increase the volume
0-9
Favorites 0-9 Recall a saved favorite station
Dimmer Select display background brightness
Sleep Timer
Activate the sleep timer
Long press: open sleep radio menu
29English
English
2. .Overview of DR 490 radio
30 English
English
2.1. Buttons and connections
On-Off Turns the radio on or off
Turning
Knob
Volume Turn the knob to change the volume
Navigation Turning the knob navigates through the menus
Con rmation Pressing the knob con rm the current selection
DC-IN Power supply Use the included wall adapter to connect to the mains
Scan Scan Scan for available DAB+ or FM stations
Home Opens the main menu
Left Go back to previous menu
Right Go to next submenu
Favorites Recall one of your saved favorites
Headphones 3.5mm connection for headphones
Local Local stations Shows the stations available at this location
Sleep
Sleep timer
Short press activates the timer. Repeated presses change the
timer.
Sleep radio Long press opens the sleep radio station list
2.2. Symbols in the display
Symbol Description Symbol Description
Connection is being established Mute
No Wi connection Search
Wi connected Alarm
Radio reception in mono Internet radio saved as favorite
Radio reception in stereo FM radio station saved as favorite
31English
English
3. Delivery content
The following accessories are included in the delivery:
1. DR 490 radio
2. Power supply
3. Remote control
4. First steps
4.1. Network requirements
Before using the DR 490, the following requirements must be met:
Broadband connection with a wireless access point, router or similar network device.
The network device must support WLAN (802.11b/g/n) wireless connection.
If you want to remotely control the DR 490 via DLNA, you will need a PC or smartphone
connected to the same network as the DR 490.
4.2. Preparing the network
Establish a WLAN connection as follows:
Make sure that the WLAN indicator on the wireless access point or router is lit.
Please refer to the corresponding user manual for further information.
Please note: WLAN allows data transmission over short distances up to 20 m without
cables. Walls or ceilings reduce the range of the WLAN connection. Therefore, place
the DR 490 and/or the access point within this distance as much as possible and avoid
obstacles between the devices.
4.3. Navigation through menus
With the
button, you can access the main menu of the DR 490 at any time.
Use the arrow buttons ◄ ► ▲ to move through the individual menus. Always con rm a selection
with the OK button. Use the ► button to go to the next menu and use the ◄ button to return to the
previous menu. The possible buttons are shown at the bottom right and left of the display.
4.3.1. Text entry
When you add the address of an online radio station or your wirless network key, you need to enter
text. It is the same procedure to set the time, date or the alarm.
To enter upper/lower case letters, symbols, or numbers:
1. Press the up/down navigation button to select a character from the following:
A a B b...Z z $ % & # _ ^ ~
“ ‘, . : ; ? ! * - + @ < = > {
} [ \ ] ( / )
0 1...9
2. Press the right navigation button ► to proceed to the next. Press the enter button when done.
NOTE: When entering numbers the numeric keys on the remote control can also be used.
32 English
English
4.4. Getting started
Connect the mains adapter to the back of the DR 490 and connect the mains plug to an electrical
outlet. Connect the supplied antenna to the antenna input on the back. Alternatively, connect your
antenna system/indoor antenna with the supplied antenna adapter.
When using the device for the  rst time, please select a language and a wireless network.
See Section 12.3 Network for detailed network con gurations.
You can set the network connection at the  rst start or later.
Press (On/Off) to enter standby mode. The time, date and active alarms are shown on
the display.
If you have set up the network connection and use the DR 490 again within the network, the
connection will be established automatically. If you would like to change the network, call up
Settings to change the corresponding connection.
Enter the network password using the keypad on the remote control or via and ▼. If the
desired character is displayed, press ► to navigate to the next entry. At the end of the input,
press OK to con rm. Alternatively, press ◄ to navigate to the previous entry.
33English
English
4.5. AirMusic Control App
The DR 490 can be controlled with your smartphone via WiFi. It is recommended to use the AirMusic
Control App. Additionally to controlling the radio, the app is able to play the smartphone’s music les
on the DR 490. Due to frequent updates of the app the manual is only available online. Please visit
www.alan-electronics.de and enter the article number 27490 into the search. You will  nd the
DR 490 product page. On the tab Downloads you will  nd the AirMusic Control Manual.
The app itself is available for Android and iOS. It can be downloaded from here:
Apple iOS
Android
5. Main menu
You can reach the main menu from any mode by pressing the Home button .
In the main menu you can select the following modes: Internet Radio, Media Center, FM, DAB+,
Information Center, Con guration and My mediaU (if activated, see chapter 7 My mediaU ).
6. Internetradio
To switch to Internet Radio mode, press , select Internet Radio and con rm with OK. After
connecting to a station, the logo of the station and information about the currently played song are
displayed.
6.1. My Favorite
Create a list of your favorite preset stations. The radio supports 250 favorite entries including
stations and folders.
To store a station, press and hold
and select the required memory with ▲/▼ and con rm with
34 English
English
OK. You may replace a previous saved station with a new one.
You can also save the station to your favorites while scrolling through the station list. When the
station is highlighted you can press to enter this menu where you can add the station to your
favorites.
When you choose Auto Scan, the radio introduces every station in the list by playing it for 30
seconds. This is stopped when every station is played or you press the OK button.
In the preset station list, move to your station, press OK to listen. You may also press to enter
its submenu to Delete, Shift Up/Down (move station to a different memory slot), Rename or Play.
6.2. Radio station / music
Stations are categorized into Global Top 20, Genre and Country/Location. Enter to continue the
subcategories and choose a station to listen.
6.3. Local Station
In this menu all stations of your local area will be displayed. You can set the local radio setup as
described in chapter 12.15. In the default setting the radio recognizes your location automatically.
6.4. Sleep radio
Select this option if you want to hear relaxing background sounds to fall asleep. You have a choice between:
Birds
Piano
Rain
Spa (relaxation)
Space
Wave (sea noise)
By pressing and holding the sleep timer button (only possible in Internet radio mode!), you can go
directly to the menu. If the device switches off automatically, the sleep timer must also be activated,
see Chapter 12.11 Sleep timer .
6.5. History
Shows you a list of last listened stations. It can save up to 10 history stations.
35English
English
6.6. Service
Search radio station - Enter your keyword to search radio station from the list.
Add new radio station - The added stations will be stored in My Favorite.
Tip: Loading the data from the server can take several seconds, especially if the WLAN connection
is poor, as long as blank appears on the display.
7. My mediaU
Display and playback your own mediaU station list on the mediaU server. Set your account  rst.
To activate your own station list, follow the steps below:
1. Access http://www.mediayou.net/
2. Join my mediaU membership
3. Login to the website
4. Enter the wireless MAC addresses of DR 490 to the mediaU website. This information can be
obtained in Information Center > System Information > Wireless Info
5. After successfully con guring, you are able to save and view your own mediaU station
playlist(s). Username and password are not required to enter to DR 490.
6. If there are different accounts stored in DR 490, you can choose the one you currently use
under Con guration menu.
After registration please turn off the radio and log in again.
Each time you have made any updates on the playlist from the website, go to Con guration
If enabled, My mediaU is displayed in the main menu.
If there are several mediaU accounts for the DR 490, select the default account with which you want
to log in. See Chapter 12.2 Manage my mediaU for more information about mediaU account setup.
36 English
English
8. DAB/DAB+ radio
The DAB radio mode receives DAB/DAB+ digital radio and displays information about the stations.
To switch to DAB mode, press
, select DAB radio and con rm with OK.
For the best playback quality, the antenna must be aligned in such a way that the highest signal
strength and thus the best sound quality are achieved. The icon at the top left of the display shows
the strength of the received transmission signal.
8.1. Scanning for stations
The  rst time you select the DAB radio mode the DR 490 automatically performs a full scan to see
what stations are available.
08:00 AM
DAB
Scanning...
00
...
Once the scan is complete, the radio shows a list of available stations. If you want to perform
another DAB station search later, press the ◄ button twice. If you want to overwrite the old station
list, select Yes. Select No to add new stations to the old station list or ESC to not perform the search.
8.2. Searching for and selecting stations
To switch to the next/previous station, press ▲/▼ on the remote control during music playback.
Alternatively, you can go to the complete station list with ◄. Here you can see an overview of all
available stations and select a desired station.
8.3. Station information and slideshow
Use the ► button to switch between the station information and the slideshow.
Station name
Radio text (DLS)
Genre
Sampling rate and bit rate
Signal strength
Channel/frequency
Multiplex name
8.4. Save favorites
To store a station, press and hold
and select the desired memory with ▲/▼ and con rm with OK.
37English
English
8.5. Recalling favorites
To recall a favorite, press , select the desired station with ▲/▼ and con rm with OK. Or just use
the numeric keypad.
In the favorites list, press the ► button to go to a menu to delete or move the saved station. Saved
stations cannot be saved again.
9. Media center
With the DR 490, you can play music tracks using UPnP or DLNA. The difference between the two
technologies lies in the direction of access.
The UPnP server can be accessed from the DR 490 and its music will be played back. Control and
navigation are done by the DR 490.
With DLNA, playback can be started on a PC, for example, and the DR 490 is only selected as a
playback device.
9.1. UPnP
To enjoy music streaming from your PC, the following steps are to be done on the PC:
Connect the PC to the network.
Ensure the DR 490 is powered on and connected to the same network.
Open the UPnP platform Windows Media Player (11 or later). Alternatively, other platforms or
server such as Windows Media Connection may be used
Allow to share your media to ALBRECHT DR 490 zu.
Add the audio  les and folders you want to share with DR 490 to the media library.
You may also enjoy the streaming music from other music server, such as smart phone (Android
platform):
38 English
English
Connect the mobile to the network
Search and install media sharing apps from Google Play.
Add the audio les from your mobile you want to share.
After setup the shared server, choose the music and control playback on the DR 490.
If you have set up shared media, you should see the shared media from UPnP. If you have more
than one computer sharing media, the alternatives are listed. Select the shared media you want to
play.
In the main menu, select Media Center and choose UPnP. It may take a few seconds for the radio
to complete the scan for available UPnP servers, especially when the WiFi connection is bad. If
no UPnP servers are found, it will show Empty. After a successful scan is done, select your UPnP
server.
The radio will show the media categories available from the UPnP server, e.g. ‘Music’, ‘Playlists’ etc.
Choose the media es that you wish to play.
Press /▼/◄/ on the remote control and OK to play or stop. to stop or play. Press ► to view the
display information of the playing track.
Tips: The radio can only read the track of le names with less than 40 characters. And the characters
should be in European language. If you encounter failure of reading the track under UPnP mode,
you may try to rename the le.
However, if the track is still unable to play, you can try converting the le to a different format.
9.1.1. My Playlist
You can create a playlist of favorite music from UPnP. When you play the music, press and hold OK
to save it into My Playlist.
9.1.2. Clear My Playlist
You can delete all tracks from the playlist
9.2. DLNA
The default device name for DLNA is "ALBRECHT DR 490". Alternatively, you can customise the
name individually (see Section ).
See Chapter 9.1 UPnP for information on how to set up media streaming from your PC or other
media servers. Also take a look at the instructions of your software or app.
The music les must be in MP3/AAC/AAC+/WMA/FLAC 32kbps->320kbps format for streaming via
the DR 490.
39English
English
10. FM radio
The FM radio mode receives analogue radio in the FM band and displays information from the
station if it is sent via RDS. For the best playback quality, the antenna must be aligned in such a way
that the highest signal strength and thus the best sound quality are achieved. The icon at the top left
of the display shows the strength of the transmission signal received from the device.
10.1. Setting the station
To switch to FM mode, press
and select FM.
Press and hold / ► to search for FM stations. The search is interrupted as soon as a station is
received.
Press ▲/▼ to set a station manually. Each search step is 0.05 MHz.
The radio can also perform a complete station search and save all found stations in the favorites.
Simply press OK in FM mode to start a full search of the complete FM band.
Attention: the complete scan will delete ALL your previously saved favorite stations!
10.2. Favorites
Press and hold
to save a station to your favorites. Select a memory slot and save the station
with OK.
Up to 20 stations can be saved. To recall a favorite, short press , select the desired station from
the list with ▲/▼ and con rm with OK. Alternatively a saved station can be recalled directly via the
numeric keypad.
11. Information center
11.1. Weather Information
There are weather information and forecasts for over 5000 cities. Select the country and then the
city for the weather details.
40 English
English
Press ◄/► to see the weather forecasts.
It is possible to display the weather information on the standby mode. On the weather information
page, press OK to set the city to be displaying on the standby mode. Then turn on the weather
display in Standby as mentioned in chapter „12.13. Weather“ auf Seite 46
11.2. Financial Information
View the stock index from around the world.
11.3. System Information
Check out the version of the system, and the details of connected network. The information includes
MAC address which you are required to  ll in when registration of my mediaU membership.
11.3.1. SW version
The software version of the device is displayed here.
11.3.2. Radio network info
It displays the following information:
Status (WLAN)
MAC address
SSID (router)
IP address
Subnet
Gateway
DNS1
DNS2
41English
English
12. Settings
12.1. Time Display
Choose the style of clock during standby mode: Analog or Digital.l
12.2. Manage my mediaU
When it is enabled, My mediaU will be shown in the main menu.
If various mediaU accounts exist in the DR 490, Select the default login account in here. Refer to
chapter 11 for more information of mediaU account setup.
.
12.3. Network
12.3.1. Wireless Network Confi guration
Enable / disable WiFi network. When you enable the WiFi network, the system will automatically
connect to the network
42 English
English
Select your required AP.
Enter WEP or WPA code to connect the WiFi.
If you would like to change/correct an entry , press ◄ to correct.
12.3.2.
Wireless Network (WPS)
If you are using a router with WPS/QSS button, you may set up the network connection simple via
WPS function. Enter it and go to press the WPS/QSS button on your router within 120 seconds. The
connection between the router and the DR 490 will then be con gured automatically.
12.3.3. Manual Confi guration
You can choose DHPC (which IP assigned automatically) or manually input IP address for wireless
43English
English
network connection.
When you select manual setting for wired connection, the followings have to be entered:
1. SSID (the name of Access Point);
2. IP Address;
3. Subnet Mask;
4. Default Gateway;
5. Preferred DNS Server;
6. Alternate DNS Server.
You may choose (Manage) speci c network if you have setup more than one network connection
within an area.
12.3.4. Check Network when Power On
“Enable / disable WiFi network”:
When you enable the WiFi network, the system will automatically search the available AP. Select
your required AP.
Enter WEP or WPA code to connect the WiFi.
If the wireless network connection is not existed or failed, the „No Wi connection“ icon will be
shown at the top left corner.
12.4. Date & Time
Press Set Date and Time and choose between Manual Setup and Auto Detect.
Setup the date and time
Set time format display as 12 Hour or 24 Hour (default). Only for manual setup required.
Set date format in the positions of YY (year), MM (month) and DD (day) – YY/MM/DD, (default)
or MM/DD/YY.
Turn on/off (default) the Daylight Saving Time (DST).Available only on manual setup
With a wireless network connected, GMT (+00:00) is the reference for time setting. Add or deduce
the hour according to your time zone when you set the time.
12.5. Alarm
44 English
English
You can choose between 2 regular alarms (Alarm 1 and Alarm 2) or the NAP Alarm in this menu.
Press
You can choose between 2 regular alarms (
on the remote control to enter the menu directly.
To set Alarm 1 or Alarm 2, press
and turn it on. Now choose the frequency (daily, once or
on speci c days of the week, e.g. Monday to Friday). Next choose the desired alarm source: Beep
tone, Melody, Internet Radio, FM Radio or DAB/DAB+ Radio. Afterwards you can leave the settings
by pressing
tone, Melody, Internet Radio, FM Radio or DAB/DAB+ Radio. Afterwards you can leave the settings
or ◄.
At the time of the alarm the radio connects to the Internet if the set network is available. Therefore
there may be some delay before the radio starts playing your station. If no network connection is
established within one minute, the alarm will change automatically to Melody.
If the NAP alarm is activated, it alarms once after 5/10/20/30/60/90/120 minutes depending on
which one you have set.
You may choose Alarm Volume to con gure the volume of the alarms. During the alarm the volume
will increase automatically up the set value (Crescendo function).
When an alarm is set, there will be a clock icon at the top of the display. The clock icon with alarm
time will also be displayed on the standby screen.
During alarm, press any key to enter snooze mode. It will alarm again after 5 minutes. Press the
key to stop the alarm.
12.6. Timer
Press ◄/► to set the timer, press OK to start. The timer will count down and play beep sound when
it reaches 00:00. To cancel the timer, enter the timer screen and press OK again. When the timer
is running, you can change the mode, the remaining time is then displayed in the top right of the
display.
12.7. Language
45English
English
Select the OSD language: English / Deutsch / Español / Français / Português / Nederlands /
Italiano / Pусский / Svenska / Norsk / Dansk / Magyar / Český / Slovenský / Polski / Türkçe / Suomi
12.8. Dimmer
Con gure the brightness of backlight on the display.
If you select Power Saving you can select the level to which the display is dimmed down when the
radio enters the Standby mode or when the radio gets no key input for 15 seconds.
The Turn On options keeps the display always illuminated. If you select it you can set the display
brightness.
See below table how the Dimmer settings will affect the screen illumination:
Choice Brightness level On Playing On Standby
Power Saving As you set
After 15s, the screen
brightness switches to
Power saving brightness
level you set
After 15s, the screen
brightness switches to
Power saving brightness
level you set
Turn On As you set
The screen stays always
on the set brightness level
After 15s, the screen
brightness switches to
Power saving brightness
level you set
12.9. Display
Choose the style of display: Color or Monochrome
46 English
English
12.10. Power Management
Choose the power management timer (5/15/30mins) to set the duration of the radio to switch to the
standby mode automatically when no network connection is available.
Choose “Turn off” to ignore the power management function.
12.11. Sleep timer
Turn off or set the sleep time to 15/30/60/90/120/150/180 minutes. Once the time is set, there will
be a bed icon with remaining minutes at the top right corner. The DR 490 will go to Standby once
the time runs out. Press Sleep on the remote control for the shortcut of this function. Pressing and
holding the button calls up the sleep radio, see Chapter 6.4 Sleep radio.
12.12. Internet Radio
In the menu Buffer you can con gure the buffer time of the music playback to 2/4/8 seconds.
In the menu Sound Quality you can choose between High and Low quality.
12.13. Weather
DR 490 is able to display current weather information under standby mode. Turn on Show on
Standby and set Temperature Unit (°C or °F) to get the weather displayed at the standby mode.
When it is turned on, the display will switch between time and weather while being in standby mode.
  • Page 1 1
  • Page 2 2
  • Page 3 3
  • Page 4 4
  • Page 5 5
  • Page 6 6
  • Page 7 7
  • Page 8 8
  • Page 9 9
  • Page 10 10
  • Page 11 11
  • Page 12 12
  • Page 13 13
  • Page 14 14
  • Page 15 15
  • Page 16 16
  • Page 17 17
  • Page 18 18
  • Page 19 19
  • Page 20 20
  • Page 21 21
  • Page 22 22
  • Page 23 23
  • Page 24 24
  • Page 25 25
  • Page 26 26
  • Page 27 27
  • Page 28 28
  • Page 29 29
  • Page 30 30
  • Page 31 31
  • Page 32 32
  • Page 33 33
  • Page 34 34
  • Page 35 35
  • Page 36 36
  • Page 37 37
  • Page 38 38
  • Page 39 39
  • Page 40 40
  • Page 41 41
  • Page 42 42
  • Page 43 43
  • Page 44 44
  • Page 45 45
  • Page 46 46
  • Page 47 47
  • Page 48 48
  • Page 49 49
  • Page 50 50
  • Page 51 51
  • Page 52 52
  • Page 53 53
  • Page 54 54
  • Page 55 55
  • Page 56 56
  • Page 57 57
  • Page 58 58
  • Page 59 59
  • Page 60 60
  • Page 61 61
  • Page 62 62
  • Page 63 63
  • Page 64 64
  • Page 65 65
  • Page 66 66
  • Page 67 67
  • Page 68 68
  • Page 69 69
  • Page 70 70
  • Page 71 71
  • Page 72 72
  • Page 73 73
  • Page 74 74
  • Page 75 75
  • Page 76 76
  • Page 77 77
  • Page 78 78
  • Page 79 79
  • Page 80 80
  • Page 81 81
  • Page 82 82
  • Page 83 83
  • Page 84 84
  • Page 85 85
  • Page 86 86
  • Page 87 87
  • Page 88 88
  • Page 89 89
  • Page 90 90
  • Page 91 91
  • Page 92 92
  • Page 93 93
  • Page 94 94
  • Page 95 95
  • Page 96 96
  • Page 97 97
  • Page 98 98
  • Page 99 99
  • Page 100 100
  • Page 101 101
  • Page 102 102
  • Page 103 103
  • Page 104 104

Ask a question and I''ll find the answer in the document

Finding information in a document is now easier with AI