Kohler K-8033-CP Installation guide
- Category
- Loudspeakers
- Type
- Installation guide
Page is loading ...

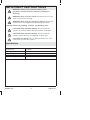
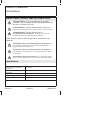
IMPORTANT INSTRUCTIONS
WARNING: When using electrical products, basic
precautions should always be followed, including the
following:
WARNING: Risk of electric shock. Disconnect power to the
audio source before servicing.
WARNING: Risk of injury or property damage. Please read
all instructions thoroughly before beginning installation.
NOTICE: Follow all plumbing, electrical, and building codes.
CAUTION: Risk of product damage. Do not install the
speakers in locations where they may become submerged.
CAUTION: Risk of product damage. Do not install the
speakers where they may be subjected to direct spray.
CAUTION: Fire hazard. Do not add insulation in the wall
cavity near or below the speaker.
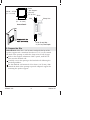
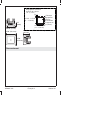
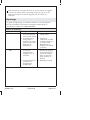
Specifications
Peak Power 135 Watts
Average Power 45 Watts
Frequency Response 85 Hz - 22 kHz
Nominal Impedance 4 Ohms
Ambient Temperature Max 122°F (50°C)
1070937-2-A 2 Kohler Co.

Thank You For Choosing Kohler Company
We appreciate your commitment to Kohler quality. Please take a few
minutes to review this manual before you start installation. If you
encounter any installation or performance problems, please don’t
hesitate to contact us. Our phone numbers and website are listed on
the back cover. Thanks again for choosing Kohler Company.
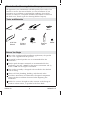
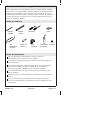
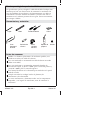
Tools and Materials
Before You Begin
Due to the varying possible installation applications, the speaker
wire is not supplied with this product.
12-16 AWG jacketed speaker wire is recommended for this
installation.
Female quick disconnect terminals are recommended for this
installation, (1) 0.187″ x 0.020″ for the positive connection and (1)
0.110″ x 0.020″ for the negative connection.
This speaker assembly is designed to be installed to the finished
wall or ceiling.
Observe all local plumbing, building, and electrical codes.
Read these instructions and determine all required components
along with their installation locations before beginning this
installation.
Kohler Co. reserves the right to make revisions in the design of
products without notice, as specified in the Price Book.
Pencil
Level
Screwdrivers
3/16" Hex
Wrench
Shims
Jigsaw
Silicone
Sealant
Propane
Torch
Solder
Kohler Co. 3 1070937-2-A

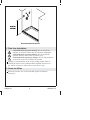
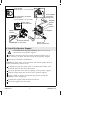
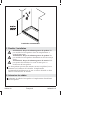
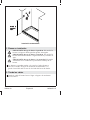
Roughing-In
Cutout
4-5/16" – 4-7/16"
(11 – 11.3 cm)
4-5/16" – 4-7/16"
(11 – 11.3 cm)
Cutout Detail
1/2" (1.3 cm) Min Clamp
Arm Clearance
1/4" (6 mm) Min
Support Overlap
Clearance
4-7/8" (12.4 cm)
4-5/16" (11 cm)
3-3/16"
(8.1 cm)
4-7/8"
(12.4 cm)
1/4"
(6 mm)
1070937-2-A 4 Kohler Co.

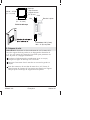
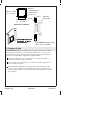
1. Plan Your Installation
CAUTION: Risk of product damage. Do not install the
speakers in locations where they may become submerged.
CAUTION: Risk of product damage. Do not install the
speakers directly across from any water spray.
CAUTION: Risk of property damage. Do not add insulation
in the wall cavity near or below the speaker.
Speakers can be mounted in the wall or ceiling, either inside or
outside the shower. The recommended installation location is in
the wall at ear level on either side of your shower arm.
2. Route the Wires
Route the speaker wire to the intended speaker installation
location(s).
Recommended Installation
Kohler Co. 5 1070937-2-A

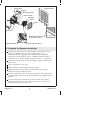
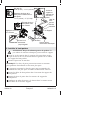
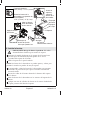
3. Prepare the Site
IMPORTANT! Allow for a 1/4″ (6 mm) overlap for the lip of the
speaker support and a minimum clearance of 1/2″ (1.3 cm) around
the back of the opening to enable the clamp arms to fully engage.
Refer to the rough-in information. With a pencil, mark the cut
lines onto the finished wall.
Carefully cut out the opening in the finished wall following the
penciled guidelines.
For thin finished wall materials of less than 3/16″ (5 mm), shim
around the back of the opening to provide adequate support for
mounting the speaker support.
1/4" (6 mm)
Cutout
Wall
Shim
Clamp Arm
Wall Support
Overlap
Cutout Detail
4-5/16" – 4-7/16"
(11 – 11.3 cm)
4-5/16" – 4-7/16"
(11 – 11.3 cm)
3/16" (5 mm) Min –
2" (5.1 cm) Max Depth
1070937-2-A 6 Kohler Co.

4. Install the Speaker Support
CAUTION: Risk of product damage. Do not use power
screwdrivers to install the support.
Thread the setscrews into the speaker support until the tops of
the setscrews are flush with the surface of the speaker support.
Measure the finished wall thickness.
NOTE: The clamp arms can be removed and turned upside down to
allow installation to thicker walls.
If appropriate, flip the clamp arms to accommodate thicker wall
materials. Refer to the above illustration.
Insert the speaker wires into the opening of the speaker support.
Tuck the clamp arms into the slots of the speaker support.
Apply a bead of silicone sealant into the groove around the
backside of the support lip.
Position the support with the drain slot down.
Insert the support into the cutout.
Flip clamp arms for thicker
wall material,
1-1/4" (3.2 cm) – 2" (5.1 cm).
Apply silicone
sealant.
Tuck clamp
arms into slots.
Support
Drain Slot
Thread setscrew
in until flush.
Do not use
power screwdriver.
Thinner Wall,
3/16" (5 mm) – 1-1/4" (3.2 cm)
Insert support
and untuck
clamp arms.
Speaker
Gasket
Cover
Gasket
Kohler Co. 7 1070937-2-A

Install the Speaker Support (cont.)
Turn the clamp arms so that they are perpendicular to the
opening.
Hand tighten the screws. Do not overtighten.
Wipe away any excess sealant from around the front of the
support. Use care not to get sealant on the outer surface of the
support.
1070937-2-A 8 Kohler Co.

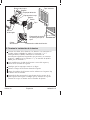
5. Complete the Speaker Installation
Connect the speaker wires to the speakers. Connections may be
made by soldering the wires to the appropriate ″+″ or ″-″
connection OR by using properly crimped, quick disconnect
receptacles (not provided); a 0.187″ x 0.020″ receptacle for the ″+″
connection and a 0.110″ x 0.020″ receptacle for the ″-″ connection.
Carefully feed the speaker wire through the support and into the
wall cavity.
Verify the gaskets are in place.
Slide the body of the speaker into the support.
Align the holes of the speaker with the holes in the support.
Secure the speaker with the screws.
Hook the top edge of the cover into the grooves in the top of the
support. Verify the holes in the bottom of the cover align with the
setscrews.
To secure the cover, unthread the setscrews from the support
through the holes in the cover until the setscrews are just past
flush with the surface of the cover.
Support
Drain Slot
Screw
Cover
Installed Cover
Cover Gasket
Cover Slots
Speaker
Speaker Gasket
Speaker Wires
Connect speaker wires.
Unthread the setscrews
to secure the cover.
Kohler Co. 9 1070937-2-A

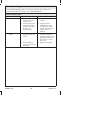
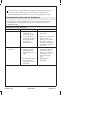
Troubleshooting
This troubleshooting guide is for general aid only. For service and
installation issues or concerns, call 1-800-4-KOHLER.
Troubleshooting Table
Symptoms Probable Cause Recommended Action
1. No sound. A. Speaker is not
connected to an
audio source.
A. Connect to an audio
source.
B. Connection to the
speaker from the
audio source may
be loose or
disconnected.
B. Check the wire
connections to the
speaker and audio
source. Reconnect or
replace wires as
needed.
2. The speaker
rattles.
A. Setscrews not fully
engaged with the
cover.
A. Unthread the
setscrews from the
speaker support and
through the holes in
the cover to secure
the cover.
B. Gasket behind
cover is missing or
damaged.
B. Replace the gasket.
1070937-2-A 10 Kohler Co.
Page is loading ...
Page is loading ...
Page is loading ...
Page is loading ...
Page is loading ...
Page is loading ...
Page is loading ...
Page is loading ...
Page is loading ...
Page is loading ...
Page is loading ...
Page is loading ...
Page is loading ...
Page is loading ...
Page is loading ...
Page is loading ...
Page is loading ...
Page is loading ...
Page is loading ...
Page is loading ...
Page is loading ...
Page is loading ...
-
 1
1
-
 2
2
-
 3
3
-
 4
4
-
 5
5
-
 6
6
-
 7
7
-
 8
8
-
 9
9
-
 10
10
-
 11
11
-
 12
12
-
 13
13
-
 14
14
-
 15
15
-
 16
16
-
 17
17
-
 18
18
-
 19
19
-
 20
20
-
 21
21
-
 22
22
-
 23
23
-
 24
24
-
 25
25
-
 26
26
-
 27
27
-
 28
28
-
 29
29
-
 30
30
-
 31
31
-
 32
32


Kohler K-8033-CP Installation guide
- Category
- Loudspeakers
- Type
- Installation guide
Ask a question and I''ll find the answer in the document
Finding information in a document is now easier with AI
in other languages
- français: Kohler K-8033-CP Guide d'installation
- español: Kohler K-8033-CP Guía de instalación
Related papers
-
Kohler K-638-K-NA Installation guide
-
-
-
-
-
-
-
-
-