Page is loading ...
caller ID / call waiting *
Digital answering system
with 3 mailboxs and
15 minutes record time.
90 name and number
caller ID memory
USER’S MANUAL
t2447
with Caller ID Digital Answering System
Cordless Phone System

1
When using your telephone equipment, basic safety precautions should always
be followed to reduce the risk of fire, electric shock and injury, including the
following:
1. Read and understand all instructions.
2. Follow all warnings and instructions marked on the product.
3. Unplug this product from the wall outlet before cleaning. Do not use liquid
cleaners or aerosol cleaners. Use a damp cloth for cleaning.
4. Do not use this product near water (for example, near a bath tub, kitchen sink,
or swimming pool).
5. Do not place this product on an unstable cart, stand, or table. The product may
fall, causing serious damage to the product.
6. Slots and openings in the cabinet and the back or bottom are provided for
ventilation. To protect it from overheating, these openings must not be blocked
by placing the product on the bed, sofa, rug, or other similar surface. This
product should never be placed near or over a radiator or heat register. This
product should not be placed in a built-in installation where proper ventila-
tion is not provided.
7. This product should be operated only from the type of power source indicated
on the marking label. If you are not sure of the type of power supply to your
home, consult your dealer or local power company.
8. Do not allow anything to rest on the power cord. Do not locate this product
where the cord will be abused by persons walking on it.
9. Never push objects of any kind into this product through cabinet slots as they
may touch dangerous voltage points or short out parts that could result in a
risk of fire or electric shock. Never spill liquid of any kind on the product.
10. To reduce the risk of electric shock, do not disassemble this product, but take
it to an authorized service facility. Opening or removing cabinet parts other
than specified access doors may expose you to dangerous voltages or
other risks. Incorrect reassembling can cause electric shock when the appli-
ance is subsequently used.
11. Do not overload wall outlets and extension cords as this can result in the risk
of fire or electric shock.
12. Unplug this product from the wall outlet and refer servicing to an authorized
service facility under the following conditions:
A. When the power supply cord or plug is damaged or frayed.
B. If liquid has been spilled into the product.
C. If the product has been exposed to rain or water.
D. If the product does not operate normally by following the operating
instructions. Adjust only those controls that are covered by the operat-
ing instructions, because improper adjustment of other controls may
result in damage and will often require extensive work by an autho-
rized technician to restore the product to normal operation.
E. If the product has been dropped and the cabinet has been damaged.
F. If the product exhibits a distinct change in performance.
Important Safety Instructions

2
Important Safety Instructions
13. Avoid using a telephone (other than a cordless type) during an electrical
storm. There may be a remote risk of electric shock from lightning.
14. Do not use the telephone to report a gas leak in the vicinity of the leak.
15. Only put the Handset of your telephone next to your ear when it is in normal
talk mode.

3
Enhanced 2.4GHz Technology - Dual Band transmission combines the best of
2.4GHz and 900MHz technologies, providing enhanced performance over stan-
dard cordless telephones.
Before You Begin

4
1. Base Unit
2. Handset
3. Base AC Power Adaptor
4. Telephone Line Cord
5. Battery
6. Belt Clip
7. User’s Manual
8. Base Wall Mounting Bracket
Parts Check List:
Before You Begin
To purchase replacement battery packs, call VTech Communications, Inc. at
1-800-595-9511. In Canada, call VTech Telecommunications Canada Ltd. at 1-
800-267-7377.
Base UnitHandset
Battery
Belt Clip
Telephone Line Cord
Base Wall
Mounting Bracket
User’s Manual

5
2
3
4
5
6
7
8
9
1
10
11
12
13
14
1. Antenna
2. Earpiece
3. LCD
4. Left and Right Arrow Keys
5. Phone/Flash Key
6. Dialing Keys (0-9,*,#)
7. Chan/Delete Key
8. Microphone
9. Headset Jack
10. Sel Key
11. Off Key
12. Hold Key
13. Redial/Pause Key
14. Prog Key
The Handset Layout
6
MODEL: 2447
VTECH TELECOMMUNICATIONS LTD.
MANUFACTURED IN CHINA
COMPLIES WITH 47 CFR PART 68
REGISTRATION NO.: US:EW7W901B24280
RINGER EQUIVALENCE: 0.1B USOC JACK: RJ11C, RJ11W
THIS DEVICE COMPLIES WITH PART 15 OFTHE FCC RULES. OPERATION
IS SUBJECT TOTHE FOLLOWING TWO CONDITIONS: 1)THIS DEVICE MAY
NOT CAUSE HARMFUL INTERFERENCE; AND 2) THIS DEVICE MUST
ACCEPT ANY INTERFERENCE RECEIVED, INCLUDING INTERFERENCE
THAT MAY CAUSE UNDESIRED OPERATION.
PRIVACY OF COMMUNICATIONS MAY NOT BE ENSURED WHEN USING
THIS PHONE.
HAC FCC ID: EW780-5298-B00
8
10
7
1
2
3
4
5
6
11
12
9
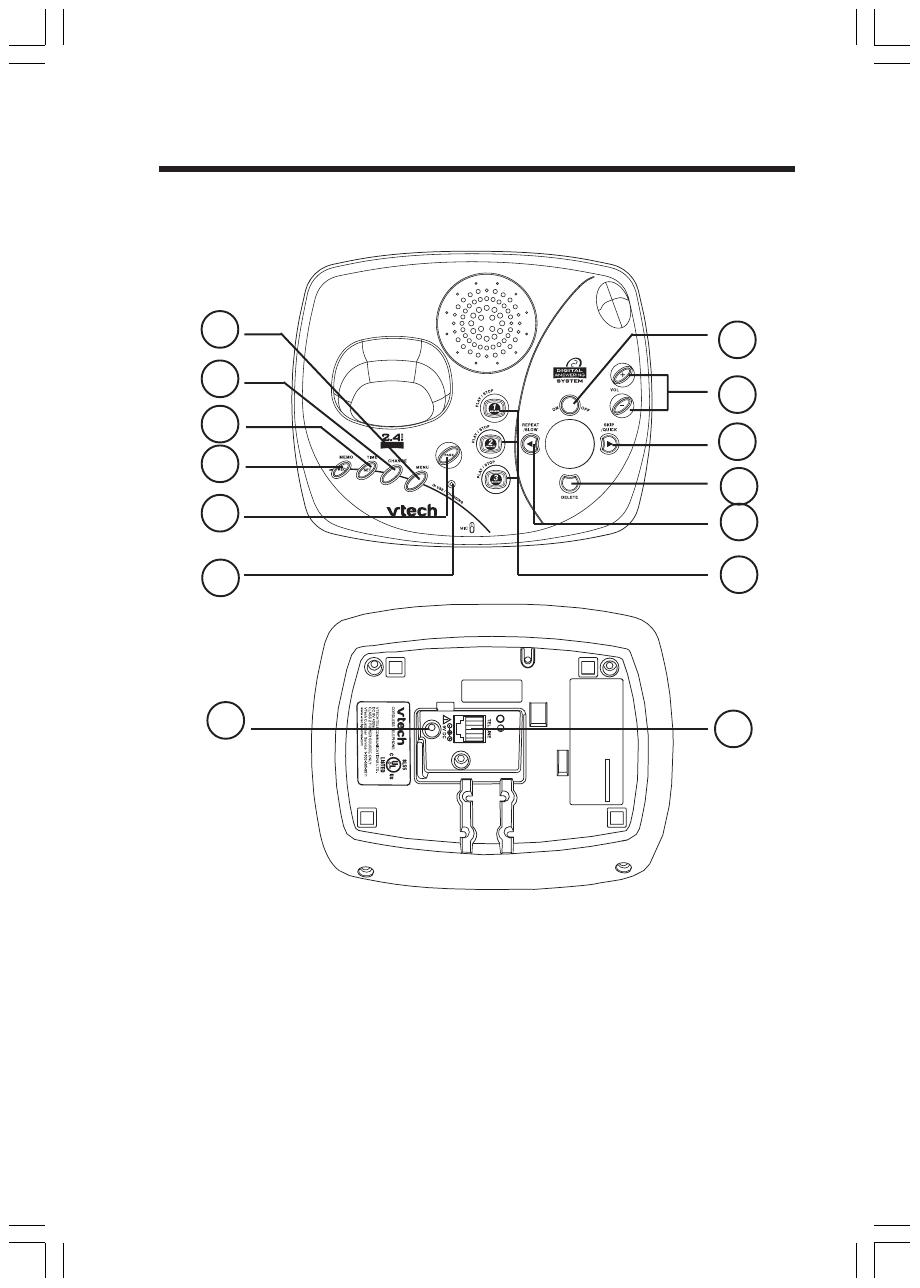
1. Menu Key
2. Change Key
3. Time/Set Key
4. Memo/Rec Key
5. Page Key
6. In Use/Charging Light
7. On/Off Key
8. Volume -/+ Keys
9. Skip/Quick Key
10. Delete Key
11. Repeat/Slow Key
12. Play/Stop (Mailbox) Keys
13. DC Connector Jack
14. Telephone Line Jack
The Base Unit Layout
13
14
7
Getting Started
Before You Install
1. Choose a location for the Base near an electrical outlet and a telephone
jack. This phone requires a modular telephone jack and a standard electri-
cal outlet (110V AC) not controlled by a wall switch.
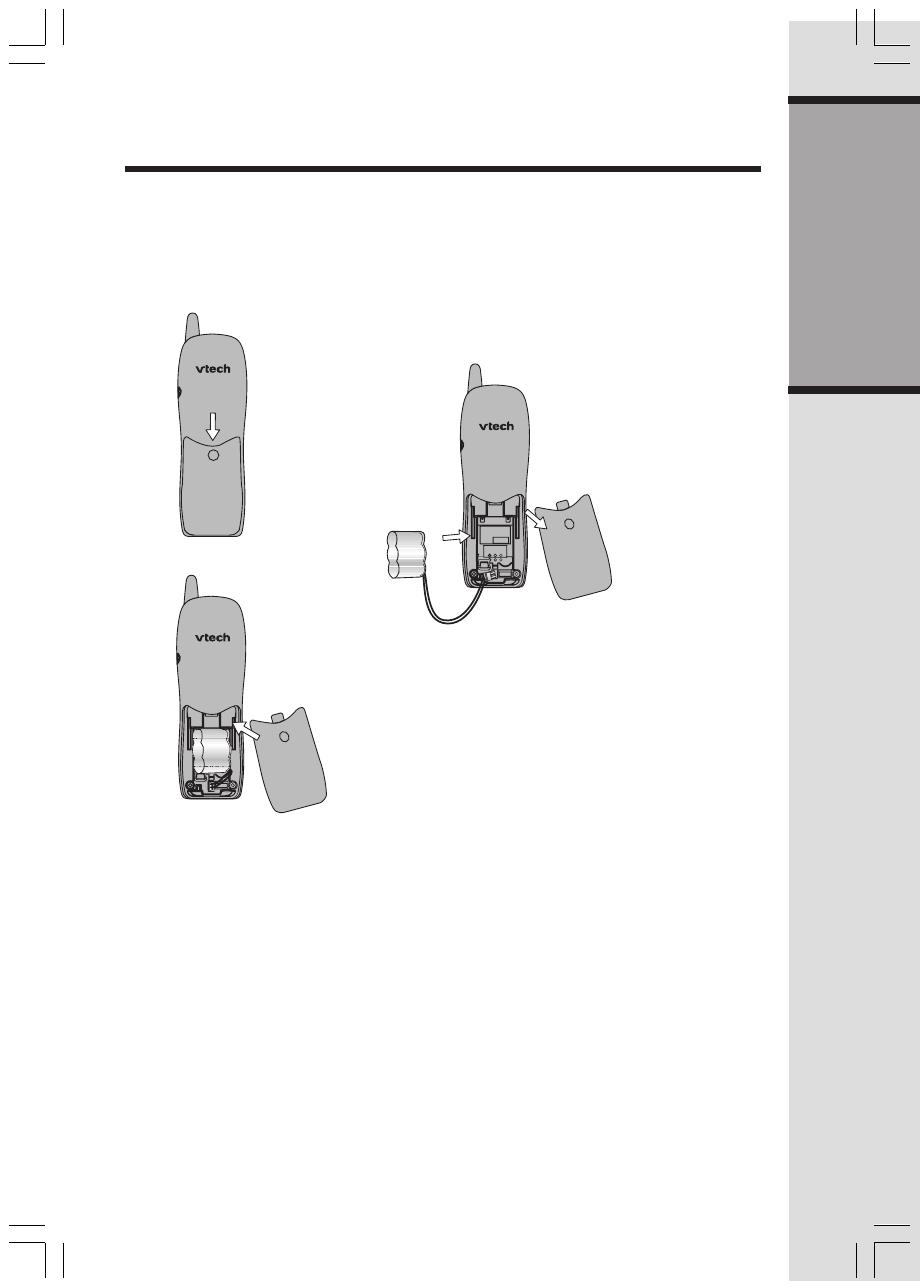
2. Install the Handset battery. Use only VTech batteries.
Installation
a) Remove battery
compartment cover
by pressing on the
indentation and slid-
ing downward.
b) Align the two holes in the plug with the
socket pins, then snap the plug into place.
c) Place the battery in the compartment with
the wires in the lower right corner. Angle
the top of the battery under the top claws
first, then snap the bottom of the battery
in. Place the wires under the guide, located
below the battery.
d) Replace battery compartment cover.
3. Plug the DC connectors to the Base. Plug the AC adaptors into an electrical
outlet. Connect the telephone line cord to the jack on the Base, and the other
end to a modular telephone jack, as illustrated on the next page.
4. Place the Handset in the Base. Charge the battery for 10-12 hours.

8
Getting Started
MODEL: 2447
VTECH TELECOMMUNICATIONS LTD.
MANUFACTURED IN CHINA
COMPLIES WITH 47 CFR PART 68
REGISTRATION NO.:US: EW7W901B24280
RINGER EQUIVALENCE: 0.1B USOC JACK: RJ11C, RJ11W
THIS DEVICE COMPLIES WITH PART15 OF THE FCC RULES. OPERATION
IS SUBJECT TOTHE FOLLOWING TWO CONDITIONS: 1)THIS DEVICE MAY
NOT CAUSE HARMFUL INTERFERENCE; AND 2) THIS DEVICE MUST
ACCEPT ANY INTERFERENCE RECEIVED, INCLUDING INTERFERENCE
THAT MAY CAUSE UNDESIRED OPERATION.
PRIVACY OF COMMUNICATIONS MAY NOT BE ENSURED WHEN USING
THIS PHONE.
HAC FCC ID: EW780-5298-B00
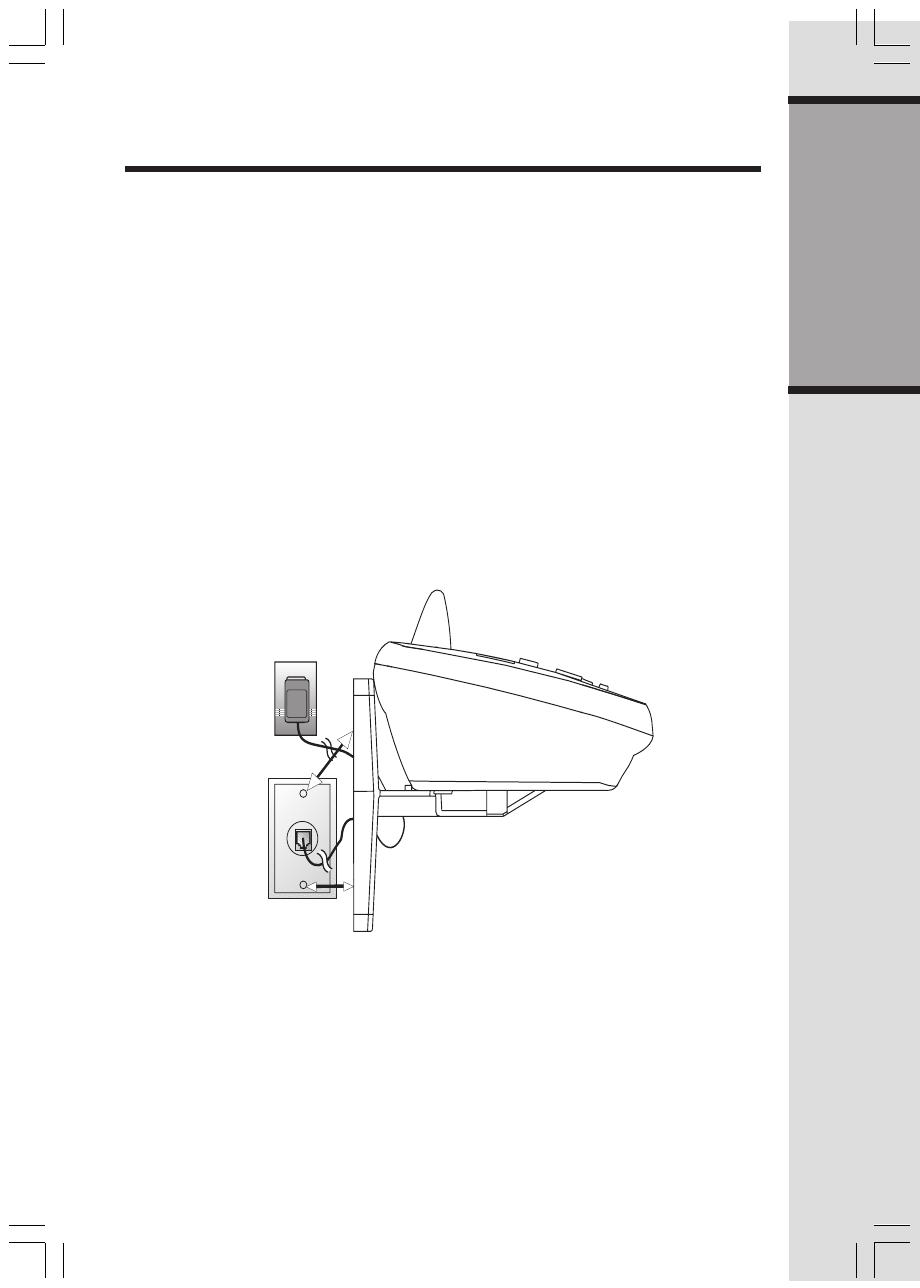
Installation
Connect the
power cord.
Connect the telephone
line cord
Table/Desk Installation
1. Check for Dial Tone
After the battery is charged, pick up the Handset and press PHONE, you should
hear a dial tone.
2. Set Time and Date
If you subscribe to Caller ID service, the date and time will be set automatically with
the first incoming call. If you do not have Caller ID service, you can set the date
and time manually.
• Press PROG, and then press or until DATE/TIME is displayed. Press
SEL.
• The month is flashing. Press or until the screen displays the correct
month. Press SEL.
• The day is flashing. Press or until the screen displays the correct day.
Press SEL.
• The hour is flashing. Press or until the screen displays the correct hour.
Press SEL.
• The minute is flashing. Press or until the screen displays the correct
minute. Press SEL.
• AM or PM is flashing. Press or to choose AM or PM. Press SEL.
9
Getting Started
Wall Mounting
The Wall Mount bracket is designed for use on standard wall mount plates only.
1. Run the power and telephone line cords through the slots in the bracket,
connecting them to the jacks located on the underside of the Base.
2. Plug the AC adapter into an electrical outlet. If the battery has not been
previously charged, place the Handset in its Base, and allow it to charge for
12 hours.
3. Connect the telephone line cord to the wall jack.
4. Line up the tabs on the wall mount bracket with the slots on the bottom of the
Base Unit. Snap the bracket firmly in place.
5. Mount the Base on the wall. Position the Base Unit so the mounting studs
will fit into the holes on the wall mount bracket. Slide the Base Unit down on
the mounting studs until it locks into place.
Installation

10
Basic Operation
Telephone Operation
End a Call
Press OFF
OR
Place Handset
in Base.
Exit
Programming
Cancel a page
Channel
Switch to a clear channel while
on a call.
Delete
While Handset is idle, press and
hold to delete all records in Call
Log.
When viewing the Call Log, press
to delete the current record dis-
played.
Handset Volume
Adjust the volume while on a call.
A double beep will sound4when
you reach the maximum or mini-
mum setting.
DIR
Press DIR when phone is not in
use to display phonebook en-
tries. While entering letters,
press to advance cusor.
CID
Press CID when phone is not
in use to display caller ID infor-
mation. When entering num-
bers or letters, press to delete
last character entered.
Select
Use SEL in conjunction with
PROG during Handset pro-
gramming.
Redial
Press PHONE, then press RE-
DIAL/PAUSE to call the last num-
ber dialed (up to 32 digits).
OR
Press REDIAL/PAUSE, then
press PHONE to the call last num-
ber dialed.
Press REDIAL/PAUSE twice to
delete the last number dialed
record with Handset idle.
Pause
Press REDIAL/PAUSE to inset a
dialing pause when enter num-
bers.
Hold
Press to put a call
on hold. Press again
to release hold.
OR
Lift the Handset of
an extension.
Answer a Call
Press any key
except OFF.
Flash/Call Waiting
If you have Call Waiting
service, you will hear a
beep if someone calls
while you are on a call.
Press PHONE/FLASH to
put your current call on
hold and take the new
call. Press this button at
any time to switch be-
tween calls.
Make a Call
Press PHONE, then dial
the number.
OR
Dial the number (use
to backspace and cor-
rect digits), then
press PHONE to call.
Program
Enter programming mode with Handset idle (on hook).

11
Basic Operation
Telephone Operation
Page
Press to page the Handset for up to 60
seconds. Press again, press OFF on
Handset or place Handset in Base to
cancel the page.
In Use/Charging
• Flashes in unison with the ring of an
incoming call.
• Flashes slowly when the Handset is in
use.
• Flashes rapidly when a call is on hold.
• Glows steadily when the Handset is
charging.
12
Basic Operation
Handset Ringer Style/Battery Save
You can select from four different Handset ringer styles, or turn the ringer off and
extend the battery life.
1. Make sure the Handset is off.
2. Press PROG.
3. Press until the screen displays RINGER:.
4. Press SEL. The current setting blinks, and you will hear a sample of the ring.
5. Press or to select RINGER:1, 2, 3, 4 or OFF. You will hear a sample of
each ring.
6. Press SEL to choose the displayed ringer setting.
Set Dial Mode
If you have touch tone service, the phone is ready to use as soon as the battery is
charged. If you have pulse (rotary) service, you'll need to change the dial mode.
1. Press PROG.
2. Press Until screen displays DIAL MODE & SETTING.
3. Press SEL. The current setting blinks.
4. Press
to display tone or pulse.
5. Press SEL.
Set Language
1. Press PROG to begin prgramming.
2. Press or until LANGUAGE is displayed.
3. Press SEL. The current setting blinks.
4. Press to display ENGLISH, ESPANOL or FRENCH
5. Preess SEL to select displayed language and exit.
Temporary Tone Dialing
If you have pulse (rotary) service only, you can change from pulse to touch tone
dialing during a call by pressing *TONE. This is useful if you need to send touch
tone signals for access to telephone banking or long-distance services.
1. Dial the number.
2. Press *TONE. Buttons pressed after this send touch tone signals.
3. After you hang up, the phone automatically returns to pulse (rotary) service.
Telephone Operation
Default setting: English
DIAL MODEL: TONEDIAL MODEL: TONE
DIAL MODEL: TONEDIAL MODEL: TONE
DIAL MODEL: TONE
ENGLISHENGLISH
ENGLISHENGLISH
ENGLISH
Default setting: Tone
13
Basic Operation
Telephone Operation
** RINGING **** RINGING **
** RINGING **** RINGING **
** RINGING **
CONNECTING...CONNECTING...
CONNECTING...CONNECTING...
CONNECTING...
PHONE ONPHONE ON
PHONE ONPHONE ON
PHONE ON
SCANNING...SCANNING...
SCANNING...SCANNING...
SCANNING...
** PAGING **** PAGING **
** PAGING **** PAGING **
** PAGING **
HOLDHOLD
HOLDHOLD
HOLD
BATTERY LOWBATTERY LOW
BATTERY LOWBATTERY LOW
BATTERY LOW
Screen Displays: When:
Display Screen Messages
There is a call coming in.
The Handset is waiting for a dial tone.
The Handset is in use.
The Handset is changing to another of the 30
channels available.
The Base is paging the Handset.
There is a call on hold.
The Battery needs to be recharged.
1. Displays and a sad tone sounds when the
Base power is off and PHONE is pressed.
2. Displays and a sad tone sounds when
Handset is out of range and an attempt to
dial is failed.
NO CONNECTNO CONNECT
NO CONNECTNO CONNECT
NO CONNECT
14
Basic Operation
1: 1
2: A B C 2
3: D E F 3
4: G H I 4
5: J K L 5
6: M N O 6
7: P Q R S 7
8: T U V 8
9: W X Y Z 9
0: 0
* *
#: & ’ , - . #
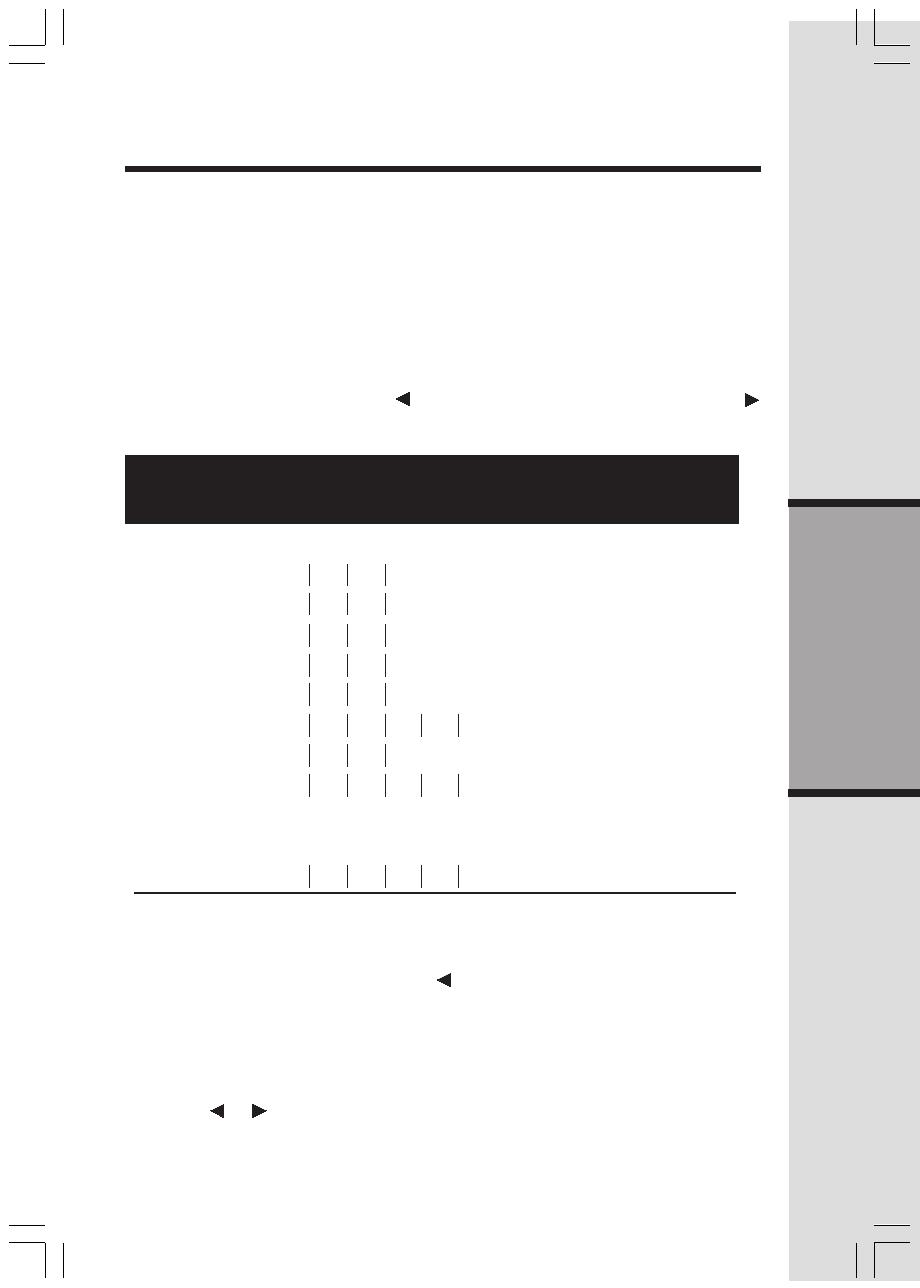
You can store up to 9 telephone numbers with names (up to 15 characters, 24 digits
each location) you dial frequently into the Speed dial memory locations you assign (1
though 9) in the Handset.
You can also store telephone numbers with names alphabetically in the directory. See
Telephone Directory for instructions.
NOTES:
1. The entries you store in Speed dial memory will be marked with 01 through
09 and also display in the directory.
2. Press OFF at any time to exit speed dial mode.
Store a Number/Name in Memory
1. Press PROG. Then press or until the screen displays SPEED DIAL.
2. Press SEL. The screen displays ENTER 1-9.
NOTE: When memory is full, the screen displays MEMORY FULL, an error tone
sounds, and you will not be able to store a new record until you delete a
stored record the speed dial memory or telephone directory.
3. Press the key (1 through 9) to assign the memory location for your entry. The
screen displays ENTER NAME.
NOTE: If the location is not empty, your new entry will be stored in place of the old
and will delete the former entry. Take caution to not save over entries you do not
wish to delete from memory.
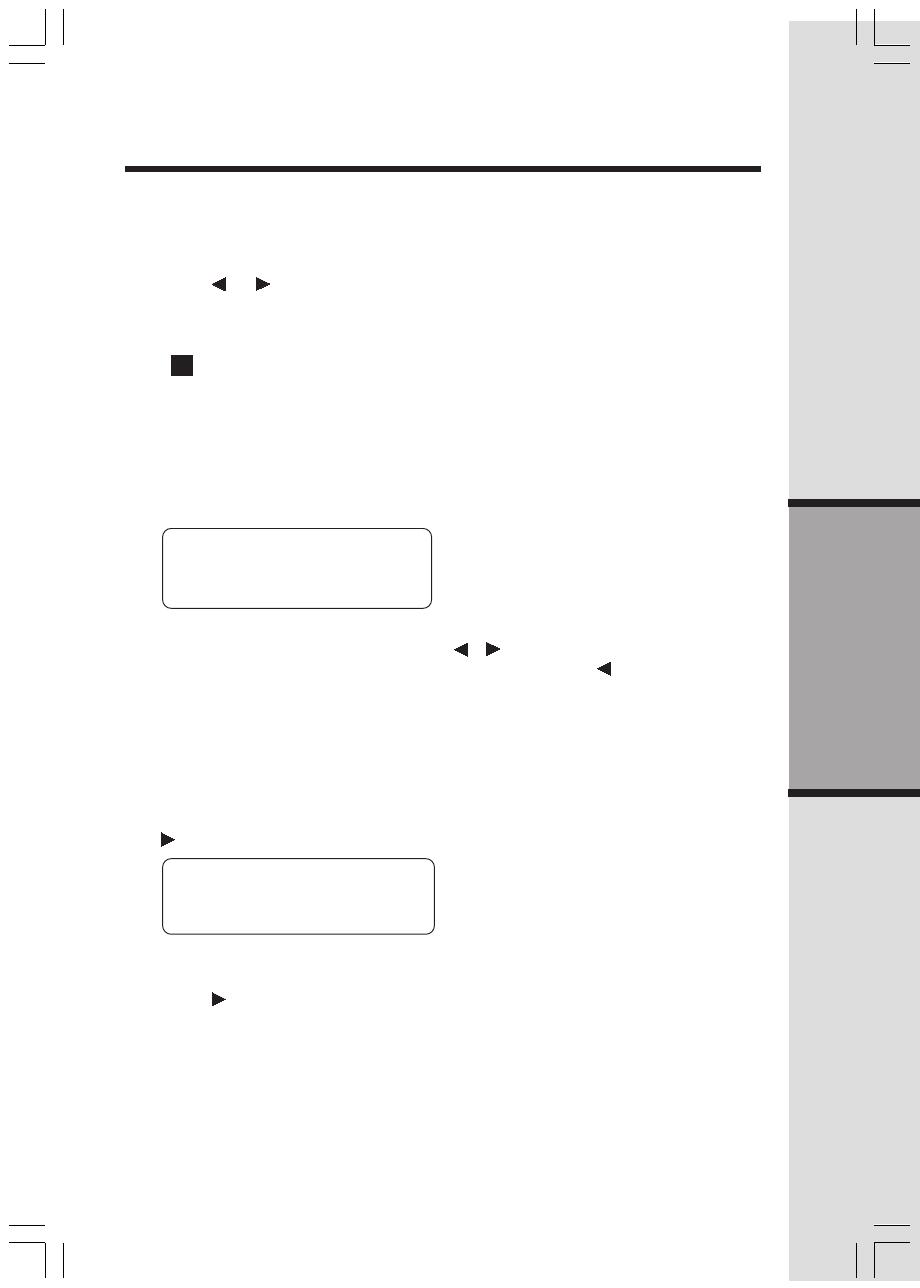
4. Using the chart below, enter up to 15 characters for the name you’re storing.
Use
to backspace and make corrections; use to add a space.
Speed Dial
5. When you finish entering the name, press SEL or PROG. The screen dis-
plays ENTER NUMBER.
6. Enter the telephone number. Use to backspace and make corrections.
Press REDIAL/PAUSE to enter a pause if necessary.
Presses
Dial Key 1 2 3 4 5 6
15
Basic Operation
Speed Dial
3. Press SEL. The screen displays ERASE NO YES and the number. The
current choice flashes.
4. Press until YES flashes.
5. Press SEL. You will hear a confirmation beep.
Dial a Speed Dial Entry
1. Press and hold the memory location key (1 through 9) of the entry you wish
to dial.
2. Press PHONE to dial.
— OR —
Press REDIAL/PAUSE to display the last number dialed from this phone.
7. Press SEL or PROG to store your entry. The screen displays DISTINCT
RING? and the current setting.
8. Press or to change the setting. Choose Y (yes) if you wish the phone
to alert you to calls from this number by assigning a distinctive ringer after
the first ring. Choose N (no) for a normal ringer.
9. Press SEL or PROG to confirm your selection. If you chose Y in step eight,
a
DD
DD
D will be displayed with the entry.
Edit a Number/Name Stored in Memory
1. Press and hold the memory location key (1 through 9) of the entry you wish
to edit.
2. When the screen displays the entry you want to edit, press SEL. EDIT flashes
in the screen.
SPEEDSPEED
SPEEDSPEED
SPEED
EDITEDIT
EDITEDIT
EDIT
ERASEERASE
ERASEERASE
ERASE
800-595-9511 800-595-9511
800-595-9511 800-595-9511
800-595-9511
3. Press SEL. The screen displays the name and number. The flashing cursor
appears at the end of the name. Use
, and the dial pad keys to edit the
name. Press SEL to move on to edit the number. Use to backspace and
make corrections. Press SEL to move on to edit the Distinctive Ring setting.
4. Press SEL to save the edited information.
Delete a Number/Name Stored in Memory
1. Press and hold the memory location key (1 through 9) of the entry you wish
to delete.
2. When the screen displays the entry you want to delete, press SEL. Then press
until ERASE flashes.
0101
0101
01
SPEED EDITSPEED EDIT
SPEED EDITSPEED EDIT
SPEED EDIT
ERASEERASE
ERASEERASE
ERASE
800-595-9511 800-595-9511
800-595-9511 800-595-9511
800-595-9511
0101
0101
01
16
Basic Operation
Reassign Locations in Memory
1. Press and hold the memory location key (1 through 9) of the entry you
wish to reassign.
2. When the screen displays the entry you want to reassign, press SEL.
Then press until SPEED flashes.
Speed Dial
SPEED EDIT ERASESPEED EDIT ERASE
SPEED EDIT ERASESPEED EDIT ERASE
SPEED EDIT ERASE
800-595-9511 800-595-9511
800-595-9511 800-595-9511
800-595-9511
0101
0101
01
3. Press SEL. The screen displays ENTER 1-9.
4. Press the keys (1 through 9) to reassign this entry into another speed dial
location. You will hear a confirmation beep.
17
Basic Operation
Your t 2447 can store 50 (including 9 speed dial entries) telephone numbers
with names (up to 15 characters for the name and 24 digits for the number).
NOTE: Press OFF at any time to exit the directory.
Store a Number/Name in the Directory
1. Press PROG. The screen displays DIRECTORY.
2. Press SEL. The screen displays ENTER NAME.
3. Using the chart below, enter up to 15 characters for the name you’re
storing with the number. Use to backspace and make corrections; use
to advance and add a space.
Telephone Directory
4. When you finish entering the name, press SEL or PROG. The screen dis-
plays ENTER NUMBER.
5. Enter the telephone number. Use to backspace and make a correction.
Press REDIAL/PAUSE to store a pause if necessary.
— OR —
Press REDIAL/PAUSE to display the last number dialed.
6. Press SEL or PROG. The screen displays DISTINCT RING? and the current
setting.
7. Press or to change the setting. Choose Y (yes) if you wish the phone to
1: 1
2: A B C 2
3: D E F 3
4: G H I 4
5: J K L 5
6: M N O 6
7: P Q R S 7
8: T U V 8
9: W X Y Z 9
0: 0
*
:
*
#: & ’ , - . #
Presses
Dial Key 1 2 3 4 5 6

18
Basic Operation
alert you to calls from this number by changing to a distinctive ringer after the
first ring. Choose N (no) for a normal ringer.
8. Press SEL or PROG to confirm your selection. If you chose Y in step 7, a D
will be displayed with the directory entry.
NOTE: When the memory is full the screen will display MEMORY FULL, an error
tone sounds and you will not be able to store a new number until you delete a
stored number to make room for another entry.
Edit a Number/Name Stored in the Directory
1. Press (DIR). The screen displays DIRECTORY.
2. Press or to scroll alphabetically through entries stored in directory.
— OR —
Press the dial pad key for the first letter of the entry you want to edit.
3. When the screen displays the entry you want to edit, press SEL. EDIT flashes
on the screen.
4. Press SEL. The screen displays the name and number. The flashing cursor
appears at the end of the name. Use , and the dial pad keys to edit the
name. Press SEL to confirm and move on to edit the number. Use to
backspace and make corrections. Press SEL to confirm and move to edit the
Distinctive Ring setting.
5. Press SEL to save the edited information.
Delete a Number/Name Stored in the Directory
1. Press (DIR). The screen displays DIRECTORY.
2. Press or to scroll alphabetically through entries stored in directory.
— OR —
Press the dial pad key for the first letter of the entry you want to delete.
3. When the screen displays the entry you want to delete, press SEL. Then
press until ERASE flashes.
4. Press SEL. The screen displays ERASE NO YES and the number. The
current choice flashes.
5. Press
until YES flashes.
6. Press SEL. You’ll hear a confirmation beep.
Telephone Directory
SPEED EDIT ERASESPEED EDIT ERASE
SPEED EDIT ERASESPEED EDIT ERASE
SPEED EDIT ERASE
800-595-9511 800-595-9511
800-595-9511 800-595-9511
800-595-9511
SPEED EDIT ERASESPEED EDIT ERASE
SPEED EDIT ERASESPEED EDIT ERASE
SPEED EDIT ERASE
800-595-9511 800-595-9511
800-595-9511 800-595-9511
800-595-9511

19
Basic Operation
Telephone Directory
Move a Number/Name to Speed Dial Memory
1. Press (DIR). The screen displays DIRECTORY.
2. Press or to scroll alphabetically through entries stored in directory.
— OR —
Press the dial pad key for the first letter of the entry you want to move.
3. When the screen displays the entry you want to move, press SEL. Then
press until SPEED flashes.
SPEEDSPEED
SPEEDSPEED
SPEED
EDIT ERASE EDIT ERASE
EDIT ERASE EDIT ERASE
EDIT ERASE
800-595-9511 800-595-9511
800-595-9511 800-595-9511
800-595-9511
4. Press SEL. The screen displays ENTER 1-9.
5. Press the key ( 1 through 9 ) to move this entry from the normal directory to
the Speed Dial memory and assign the memory location. You will hear a
confirmation beep. A memory location number ( 01 through 09 ) will be
displayed with this entry.
Dial a Number from the Directory
1. Press (DIR). The screen displays DIRECTORY.
2. Press
or to scroll alphabetically through entries stored in directory.
— OR —
Press the dial pad key for the first letter of the entry you want to dial.
Press
or to scroll through the contents.
3. When the screen displays the entry you want to dial, press PHONE.
/