
Rev1.10.23.14
rollator
andador
déambulateur
item # R726
www.drivemedical.comwww.drivemedical.com
EU Authorized Representative
Drive Medical LTD
Ainley’s Industrial Estate
Elland, West Yorkshire,
United Kingdom HX5 9JP
Rev1.10.23.14

Rev1.10.23.14
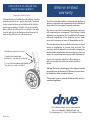
Always engage and disengage wheel locks on both sides
simultaneously.
1. To Slow Down or Come to a Temporary Stop — Pull
up slowly on the loop locks with four fingers until unit
slows down or comes to a temporary stop.
2. To Temporarily Lock Wheels in Position — Press down
on both loop locks with palms until you hear a “click”
that will tell you wheels are locked.
3. To Release Wheel Locks — Push up on both loop locks
with palms of hand to original position.
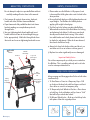
assembly instructions
Do not aempt to adjust or operate Rollator without
carefully reading all instructions in this manual.
1. First remove all contents from carton: backrest,
handle with tube, Rollator frame and Basket.
2. Open frame and slide padded backrest into frame
brackets making sure snap booms protrude
through holes.
3. Unscrew tightening knob from handle and insert
handle tube into frame at desired height lining up
holes appropriately. Slide bolts through holes from
the inside and screw on tightening knob until secure.
1. Please make sure the Rollator is fully opened, seat
is down and the folding bar under seat is locked in the
down position.
2. Be sure that both knobs are fully tightened and are at
equal heights. Test Rollator for stability before
applying full weight to hand grips.
3. Test the loop locks before operating the Rollator.
When wheels are locked (see illustrations for locking
and releasing locks below), lock bar on rear wheels
should prevent wheels from turning. If the wheels
turn while brakes are locked, please take unit back
to dealer for adjustment. When locks are released,
the wheels should turn freely.
4. Always lock loop locks before siing and do not use
seat when unit is on an incline or uneven ground.
5. Replace tires when significantly worn or damaged.
safety precautions
loop lock operation
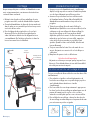
Orthodic
Hand Grips
Height
Adjustable
Wide
Comfortable
Seat
Folding
Hinge for
Portability
Loop Locks
Safest System
Available
Backrest
Hanging Bag for
Functionality &
Storage
R726BK
Shown
Important Safety Notice
Do not have anyone push you while you are seated on
the Rollator. This is a walking aid only and is not to be
used as a transportation device.

Rev1.10.23.14
lifetime limited
warranty
Your Drive branded product is warrantied to be free of
defects in materials and workmanship for the lifetime of
the product for the original consumer purchaser.
This device was built to exacting standards and care-
fully inspected prior to shipment. This Lifetime Limited
Warranty is an expression of our confidence in the mate-
rials and workmanship of our products and our assur-
ance to the consumer of years of dependable service.
This warranty does not cover device failure due to owner
misuse or negligence, or normal wear and tear. The
warranty does not extend to non- durable components,
such as rubber accessories, casters, and grips, which are
subject to normal wear and need periodic replacement.
If you have a question about your Drive device or
this warranty, please contact an authorized Drive
dealer.
Warning: The items and packaging in this shipment contain
chemicals known to the state of California to cause cancer,
birth defects or other reproductive harm.
*This product meets or exceeds all federal safety and envi-
ronmental regulations.
© 2014 Medical Depot, Inc. All rights reserved.
Drive is a trademark of Medical Depot, Inc.
Port Washington N.Y. 11050 USA Made in China
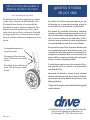
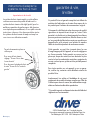
instructions to adjust the
hand brake system
Important Safety Notice
The hand brake system fied on this rallator complies
with the manufacturer’s quality standards. The hand
brake system has been preset (adjusted) to the best
performance seings. To beer suit you personally,
please follow the instructions set out below. You may
need to adjust the hand brake systems from time to
time as they will wear out with normal use.
Hold firmly in place do not turn.
To tighten the hand brake
adjustment. “turn the nut clockwise”
To loosen the hand brake adjustment.
“turn the nut counter clockwise”
Page is loading ...
Page is loading ...
Page is loading ...
Page is loading ...

Rev1.10.23.14
www.drivemedical.comwww.drivemedical.com
-
 1
1
-
 2
2
-
 3
3
-
 4
4
-
 5
5
-
 6
6
-
 7
7
-
 8
8


Drive Medical Aluminum Rollator 6" Caster Owner's manual
- Type
- Owner's manual
Ask a question and I''ll find the answer in the document
Finding information in a document is now easier with AI
in other languages
Related papers
-
Drive Medical Durable 4 Wheel Rollator Owner's manual
-
Drive Medical 1239RD Owner's manual
-
-
-
-
-
-
-
-
Drive Medical Nitro Aluminum Rollator 10" Caster Owner's manual
Other documents
-
Drive Rollator User manual
-
Drive Medical Design 10215RD-1 User manual
-
Medline MDS86800XW Operating instructions
-
-
Vermeiren Goliat User manual
-
-
Invacare DOLOMITE Legacy User manual
-
-
-
CareCo WA01084 User manual