Focusrite Platinum OctoPre Installation guide
- Type
- Installation guide

Digital
Option
OCTOPRE DIGITAL OPTION INSTALLATION GUIDE
The kit should contain: -
Qty Description
1 Digital card
5 Plastic support posts
1 Large nut and shakeproof washer (for BNC
connector)
2 440 UNC fixing posts (for 9-way 'D' sub
connector - AES option only)
Tools required: -
No. 1 crosshead screwdriver.
M3 nut driver/spanner.
16mm socket
WARNING!
THE MODULE SHOULD BE DISCONNECTED FROM THE
AC POWER BEFORE ATTEMPTING TO CARRY OUT THE
FOLLOWING INSTRUCTIONS.
ALLOW THE MODULE TO COOL BEFORE STARTING
INSTALLATION OF THE DIGITAL OPTION
ANTISTATIC PRECAUTIONS SHOULD BE TAKEN
WHEN HANDLING THE CARD OUTSIDE OF ITS
ANTISTATIC BAG; ONLY HANDLE THE CARD BY
GRIPPING THE CARD BY ITS EDGES AND AVOID
TOUCHING ANY OF THE COMPONENT PARTS
OTHER THAN THE CABLE AND CONNECTORS
PLACE THE UNIT ON A CLEAN FLAT SURFACE
Top Cover Removal
Remove the 10 crosshead screws securing the top cover.
Remove the top cover.
Digital Option Cover Removal
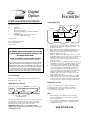
REAR PANEL
AC INLET
RICHCO SNAP CONNECTORS
The rear panel digital connector is accessed by removing the
two small rear cover plates. To remove the cover plates
push the 3 Richco snap rivet inserts from inside the unit,
then pull out the rivet body from the rear panel.
ATTENTION: If AES option is not installed retain the
smaller cover and two Richco snap rivets to replace after
installing digital card.
Installing Digital Card
REAR PANEL
DIGITAL
CARD
FIXING HOLES
J1
J2
J3
J4
BNC CONNECTOR 'D' SUB
1. First insert the five plastic support posts into the holes
provided in the main lower circuit board. These
push/snap into place.
2. Remove the large nut and shakeproof washer from the
BNC connector and the two 440 UNC fixing posts
from the 9-way ‘D’ sub connector on the card (if
installed – AES option only).
3. Offer the digital card to the inside of the unit to locate
the BNC and 'D' sub connectors to the rear panel. Line
up the five plastic support posts to the holes in the
digital card and push the card down onto the posts to
snap into position.
4. Ensure the card is not touching any of the capacitors on
the OctoPre. If necessary, carefully bend the capacitors
so that they clear the underside of the digital card.
5. Fix the large nut and shakeproof washer to the BNC
connector and tighten. If the AES 'D' sub connector
option is installed, locate the two fixing holes and
secure the 'D' sub connector with the two 440 UNC
fixing posts and tighten. If the AES option is not
installed, replace the smaller cover plate and secure
with original snap rivets.
6. Finally, connect the 10-way ribbon cable J3 (on digital
card) to the J4 connector on the main lower circuit
board, and the 10-way ribbon cable J2 (on digital card)
to the J1 connector on the main upper circuit board.
Replacing the Top Cover
The top cover should now be replaced, using the 10
crosshead screws, to secure it firmly to the chassis.
The installation is now complete and the unit can be
reconnected to the AC power.
Notes
• When syncing to an external clock the sampling
frequency should be set to match between the two
pieces of equipment.
• If you experience any difficulties installing this digital
option please contact Focusrite technical support at
www.focusrite.com
-
 1
1

Focusrite Platinum OctoPre Installation guide
- Type
- Installation guide
Ask a question and I''ll find the answer in the document
Finding information in a document is now easier with AI
Related papers
-
Focusrite Scarlett Octopre Getting Started
-
-
-
-
-
-
Focusrite Platinum TrakMaster Pro User guide
-
Focusrite Clarett 8PreX Owner's manual
-
-
Focusrite OctoPre MkII User manual
Other documents
-
Focusrite Pro ISA 828 Eight Channel Pre Optional ADC Installation guide
-
Crathco / Grindmaster Model 3311 User manual
-
Crathco 3311 Manual User manual
-
Beverage-Air GRINDMASTER 3311 User manual
-
Tektronix WVR7100 Series Instructions Manual
-
Tektronix WFM8300 User manual
-
Focusrite Pro ISA ADN2 User guide
-
-
-
Tektronix WVR8200 Instructions Manual