


ThinkCentre
Hard ware Maintenan ce Manual

Note
Before using this information and the product it supports, be sure to read and understand the Chapter 2, “Safety
information,” on page 3 and “Notices,” on page 329.
First Edition (February 2010)
© Copyright Lenovo 2010.
LENOVO products, data, computer software, and services have been developed exclusively at private expense and
are sold to governmental entities as commercial items as defined by 48 C.F.R. 2.101 with limited and restricted
rights to use, reproduction and disclosure.
LIMITED AND RESTRICTED RIGHTS NOTICE: If products, data, computer software, or services are delivered
pursuant a General Services Administration ″GSA″ contract, use, reproduction, or disclosure is subject to restrictions
set forth in Contract No. GS-35F-05925.

Contents
Chapter 1. About this manual .....1
Important safety information .........1
Important information about replacing RoHS
compliant FRUs .............2
Chapter 2. Safety information .....3
General safety ..............3
Electrical safety .............3
Voltage-selection switch...........5
Safety inspection guide ...........5
Handling electrostatic discharge-sensitive devices . . 6
Grounding requirements ..........7
Safety notices (multi-lingual translations) .....7
Chapter 3. General information ....39
ThinkVantage Productivity Center .......39
Additional information resources .......39
Specifications ..............40
For machine types: 3029, 3054, 3139, 3219, 3246,
3282, 3349, 3421, 3544, 3652, 3769, 3934, 4992,
5206, 5267, 5325, 5384, 5450, 5474, 5498, 5554,
5852, 6232, and 6590. ..........40
For machine types: 3026, 3039, 3137, 3149, 3245,
3269, 3319, 3394, 3491, 3627, 3699, 3878, 4972,
5132, 5261, 5297, 5391, 5472, 5485, 5536, 5548,
5567, 5864, and 6213. ..........40
Chapter 4. General checkout .....43
Problem determination tips .........44
Chapter 5. Diagnostics ........45
Lenovo ThinkVantage Toolbox ........45
Lenovo System Toolbox ..........45
PC-Doctor for Rescue and Recovery ......46
PC-Doctor for DOS ............46
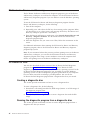
Creating a diagnostic disc ........46
Running the diagnostic program from a
diagnostic disc ............46
Navigating through the diagnostics programs . . 47
Running tests.............47
Viewing the test log ..........49
Chapter 6. Using the Setup Utility
program ..............51
Starting the Setup Utility program.......51
Viewing and changing settings ........51
Using passwords ............51
Password considerations .........52
Power-On Password ..........52
Administrator Password .........52
Hard Disk Password ..........52
Setting, changing, and deleting a password. . . 52
Enabling or disabling a device ........53
Selecting a startup device..........53
Selecting a temporary startup device .....53
Selecting or changing the startup device sequence 54
Exiting from the Setup Utility program .....54
Chapter 7. Symptom-to-FRU index . . . 55
Hard disk drive boot error .........55
Power Supply Problems ..........56
Diagnostic error codes ...........57
Beep symptoms .............74
POST error codes ............74
Miscellaneous error messages ........77
Undetermined problems ..........78
Chapter 8. Replacing FRUs (Machine
Types: 3029, 3054, 3139, 3219, 3246,
3282, 3349, 3421, 3544, 3652, 3769,
3934, 4992, 5206, 5267, 5325, 5384,
5450, 5474, 5498, 5554, 5852, 6232, and
6590.) ...............79
Locating connectors on the front of the computer. . 80
Locating connectors on the rear of the computer . . 81
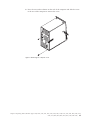
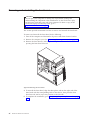
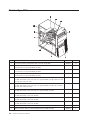
Removing the computer cover ........82
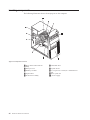
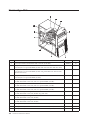
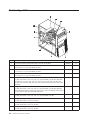
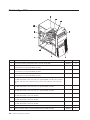
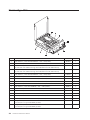
Locating components ...........84
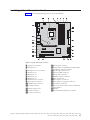
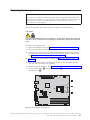
Locating parts on the system board ......85
Removing and reinstalling the front bezel ....86
Replacing a memory module ........87
Replacing the power supply assembly.....88
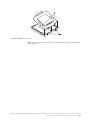
Replacing the heat sink and fan assembly ....90
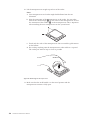
Replacing the microprocessor ........92
Replacing the system board .........94
Replacing the battery ...........97
Replacing a PCI card ...........98
Replacing the primary hard disk drive .....101
Replacing the secondary hard disk drive ....104
Replacing the optical drive .........106
Replacing the front fan assembly .......108
Replacing the rear fan assembly .......110
Replacing the front audio and USB assembly . . . 112
Replacing the internal speaker ........114
Completing the parts replacement ......115
Chapter 9. Replacing FRUs (Machine
types: 3026, 3039, 3137, 3149, 3245,
3269, 3319, 3394, 3491, 3627, 3699,
3878, 4972, 5132, 5261, 5297, 5391,
5472, 5485, 5536, 5548, 5567, 5864,
and 6213.) .............117
Locating connectors on the front of the computer 118
Locating connectors on the rear of the computer 119
Opening the computer cover ........120
Locating components ...........121
Locating parts on the system board ......122
Replacing the battery ...........122
© Copyright Lenovo 2010 iii

Replacing a memory module ........124
Replacing a PCI card ...........126
Replacing the power supply assembly .....128
Replacing the heat sink ..........131
Replacing the microprocessor ........133
Replacing the system board ........135
Replacing the hard disk drive ........139
Replacing the optical drive .........141
Replacing the internal speaker........143
Replacing the front audio and USB assembly . . . 146
Replacing the system fan .........147
Completing the parts replacement ......148
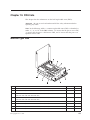
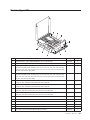
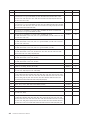
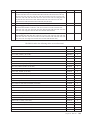
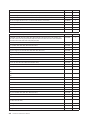
Chapter 10. FRU lists ........151
Machine Type 3245 ...........151
Machine Type 3246 ...........164
Machine Type 3269 ...........176
Machine Type 3282 ...........188
Machine Type 3491 ...........200
Machine Type 3544 ...........212
Machine Type 3627 ...........224
Machine Type 3652 ...........236
Machine Type 5474 ...........248
Machine Type 5485 ...........261
Machine Type 5498 ...........274
Machine Type 5536 ...........287
Machine Type 5852 ...........300
Machine Type 5864 ...........312
Chapter 11. Additional service
information ............325
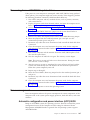
Security features ............325
Hardware-controlled passwords ......325
Operating system password .......325
Vital Product Data...........325
Secure Managed Client .........325
BIOS levels ..............325
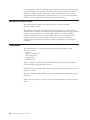
Updating (flashing) BIOS from a disc .....326
Updating (flashing) BIOS from your operating
system ...............326
Recovering from a POST/BIOS update failure . . 327
Power management ...........327
Automatic configuration and power interface
(ACPI)BIOS.............327
Automatic Power-On features .......328
Appendix. Notices .........329
Television output notice ..........330
Trademarks ..............330
iv Hardware Maintenance Manual

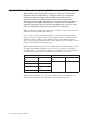
Chapter 1. About this manual
This manual contains service and reference information for ThinkCentre
®
computer
machine types listed on the front cover. This manual is intended only for trained
servicers who are familiar with Lenovo
®
computer products.
Note: Be sure to read and understand the Chapter 2, “Safety information,” on page
3 before using the information in this manual.
This manual includes a complete FRU part number list for each machine type
listed on the front cover. If you have Internet access, the FRU part numbers are
also available at:
http://www.lenovo.com/support
Important safety information
Be sure to read all caution and danger statements in this manual before performing
any of the instructions.
Veuillez lire toutes les consignes de type DANGER et ATTENTION du présent
document avant d’exécuter les instructions.
Lesen Sie unbedingt alle Hinweise vom Typ ″ACHTUNG″ oder ″VORSICHT″ in
dieser Dokumentation, bevor Sie irgendwelche Vorgänge durchführen
Leggere le istruzioni introdotte da ATTENZIONE e PERICOLO presenti nel
manuale prima di eseguire una qualsiasi delle istruzioni
Certifique-se de ler todas as instruções de cuidado e perigo neste manual antes de
executar qualquer uma das instruções
Es importante que lea todas las declaraciones de precaución y de peligro de este
manual antes de seguir las instrucciones.
© Copyright Lenovo 2010 1

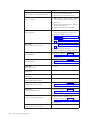
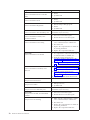
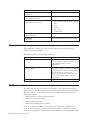
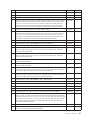
Important information about replacing RoHS compliant FRUs
RoHS, the Restriction of Hazardous Substances in Electrical and Electronic
Equipment Directive (2002/95/EC) is a European Union legal requirement
affecting the global electronics industry. RoHS requirements must be
implemented on Lenovo products placed on the market and sold in the
European Union after June, 2006. Products on the market before June, 2006 are
not required to have RoHS compliant parts. If the parts are not compliant
originally, replacement parts can also be noncompliant, but in all cases, if the
parts are compliant, the replacement parts must also be compliant.
Note: RoHS and non-RoHS FRU part numbers with the same fit and function are
identified with unique FRU part numbers.
Lenovo plans to transition to RoHS compliance well before the implementation
date and expects its suppliers to be ready to support Lenovo’s requirements and
schedule in the EU. Products sold in 2005 will contain some RoHS compliant
FRUs. The following statement pertains to these products and any product Lenovo
produces containing RoHS compliant parts.
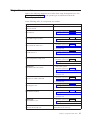
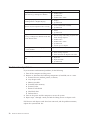
RoHS compliant ThinkCentre parts have unique FRU part numbers. Before or after
June 2006, failed RoHS compliant parts must always be replaced using RoHS
compliant FRUs, so only the FRUs identified as compliant in the system hardware
maintenance manual or direct substitutions for those FRUs can be used.
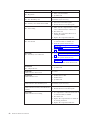
Products marketed before June 2006 Products marketed after June 2006
Current or original
part
Replacement FRU Current or original
part
Replacement FRU
Non-RoHS Can be Non-RoHS Must be RoHS Must be RoHS
Non-RoHS Can be RoHS
Non-RoHS Can substitute for
RoHS
RoHS Must be RoHS
Note: A direct substitution is a part with a different FRU part number that is
automatically shipped by the distribution center at the time of order.
2 Hardware Maintenance Manual

Chapter 2. Safety information
This chapter contains the safety information that you need to be familiar with
before servicing a computer.
General safety
Follow these rules to ensure general safety:
v Observe good housekeeping in the area of the machines during and after
maintenance.
v When lifting any heavy object:
1. Ensure you can stand safely without slipping.
2. Distribute the weight of the object equally between your feet.
3. Use a slow lifting force. Never move suddenly or twist when you attempt to
lift.
4. Lift by standing or by pushing up with your leg muscles; this action removes
the strain from the muscles in your back. Do not attempt to lift any objects that
weigh more than 16 kg (35 lb) or objects that you think are too heavy for you.
v Do not perform any action that causes hazards to the customer, or that makes
the equipment unsafe.
v Before you start the machine, ensure that other service representatives and the
customer’s personnel are not in a hazardous position.
v Place removed covers and other parts in a safe place, away from all personnel,
while you are servicing the machine.
v Keep your tool case away from walk areas so that other people will not trip over
it.
v Do not wear loose clothing that can be trapped in the moving parts of a
machine. Ensure that your sleeves are fastened or rolled up above your elbows.
If your hair is long, fasten it.
v Insert the ends of your necktie or scarf inside clothing or fasten it with a
nonconductive clip, approximately 8 centimeters (3 inches) from the end.
v Do not wear jewelry, chains, metal-frame eyeglasses, or metal fasteners for your
clothing.
Remember: Metal objects are good electrical conductors.
v Wear safety glasses when you are: hammering, drilling, soldering, cutting wire,
attaching springs, using solvents, or working in any other conditions that might
be hazardous to your eyes.
v After service, reinstall all safety shields, guards, labels, and ground wires.
Replace any safety device that is worn or defective.
v Reinstall all covers correctly before returning the machine to the customer.
Electrical safety
© Copyright Lenovo 2010 3

CAUTION:
Electrical current from power, telephone, and communication cables can be
hazardous. To avoid personal injury or equipment damage, disconnect the
attached power cords, telecommunication systems, networks, and modems before
you open the computer covers, unless instructed otherwise in the installation
and configuration procedures.
Observe the following rules when working on electrical equipment.
Important: Use only approved tools and test equipment. Some hand tools have
handles covered with a soft material that does not insulate you when working
with live electrical currents.
Many customers have, near their equipment, rubber floor mats that contain small
conductive fibers to decrease electrostatic discharges. Do not use this type of mat
to protect yourself from an electric shock.
v Find the room emergency power-off (EPO) switch, disconnecting switch, or
electrical outlet. If an electrical accident occurs, you can then operate the switch
or unplug the power cord quickly.
v Do not work alone under hazardous conditions or near equipment that has
hazardous voltages.
v Disconnect all power before:
– Performing a mechanical inspection
– Working near power supplies
– Removing or installing Field Replaceable Units (FRUs)
v Before you start to work on the machine, unplug the power cord. If you cannot
unplug it, ask the customer to power-off the wall box that supplies power to the
machine and to lock the wall box in the off position.
v If you need to work on a machine that has exposed electrical circuits, observe
the following precautions:
– Ensure that another person, familiar with the power-off controls, is near you.
Remember: Another person must be there to switch off the power, if
necessary.
– Use only one hand when working with powered-on electrical equipment;
keep the other hand in your pocket or behind your back.
Remember: There must be a complete circuit to cause an electric shock. By
observing the above rule, you may prevent a current from passing through
your body.
– When using testers, set the controls correctly and use the approved probe
leads and accessories for the testers.
– Stand on suitable rubber mats (obtained locally, if necessary) to insulate you
from grounds such as metal floor strips and machine frames.
Observe the special safety precautions when you work with very high voltages;
these instructions are in the safety sections of maintenance information. Use
extreme care when measuring high voltages.
v Regularly inspect and maintain your electrical hand tools for safe operational
condition.
v Do not use worn or broken tools and testers.
v Never assume that power has been disconnected from a circuit. First, check that it
has been powered-off.
4 Hardware Maintenance Manual

v Always look carefully for possible hazards in your work area. Examples of these
hazards are moist floors, nongrounded power extension cables, power surges,
and missing safety grounds.
v Do not touch live electrical circuits with the reflective surface of a plastic dental
mirror. The surface is conductive; such touching can cause personal injury and
machine damage.
v Do not service the following parts with the power on when they are removed
from their normal operating places in a machine:
– Power supply units
– Pumps
– Blowers and fans
– Motor generators
and similar units. (This practice ensures correct grounding of the units.)
v If an electrical accident occurs:
– Use caution; do not become a victim yourself.
– Switch off power.
– Send another person to get medical aid.
Voltage-selection switch
Some computers are equipped with a voltage-selection switch located near the
power-cord connection point on the computer. If your computer has a
voltage-selection switch, ensure that you set the switch to match the voltage
available at your electrical outlet. Setting the voltage-selection switch incorrectly
can cause permanent damage to the computer.
If your computer does not have a voltage-selection switch, your computer is
designed to operate only at the voltage provided in the country or region where
the computer was originally purchased.
If you relocate your computer to another country, be aware of the following:
v If your computer does not have a voltage-selection switch, do not connect the
computer to an electrical outlet until you have verified that the voltage provided
is the same as it was in the country or region where the computer was originally
purchased.
v If your computer has a voltage-selection switch, do not connect the computer to
an electrical outlet until you have verified that the voltage-selection switch is set
to match the voltage provided in that country or region.
If you are not sure of the voltage provided at your electrical outlet, contact your
local electric company or refer to official Web sites or other literature for travelers
to the country or region where you are located.
Safety inspection guide
The intent of this inspection guide is to assist you in identifying potentially unsafe
conditions on these products. Each machine, as it was designed and built, had
required safety items installed to protect users and service personnel from injury.
This guide addresses only those items. However, good judgment should be used to
identify potential safety hazards due to attachment of features or options not
covered by this inspection guide.
Chapter 2. Safety information 5

If any unsafe conditions are present, you must determine how serious the apparent
hazard could be and whether you can continue without first correcting the
problem.
Consider these conditions and the safety hazards they present:
v Electrical hazards, especially primary power (primary voltage on the frame can
cause serious or fatal electrical shock).
v Explosive hazards, such as a damaged CRT face or bulging capacitor
v Mechanical hazards, such as loose or missing hardware
The guide consists of a series of steps presented in a checklist. Begin the checks
with the power off, and the power cord disconnected.
Checklist:
1. Check exterior covers for damage (loose, broken, or sharp edges).
2. Power-off the computer. Disconnect the power cord.
3. Check the power cord for:
a. A third-wire ground connector in good condition. Use a meter to measure
third-wire ground continuity for 0.1 ohm or less between the external
ground pin and frame ground.
b. The power cord should be the appropriate type as specified in the parts
listings.
c. Insulation must not be frayed or worn.
4. Remove the cover.
5. Check for any obvious alterations. Use good judgment as to the safety of any
alterations.
6. Check inside the unit for any obvious unsafe conditions, such as metal filings,
contamination, water or other liquids, or signs of fire or smoke damage.
7. Check for worn, frayed, or pinched cables.
8. Check that the power-supply cover fasteners (screws or rivets) have not been
removed or tampered with.
Handling electrostatic discharge-sensitive devices
Any computer part containing transistors or integrated circuits (ICs) should be
considered sensitive to electrostatic discharge (ESD). ESD damage can occur when
there is a difference in charge between objects. Protect against ESD damage by
equalizing the charge so that the machine, the part, the work mat, and the person
handling the part are all at the same charge.
Notes:
1. Use product-specific ESD procedures when they exceed the requirements noted
here.
2. Make sure that the ESD protective devices you use have been certified (ISO
9000) as fully effective.
When handling ESD-sensitive parts:
v Keep the parts in protective packages until they are inserted into the product.
v Avoid contact with other people while handling the part.
v Wear a grounded wrist strap against your skin to eliminate static on your body.
6 Hardware Maintenance Manual

v Prevent the part from touching your clothing. Most clothing is insulative and
retains a charge even when you are wearing a wrist strap.
v Use the black side of a grounded work mat to provide a static-free work surface.
The mat is especially useful when handling ESD-sensitive devices.
v Select a grounding system, such as those listed below, to provide protection that
meets the specific service requirement.
Note: The use of a grounding system is desirable but not required to protect
against ESD damage.
– Attach the ESD ground clip to any frame ground, ground braid, or green-wire
ground.
– Use an ESD common ground or reference point when working on a
double-insulated or battery-operated system. You can use coax or
connector-outside shells on these systems.
– Use the round ground-prong of the ac plug on ac-operated computers.
Grounding requirements
Electrical grounding of the computer is required for operator safety and correct
system function. Proper grounding of the electrical outlet can be verified by a
certified electrician.
Safety notices (multi-lingual translations)
The caution and danger safety notices in this section are provided in the following
languages:
v English
v Arabic
v Brazilian/Portuguese
v Chinese (simplified)
v Chinese (traditional)
v French
v German
v Hebrew
v Italian
v Korean
v Spanish
DANGER
Electrical current from power, telephone and communication cables is hazardous.
To avoid a shock hazard:
v Do not connect or disconnect any cables or perform installation, maintenance,
or reconfiguration of this product during an electrical storm.
v Connect all power cords to a properly wired and grounded electrical outlet.
Chapter 2. Safety information 7

v Connect to properly wired outlets any equipment that will be attached to this
product.
v When possible, use one hand only to connect or disconnect signal cables.
v Never turn on any equipment when there is evidence of fire, water, or
structural damage.
v Disconnect the attached power cords, telecommunications systems, networks,
and modems before you open the device covers, unless instructed otherwise
in the installation and configuration procedures.
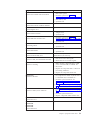
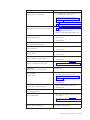
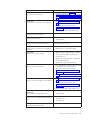
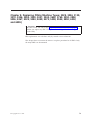
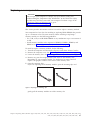
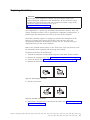
v Connect and disconnect cables as described in the following tables when
installing, moving, or opening covers on this product or attached devices.
To Connect To Disconnect
1. Turn everything OFF.
2. First, attach all cables to devices.
3. Attach signal cables to connectors.
4. Attach power cords to outlet.
5. Turn device ON.
1. Turn everything OFF.
2. First, remove power cords from outlet.
3. Remove signal cables from connectors.
4. Remove all cables from devices.
8 Hardware Maintenance Manual

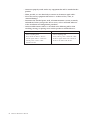
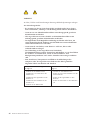
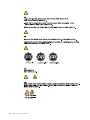
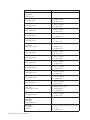
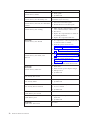
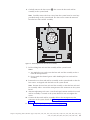
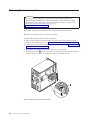
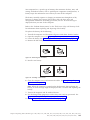
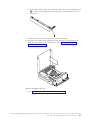
CAUTION:
When replacing the lithium battery, use only Part Number 45C1566 or an
equivalent type battery recommended by the manufacturer. If your system has a
module containing a lithium battery, replace it only with the same module type
made by the same manufacturer. The battery contains lithium and can explode if
not properly used, handled, or disposed of.
Do not:
v Throw or immerse into water
v Heat to more than 100°C (212°F)
v Repair or disassemble
Dispose of the battery as required by local ordinances or regulations.
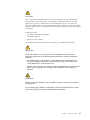
CAUTION:
When laser products (such as CD-ROMs, DVD-ROM drives, fiber optic devices,
or transmitters) are installed, note the following:
v Do not remove the covers. Removing the covers of the laser product could
result in exposure to hazardous laser radiation. There are no serviceable parts
inside the device.
v Use of controls or adjustments or performance of procedures other than those
specified herein might result in hazardous radiation exposure.
DANGER: Some laser products contain an embedded Class 3A or Class 3B laser
diode. Note the following:
Laser radiation when open. Do not stare into the beam, do not view directly
with optical instruments, and avoid direct exposure to the beam.
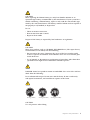
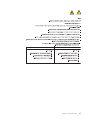
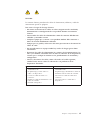
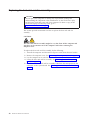
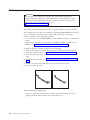
≥18 kg (37 lbs) ≥32 kg (70.5 lbs) ≥55 kg (121.2 lbs)
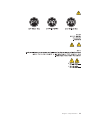
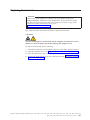
CAUTION:
Use safe practices when lifting.
Chapter 2. Safety information 9

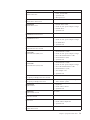
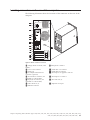
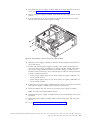
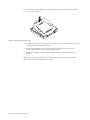
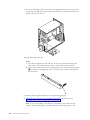
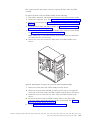
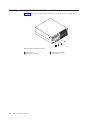
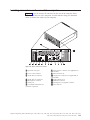
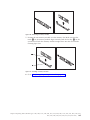
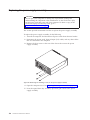
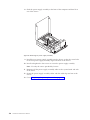
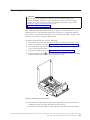
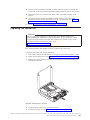
CAUTION:
The power control button on the device and the power switch on the power
supply do not turn off the electrical current supplied to the device. The device
also might have more than one power cord. To remove all electrical current from
the device, ensure that all power cords are disconnected from the power source.
1
2
10 Hardware Maintenance Manual

Chapter 2. Safety information 11

12 Hardware Maintenance Manual

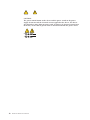
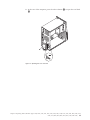
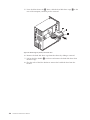
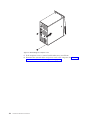
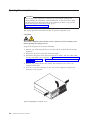
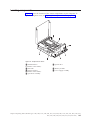
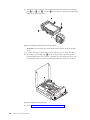
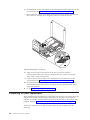
≥18 kg (37 lbs) ≥32 kg (70.5 lbs) ≥55 kg (121.2 lbs)
1
2
Chapter 2. Safety information 13

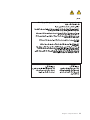
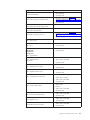
PERIGO
A corrente elétrica proveniente de cabos de alimentação, de telefone e de
comunicações é perigosa.
Para evitar risco de choque elétrico:
v Não conecte nem desconecte nenhum cabo ou execute instalação, manutenção
ou reconfiguração deste produto durante uma tempestade com raios.
v Conecte todos os cabos de alimentação a tomadas elétricas corretamente
instaladas e aterradas.
v Todo equipamento que for conectado a este produto deve ser conectado a
tomadas corretamente instaladas.
v Quando possível, utilize apenas uma das mãos para conectar ou desconectar
cabos de sinal.
v Nunca ligue nenhum equipamento quando houver evidência de fogo, água ou
danos estruturais.
v Antes de abrir tampas de dispositivos, desconecte cabos de alimentação,
sistemas de telecomunicação, redes e modems conectados, a menos que
especificado de maneira diferente nos procedimentos de instalação e
configuração.
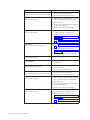
v Conecte e desconecte os cabos conforme descrito na tabela apresentada a seguir
ao instalar, mover ou abrir tampas deste produto ou de dispositivos conectados.
Para Conectar: Para Desconectar:
1. DESLIGUE Tudo.
2. Primeiramente, conecte todos os cabos
aos dispositivos.
3. Conecte os cabos de sinal aos
conectores.
4. Conecte os cabos de alimentação às
tomadas.
5. LIGUE os dispositivos.
1. DESLIGUE Tudo.
2. Primeiramente, remova os cabos de
alimentação das tomadas.
3. Remova os cabos de sinal dos conectores.
4. Remova todos os cabos dos dispositivos.
14 Hardware Maintenance Manual
Page is loading ...
Page is loading ...
Page is loading ...
Page is loading ...
Page is loading ...
Page is loading ...
Page is loading ...
Page is loading ...
Page is loading ...
Page is loading ...
Page is loading ...
Page is loading ...
Page is loading ...
Page is loading ...
Page is loading ...
Page is loading ...
Page is loading ...
Page is loading ...
Page is loading ...
Page is loading ...
Page is loading ...
Page is loading ...
Page is loading ...
Page is loading ...
Page is loading ...
Page is loading ...
Page is loading ...
Page is loading ...
Page is loading ...
Page is loading ...
Page is loading ...
Page is loading ...
Page is loading ...
Page is loading ...
Page is loading ...
Page is loading ...
Page is loading ...
Page is loading ...
Page is loading ...
Page is loading ...
Page is loading ...
Page is loading ...
Page is loading ...
Page is loading ...
Page is loading ...
Page is loading ...
Page is loading ...
Page is loading ...
Page is loading ...
Page is loading ...
Page is loading ...
Page is loading ...
Page is loading ...
Page is loading ...
Page is loading ...
Page is loading ...
Page is loading ...
Page is loading ...
Page is loading ...
Page is loading ...
Page is loading ...
Page is loading ...
Page is loading ...
Page is loading ...
Page is loading ...
Page is loading ...
Page is loading ...
Page is loading ...
Page is loading ...
Page is loading ...
Page is loading ...
Page is loading ...
Page is loading ...
Page is loading ...
Page is loading ...
Page is loading ...
Page is loading ...
Page is loading ...
Page is loading ...
Page is loading ...
Page is loading ...
Page is loading ...
Page is loading ...
Page is loading ...
Page is loading ...
Page is loading ...
Page is loading ...
Page is loading ...
Page is loading ...
Page is loading ...
Page is loading ...
Page is loading ...
Page is loading ...
Page is loading ...
Page is loading ...
Page is loading ...
Page is loading ...
Page is loading ...
Page is loading ...
Page is loading ...
Page is loading ...
Page is loading ...
Page is loading ...
Page is loading ...
Page is loading ...
Page is loading ...
Page is loading ...
Page is loading ...
Page is loading ...
Page is loading ...
Page is loading ...
Page is loading ...
Page is loading ...
Page is loading ...
Page is loading ...
Page is loading ...
Page is loading ...
Page is loading ...
Page is loading ...
Page is loading ...
Page is loading ...
Page is loading ...
Page is loading ...
Page is loading ...
Page is loading ...
Page is loading ...
Page is loading ...
Page is loading ...
Page is loading ...
Page is loading ...
Page is loading ...
Page is loading ...
Page is loading ...
Page is loading ...
Page is loading ...
Page is loading ...
Page is loading ...
Page is loading ...
Page is loading ...
Page is loading ...
Page is loading ...
Page is loading ...
Page is loading ...
Page is loading ...
Page is loading ...
Page is loading ...
Page is loading ...
Page is loading ...
Page is loading ...
Page is loading ...
Page is loading ...
Page is loading ...
Page is loading ...
Page is loading ...
Page is loading ...
Page is loading ...
Page is loading ...
Page is loading ...
Page is loading ...
Page is loading ...
Page is loading ...
Page is loading ...
Page is loading ...
Page is loading ...
Page is loading ...
Page is loading ...
Page is loading ...
Page is loading ...
Page is loading ...
Page is loading ...
Page is loading ...
Page is loading ...
Page is loading ...
Page is loading ...
Page is loading ...
Page is loading ...
Page is loading ...
Page is loading ...
Page is loading ...
Page is loading ...
Page is loading ...
Page is loading ...
Page is loading ...
Page is loading ...
Page is loading ...
Page is loading ...
Page is loading ...
Page is loading ...
Page is loading ...
Page is loading ...
Page is loading ...
Page is loading ...
Page is loading ...
Page is loading ...
Page is loading ...
Page is loading ...
Page is loading ...
Page is loading ...
Page is loading ...
Page is loading ...
Page is loading ...
Page is loading ...
Page is loading ...
Page is loading ...
Page is loading ...
Page is loading ...
Page is loading ...
Page is loading ...
Page is loading ...
Page is loading ...
Page is loading ...
Page is loading ...
Page is loading ...
Page is loading ...
Page is loading ...
Page is loading ...
Page is loading ...
Page is loading ...
Page is loading ...
Page is loading ...
Page is loading ...
Page is loading ...
Page is loading ...
Page is loading ...
Page is loading ...
Page is loading ...
Page is loading ...
Page is loading ...
Page is loading ...
Page is loading ...
Page is loading ...
Page is loading ...
Page is loading ...
Page is loading ...
Page is loading ...
Page is loading ...
Page is loading ...
Page is loading ...
Page is loading ...
Page is loading ...
Page is loading ...
Page is loading ...
Page is loading ...
Page is loading ...
Page is loading ...
Page is loading ...
Page is loading ...
Page is loading ...
Page is loading ...
Page is loading ...
Page is loading ...
Page is loading ...
Page is loading ...
Page is loading ...
Page is loading ...
Page is loading ...
Page is loading ...
Page is loading ...
Page is loading ...
Page is loading ...
Page is loading ...
Page is loading ...
Page is loading ...
Page is loading ...
Page is loading ...
Page is loading ...
Page is loading ...
Page is loading ...
Page is loading ...
Page is loading ...
Page is loading ...
Page is loading ...
Page is loading ...
Page is loading ...
Page is loading ...
Page is loading ...
Page is loading ...
Page is loading ...
Page is loading ...
Page is loading ...
Page is loading ...
Page is loading ...
Page is loading ...
Page is loading ...
Page is loading ...
Page is loading ...
Page is loading ...
Page is loading ...
Page is loading ...
Page is loading ...
Page is loading ...
Page is loading ...
Page is loading ...
Page is loading ...
Page is loading ...
Page is loading ...
Page is loading ...
Page is loading ...
Page is loading ...
Page is loading ...
Page is loading ...
Page is loading ...
Page is loading ...
Page is loading ...
Page is loading ...
Page is loading ...
Page is loading ...
Page is loading ...
Page is loading ...
Page is loading ...
Page is loading ...
Page is loading ...
Page is loading ...
Page is loading ...
Page is loading ...
Page is loading ...
Page is loading ...
Page is loading ...
-
 1
1
-
 2
2
-
 3
3
-
 4
4
-
 5
5
-
 6
6
-
 7
7
-
 8
8
-
 9
9
-
 10
10
-
 11
11
-
 12
12
-
 13
13
-
 14
14
-
 15
15
-
 16
16
-
 17
17
-
 18
18
-
 19
19
-
 20
20
-
 21
21
-
 22
22
-
 23
23
-
 24
24
-
 25
25
-
 26
26
-
 27
27
-
 28
28
-
 29
29
-
 30
30
-
 31
31
-
 32
32
-
 33
33
-
 34
34
-
 35
35
-
 36
36
-
 37
37
-
 38
38
-
 39
39
-
 40
40
-
 41
41
-
 42
42
-
 43
43
-
 44
44
-
 45
45
-
 46
46
-
 47
47
-
 48
48
-
 49
49
-
 50
50
-
 51
51
-
 52
52
-
 53
53
-
 54
54
-
 55
55
-
 56
56
-
 57
57
-
 58
58
-
 59
59
-
 60
60
-
 61
61
-
 62
62
-
 63
63
-
 64
64
-
 65
65
-
 66
66
-
 67
67
-
 68
68
-
 69
69
-
 70
70
-
 71
71
-
 72
72
-
 73
73
-
 74
74
-
 75
75
-
 76
76
-
 77
77
-
 78
78
-
 79
79
-
 80
80
-
 81
81
-
 82
82
-
 83
83
-
 84
84
-
 85
85
-
 86
86
-
 87
87
-
 88
88
-
 89
89
-
 90
90
-
 91
91
-
 92
92
-
 93
93
-
 94
94
-
 95
95
-
 96
96
-
 97
97
-
 98
98
-
 99
99
-
 100
100
-
 101
101
-
 102
102
-
 103
103
-
 104
104
-
 105
105
-
 106
106
-
 107
107
-
 108
108
-
 109
109
-
 110
110
-
 111
111
-
 112
112
-
 113
113
-
 114
114
-
 115
115
-
 116
116
-
 117
117
-
 118
118
-
 119
119
-
 120
120
-
 121
121
-
 122
122
-
 123
123
-
 124
124
-
 125
125
-
 126
126
-
 127
127
-
 128
128
-
 129
129
-
 130
130
-
 131
131
-
 132
132
-
 133
133
-
 134
134
-
 135
135
-
 136
136
-
 137
137
-
 138
138
-
 139
139
-
 140
140
-
 141
141
-
 142
142
-
 143
143
-
 144
144
-
 145
145
-
 146
146
-
 147
147
-
 148
148
-
 149
149
-
 150
150
-
 151
151
-
 152
152
-
 153
153
-
 154
154
-
 155
155
-
 156
156
-
 157
157
-
 158
158
-
 159
159
-
 160
160
-
 161
161
-
 162
162
-
 163
163
-
 164
164
-
 165
165
-
 166
166
-
 167
167
-
 168
168
-
 169
169
-
 170
170
-
 171
171
-
 172
172
-
 173
173
-
 174
174
-
 175
175
-
 176
176
-
 177
177
-
 178
178
-
 179
179
-
 180
180
-
 181
181
-
 182
182
-
 183
183
-
 184
184
-
 185
185
-
 186
186
-
 187
187
-
 188
188
-
 189
189
-
 190
190
-
 191
191
-
 192
192
-
 193
193
-
 194
194
-
 195
195
-
 196
196
-
 197
197
-
 198
198
-
 199
199
-
 200
200
-
 201
201
-
 202
202
-
 203
203
-
 204
204
-
 205
205
-
 206
206
-
 207
207
-
 208
208
-
 209
209
-
 210
210
-
 211
211
-
 212
212
-
 213
213
-
 214
214
-
 215
215
-
 216
216
-
 217
217
-
 218
218
-
 219
219
-
 220
220
-
 221
221
-
 222
222
-
 223
223
-
 224
224
-
 225
225
-
 226
226
-
 227
227
-
 228
228
-
 229
229
-
 230
230
-
 231
231
-
 232
232
-
 233
233
-
 234
234
-
 235
235
-
 236
236
-
 237
237
-
 238
238
-
 239
239
-
 240
240
-
 241
241
-
 242
242
-
 243
243
-
 244
244
-
 245
245
-
 246
246
-
 247
247
-
 248
248
-
 249
249
-
 250
250
-
 251
251
-
 252
252
-
 253
253
-
 254
254
-
 255
255
-
 256
256
-
 257
257
-
 258
258
-
 259
259
-
 260
260
-
 261
261
-
 262
262
-
 263
263
-
 264
264
-
 265
265
-
 266
266
-
 267
267
-
 268
268
-
 269
269
-
 270
270
-
 271
271
-
 272
272
-
 273
273
-
 274
274
-
 275
275
-
 276
276
-
 277
277
-
 278
278
-
 279
279
-
 280
280
-
 281
281
-
 282
282
-
 283
283
-
 284
284
-
 285
285
-
 286
286
-
 287
287
-
 288
288
-
 289
289
-
 290
290
-
 291
291
-
 292
292
-
 293
293
-
 294
294
-
 295
295
-
 296
296
-
 297
297
-
 298
298
-
 299
299
-
 300
300
-
 301
301
-
 302
302
-
 303
303
-
 304
304
-
 305
305
-
 306
306
-
 307
307
-
 308
308
-
 309
309
-
 310
310
-
 311
311
-
 312
312
-
 313
313
-
 314
314
-
 315
315
-
 316
316
-
 317
317
-
 318
318
-
 319
319
-
 320
320
-
 321
321
-
 322
322
-
 323
323
-
 324
324
-
 325
325
-
 326
326
-
 327
327
-
 328
328
-
 329
329
-
 330
330
-
 331
331
-
 332
332
-
 333
333
-
 334
334
-
 335
335
-
 336
336
-
 337
337
-
 338
338


Ask a question and I''ll find the answer in the document
Finding information in a document is now easier with AI
Related papers
-
Lenovo 5068 User manual
-
Lenovo ThinkCentre M73 10B2 Maintenance Manual
-
-
-
-
Lenovo ThinkCentre Hardware Maintenance Manual
-
-
Lenovo 3243 Hardware Maintenance Manual
-
-
Lenovo ThinkCentre M55e Hardware Maintenance Manual