Canon Vixia HG21 Owner's manual

Category
Camcorders
Type
Owner's manual

This manual is also suitable for

PJ_tB_idg_I_,J_D AVCHE_
IdDCamcorder,VIX_ANG21A / VIX_AHG20A systems
Thisdevice complies with Part15 ofthe PCCRules.Operationis subject to thefollowing two conditions: (1)Thisdevice may'notcause
harmful interference, and(2) this device must accept anyinterference received, including interference that may cause undesired
operation_
Note:Thisequipment hasbeentested and found tocomply with the limitsfor c_assBdigita_device pursuantto Part15 of the FCC
Ru_esThese limits aredesigned to pros!de reasonable protectionagainst harmful interference ina residential installation. This
equipment generates usesand can radiateradio frequency energy and, if not installed anduse in accordancewith the instructions,
maycause harmful interference to radio communications. However,there is no guarantee that interference win notoccur in a
)articular installation. _fthis equipment doescause harmful interference to radioor television reception, which can be determined by
turning theequipment off and on,the user is encouraged totry tocorrect the interference byone or more ofthe following measures:
Reorientor relocatethe receiving antenn&
Increasetheseparation between the equipmentand receiver
Connect theequipment into an outlet on a circuit different fromthat to 'which thereceiver is connected.
Consultthe dealer or art experiencedradio/_! technician for help.
Thecable with the ferrite core providedwith thedigital videocamcorder must be usedwith this equipment in order to comply 'with
ClassB limits in Subparf Bof Part15 of the FCCrules.
Donot makeany changesor modifications tothe equipment unless otherwise specified in the manual.
If such changesor modifications should be made you couldbe required to stopoperation ofthe equipment.
CanonU.SA. Inc_
OneCanon P_az&Lake Success, NY11042, US.A.
Te_No (516)320-5600
CAUTION:
TO PREVENT ELECTRIC SHOCK, MATCH WIDE BLADE OF PLUG TO WIDE SLOT, FULLY INSERT.
Important Warning
CAUTmON:
TO REDUCE THE RISK OF ELECTRIC
SHOCK, DO NOT REMOVE COVER (OR
BACK). NO USER-SERVICEABLE PARTS
mNSIDE. REFER SEBWCING TO QUALIRED
SERWCE PERSONNEL.
The lightning flash with arrowhead symbol,
within an equilateral triangle, is intended to
s_ert the user to the presence of uninsuIated
"dangerous voltage" within the product's
enclosure, that may be of sufficient
magnitude to constitute s risk of electric
shock to persons.
The exclamation point, withth an equNateral
triangle, is thtended to alert the user to the
presence of important operating and
maintenance (servicing) instructions in the
_iterature accompanying the product.
in these safetyinstructions the word "product" refers
tothe CanonHD CamcorderVlXIAHG21A/ VlXlA
HG20Aandall itsaccessories.
1 ReadInstructions-- Atlthe safetyandoperating
instructions should be readbeforethe productis
operated.
2 RetainInstructions-- The safetyandoperating
instructions should beretained for future
reference.
3 HeedWarnings-- All warnings on the product
andin the operating instructionsshould be
adheredto.
4 FollowInstructions-- All operatingand
maintenanceinstructions should befollowed.
5 Cleaning-- Unplugthis product fromthe wall
outlet beforecleaning.Do not use liquidor
aerosol cleaners.The productshould be cleaned
onlyas recommendedin this manual
6 Accessories-- Do not useaccessories not
recommendedin this manualas they maybe
hazardous.
7' Avoidmagneticor electric fields-- Do notuse
the cameraclosetoTV transmitters,portable
communicationdevices orother sourcesof
electdc or magneticradiation. Theymay cause
picture interference,or permanentlydamagethe
camera.
8 WaterandMoisture-- Hazardd electric shock
-- Donot use this productnearwater or inrainy/
moist situations.
9 Placingor Moving-- Donot placeonan unstable
cart, stand, tripod, bracketor table. The product
mayfall, causing seriousinjury toachild or adult,
andserious damageto the product.
Aproduct andcart
combinationshould bemoved
with care.Quick stops,
excessiveforce,and uneven
surfaces maycausethe
productand cartcombination
to overturn.
1 6 PowerSources-- TheCA-570 CompactPower
Adaptershouldbe operatedonlyfrom thetype of
power sourceindicatedon the marking label If
you are not sureofthe type d power supplyto
your home, consultyour productdealer or local
power company'.Regardingother power sources
such asbattery power,refertoinstructions in this
manual
1 1 Polarization-- TheCA-570 CompactPower
Adapteris equippedwith a polarized2-prong
plug (aplug having oneblade wider thanthe
other).
12
13
The2-prong polarizedplugwill fit intothe power
outlet onlyoneway'.Thisis asafetyfeature. Ifyou
are unableto insert the plugfully into the outlet,
try reversingthe plug. Ifthe plug still failsto fit,
contact your electricianto replaceyour obsolete
outlet. Do notdefeat the safety purposeofthe
polarizedplug.
PowerCordProtection-- Powercords shouldbe
routedso that theyare not likely to be walked on
or pinchedbyitems placed uponoragainstthem.
Payparticular attentionto plugs andthe point
from which the cords exitthe product.
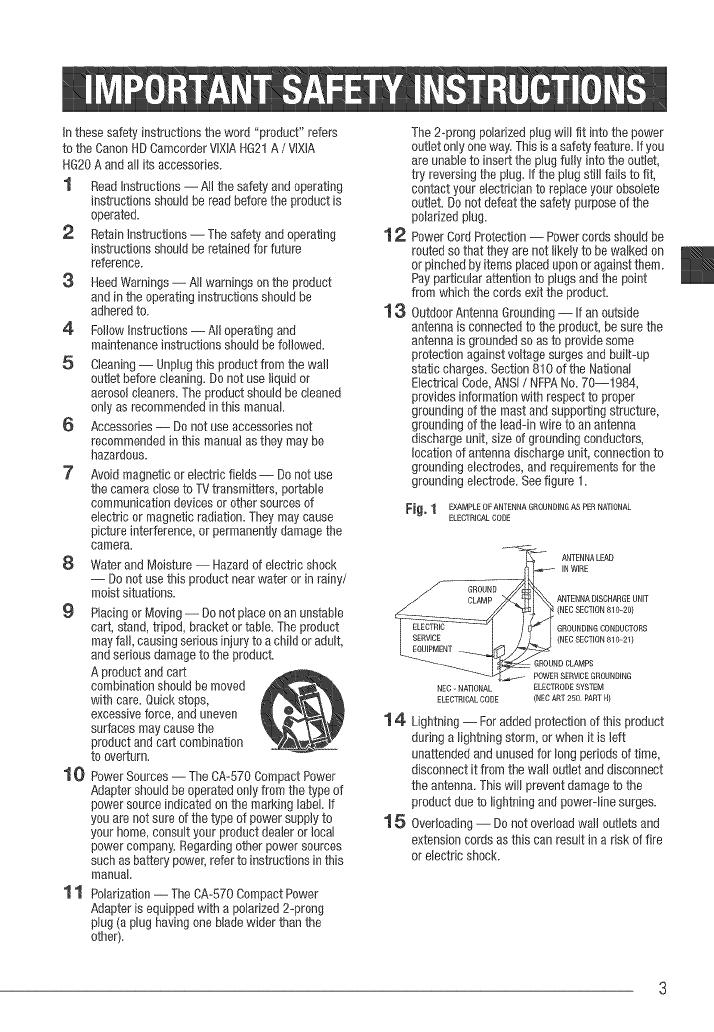
OutdoorAntennaGrounding--If an outside
antenna is connectedto the product, besurethe
antenna is groundedsoas to providesome
protection againstvoltage surgesandbuilt-up
static charges.Section810of the National
ElectricalCode,ANSI/ NFPANo.70--1984,
provides information with respectto proper
grounding ofthe mastandsupportingstructure,
grounding ofthe lead-in wire toan antenna
dischargeunit, size of groundingconductors,
location of antennadischargeunit, connectionto
grounding electrodes,andrequirementsfor the
grounding electrode.Seefigure t.
Fi_, 1 EXAMPLE OF ANTENNA GROUN DMG AS PER NA'RONAL
ELECTRICAL CORE
"__ ANTENNA LEAD
__ IN WiRE
___ GROUND
CLAMP ANTENNA DISCHARGE UNiT
---_- (NEC SECTION 81020)
ELECTRIC ------ GROUNDINGCONDUCTORS
I ;_c;rREIc -I /I_ I( NEo SECfION ....... )
EQUIPMENT
_._- POWER SERVICE GROUNDING
ELECTRODESYSTEM
NEC-NATIONAL
ELECTRICAL CODE (NEC ART 250 PART N)
14 Lightning -- Foradded protectionofthis product
during a lightning storm, or when it is left
unattendedandunused for longperiods oftime,
disconnect it fromthe wall outlet anddisconnect
the antenna.This will preventdamage tothe
product dueto lightningand poweFline surges.
5 Overloading-- Do not overloadwail outletsand
extension cordsas this can result in a risk offire
or electric shock.
16ObjectsandLiquidEntry--Neverpushobjects
ofanykindintothisproductthroughopeningsas
theymaytouchdangerousvoltagepointsorshort
outpartsthatcouldresultinafireorelectric
shock.Becarefulnottospillliquidofanykind
ontotheproduct.
17'Servicing--Donotattempttoservicethis
productyourselfasopeningorremovingcovers
mayexposeyoutodangerousvoltageorother
hazards.Referallservicingtoqualifiedservice
personnel.
18DamageRequiringService--Disconnectthis
productfromthewal!outletandallpower
sourcesincludingbattery,andreferservicingto
qualifiedservicepersonnelunderthefollowing
conditions:
a.Whenthepower-supplycordorplugis
damaged.
b.Ifanyliquidhasbeenspilledonto,orobiects
havefalleninto,theproduct.
c.Iftheproducthasbeenexposedtorainor
water.
19
2O
d. ifthe productdoesnotoperate normally even
ifyou follow the operatinginstructions.Adjust
onlythose controlsthat are coveredbythe
operationinstructions.Improperadjustmentof
other controlsmay result indamage andwm
often requireextensivework bya qualified
technicianto restore the productto itsnormal
operation.
e. Ifthe producthas beendroppedor thecabinet
has beendamaged.
f. Whenthe productexhibits adistinct changein
performance.Thisindicates a needfor
service.
ReplacementParts-- Whenreplacementparts
are required, besure the servicetechnicianhas
usedreplacementparts that arespecified by
Canonor that havethesame characteristics as
the original part.Unauthorizedsubstitutions may
result in fire,electric shock or other hazards.
SafetyCheck-- Uponcompletionof any service
or repairsto this product,ask the service
technicianto perform safetychecksto determine
that the productis in safe operatingorder.
I Whenreplacementofthepower supplyis required, pleasereturn ittothe responsible nearestCanonServiceCenter
1
andplease replaceit with the sametype number CA-570.
H
I TheAdaptercan beusedwith apower supply between 100and240 VAC.Forareaswhere 120VACpower is not ]
used,you will needa special plugadapter.Contactyour nearestCanonServiceCenterforfurfher information.
H
I ThisClassB with CanadianICES-O03. ]
digital apparatus complies
H
Online product registration for U.S.A. Customers on[yo
Register your product online at www, registercano&com
./Protect your product
We will keep the mode[ number and date of purchase of your new Canon
product on file to help you refer to this information in the event of an insurance
claim such as loss or theft.
,/Receive information on new products and promotions
Upon your request, we will send you information on Canon new products and
promotions,
The serial number of this product can be found at the battery attachment unit of
the camcorder. Write down the number and other information here and retain
this book as a permanent record of your purchase to aid identification in case of
theft,
Date of Purchase: Model Name: VlXlA HG21 A/
VIXIA HG20 A
Purchased From: Serial No,:
Dealer Address:
Dealer Phone No.:
Trademark Ackn0wmedgements
The SD10gois a trademark. The SDHClogo is a trademark.
Microsoft, Windows andWindows Vistaare ftademarks or registeredtrademarks of Microsoft Corporation in theUnited Statesand/or
other countries.
Macintosh and Mac OSare trademarks ofApple Inc.,registered in the US. and other countries
HDM_,the HDMI bgo and High-Definition Multimedia Interfaceare trademarks or registered
trademarks of HDMILicensing LLC. [_ [_O _BY_,
* "AVOHD"andthe AVCHD' logoare trademarks of MatsusMta Electric Industria_Co, Ltd and Sony DiGiTAL ]
Corporation. S'[E RE 0
[
Manufactured under license from Do_byLaboratories. CREATOR
"Do,by" andthe boubM-Dsymbol aretrademarks of Dolby Laboratories.
Other names and productsnot mentionedabove may be trademarks or registeredtrademarks oftheir
respective companies
Thisproduct is licensed under AT&Tpatents for the MPEG-4standard and maybe used for encodingMPEG-4compliant videoand/or
decoding MPEG4 compliant video that wasencodedonly (1) for a personaland non-commercia_purpose or (2)bya video provider
_icensedunder theAT&Tpatents to provide MPE64 compliant video No _icenseis grantedor implied for anyother use for MPE64
standard
Enjoying High-DefinitionVideowith your
Preserve your most treasured memories, be it unforgettable scenery or cherished
moments spent with family and friends, with high-definition video recordings of a
quality second only to actually being there.
What is High-Definiti0n Video?
1,080
lines
l Capture the finest detail,
like the movement or shine
of a single strand of hair
Your camcorder features a full high-definition image sensor (Full HD CMOS) that captures
video at a resolution of 1,920 x 1,080 pixels 1, This results in video recordings of
unparalleled high quality, fine detail and lifelike vivid colors.
How does full high definition compare with standard-definition TV broadcasts?
Approximately 6 times the number of pixels.
More than twice the number of scanning lines.
"Full HD 1080" refers to Canon camcorders compliant with high-definition
video composed of 1,080 vertical pixels (scanning lines).
What isCinema Mode?
Give your recordings a cinematic look by using the [ _L_ Cine Mode] recording program
(Q3 47). Combine this recording program with the 24 fps progressive frame rate
[[]_ PF24] to get the enhanced effect of the 24p Cinema Mode.
1 Video is recorded at this resolution only when the recording mode is set to MXP or FXP mode.
in other recording modes, the picture is resized to 1,440 x 1,080 pixels before being recorded.
Even in that case, the picture captured is detailed enough to render richly detailed recordings.
iiilii0yii_!iI iii!iiiiiili_!_fii_iti0it_J_,...._ ._-,__i_i¸¸C_i_Ic0_t:i_!_i¸
What are the advantages of a hard disk?
Your videos and photos are recorded on the built-in hard disk or commercially available
SD/SDHC memory cards 2 using AVCHD specifications 3, This Double Media recording
system gives you longer recording times for more high-definition videos and photos,
You can shoot approximately 11 hours ([[_[_ 120 GB HDD) or 5,5 hours (_ 60 GB
HDD) of video in MXP mode, which offers the highest video quality under AVCHD
specifications,
The camcorder records video and photos in unused space on the recording media so
you need not worry about accidentally recording over important videos,
You can immediately access the scenes you want to play back from an index menu,
You can easily manage your video and photo collections with the supplied editing
software: lmageMixer 3 (movies) and DIGITAL VIDEO Solution Disk (photos),
Can play back my high-definiti0n video on other
devices?
Needless to say, you can connect your camcorder to an HDTV to enjoy your recordings
with family and friends (L_ 81), You also have the following options:
You can easily play back video recorded on the memory card by inserting the
memory card directly into AVCHD-compatible TV sets and HDD or DVD recorders
that feature an SD/SDHC memory card slot 4. For details, refer to the instruction
manual of your TV or digital video recorder.
You can play back AVCHD discs of your recordings created using the optional
DW-100 DVD Burner (G) 82) on the DVD Burner itself or on AVCHD-compatible
DVD players or Blu-ray Disc players 5.
2 For details about memory cards that can be used with this camcorder refer to Using a Memory
Card (_ 31).
3 AVCHD is the new standard for recording high-definition video, With AVCHD specifications the
video signal is recorded using MPEGo4 AVC/H,264 compression and the audio signal is
recorded in Dolby Digital,
4 Depending on the device used, correct playback may not be possible even if the device is
AVCHD-compatible, In such case, play back the recordings on the memory card using the
camcorden
5 AVCHD discs containing scenes recorded in MXP mode cannot be created with the optional
DW-100 DVD burner, Use the supplied software ImageMixer 3 to back up such scenes,
Impe ant NotesAboutthe HardDiskDrive
Your hard disk camcorder allows you to shoot and store many hours of video.
However, there are differences between recording onto a hard disk and recording
onto other media. Make sure to follow the points below when using your camcorder.
For more details, refer to Handfing Precautions (CC]116).
Back upyour recordingsperi0dically
Make sure to transfer your movies and photos
to an external device such as a computer or
digital video recorder (CC} 82) and back them
up regularly and especially after making
important recordings. Canon shall not be
liable for any loss or corruption of data.
D0notsubjectthe camc0rderto
vibrationsor strong impacts
The hard disk is a high-precision device,
Vibrations, strong impacts or dropping the
camcorder may result in permanent data loss,
Keepthe drop sensoractivated
wheneverpossible
The drop sensor ([Z3 99) detects when the
camcorder is dropped and activates a
protection mechanism to help prevent hard
disk damage, Turning this func:tion off will
disable the mechanism, Even if this function
is set to [_ On] and the camcorder is
dropped, hard disk damage can occur.
D0notdisconnectthe powersource
while the camc0rderis on
Always turn the camcorder off before
removing the battery or compact power
adapter.
{'? tat',ii:ssAbott_e {a;ig{Skg) Ve
Donotturn off the camcorderwhib the
camcorderison andthe ACCESS
indicator is onor flashing or while the
camcorderis in standbymode
Doing so may result in hard disk damage or
permanent data loss,
Usethe camcorderwithin its operating
temperaturerange
If the camcorder's temperature becomes too
hot or too cold, recording/playback may stop
in order to prevent hard disk damage,
Donotusethe camc0rderat high
altitudes
Turning on or using the camcorder in places
with low atmospheric pressure, such as at
altitudes higher than 3,000 m (9,800 ft,), may
result in hard disk damage,
initialize the hard disk when movies
cannot berec0rded/playedback
n0rmaliy
As movies are recorded and deleted over
time, hard disk fragmentation may occur,
which may reduce performance, initialize the
hard disk should this happen,
Protectpersonalinformation onthe
harddisk
When the hard disk is initialized or recordings
are deleted, stored data is not physically
erased, Remember this when disposing of the
camcorder or giving it to another person,
Table of contents
[] introduction
6
8
14
1(}
16
17
20
Enjoying High-Definition Video with your Camcorder
Important Notes About the Hard Disk Drive
About this Manual
Getting to Know the Camcorder
Supplied Accessories
Components Guide
Screen Displays
[] Preparatieas
23 Getting Started
23 Charging the Battery Pack
24 Preparing the Wireless Controller and Accessories
26 Adjusting the Position and Brightness of the LCD Screen
27 Basic Operation of the Camcorder
27 The _ Button: _ Mode or Flexible Recording
28 Joystick and Joystick Guide
28 Using the Menus
30 First Time Settings
30 Setting the Date and Time
30 Changing the Language
3! Changing the Time Zone
31 Using a Memory Card
31 Memory Cards Compatible for Use with the Camcorder
32 Inserting and Removing a Memory Card
33 Selecting the Recording Media
33 initializing the Hard Disk or Memory Card
10
[] Videe
i{_i_ oi¸coiito_its
34 Basic Recording
34 Shooting Video
35 Selecting the Video Quality (Recording Mode)
36 Zooming
37 Quick Start Function
37 Reviewing and Deleting the Last Scene Recorded
38 Basic Playback
38 Playing Back the Video
40 Changing the Index Screen Selection
4! Selecting Scenes by Recording Date
42 Selecting the Playback Starting Point from the Movie Timeline
43 Selecting Recordings from the Index Screen
44 Deleting Scenes
45 Advanced Functions
45 Special Scene Recording Programs
46 Changing the Shutter Speed and Aperture
47 Cinema Mode: Giving a Cinematic Look to your Recordings
48 Self Timer
48 Manual Exposure Adjustment and Automatic BackJight Correction
49 Manual Focus Adjustment
50 White Balance
5! image Effects
52 Digital Effects
53 On-Screen Displays and Data Code
53 Audio Recording Level
54 Using Headphones
55 Using the Mini Advanced Shoe
56 Using an External Microphone
57 Using a Video Light
57 Piayiist and Scene Operations
57 Dividing Scenes
58 Editing the Playlist: Adding, Moving and Deleting Playlist Scenes
60 Copying Scenes
11
[] Photos
61 Basic Recording
61 Taking Photos
62 Selecting Photo Size and Quality
63 Deleting a Photo Right After Recording It
63 Basic Playback
63 Viewing Photos
65 Deleting Photos
66 Additional Functions
66 Magnifying Photos during Playback
66 Flash
67 Histogram Display
67 Drive Mode: Continuous Shooting and Exposure Bracketing
68 Taking Photos while Recording Movies
(Simultaneous Recording)
69 Light Metering Mode
69 Capturing a Photo from the Playback Scene
70 Protecting Photos
70 Copying Photos
71 Other Functions You Can Use when Taking Photos
72 Printing Photos
72 Printing Photos (Direct Print)
73 Selecting the Print Settings
75 Trimming Settings
76 Print Orders
[] E×temal ( ennectiens
78 Terminals on the Camcorder
79 Connection Diagrams
81 Playback on a TV Screen
82 Saving and Backing Up Your Recordings
82 Backing Up Your Recordings on a Computer
82 Authoring High-Definition (AVCHD) Discs and Photo DVDs
86 Copying your Recordings to an External Video Recorder
86 Transferring Photos to a Computer (Direct Transfer)
89 Transfer Orders
12
[] Additionalinformation
90 Appendix: Menu Options Lists
90 FUNC. Menu
92 Setup Menus
101 Trouble?
101 Troubleshooting
107 List of Messages
116 Do's and Don'ts
1!6 Handling Precautions
120 Maintenance!Others
12! Using the Camcorder Abroad
122 General information
122 System Diagram
123 Optional Accessories
127 Product Codes
128 Specifications
130 index
13
i"i!_od_ct on
Thank you for purchasing the Canon VIXIA HG21!VlXIA HG2O. Please read this
manual carefully before you use the camcorder and retain it for future reference.
Should your camcorder fail to operate correctly, refer to Troubleshooting (ffl3 101).
ConventionsUsedinthis Manaal
@ IMPORTANT: Precautions related to the camcorder's operation.
(_ NOTES: Additional topics that complement the basic operating procedures.
_ POINTS TO CHECK: Restrictions or requirements regarding the function
described.
ECI: Reference page number within this manual.
To complete some operations you will need to refer also to other instruction
manuals. This will be indicated with the following icons:
Refer to the "Digital Video Software" instruction manual, included as a
PDF file in the supplied DIGITAL VIDEO Solution Disk CD-ROM.
Refer to the instruction manual of the optional DW=I0O DVD Burner.
_ : Text that applies only to the model shown in the icon.
The following terms are used in this manual:
"Screen" refers to the LCD and the viewfinder screen (C[I_ only).
"Hard disk" and "HDD" are used interchangeably to refer to the camcorder's built-
in hard disk drive.
"Media" is used to refer collectively to either the builtqn hard disk or an external
memory card.
The photos included in this manual are simulated pictures taken with a still camera.
Unless indicated otherwise, illustrations and menu icons refer to the _.
14
SpecHsBSceneRecording Programs
Names of buttons and switches other Recording in a very bright ski resort or
than the joystick are indicated within capturing the full colors of a sunset or a
--] fireworks display becomes as easy as
a "button" frame, selecting a Special Scene recording
For example _F0-N-_:I" / program. For details about the available
options, refer to the sidebar on page
50,
Brackets [ ] are used to refer to menu
options as they are displayed on [_pProgrammedAE]Q
screen. In tables in this manual the gl_Portrai[]¢
press #_ to display the Special/._,
default value is shown in boldface. IScene(SCN)recordingpro_24_!(O)
For exam pie [O n], [Oft]. LDesiredrecordingprograrr(©) _T"
In this manual, the © arrow is used to abbreviate menu selections.
For a detailed explanation refer to Using the Menus (EZ]28).
The camcorder's operating mode is determined by the position of
the mode dial. In this manual, indicates that a function is
available and indicates that the function is not available. When
no operating mode icons are given, the function is available in all
operating modes.
15
_( "; iOR
$1pplied Accessories
CA-570 Com-JactPower
Adapter fincL Dower coro_ _ [tP 807 Battery _ack
WL D88 Wireless Controller
Lithium Button Battery
CR2025 for Wireless
Controller
KC-1OO/S
Corr uonent Cable
Red ,, Green ® Blue plugs
Software CD-ROM1
ana mslalaeon Guide
PIXELAlraage_lixer 3 S£
STV-250N
Stereo Video Cable
Yellow _ Red _ White plugs
SoftwareCD-ROM2
andInstallationGuide
DIIIYALVll£O
Solution lisk
IFC400PCU USB Cable
1 Software for saving, managing, editing and playing back movies on your computer (_ 82). The
CD-ROM includes the instruction manual of the software (electronic version on PDF file).
2 Software for saving, managing, retouching and printing photos (liZ3 86). The CD-ROM includes
the instruction manual of the software (electronic version on PDF file).
16
Leftsideview
Riohtsideview
® ® ®
/<1}_ button (_ 27)/
A._(print/share) button (_ 73, 86)
DISR (on-screen display) button
(8[3 42, 53)/
BATT=INFO button (1:]}] 22)
_) Speaker (CJ3 39)
G_Memory card slot ([_ 32)
C5}USB terminal (Q3 80)
_6)HDMI OUT terminal (EZ379, 81)
_ AV OUT/{"_ terminal (8::[379)
(8} COMPONENT OUT terminal (]Z3 79)
_} MIC terminal (C[_ 56)
_3}Strap mount (8_3 25)
_# Grip belt
_ Instant AF sensor ([Z.394)
_ Flash ([_ 66)
_-4_Stereo microphone
@
17
r ttodt ot tit
Back view
®
LCDpanel
) )
®@® @® @
Topview
®@
@ VIEWF_NDER button* (£{2 35)
(_ Viewfinder* (_ 26, 35)
(_ Dioptric adiustment lever* ({_1_35)
(_ Battery attachment unit ([_ 23)
_9-}RESET button (_ 104)
(_0}ACCESS indicator (C[3 34, 81)/
OHG (charge) indicator (_ 23)
_1}Start/Stop button ([_ 34)
@ Mode dial
_m Recording movies (Q3 34)
Taking photos ([_ 61)
_D Playing back movies (L_ 38)
Viewing photos (Q3 83)
_3} DC )N termina( ([_ 23)
@ Remote sensor (_ 25)
@ LCD screen (8{[3 26)
@ Joystick (_ 28)
@ FUNC. button (C_ 28, 90)
@ _/|! (play/pause) button (EZ338)/
START/STOP button (_ 34)
_ _,_ (fast reverse) button (_ 38)/
Zoom out W (wide_ang)e) button (_ 38)
® _ (fast forward) button (El3 38)/
Zoom in T (telephoto) button (_ 36)
_) [] (stop) button ([_ 38)/
BLC (backlight correction) button (C_ 48)
Mini advanced shoe (_ 55}
_ Zoom lever ([_ 36)
_) PHOTO button ({_[3 61)
ON/OFF button
_6} _ indicator
* _ only.
18
Bottom view @ Tripod socket (_ 117)
@ BATTERY RELEASE switch (_ 24)
_ Serial number
_ @ The serial number label is located on the
top surface of the battery attachment unit.
Remove the battery pack to find it.
I fVI/, '_ L [I _--/ 1 [_ ILl .! ....... t
o
Wiremess00ntr011erWL-D88
©
_ START/STOP button (_ 34)
_2)FUNC. button (_ 28, 90)
_3]MENU button (CI_ 29, 92)
_/_,_P_AYLIST button (C_ 58)
_5)Navigation buttons ( A/'V/4/_ )
{G] 411 (frame reverse) button (_ 39)
_ _ (fast reverse) button (C[_ 39)
(8_ _ (play) button (CCJ38)
@ || (pause) button (_ 38)
_ [] (stop) button (Q_ 38)
_# PHOTO button (CC] 61)
_2_Zoom buttons (Q_] 36)
_ SET button
11_ (frame advance) button (C_.J39)
_ _ (fast forward) button (_ 39)
_ DISR (on-screen display) button
(L_ 42, 53)
19
t i!_od_ct on
Screen Displays
(During Playback}
@
@
(1_Operating mode
(2} Recording program (l_ 45, 46)
(3} White balance ([_ 50)
(4} Image effect ([_ 51)
(5} Digital effect (L_ 52)
(_) Recording mode (_ 35)
(7} Photo quality/size
(simultaneous recording) (_ 68)
(8} Remote sensor off (_ 98)
(9} Hard disWmemory card operation (_ 22)
(l_ _ Instant AF ([_ 94),
MF Manual focus (L_ 49)
_i} Remaining battery time (_ 22)
(_ While recording/during playback:
Scene counter (hours : minutes :seconds)
Record pause mode: Total number of
scenes
43}Remaining recording time
I_ On the hard disk
@ On the memory card
(_ Image stabilizer (_ 94)
24F progressive frame rate (E_J 22)
(_ Backiight correction (8_1 49)
(_ Drop sensor off (L_ 99}
_}_Audio level indicator (L_ 53)
69}Microphone attenuator (_ 95)
@}Mini advanced shoe ({_[3 55)
_) Headphone output ([_ 54)
Wind screen off ([3J394)
¢_:_Level marker ([_ 93)
_ Scene number
Data code ([_3 53)
2O
  • Page 1 1
  • Page 2 2
  • Page 3 3
  • Page 4 4
  • Page 5 5
  • Page 6 6
  • Page 7 7
  • Page 8 8
  • Page 9 9
  • Page 10 10
  • Page 11 11
  • Page 12 12
  • Page 13 13
  • Page 14 14
  • Page 15 15
  • Page 16 16
  • Page 17 17
  • Page 18 18
  • Page 19 19
  • Page 20 20
  • Page 21 21
  • Page 22 22
  • Page 23 23
  • Page 24 24
  • Page 25 25
  • Page 26 26
  • Page 27 27
  • Page 28 28
  • Page 29 29
  • Page 30 30
  • Page 31 31
  • Page 32 32
  • Page 33 33
  • Page 34 34
  • Page 35 35
  • Page 36 36
  • Page 37 37
  • Page 38 38
  • Page 39 39
  • Page 40 40
  • Page 41 41
  • Page 42 42
  • Page 43 43
  • Page 44 44
  • Page 45 45
  • Page 46 46
  • Page 47 47
  • Page 48 48
  • Page 49 49
  • Page 50 50
  • Page 51 51
  • Page 52 52
  • Page 53 53
  • Page 54 54
  • Page 55 55
  • Page 56 56
  • Page 57 57
  • Page 58 58
  • Page 59 59
  • Page 60 60
  • Page 61 61
  • Page 62 62
  • Page 63 63
  • Page 64 64
  • Page 65 65
  • Page 66 66
  • Page 67 67
  • Page 68 68
  • Page 69 69
  • Page 70 70
  • Page 71 71
  • Page 72 72
  • Page 73 73
  • Page 74 74
  • Page 75 75
  • Page 76 76
  • Page 77 77
  • Page 78 78
  • Page 79 79
  • Page 80 80
  • Page 81 81
  • Page 82 82
  • Page 83 83
  • Page 84 84
  • Page 85 85
  • Page 86 86
  • Page 87 87
  • Page 88 88
  • Page 89 89
  • Page 90 90
  • Page 91 91
  • Page 92 92
  • Page 93 93
  • Page 94 94
  • Page 95 95
  • Page 96 96
  • Page 97 97
  • Page 98 98
  • Page 99 99
  • Page 100 100
  • Page 101 101
  • Page 102 102
  • Page 103 103
  • Page 104 104
  • Page 105 105
  • Page 106 106
  • Page 107 107
  • Page 108 108
  • Page 109 109
  • Page 110 110
  • Page 111 111
  • Page 112 112
  • Page 113 113
  • Page 114 114
  • Page 115 115
  • Page 116 116
  • Page 117 117
  • Page 118 118
  • Page 119 119
  • Page 120 120
  • Page 121 121
  • Page 122 122
  • Page 123 123
  • Page 124 124
  • Page 125 125
  • Page 126 126
  • Page 127 127
  • Page 128 128
  • Page 129 129
  • Page 130 130
  • Page 131 131
  • Page 132 132
  • Page 133 133
  • Page 134 134
  • Page 135 135

Canon Vixia HG21 Owner's manual

Category
Camcorders
Type
Owner's manual
This manual is also suitable for

Ask a question and I''ll find the answer in the document

Finding information in a document is now easier with AI