Page is loading ...

OWNER’S MANUAL

INSTALLATION INSTRUCTIONS
General Recommendations:
Read installation and maintenance instructions, thoroughly before
installation.
Be sure to use proper tools and always wear personal safety
accessories for your protection.
Warning: The enclosed cut-out template is provided as a guide
only and should be checked against actual sink to determine
correct fit. Metal edges may be sharp. Use gloves when
handling.
Long-Life Care
Ancona Stainless Steel Sinks are easy to keep looking new, longer
with minimal care. For best results, always rinse with a mild soap
and wipe after each use. Rub lightly with soft cloth in the direction of
the grain line on a regular basis. To avoid damage and discoloration
to the sink surface never use a steel wool or scouring pad.
Tools and Materials needed:
- Tape Measure
- Pencil (NOT ink)
- Putty knife
- Scissors
- Adjustable wrenches
- Sealant drill and 1/2” (or larger) drill bits
- Silicone Adhesive Sealant Rags
- Denatured Alcohol
- Ear Protection
- Eye Protection
- Gloves
- Hacksaw/Jigsaw
- Mounting Clips (included)
- Cut-out template (included)

TOP-MOUNT INSTALLATION
Please carefully read complete instructions before beginning
installation.
Note: These instructions are for installation with solid surface,
composite material countertops. Ancona recommends
professional countertop installers, customer is responsible
for damage to the countertop or sink during installation.
1. Unpack the new sink and check the contents of the materials
supplied: sink, mounting brackets, and cut-out template
(depending on model).
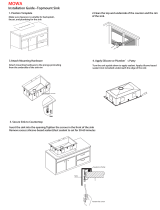
2. Preparing the countertop:
- Place the template (B) on the countertop. Ensure the template (B)
is centered on the counter so that it is parallel to the counter edge
and that the installation hole will not
interfere with the structure of the
cabinet.
- Tape the template (B) to the
countertop to keep it in place and
trace the outline on the template (B)
with a pencil.
3. Cutting the installation hole:
Drill a pilot hole and cut the countertop
opening. Use the appropriate cutting tool for
the surface you are cutting.
4. Preparing the sink:
- Place the sink (A) into the
installation hole to verify the fit.
Adjust the cut-out if necessary.
- Place the sink (A) upside down
and align the bottom edge with
waterproofing strip.
A
B

TOP-MOUNT INSTALLATION
5. Attaching the mounting clips:
Attach the top-mount clips (AA)
to the sink (A).
6. Installing the sink:
- Apply silicone sealant (not included) around the underside
and lip of the sink (A).
7.
Connect drain and water supply.
A
AA
A
AA
A
AA
A
- Carefully lower the sink (A)
into the counter.
- Tighten the screws on the
top-mount clips (AA) evenly
until the sink (A) is flush with
the counter. Do not over-
tighten.
- Wipe excess sealant with a
rag.

UNDERMOUNT INSTALLATION
Please carefully read complete instructions before beginning
installation.
Note: These instructions are for installation with solid surface,
composite material countertops. Ancona recommends
professional countertop installers, customer is responsible
for damage to the countertop or sink during installation.
1. Unpack the new sink and check the contents of the materials
supplied: sink, mounting brackets, and cut-out template
(depending on model).
2. Position cut-out sink template as desired and trace it on the
countertop.
3. Locate and drill the clearance hole inside the cut-out line.
4. Cut the countertop opening by carefully following the line traced
from the template according to the countertop manufacturer’s
instructions.
5. Drill faucet holes and install faucet according to manufacturer’s
installation instruction.
6. Locate and drill the mounting holes (following the countertop
manufacturer’s instructions) as shown below.
Holes should allow even spacing of mounting bracket around the
sink.
7. Fasten mounting clip to countertop loosely.
Fastener
Screws
Countertop

UNDERMOUNT INSTALLATION
8. Clean underside of the countertop and around cut-out area,
making sure area is smooth and free of defects.
9. Apply a bead of sealant to the rim of sink, near the inside edge.
Be careful not to miss or skip any area.
10. Carefully lift sink squarely under counter top cut-out. Press
firmly on sink to form seal and seat sink.
Using a damp cloth, immediately wipe any excess sealant from
edge of sink.
Do not smear or spread any excess sealant on counter top or sink.
11. Turn all mounting bracket so they fit over sink rim. Check
alignment of sink in cut out, adjust alignment as necessary. Tighten
fasteners to secure sink.
12. Connect water supply lines to the faucet and complete the
faucet installation. Connect drain assembly, hand tighten first to
check alignment. Secure joint for water-tight assembly.

CARE AND MAINTENANCE
ALWAYS:
- Clean everyday by thoroughly rinsing with a mild soap and warm water
and wipe dry. Some chemicals such as chlorides may corrode stainless
steel, make sure you rinse the surface immediately.
- Rub lightly with a soft cloth in the direction of grain lines on a regular
basis for additional preventive cleaning.
- Keep the sink free of any standing water as this can cause a buildup of
mineral deposit, which can affect the appearance of your sink.
- Any stubborn stains should be removed by scrubbing in the direction of
the grain with a mild abrasive such as Comet.
- Always rinse the sink after using any cleaning agent and wipe dry. Clean
any mineral deposits built up over time with a mild solution of vinegar and
water followed by a thorough flushing with water. Towel dry after each
use to prevent mineral deposits from building up on the surface of the
sink.
- Remove any scratches with a Scotch-brite pad and cleaning agent
rubbing in the direction of the grain.
NOT RECOMMENDED FOR MIRROR FINISH.
NEVER:
- Leave water spots, steel cookware, utensils, wet sponges, cloths or
cleaning pads in the sink for lengthy periods; iron particles often develop
rust spots in the stainless steel surface.
- Use a steel wool or scoring pad as it damages the sink surface and
causes discoloration.
- Rub the sink across the stainless steel finish lines.
- Let household cleaning agents or bleach sit in your sink for long period
of time as this may ruin the finish of your sink.
- Leave rubber mats, sponges, or cleaning pads in the sink for long
period of time as this may ruin the finish of your sink.
- Use any drain cleaning products containing sulfuric acid or hydrochloric
acid as this will attach the sink. Silver cleaners can also contain acids that
will damage the sink surface.
- Use the inside of the sink as cutting surface.
- Use a steel wool pad to clean your sink.
2017-11-13 V2
/