Page is loading ...


OWNER’S MANUAL
Capri Series Luxury Sinks

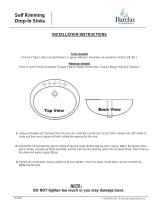
INSTALLATION INSTRUCTIONS
General Recommendations:
Read installation and maintenance instructions, thoroughly before installation.
Be sure to use proper tools and always wear personal safety accessories for your protection.
Long-Life Care
Ancona Stainless Steel Sinks are easy to keep looking new, longer with minimal care. For best results,
always rinse with a mild soap and wipe after each use. Rub lightly with soft cloth in the direction of the
grain line on a regular basis. To avoid damage and discoloration to the sink surface never use a steel wool
or scouring pad.
Tools and Materials needed:
- Tape Measure
- Pencil (NOT ink)
- Silicone Adhesive Sealant Rags
- Denatured Alcohol
- Ear Protection
- Eye Protection
- Hacksaw/Jigsaw
- Mounting Clips (included)

TOPMOUNT INSTALLATION
Please carefully read complete instructions before beginning installation.
Note: These instructions are for installation with solid surface, composite material countertops.
Ancona recommends professional countertop installers, customer is responsible for damage to
the countertop or sink during installation.
1. Unpack the new sink and check the contents of the materials supplied: Sink, Mounting brackets, and
cut-out template (depending on model).
2. Preparing the countertop:
A. Place the template (B) on the countertop. Ensure the template (B) is centered on the counter so that it
is parallel to the counter edge and that the installation hole
will not interfere with the structure of the cabinet
B. Tape the template (B) to the countertop to keep it in place
and trace the outline on the template (B) with a pencil.
3. Cutting the installation hole:
Dill a pilot hole and cut the countertop opening. Use the appropriate cutting tool for the surface you are
cutting.
4. Preparing the sink
A. Place the sink (A) into the installation hole to verify the fit. Adjust the cut-out if necessary.
B. Place the sink (A) upside down and align the bottom edge with waterproofing strip.

TOPMOUNT INSTALLATION
5. Attaching the mounting clips
Attach the topmount clips (AA) to the sink (A).
6. Installing the sink
A. Apply silicone sealant (not included) around the underside and lip of the sink (A).
B. Carefully lower the sink (A) into The Counter.
C. Tighten the screws on the topmount clips (AA) evenly until the
sink (A) is flush with the counter. Do not over-tighten.
D. Wipe excess sealant with a rag.
7. Connect drain and water supply according to manufactures instruction.

UNDERMOUNT INSTALLATION
Please carefully read complete instructions before beginning installation.
Note: These instructions are for installation with solid surface, composite material countertops.
Ancona recommends professional countertop installers, customer is responsible for damage to
the countertop or sink during installation.
1 .Unpack the new sink and check the contents of the materials supplied: Sink, Mounting brackets, and
cut-out template (depending on model).
2. Supplied cut-out template provides three options of installation:
A. Flush mount: Sink edge is flush with countertop opening. (FIGURE 1)
B. Reveal mount: Sink rim is exposed approximately 114" from the edge of countertop opening. (FIGURE 2)
3. Cut out the appropriate template for your sink model and desired installation option. Place template in
desired position on countertop, locating center of the bowl over cabinet and faucet holes.
4. Trace the outline of the template and not countertop along the inside of the line using appropriate
cutting tools. Template is for guide only. Use physical sink to ensure accurate cut-out opening.
5. Locate the drill holes on the underside of the countertop, approximately 1” from edge of the sink to be
installed. Holes should be evenly spaced approximately 6" to 8" apart starting from every corner as shown
in Figure 3. It is recommended to install a faucet at this point before installing the sink.

UNDERMOUNT INSTALLATION
6. Loosely attach mounting brackets to the countertop, parallel to the cut-out opening using the supplied
mounting screws and nuts. Mounting screws with brass inserts are supplied with the sink, however,
countertop material vary and the correct type of fasteners should be recommended by your installer or
supplier.
7. Clean sink flange and underside of cut-out area of countertop,
making sure that the area is smooth and free of grease. Apply
continuous bead of silicone caulk evenly on top of sink flange.
(FIGURE 4)
8. Position and align sink over the countertop opening and press sink
onto countertop. Turn bent end of mounting bracket to snug over the
sink rim.
9. Check alignment of sink again and tighten fasteners to secure
sink. (FIGURE 5)
10. Wipe away excess silicone caulk with damp cloth, Connect drain and water supply according to
manufacturer's instruction.

CARE AND MAINTENANCE
ALWAYS:
- Clean everyday by thoroughly rinsing with a
mild soap and warm water and wipe dry.
- Rub lightly with a soft cloth in the direction of
grain lines on a regular basis for additional
preventive cleaning.
- Keep the sink free of any standing water as
this can cause a buildup of mineral deposit,
which can affect the appearance of your sink.
- Any stubborn stains should be removed by
scrubbing in the direction of the grain with a
mild abrasive such as Comet.
- Always rinse the sink after using any cleaning
agent and wipe dry. Clean any mineral deposits
built up over time with a mild solution of vinegar
and water followed by a thorough flushing with
water.
- Remove any scratches with a Scotch-brite pad
and cleaning agent rubbing in the direction of
the grain.
NOT RECOMMENDED FOR MIRROR FINISH.
NEVER:
- Leave water spots, steel cookware or utensils
in the sink for lengthy periods; iron particles
often develop rust spots in the stainless steel
surface.
- Use a steel wool or scoring pad as it damages
the sink surface and causes discoloration.
- Let household cleaning agents or bleach sit in
your sink for long period of time as this may ruin
the finish of your sink.
- Leave rubber mats, sponges, or cleaning
pads in the sink for long period of time as this
may ruin the finish of your sink.
- Use any drain cleaning products containing
sulfuric acid or hydrochloric acid as this will
attach the sink. Silver cleaners can also contain
acids that will damage the sink surface.
- Use the inside of the sink as cutting surface.

ANCONA LIMITED LIFETIME WARRANTY
This Ancona Sink product (the “Product”) is warranted by AMS, in the manner fully
set forth below, to be free from defects in material and workmanship and to operate
properly in accordance with specifications, provided that it is used under the normal
operating conditions and for ordinary homfe use and service in Canada and the
USA.
AMS provides a limited lifetime warranty on manufacturing defects in material and
workmanship for its Products. This warranty applies to the initial domestic
installation only and only to the original owner/purchaser. Proof of purchase
(original sales receipt) must be made available to AMS for all warranty claims. This
limited warranty does not apply to commercial installations. The warranty for
commercial installations is 90 days.
AMS will repair or replace at no charge excluding shipping and labour costs any
sink that has been proven to be defective under normal residential use (or, if the
Product is no longer available, replace the defective Product with a comparable
Product of equal or greater value). This lifetime limited warranty DOES NOT apply
to any defects or damages caused by, installation, alterations, accidents,
negligence, abuse, misuse, environmental factors or lack of proper maintenance.
Chips, scratches and stains are not considered manufacturing defects, and this
warranty DOES NOT apply to chips scratches and stains that occur with normal
use. The limited lifetime warranty excludes labour costs and all shipping costs to
and from the manufacturer and will be the responsibility of the purchaser. AMS is
not liable for any damage to persons or property incurred in the installation and/or
removal of the sink. AMS will not be responsible for the cost of repair or replace-
ment of any materials used in the installation of the sink including but not limited to
tiles, granite, marble, etc. This warranty excludes any accessories that are included
with the sink including basket strainers.
AMS’S SOLE OBLIGATION AND THE CUSTOMER’S SOLE REMEDY FOR ANY
DEFECTIVE PRODUCT OR PART THEREOF SHALL BE LIMITED TO THE
REPAIR AND REPLACEMENT THEREOF. AMS’S ENTIRE AGGREGATE
LIABILITY UNDER THE WARRANTY SHALL NOT EXCEED THE ORIGINAL
PURCHASE PRICE OF THIS PRODUCT (EXCEPT WHERE AMS, IN ITS SOLE
DISCRETION, DECIDES TO REPLACE THE PRODUCT WITH A PRODUCT OF
GREATER VALUE).
PRIOR TO RETURNING ANY PRODUCT TO AMS, THE CUSTOMER MUST
FIRST OBTAIN A RETURN AUTHORIZATION NUMBER AND SHIPPING
INSTRUCTIONS FROM AMS (AN “AUTHORIZATION”) BY CALLING THE
FOLLOWING NUMBER: 1-800-350-4562.
After having obtained an Authorization from AMS, the customer should promptly
ship the Product to the address specified in the Authorization with the following
documentation:
- a complete description of the problem;
- the Product model number;
- the date and location of Product purchase; and
- the original sales receipt to be valid.
This Warranty does not cover and AMS shall not be responsible for: (i) service calls
to correct the installation of the Product, to instruct the customer on how to use the
Product or any other customer education; (ii) accessory parts, such as strainers;
(iii) service outside the covered service area and (iv) labour costs associated with
the removal, shipping and reinstallation cost or other contingent expenses.
Damages caused by accident, fire, lightning, brown-out, leaking, superior force,
improper installation, handling or operation, error, use for non-domestic purposes,
shipping damage, negligence, abuse, misuse, unauthorized repair, whether
performed by the customer or a third party, or improper care or maintenance WILL
IMMEDIATELY RENDER THIS WARRANTY NULL AND VOID AND AMS WILL BE
RELIEVED FROM ITS OBLIGATION TO WARRANT THE PRODUCT.
AMS WILL NOT BE LIABLE FOR DAMAGES TO PERSONS OR PROPERTY IN
CONNECTION WITH THE INSTALLATION, REPAIR OR REPLACEMENT OF THE
PRODUCT, NOR FOR ANY INDIRECT, SPECIAL, PUNITIVE, EXEMPLARY,
INCIDENTAL OR CONSEQUENTIAL DAMAGES, LOSSES, INJURY OR COSTS
OF ANY NATURE, INCLUDING, WITHOUT LIMITATION, LOSS OF USE OR
MALFUNCTION RELATING TO THIS PRODUCT. THIS WARRANTY IS NOT
TRANSFERABLE OR ASSIGNABLE TO ANY PERSON.
SAVE AS HEREIN PROVIDED, THERE ARE NO OTHER WARRANTIES,
CONDITIONS, REPRESENTATIONS OR GUARANTEES, EXPRESS OR
IMPLIED, INCLUDING, WITHOUT LIMITATION, WARRANTY OF MERCHANTABI-
LITY OR FITNESS FOR A PARTICULAR PURPOSE, MADE OR INTENDED BY
AMS OR ITS AUTHORIZED DISTRIBUTORS.
Some provinces or states may not allow limitations on the exclusion or limitation of
incidental or consequential damages, so these limitations and exclusions may not
entirely apply to certain customers. Any provision in the Warranty which is
unenforceable in any province or state shall be ineffective to the extent of such
unenforceability, without invalidating the remaining provisions or affecting the
validity or enforceability of such provisions in any other province or state.
This Warranty gives the customer specific legal rights, and the customer may also
have rights which vary based on state, province or country. For service and
assistance, please call: 1-800-350-4562, or email us at: [email protected]
/