Innovation. Performance. Efficiency.
OPERATING
&
INSTALLATION
INSTRUCTIONS
Freestanding Consoles & Inserts
Standard, Edwardian & Victorian Models
Large, Medium & Small Sizes
Keep these instructions for
future reference.
Serial No:
Model:Model:
Colour:
Date Installed:
G.L.G. Australia Pty Ltd
Building A2, Campus Business Park
350-374 Parramatta Road, Homebush, NSW, 2140
Made in China. Imported by GLG Australia.
20151002

SAFETY PRECAUTIONS
For your safety, please read and observe the following safety precautions:
1. CAUTION: THIS APPLIANCE SHOULD BE MAINTAINED AND OPERATED ATALL
TIMES IN ACCORDANCE WITH THESE INSTRUCTIONS.
2. WARNING: APPLIANCES INSTALLED IN ACCORDANCE WITH THIS
STANDARD SHALL COMPLY WITH THE REQUIREMENTS OF AS/NZS 4013
WHERE REQUIRED BY THE REGULATORY AUTHORITY, I.E. THE APPLIANCE
SHALL BE IDENTIFIABLE BY A COMPLIANCE PLATE WITH THE MARKING
‘TESTED TO AS/NZS 4013’.
3. WARNING: ANY MODIFICATION OF THE APPLIANCE THAT HAS NOT BEEN
APPROVED IN WRITING BY THE TESTING AUTHORITY IS CONSIDERED AS
BREACHING AS/NZS 4013.
4. CAUTION: MIXING OF APPLIANCE OR FLUE-SYSTEM COMPONENTS FROM
DIFFERENT SOURCES OR MODIFYING THE DIMENSIONAL SPECIFICATION
OF COMPONENTS MAY RESULT IN HAZARDOUS CONDITIONS. WHERE
SUCH ACTION IS CONSIDERED, THE MANUFACTURER SHOULD BE
CONSULTED IN THE FIRST INSTANCE.
5. CAUTION: CRACKED AND BROKEN COMPONENTS, e.g. GLASS PANELS OR
CERAMIC TILES, MAY RENDER THE INSTALLATION UNSAFE.
6. WARNING: DO NOT USE FLAMMABLE LIQUIDS OR AEROSOLS TO START OR
REKINDLE THE FIRE.
7. WARNING: DO NOT USE FLAMMABLE LIQUIDS OR AEROSOLS IN THE
VICINITY OF THIS APPLIANCE WHEN IT IS OPERATING.
8. WARNING: DO NOT STORE FUEL WITHIN HEATER INSTALLATION
CLEARANCES.
9. CAUTION: THIS APPLIANCE SHOULD NOT BE OPERATED WITH A CRACKED
GLASS.
10. place wood, paper, clothes, furniture, or any combustibles etc. withinDO NOT
heater installation clearance areas.
11. install heater or flue any closer than compliance clearances.DO NOT
12. DO NOT BURN WET OR GREEN WOOD.
13. burn rubbish or treated timber as fumes may be dangerous.DO NOT
14. CAUTION: THE USE OF SOME TYPES OF PRESERVATIVE-TREATED WOOD
AS AFUEL CAN BE HAZARDOUS.
15. over fire heater. Always operate with door closed. Turn fan on when burningDO NOT
on high.
16. install heater with over length flue as this may over fire heater. Check flueDO NOT
draught when more the 5.4 metres of flue are used.
17. let small children near heater while operating. The glass and front are HOT.DO NOT
18. PLEASE NOTE A PERMIT MAY BE REQUIRED FOR INSTALLATIONS IN SOME
STATES.
Page 2
DISCLAIMER
Clean Air Woodheating Pty Ltd does not accept any responsibility whatsoever for errors and omissions
or their interpretation regarding building codes and AS/NZS 2918.
It is the responsibility, entirely of the purchaser to investigate local council building requirements to
ensure their CleanAir wood heater is installed correctly in accordance withAS/NZS 2918.
All information is current at time of printing. Clean Air Woodheating relies on the reports from testing
authorities in any claims made regarding adherence toAustralian standards and EPArequirements.
Clean Air Woodheating accepts no reliability for the testing authorities interpretation of AS/NZS 2918.
The manufacturer reserves the right to alter designs and specifications at any time.

FOREWORD
Clean Air Woodheating is totally committed to excellence and innovation in wood
heater design.
Clean Air’s innovative use of the latest technology has created a wood heater
range with leading edge firebox design and quad burn system that outclasses the
rest of the field in heat output, efficient use of fuel, environmental performance
and style.
Clean Air wood heaters are designed in Australia, especially for Australian
winters.
Page 3
FIRST TIME USE
CURING THE PAINT
Your heater has been painted with
high temperature paint to protect the
surfaces and give them an attractive
finish.
You will need to burn a few small fires
to cure the high temperature paint.
During this time, you will experience a
smell and smoke will come off the
s u r f a c e s o f t h e h e a t e r. I t i s
recommended to open windows and
doors for ventilation. Using a fan will
also help disperse the odours. The
house should be ventilated until all
the odours are gone.
Do not touch the heater while curing
as the paint will be soft.
BAFFLE
Your heater comes almost completely assembled. Ensure that the baffle is in
place and position the refractory and protection angle in the firebox and the heater
is ready to be installed.
Please refer to the following notes to ensure maximum enjoyment from your wood
heater.
In the Medium and Large heaters, the
baffle sits in between the heat
exchange tubes, on four heavy duty
tabs located on the tubes. For the
Large heater, the baffle is positioned
to the back of the firebox with the lip at
the front, facing up.
If you need to remove the baffle, lift
the baffle, tilt to the side and lower
down.
In the Small heater, the baffle is a
large plate (48 cm x 28 cm). It sits on
four heavy duty tabs located on either
side of the firebox. Ensure the baffle is
positioned to the back of the firebox
and that the lip at the front of the
firebox is facing up.
If you need to remove the Small
baffle, lift at back, tilt forward and
remove.

Page 4
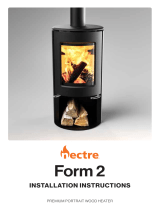
REFRACTORY
The refractory in your heater is an important part of the function of your heater. It
should be fitted correctly and the heater should not be operated without the
refractory in place.
It has a steel protection angle placed over the top edge to stop chipping and
cracking when wood hits it. The angle is light gauge and may need replacing after
several seasons.
The refractory may develop cracks. This is not a problem, but if they break away,
they should be replaced.
NOTE:
There will be spaces between the firebricks. Allow the ash to settle between the
firebricks. There is no need to remove the bricks during cleaning of the firebox.
LARGE - 13 BRICKS
A - 165 x 185
G - 165 x 185,
with chamfer
MEDIUM - 12 BRICKS
A - 165 x 185
B - 165 x 115
C - 230 x 115
F - 165 x 90
SMALL - 11 BRICKS
A - 165 x 185
B - 165 x 115
C - 230 x 115
D - 200 x 115
E - 165 x 45

Page 5
OVERNIGHT BURN
For overnight burn, load 4-5 pieces of
wood (approx. 150-200 mm in
diameter) into the firebox and burn on
high for 30 minutes, or more, until logs
are glowing red. Close air slide
completely and switch fan off.
On overnight burn or extended low
burn periods, it is normal for the door
to blacken or smoke up when the air
slide is shut down. To clean your
glass, simply drag hot coals forward
for radiant heat, reload with smaller
logs and burn a high fire until the glass
begins to clean. This can take up to 90
minutes.
ASH REMOVAL
To avoid ash spillage, clean the ash
out of the firebox when it has built up
to the bottom of the ash lip.
Ash is produced in greater quantities
when you burn wet or green wood,
dirty wood, wood with a lot of bark or
rotten wood. Do not burn rotten or
treated wood.
Excess ashes should be removed
when necessary. Ashes should be
placed in a non combustible container
with a tightly fitting lid and moved
outdoors immediately to a location
clear of combustible materials.
Empty ash approximately every 3-6
weeks or when necessary.
USING YOUR HEATER
LIGHTING YOUR FIRE
1. Open air slide fully: push air
control to right hand side.
2. Open door, place one small log
on each side of firebox. Place
crumpled newspaper on base of
firebox, then place several small
pieces of dried kindling on top of
paper in a pyramid style, with
more paper on top again. This
creates a fire quicker.
3. Clear area of combustibles. Light
fire and leave door slightly ajar to
let extra air in to start fire.
4. Once kindling is alight and
burning brightly, add some small
split wood.
5. Let fire establish itself, then start
placing larger logs on for desired
f i r e a n d c l o s e t h e d o o r
completely. When the fire is
burning well with a good coal
base and the heater has reached
it’s operating temperature, the
fan can then be turned on.
6. Once you have reached your
required temperature, the air
slide can be pushed gradually to
the left. This will restrict air flow to
the fire and reduce heat output.
To ensure correct burning, always
load timber from front to back (so you
are looking at the end of the log).
RELOADING YOUR FIRE
Before reloading, it is always best to
switch the fan off and open the air
slide fully. Open door carefully and
place wood in fire with gaps between
logs. Don't throw logs into fire.
Reloading should only be done onto a
hot fire with glowing coals.
Allow logs to burn for about 30
minutes before closing down air slide.
IN CASE OF FLUE FIRE
In the case of a flue fire, do not panic.
Immediately close the air slide down
to its lowest setting. Do not open the
door.
Once the fire has extinguished, you
should have your flue system
inspected by a qualified service
person.

FAN OPERATION
During normal operation of the wood
heater, the fan should generally be on
first or second speed. Third speed is a
boost and is used only with a very hot
fire.
When first lighting a fire, leave the fan
off for 30 to 40 minutes to allow the fire
to establish. Switch the fan off when
the heater is shut down for low burn.
DOOR GLASS
Clean Air use the best neo ceramics
glass available. Please treat with
care. Do not slam the door on logs.
Generally any creosote build up on
the glass will burn off on the next high
fire. It may be cleaned with good
quality detergent, but don’t leave
residue on the glass as this will bake
on.
If you break or crack your glass,
replace it immediately. Your Clean Air
dealer will be able to do this for you.
Your glass is not covered by warranty.
DOOR SEAL
The door seal is a glass fibre and will
compress over time. If it becomes
damaged or broken, it should be
replaced for the best performance
and safety of your heater.
DOOR CATCH ADJUSTMENT
When the door handle becomes
loose or when the door seal has
compressed in, the door catch will
need to be adjusted.
Simply open the door and loosen the
nuts on inside of firebox. Push the
catch back and re-tighten the nuts.
Undo nuts
on inside
of firebox
Push back
catch and
retighten
Page 6

Page 7
INSTALLATION
With all wood heaters, installation of
the flue is critical because the flue
creates the final performance of a
wood heater.
Your flue must extend the required
height above your roof to promote
sufficient draught. If the flue is not
high enough, the heater will not
“draw” properly, causing smoke to
spill back into the room.
The installer must make sure that the
heater and flue are correctly and
safely installed in accordance with
AS/NZS 2918.
All heaters must be fully flued.
All Large heaters must be
installed with a minimum of 4.5
metres of flue.
Stainless steel flue must be fitted
securely with crimped end down,
fixed and sealed to heater. The flue
must also be secured along each
l e n g t h t o p r e v e n t a c c i d e n t a l
separation.
Failure to do this will cause the flue to
leak and correct draught will not be
achieved, which will prevent the
heater from burning correctly.
WARNING: THE APPLIANCE AND
F L U E - S Y S T E M S H A L L B E
INSTALLED IN ACCORDANCE
WITH AS/NZS 2918 AND THE
APPROPRIATE REQUIREMENTS
OF THE RELEVANT BUILDING
CODE OR CODES.
ANY MODIFICATION OF THE
APPLIANCE THAT HAS NOT BEEN
APPROVED IN WRITING BY THE
T E S T I N G A U T H O R I T Y I S
CONSIDERED TO BE IN BREACH
OF THE APPROVAL GRANTED
FOR COMPLIANCE WITH AS/NZS
4013.
The appliance or flue system should
not be modified in any way without the
written approval of the manufacturer.
FIREPLACE INSERTS
A fireplace insert be installed inmust
a full masonry fireplace, which has
been inspected for cracks and
deterioration. The chimney must be
cleaned and a flue pipe connected to
the heater in accordance with
AS/NZS 2918.
You must install a flue the entire
length of the chimney. This will help
your heater perform to its full
capabilities. It will also be easier to
clean.
Chimney must be sealed to be
waterproof and vermin proof.
Refer to diagrams on following pages
for all installation clearances.
A floating isolator panel needs to be
installed. This panel MUST use non-
combustible sheeting. Do not fix the
panel.
FLOOR PROTECTOR
If your wood heater is to be installed
on any combustible material, such as
carpet or timber, you must place a
floor protector (also known as a
hearth) underneath the heater.
Please refer to clearance details on
the following pages for floor protector
requirements for each heater model.
It is not recommended that you make
your own hearth.
The hearth and the heater assembly
must be placed on a firm and level
surface.
LOCATION
Do not place your heater in areas of
hi gh tr a ffi c , nea r fur n it u re or
draperies.
Check that the intended location will
not interfere with ceiling joists, rafters,
valleys and ridges.

INSTALLATION CLEARANCES FOR CONSOLE MODELS
TEST NO.
HCMG/04/006
LARGE
CONSOLE
All clearances are
to combustibles.
150 mm
1090 mm
200 mm
350 mm
450 mm
1040 mm
Floor Protector: 6 mm CEMENT SHEET MIN.
STANDARD CORNER INSTALLATION
50 mm
50 mm
DIAGONAL CORNER INSTALLATION
TEST NO.
HCMG/04/020
MEDIUM
CONSOLE
All clearances are
to combustibles.
100 mm
920 mm
200 mm
300 mm
350 mm
940 mm
Floor Protector: 6 mm CEMENT SHEET MIN.
STANDARD CORNER INSTALLATION
50 mm
50 mm
DIAGONAL CORNER INSTALLATION
TEST NO.
RF/95/072
SMALL
CONSOLE
All clearances are
to combustibles.
100 mm
890 mm
200 mm
300 mm
350 mm
890 mm
Floor Protector: 6 mm CEMENT SHEET MIN.
STANDARD CORNER INSTALLATION
50 mm
50 mm
DIAGONAL CORNER INSTALLATION
NB: Small heater to have extra 450
mm stainless steel heat shield at
bottom of decromesh casing.
Clean Air Woodheaters tested by HRL Technology Pty Ltd to comply with Australian Standards when installed to
enclosed dimensions. The flue system used for testing was a Hawkwind Twistlock flue kit, manufactured by S V Metals.
This flue system has not been tested to joint AS/NZS 2918:2001. The flue height was 4.6 ± 0.3 m from the floor protector.
Local council building approval may be required in some states.
Page 8

STANDARD FIREPLACE INSERT - GENERIC MANTLEPIECE
MEDIUM STANDARD
LARGE STANDARD
NOTES:
1. All dimensions are in millimetres.
2. Clearances are to combustible materials and are a minimum.
3. The minimum distance between the hot air outlet and underside of mantle shelf is 330 mm. For
distances over 600 mm, no heat shield is required.
4. The heat shields, as specified above, must be used to maintain clearances. Ensure heat shields
extend the width and depth of underside of mantle shelf and key.
5. Clean Air Woodheaters tested by HRL Technology P/L to comply with Australian Standards
when installed to enclosed dimensions. Test Reports: Medium HCMG/04/025 & Large
HCMG/04/026.
DIAGRAMS ARE NOT TO SCALE
Page 9
INSTALLATION CLEARANCES FOR MANTLEPIECES
110
595
960
25 25
250 max
HEAT SHIELD
Min. 1070 mm wide x
0.6 mm sheet metal
FLOATING
ISOLATOR
PANEL
HOT AIR
OUTLET
480 D x 950 W
180
min 330
min
HEAT SHIELD
10
10
75 max
110
645
1060
25 25
250 max
HEAT SHIELD
Min. 1070 mm wide x
0.6 mm sheet metal
FLOATING
ISOLATOR
PANEL
HOT AIR
OUTLET
480 D x 1050 W
180
min 330
min
HEAT SHIELD
10
10
75 max
HEARTH: 2 x
6 mm cement
sheet & tiles
HEARTH: 2 x
6 mm cement
sheet & tiles

EDWARDIAN FIREPLACE INSERT - GENERIC MANTLEPIECE
MEDIUM EDWARDIAN
LARGE EDWARDIAN
NOTES:
1. All dimensions are in millimetres.
2. Clearances are to combustible materials and are a minimum.
3. The minimum distance between the hot air outlet and underside of mantle shelf is 330 mm. For
distances over 600 mm, no heat shield is required.
4. The heat shields, as specified above, must be used to maintain clearances. Ensure heat shields
extend the width and depth of underside of mantle shelf and key.
5. Clean Air Woodheaters tested by HRL Technology P/L to comply with Australian Standards
when installed to enclosed dimensions. Test Reports: Medium HCMG/04/025 & Large
HCMG/04/026.
DIAGRAMS ARE NOT TO SCALE
Page 10
INSTALLATION CLEARANCES FOR MANTLEPIECES
110
595
800
60 60
250 max
HOT AIR
OUTLET
480 D x 950 W
180
min
HEAT SHIELD
Min. 1070 mm wide x
0.6 mm sheet metal
FLOATING
ISOLATOR
PANEL
HEAT SHIELD
330
min 75 max
10
10
110
645
900
60 60
250 max
HOT AIR
OUTLET
480 D x 1050 W
180
min
HEAT SHIELD
Min. 1070 mm wide x
0.6 mm sheet metal
FLOATING
ISOLATOR
PANEL
HEAT SHIELD
330
min 75 max
10
10
HEARTH: 2 x
6 mm cement
sheet & tiles
HEARTH: 2 x
6 mm cement
sheet & tiles

INSTALLATION CLEARANCES FOR MANTLEPIECES
VICTORIAN FIREPLACE INSERT - GENERIC MANTLEPIECE
MEDIUM VICTORIAN
LARGE VICTORIAN
NOTES:
1. All dimensions are in millimetres.
2. Clearances are to combustible materials and are a minimum.
3. The minimum distance between the hot air outlet and underside of mantle shelf is 600 mm for the
medium Victorian and 580 mm for the large Victorian.
4. The heat shield and key shield, as specified above, must be used to maintain clearances.
Ensure heat shields extend the width and depth of underside of mantle shelf and key.
5. Clean Air Woodheaters tested by HRL Technology P/L to comply with Australian Standards
when installed to enclosed dimensions. Test Reports: Medium HCMG/04/025 & Large
HCMG/04/026.
DIAGRAMS ARE NOT TO SCALE
Page 11
225
595
800
60 60
250 max
600
min
HOT AIR
OUTLET
KEY SHIELD
100 x 30 x 1 mm
sheet metal
480 D x 950 W
HEAT SHIELD
Min. 1070 mm wide x
0.6 mm sheet metal
FLOATING
ISOLATOR
PANEL
25
max
10
2
235
645
900
60 60
250 max
580
min
HOT AIR
OUTLET
KEY SHIELD
100 x 30 x 1 mm
sheet metal
480 D x 1050 W
HEAT SHIELD
Min. 1070 mm wide x
0.6 mm sheet metal
FLOATING
ISOLATOR
PANEL
25
max
10
2
HEARTH: 2 x
6 mm cement
sheet & tiles
HEARTH: 2 x
6 mm cement
sheet & tiles

SMALL FIREPLACE INSERT - GENERIC MANTLEPIECE
SMALL STANDARD
110
560
910
25 25
450
FLOATING
ISOLATOR
PANEL
HOT AIR
OUTLET
DIAGRAMS ARE NOT TO SCALE
NOTES:
1. All dimensions are in millimetres.
2. Clearances are to combustible materials and are a minimum, unless otherwise stated.
3. Clean Air Woodheaters tested by HRL Technology P/L to comply with Australian Standards when installed
to enclosed dimensions. Test Reports: Medium HCMG/04/025 & Large HCMG/04/026.
Page 12
INSTALLATION CLEARANCES FOR MANTLEPIECES
350 D x 890 W
170
min
HEARTH: 2 x
6 mm cement
sheet & tiles

CHIMNEY INSTALLATIONS
Top of chimney
to be waterproof
CHIMNEY
- Fireplace inserts must be installed in a full masonry fireplace.
- Heater must be flued to the top of the chimney.
- Large model requires a minimum of 4.5 metres of flue.
Clean Air Woodheaters tested by HRL Technology Pty Ltd to comply with Australian Standards when
installed to enclosed dimensions.
Refer to AS/NZS 2918:2001.
Local council building approval may be required in some states.
STAINLESS
STEEL FLUE
SMOKE SHELF
(may need to
be removed
in some cases)
2 x 45° BENDS
Flue to be riveted
or screwed together
to prevent accidental
separation.
Place crimped end
down.
Flexible flue can be
used in situations
where the chimney
is not straight or
has a lot of bends.
1. Remove baffle plate
and pre drill hole in flue
spigot and stainless
steel.
2. Align holes and fix with
screw.
3. Flue to be fixed to
heater and sealed air
tight.
Page 13

MAXIHEAT DEFAULT FLUE KIT
IMPORTANT
This drawing is meant as a guide only. Heater should be installed by a qualified
person whose work conforms to local council VBR Regulations, ASA Standards
and manufacturer’s recommendations.
COWL
ROOF FLASHING
RAFTER
MINIMUM DISTANCE
FROM OUTER CASING
TO ANY COMBUSTIBLE
MATERIAL = 25mm
ANGLE SUPPORT
BRACKET FOR
OUTER CASING
JOIST
CERAMIC
SPACERS
MINIMUM DISTANCE FROM
OUTER CASING TO ANY
COMBUSTIBLE
MATERIAL = 25mm
DO NOT USE CEILING
PLATE TO SUPPORT
CASINGS
HEATER FLUE COLLAR
CEILING PLATE FIXED WITH
CERAMIC SPACERS
150mm OF OUTER CASING
PROTRUDING INTO ROOM
CEILING
INNER AND OUTER CASING SCREWED
OR POP RIVETED TOGETHER
1000mm
MINIMUM
OUTER CASING
INNER CASING
ACTIVE
FLUE
INNER AND OUTER
CASINGS HAVE
VENTILATION SLOTS
AT THE TOP
SIDE VIEW OF
ANGLE SUPPORT BRACKET
50mm FROM TOP OF CASINGS
TO TOP OF ACTIVE LENGTH
ACTIVE LENGTHS
SCREWED OR POP
RIVETED TOGETHER
BRACKET
SCREWED
TO OUTER
CASING
AND JOISTS
COWL SECURED
ONTO OUTER
CASING
Page 14

CLEANING YOUR HEATER
Clean the heater with a damp cloth
when required. Do not use abrasives
or polish sprays.
If you mark the paint, touch up paint is
available from your dealer.
CLEANING THE FLUE
Your flue should be cleaned every
year to prevent creosote build up, as
this may ignite and cause a flue fire.
To prevent creosote build up, don’t
burn wet wood and don’t burn heater
on low all the time. A hot fire every few
days will help keep the flue clean.
Also, don’t forget to clean the gaps in
between the heat exchange tubes
inside the firebox.
Page 15
CLEANING THE FAN
The fan will provide years of trouble
free service if maintained correctly.
IT IS HIGHLY RECOMMENDED THAT
YOU CLEAN AND VACUUM YOUR
FAN AT THE BEGINNING AND END
OF EACH BURNING SEASON.
Before cleaning, switch fan off at
power point and disconnect.
Vacuum the blades and surrounding
area to prevent dust build up that may
overload and cause premature failure
of the fan.
CONSOLE - Remove rear pedestal
cover. Undo the screws and remove
fan and mounting brackets.
INSERT - Remove the heater top
mantle and air slide knob. To remove
the fascia, undo the screws at the top
and the 2 screws at the bottom. The
fascia will come away from the insert
cabinet and give access to the fan.
!Service your heater during Spring
or early Summer. This minimises
the corrosive effects of creosote
and condensation during the off-
season.
!Check the condition of the heater
and flue, door seals, baffles, etc.
!Check for bird nests in or near the
flue system in the roof cavity.
!If loose insulation has been added
to the ceiling, i.e. blow-in cellulose,
etc., check carefully that none has
built up in the flue cavity area.
Or alternatively,
!Get an early bird service call from
an experienced installer/service
person.
!Contact your retailer.
Flue Checks
!Your wood heater should be
serviced once a year and have your
flue cleaned regularly by your local
chimney sweep.
!Creosote is a substance formed by
solid fuel combustion. Creosote
and resin build up can cause flue
fires.
!Check the flue prior to each winter.
Make it a habit to look outside and
check your flue for smoke. If it’s
smoking excessively, you are
wasting fuel and heat and may be
causing unnecessary emissions.
You need to increase the air supply
to the fire. A little air avoids a lot of
smoke.
SERVICE AND MAINTENANCE
AFTER CLEANING FAN OR
IF CHANGING SWITCH POSITION,
MAKE SURE LEAD IS TUCKED
UNDER FAN,
OTHERWISE FAN OR LEAD
DAMAGE WILL RESULT
FIREPLACE INSERT FANS

Stop your money going up in smoke.
1. Burn dry, seasoned untreated
wood
Wet and green (or unseasoned) wood
will not burn properly and produces a lot
of smoke. Freshly cut wood contains
about half its weight in water. A
reasonable log of firewood, if still green,
can contain about two litres of water.
Energy and money are wasted in
boiling the water in each log, the fire
does not get as hot as it should and
excessive smoke is produced. Burning
wet wood also means you need to burn
more wood to achieve a reasonable
amount of heat. Therefore, burning dry
wood saves you money.
Two pieces of dry, seasoned wood
banged together will make a loud
hollow crack, whereas unseasoned
wood makes more of a thud.
2. Stack wood under cover in a dry
ventilated area
Wood is ready to burn when air dried for
at least 8 months to a moisture content
less than 20%.
Store wood under cover in a dry
ventilated wood shed, in a fashion to
allow the wood to continue to dry out. If
freshly cut (green) wood is stacked in
the open, it will dry out and eventually
reach about 15% moisture content.
Stack wood away from the house walls
as the wood can act as a pathway for
insects, eg. ants or termites in some
regions ofAustralia.
3. Use small logs
Small logs burn brightly and do not
crowd the heater as larger logs can do.
Smaller logs will make a fire easier to
light and help in establishing a vigorous
fire quickly after refueling. This will
reduce smoke emissions.
Use at least two or three logs in the
heater - never one large log. However,
if a wood heater is stacked full of small
logs, there might be such a rapid
combustion that there is not enough
oxygen present to achieve complete
c o m b u s t i o n a n d s m o k e w o u l d
increase. Leave enough space over the
top of the fuel load to allow flames to
develop.
For slower burning, two or three larger
l o g s w i l l u s u a l l y p r o v e m o s t
satisfactory.
4. Burn the fire brightly
A robust fire produces less smoke than
a slow or smoldering fire. A smoldering
fire at any time, whether caused by wet
wood, not enough air, not enough
kindling or poor loading of logs (i.e.
blocking off combustion air) will cause
excessive smoke.
Run the heater on high burn (air control
fully open) for 5 minutes before and 15
to 20 minutes after adding more logs.
Check the heater chimney regularly for
smoke. If the heater is producing lots of
visible smoke for more than 15 minutes
after lighting or refueling, adjust the fuel
load and increase the air settings.
Just a little bit of attention to the fire will
make a big difference to how much
smoke is produced. Testing has shown
that a poor fire can produce up to 10
times more smoke than a brightly
burning fire.
When lighting a cold heater, always use
sufficient dry kindling to establish a
good fire quickly.
5. Signs of wet wood
Black glass
Low heat output
High ash deposits
Strong wine like smell
6. Wood smoke: Causes and cures
When wood is heated, energy is
required to drive off any moisture
before higher temperatures can be
reached. As the wood continues to
increase in temperature, complex
chemical reactions begin to take place.
The wood begins to break down,
releasing a mixture of gases, such as
methane and hydrogen, and many
complex tars and oils.
HOT TIPS
Page 16

If a flame or glowing charcoal are
present to ignite these gases, they will
burn vigorously, giving off heat and
providing the visible flame we all
associate with wood fires. This
combustion requires oxygen from air. If
there is not enough oxygen, these
gases will not burn, or only partially
burn.
Any gases escaping the flame unburnt
will escape through the flue. As they
cool, many of the gases will condense
into tiny droplets of oils and tars. These
particles are too small to be visible to
the naked eye, but in large numbers
become visible as white or faint blue
smoke. The smoke is wasted fuel, so
the more a heater smokes, the more
fuel is wasted.
The final phases of wood combustion
accounts for almost half the heat
released from wood - through glowing
charcoal. During this phase, very little
smoke is emitted, as charcoal is a very
clean burning fuel. However, all the
gases must have been burnt off while
there was a lot of flame and before the
air access is restricted, i.e. before the
fire is turned down.
7. Which wood to burn?
BURN HARDWOOD ONLY
Buying wet wood means paying a lot of
money for water! Freshly cut wood
contains about half its weight in water.
Order or collect your wood in the
summer months.
Deciduous trees should be harvested
in winter, when there is little sap, then
dried the following winter.
Buy wood that has a low moisture
content. You could save up to 40%
when buying dry, seasoned hardwood.
Page 17

BUILDERS NOTES
Page 18
/