Page is loading ...

Cable Drum Machine
Operation Manual BC2040
Used For: Sinks, Showers and Tub Drains
(Not for roots)
READ THIS OPERATION MANUAL CAREFULLY
BEFORE USING THIS PRODUCT. FAILURE TO UNDERSTAND
AND FOLLOW THE CONTENTS OF THIS MANUAL MAY
RESULT IN ELECTRICAL SHOCK, FIRE, AND/OR SERIOUS
PERSONAL INJURY OR DEATH. KEEP THESE INSTRUCTIONS
IN A SAFE PLACE FOR FUTURE USE OR WHEN LOANING OR
SELLING THE PRODUCT.

www.brasscraft.com
Acquaint yourself with the functions and controls prior to
using this machine. Should you have any questions or
uncertainties about the operation of this machine, please
call Customer Service (toll free) at 877-272-7755. If you
have any uncertainty about how to use this machine,
contact a drain cleaning specialist. Failure to follow
the instructions and warnings may result in electric
shock, re, serious injury or even death.
Make Sure This is The Right Tool
For Your Job
• This cable drum machine is intended for use in
sinks, tubs, oor drains and roof stacks with 3/4
inch to 3 inch diameter lines.
• This machine is NOT designed to clear tree roots
from pipes – attempting to clear tree roots can result
in injury and will damage the machine/cable, in turn
voiding the warranty. For clearing root disturbances,
utilize a larger drain cleaning machine such as the
BrassCraft 650 series.
• Do not modify this product or use it for anything
other than its intended purpose. Only use equipment
suggested by the manufacturer. Alterations or other
improper use could result in personal injury or damage
to the product also nullifying the product warranty.
Personal Protection Equipment
• Wear snug tting leather gloves when operating this
machine. Never grasp the rotating cable with anything
else, including a rag or non-leather gloves.
• Wear safety glasses or eye protection
• Exercise cleanliness. Use hot soapy water to clean
hands and other body parts that may have been
exposed to drain cleaning contents. To reduce the risk
of contamination and illness, do not eat or smoke while
cleaning drain.
Personal Safety
• Stay alert, watch what you are doing and use
common sense when operating a power tool. Do
not use a power tool while you are tired or under the
inuence of drugs, alcohol or medication. A moment
of inattention while operating power tools
may result in serious personal injury.
• Use personal protective equipment.
Always wear eye protection. Protective equipment
such as dust mask, non-skid safety shoes, hard hat, or
hearing protection used for appropriate conditions will
reduce personal injuries.
Read all safety warnings and instructions.
In this Operation Manual and on the product, safety
symbols and signal words are used to communicate
important safety information. This section is provided to
improve understanding of these signal words and symbols.
• This is the safety alert
symbol. It is used to alert you
to potential physical injury
hazards. Obey all safety
messages that follow this
symbol to avoid possible
injury or death.
• This symbol signies the
importance of the user to
read the operator’s manual
carefully prior to using
the machine. The manual
encompasses essential
information regarding the
safe and proper operation of
the equipment.
• This symbol denotes the
signicance to always
wear safety glasses with
side shields or goggles
when handling or using this
equipment to reduce the risk
of eye injury.
• This symbol denotes the risk
of ngers getting trapped in a
belt and/or pulley
• WARNING indicates a
hazardous situation that, if
not avoided, could result in
death or serious injury.
• This symbol indicates the
risk of hands, ngers or other
body parts being trapped,
wrapped or crushed in the
drain cleaning cable.
• This symbol designates the
risk of electrical shock. This
could result in death if the
machine is plugged into an
improperly wired outlet.
?
?
?
SAFETY SYMBOLS &
SIGNAL WORD
CABLE DRUM MACHINE
SAFETY

www.brasscraft.com
• Do not operate machine with motor in
reverse.
Reverse is only used when the cable is stuck or
overstressed. Running the machine in reverse could result
in possible kinked or stressed cable and personal injury.
• Never retract the cable from the inlet
while drum is spinning. The cable could whip around
and cause serious personal injury or death.
Work area safety
• Keep work area clean and well lit. Cluttered or dark
areas invite accidents.
• Do not operate power tools in explosive
atmospheres, such as in the presence of ammable
liquids, gases or dust. Power tools create sparks
which may ignite the dust or fumes.
• Keep children and bystanders away while operating
a power tool. Distractions can cause you to lose control.
Electrical Safety
• Power tool plugs must match the outlet. Never
modify the plug in any way. Do not use any
adapter plugs with earthed (grounded) power tools.
Unmodied plugs and matching outlets will reduce risk
of electric shock.
• Avoid body contact with earthed or grounded
surfaces such as pipes, radiators, ranges and
refrigerators. There is an increased risk of electric
shock if your body is earthed or grounded.
• Do not expose power tools to rain or wet conditions.
Water entering a power tool increases the risk of
electric shock.
• Do not abuse the cord. Never use the cord for
carrying, pulling or unplugging the power tool.
Keep cord away from heat, oil, sharp edges or
moving parts. Damaged or entangled cords increase
the risk of electric shock.
• When operating a power tool outdoors, use an
extension cord suitable for outdoor use. Using a cord
suitable for outdoors reduces the risk of electric shock.
• If operating a power tool in a damp location is
unavoidable, use a ground fault circuit interrupter
(GFCI) protected supply. Use of a GFCI reduces the
risk of electric shock.
Power Tool Use and Care
• Do not force the power tool. Use the correct power tool
for your application. The correct power tool will do the job
better and safer at the rate for which it was designed.
• Do not use the power tool if the switch does not turn
it on and off. Any power tool that cannot be controlled
with the switch is dangerous and must be repaired.
WARNING indicates a hazardous
situation that, if not avoided, could result in death or
serious injury.
Save all warnings and instructions for future reference.
• The term “power tool” in the warnings refers to your
mains-operated (corded) power tool or battery operated
(cordless) power tool.
• Prevent unintentional starting. Ensure the switch
is in the off-position before connecting to power
source and/or battery pack, picking up or carrying
the tool. Carrying power tools with your nger on the
switch or energizing power tools that have the switch
on invites accidents.
• Remove any adjusting key or wrench before
turning the power tool on. A wrench or a key left
attached to a rotating part of the power tool may
result in personal injury.
• Do not overreach. Keep proper footing and balance
at all times. This enables better control of the power
tool in unexpected situations.
• Dress properly. Do not wear loose clothing or
jewelry. Keep your hair, clothing and gloves away
from moving parts. Loose clothes, jewelry or long hair
can be caught in moving parts.
• If devices are provided for the connection of dust
extraction and collection facilities, ensure these are
connected and properly used. Use of dust collection
can reduce dust-related hazards.
• When lifting heavy objects, always lift with your
knees, never with your back. Consider using two-
people when lift is heavy and/or awkward.
Proper Machine Operation
• Cleaning chemicals can be present in clogged
drains. If you have previously used chemicals or are
unsure, take care to avoid contact with the cable or
debris found in the drain.
• Machine is designed to be used by one
person only. The operator must control both the cable
and the foot switch. Should the cutter stop rotating,
the operator must be able to quickly stop the motor.
This helps to prevent kinking and breaking of the cable
which could cause crushing or striking injuries.
• Do not allow the cable to twist, kink
or build up tension. Do not let the cable endure
overstressed situations. This could potentially result in
crushing and/or striking injuries and unpredicted cable
reactions. If the cable starts to become overstressed,
immediately turn the machine off by taking your foot off
the switch and rotate the cable in the opposite direction
until the twist or buckle has been removed.

www.brasscraft.com
• Disconnect the plug from the power source and/or
the battery pack from the power tool before making
any adjustments, changing accessories, or storing
power tools. Such preventive safety measures reduce
the risk of starting the power tool accidentally.
• Store idle power tools out of the reach of children and
do not allow persons unfamiliar with the power tool
or these instructions to operate the power tool. Power
tools are dangerous in the hands of untrained users.
• Maintain power tools. Check for misalignment or
binding of moving parts, breakage of parts and any
other condition that may affect the power tool’s
operation. If damaged, have the power tool repaired
before use. Many accidents are caused by poorly
maintained power tools.
• Keep cutting tools sharp and clean. Properly
maintained cutting tools with sharp cutting edges are
less likely to bind and are easier to control.
• Use the power tool, accessories and tool bits etc.
in accordance with these instructions, taking into
account the working conditions and the work to be
performed. Use of the power tool for operations different
than those intended could result in a hazardous situation.
Service
• Have your power tool serviced by a qualied repair
person using only identical replacement parts. This
will ensure that the safety of the power tool is maintained.
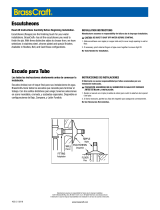
Tool Description
Your cable drum machine has four benecial
tool attachments to cope with a wide variety of
obstructions. As a general guideline, it is wise to use a
tool that is at least 1" smaller than the line to be cleared.
The nature of the job and the operator’s judgment should
determine the type of tool.
• ST-96205
• 3/4" x 5"
Straight Boring Head
for initial exploration of clog
• ST-96207
• 1-1/2" x 2"
Slotted Spear Head
for piercing clogs
• ST-96201
• 1-1/4" x 2"
Grease Cutter
for grease blockages
• ST-96208
• 2" x 4"
Side Cutter
for nishing pipe cleaning
MACHINE DESCRIPTION
Do not operate a machine that has the belt guard
removed, any absent or broken parts, or that is
incorrectly assembled. If your machine does not meet all
of the conditions in this section, do not operate until the
machine is properly repaired (See Repairing Your Drum
Machine). Failure to properly prepare for operation may
result in shock, re, and/or serious personal injury or death.
Check Your Personal Protective Equipment
Be sure your personal protective equipment (See
Personal Protection Equipment Section) is in good
condition. Before use, ensure gloves are not damaged.
PREPARATION
FOR OPERATION
This machine has manual cable feed. The cable must be
fed by hand and does not automatically extend or retract
into the machine.
This machine should not be operated in reverse under
normal operating conditions. Reverse should be used
only for a few seconds at a time to free a stuck cutting tool.
1. Frame
2. Drum
3. Drill
4. Air Actuated
Press Box
5. Foot Switch
Actuator
1
2
3
4
5

www.brasscraft.com
• Make sure the drain cleaning machine is unplugged
and inspect the Ground Fault Circuit Interrupter,
plug and power cord for any damage. If the plug has
been modied or is missing any components, do not use
the machine. It will need to be repaired by a qualied
person prior to use.
• Ensure the foot switch is attached to the air press
box properly. Do not operate the machine without the
foot switch.
• Before use, clean any grease, dirt or oil off the
equipment controls and handles. This will reduce the
risk of the machine or controls slipping from your grip.
• Conrm that the machine is accurately assembled.
Look for any parts that are not in a condition which
would prevent safe and normal operation. Rotate the
drum and make sure that it smoothly rotates. If any
problems are found, or if you are unsure, do not use the
machine until it has been properly repaired.
• Make sure the warning label on the motor is intact
and readable. Do not operate the machine without the
warning label.
• Clean any debris from the tools and cable while
inspecting the cable for any wear and damage.
Check for ats on the outside of the cable, if any
portion looks as though it is not round, the cable should
be replaced. Inspect the cable for any kinks, space
between the coils or excessive corrosion. These can
weaken the cable during use.
• Inspect the cutting tools for any damage or wear. If
damage or wear is found, the tools need to be replaced.
• Using dry hands, plug the cord into a correctly
grounded outlet. To test the GFCI provided, push the
test button in, the indicator light should go off. Restart
by pushing the reset button in. If the indicator light goes
on, the GFCI is functioning properly. If it is not working
properly, unplug the cord and do not use the machine
untill it has been correctly xed.
• Move the FOR/OFF/REV switch to the FOR position.
Slowly press the foot switch and note the direction of
rotation of the drum. If the foot switch does not rotate
the drum, do not use this machine until it is properly
inspected. The drum should rotate counter clockwise
when viewing from the front of the machine.
• Move the switch to the REV position to ensure
that the drum is rotating clockwise, repeating
the previous steps to ensure that the machine is
working properly. If the rotation is not correct, do not
operate this machine.
Prepare the Work Area
• Make sure the work area has satisfactory lighting.
• Do not work in areas that have combustible liquids,
dust or vapors that may ignite. The drain machine is
not explosion resistant and can create sparks.
• Do not work in any area until all the amable
sources have been identied and corrected.
• Never place the machine in water. If necessary,
remove the water from the work area prior to use.
• Be sure the electrical outlet is properly grounded. If
unsure, have the outlet inspected by a licensed electrician.
• Make sure the path for the power machine
transportation and power cord are clear of
obstructions. Any potential sources of damage to the
power cord or machine should be relocated prior to use.
• Keep bystanders and children away from the work area.
• Drain cleaning can be messy. If necessary, use
protective covers.
Inspect and Prepare the Drain
• Determine if cleaning chemicals have been used
in the drain. If chemicals are present, contact the
chemical manufacturer to understand the safety
measures that are necessary to work around those
substances.
• Properly
inspect the drain.
Determine the best
access point to
the drain and the
size of the drain. If
possible, determine
the distance to
the blockage or
the nature of the
clog. If necessary,
remove the xture
(toilet, sink, etc.) to
allow access to the
drain.
Inspect and Prepare the Machine
• Verify machine and components are in place.
• Inspect your drain cleaning gloves to ensure they
are in good condition with no holes, tears or loose
sections. It is critical to have the proper gloves to
protect your hands from the rotating cable.
1
2
1
1
4
3
1

www.brasscraft.com
If your machine is not properly operating, do not use it
until the machine is properly repaired.
Do not allow the cable to twist, kink, buckle, become
overstressed or stuck. If the cable begins to get stuck
or buckle/twist, immediately remove your foot from the
foot switch while rmly holding the cable with both
hands. Allow the machine to come to a complete stop
and the tension to release from the cable. Turn the
machine off and immediately manually rotate the cable
in the opposite direction until the twist or buckle has
been removed.
If the cutter is stuck in the clog, turn the machine into
the OFF position, then to REV and slowly press the foot
switch. Let the machine run slowly in reverse, stopping
the motor often to check if the cutter has become
released by manually retrieving the cable into the
drum. ONLY run the motor in REV if the cutter has
become caught. If the cable begins to get stuck or
buckle/kink/twist, immediately remove your foot from
the foot switch while rmly holding the cable with
both hands. Allow the machine to come to a complete
stop and the tension to release from the cable. Turn the
machine off and immediately manually rotate the cable
in the opposite direction until the twist or buckle has
been removed.
Fingers or other body parts can be caught in rotating
parts and crush. Do not wear loose clothing, neck ties,
unbuttoned jackets, rings, watches or jewelry and always
tie back long hair. This will help reduce the risk of
entanglement with moving parts.
This machine has manual cable feed and it does NOT
automatically extend or retract the cable into the machine.
Cable MUST be fed by hand. You will use the machine
to clear obstructions, return to hand feeding the cable in
between clogs or joints.
1. Plug the machine into a properly grounded outlet.
Leave the motor in the OFF position.
2. Loosen thumbscrew and pull sufcient cable out of
the drum and place the end of the cable as far into the
inlet as possible. The machine should be NO MORE
THAN 2 FEET from the drain opening, with around 4
feet of uncovered cable between the drain opening and
drum opening. The cable should form a slight arch.
NEVER FORCE cable down the line. When the cable
will not feed further into the drain pipe, the cable is
probably stuck against an elbow or joint in the pipe or
may have reached the clog.
3. Tighten thumbscrew.
4. Place the motor in the forward (FOR) position and
slowly depress the footswitch to start the machine.
The drum will begin to turn as will the cable.
Do not continue to force cable into the
drain pipe. This can cause the cable
to twist, buckle, kink or break.
5. While depressing the foot switch, apply slight pressure
to the top of the arch of cable with both gloved hands.
If your cutter is at an elbow, this will help the cutter
“jump” the elbow, freeing it to continue through the
drain. If your cutter is at the clog, the cable will not
feed further.
6. Continue steps 2-5 until you have reached your clog.
7. Let the cutter do the work. Do not use too much force.
Do not continue to force cable into the drain pipe. This
can cause the cable to twist, buckle, kink or break.
Continue applying pressure to the arch of the cable until
the cutter has cleared past the clog.
If the cutter is stuck in the clog, turn the machine into
the OFF position, then to REV and slowly press the
foot switch. Let the machine run slowly in reverse,
stopping the motor often to check if the cutter has
released by manually retrieving the cable into the
drum. ONLY run the motor in REV if the cutter has
become caught. If the cable begins to get stuck or
buckle/kink/twist, immediately remove your foot from
the foot switch while rmly holding the cable with
both hands. Allow the machine to come to a complete
stop and the tension to release from the cable. Turn
the machine off and immediately manually rotate the
cable in the opposite direction until the twist or buckle
has been removed.
If drum continues to rotate under power when the
cable/cutter is stuck, the cable can twist, buckle, kink
or break.
Retrieving the Cable
1. Move the motor switch to the OFF position. Do not
operate the motor in reverse.
2. Unplug the power cord.
3. Loosen the thumbscrew and hand feed all the cable
back into the drum, cleaning in cold water then oiling
the cable as you go. It is recommended that the cable
is continuously ushed through with clean water and
oiled as it is being retrieved from the pipe before
putting it away. This will prolong cable life and prevent
unpleasant odors as well as the damaging effects of
drain cleaning compounds.
4. Once all of the cable is fed back into the drum, tighten
the thumbscrew.
OPERATING INSTRUCTIONS

www.brasscraft.com
Post-Operation Maintenance
1. Drain water from drum. Your model is equipped with
a drain hole in the cable drum. Water, sediment and
debris can corrode cable – remove the drum from the
machine (see “To Remove Drum from Frame” below)
and place it face down to allow all the water to drip
out. This should be done after every use.
MACHINE MAINTENANCE
To reduce the risk of electric shock, re, serious injury
or death, the motor switch should be OFF and machine
unplugged prior to performing any maintenance,
adjusting, or when cleaning this product.
Cables
• The metal cable should be thoroughly cleaned with
water and lubricated to prolong cable life and prevent
unpleasant odors and the damaging effects of sediment
and drain cleaning compounds. Cleaning and lubricating
should occur prior to storing the machine.
• Regularly inspect cables for damage. Replace cables
that are worn or kinked.
Lubrication
The cable will need to be lubricated after each use.
Storage
Store machine in a dry, safe, secured place, out of the
reach of children and people unfamiliar with this machine.
To Remove Drum from Frame
1. Remove wing nuts on the belt
guard (pulley wheel cover) and
remove the belt guard.
2. Remove the drive belt from the
drum by pressing down rmly on
the spring motor housing and
release the drive belt.
3.
A release hook is situated
immediately behind the drum. Pull this hook upward and
pull the drum forward to remove it from the frame.
To Connect the Drum to the Frame
1. Place center of drum hub on drum
drive. Pull the release hook up to
securely push the drum on the frame.
2. Slide the belt under and over the
drum and onto the pulley wheel.
3. Push the motor housing
downward to locate the belt onto
the pulley wheel.
4. Reinstall belt guard and wing nuts.
Belt Installation
1. Remove wing nuts on the belt guard (pulley wheel
cover) and remove the belt guard.
2. Slide the belt under and over the drum and onto the
pulley wheel.
3. Push the motor housing downward to locate the belt
onto the pulley wheel.
4. Reinstall belt guard and wing nuts.
General maintenance and other tasks detailed in this
manual, such as the replacement of the cable or a
damaged belt guard can be done by a qualied owner.
Other servicing repairs, such as the replacement
of a defective motor switch, must only be done by
BrassCraft. Please contact BrassCraft Customer
Service at 877-272-7755.
When servicing, use only genuine BrassCraft parts or
contact customer service. Not using proper parts may
result in electric shock/serious injury or death.
Installing Replacement Cable
1.
Ensure the motor switch is OFF and machine unplugged.
2. Loosen the thumbscrew and remove existing cable
from the machine.
3. Disconnect secured cable end from inside drum unit.
4. Carefully remove the new cable from the packaging.
The tension is likely built up and has potential to strike
the user.
5. Uncoil the new cable completely.
6. Carefully insert the cable into the drum and
reconnect the cable to the inside drum unit for a
counterclockwise insertion.
7. Once cable is secured in drum, continue to insert the
remaining cable counterclockwise until you reach the
slotted end. This part should remain on the outside of
the drum.
8. Finally, tighten the thumbscrew.
REPAIRING YOUR DRUM
MACHINE

Manufacturer assumes no responsibility for failure due to improper use.
©2019 Brasscraft Manufacturing Company, Novi, MI 48375-5331 U.S.A.
All Rights Reserved. www.brasscraft.com Made in China to Brasscraft Mfg. Co. specications.
BrassCraft
®
brand is a trademark of Brasscraft Mfg. Co.
El fabricante no asume ninguna responsabilidad si la uso no se hace de acuerdo al instructivo.
Todos los Derechos Reservados. Hecho en China bajo las especicaciónes de Brasscraft Mfg. Co.
BrassCraft
®
brand es una marca registrada de Brasscraft Mfg. Co.
651-BC2040
v1019
/