Page is loading ...

WARNING - RISK OF ELECTRIC SHOCK. DISCONNECT MAIN
POWER AT FUSE OR CIRCUIT BREAKER BEFORE
INSTALLING OR SERVICING THE FIXTURE.
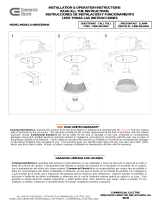
LED 4” RETROFIT TRIM INSTALLATION
INSTRUCTIONS - MODEL CER4742
Please read carefully and save these instructions,
as you may need them at a later date.
GENERAL: All electrical connections must be in accordance
with local and National Electrical Code (N.E.C.) standards. If
you are unfamiliar with proper electrical wiring connections
obtain the services of a qualified electrician.
Remove the trim from the box and make sure that no parts
are missing by referencing the PARTS illustrations.
THIS RETROFIT ASSEMBLY IS ACCEPTED AS A
COMPONENT OF A LED LUMINAIRE WHERE THE
SUITABILITY OF THE COMBINATION SHALL BE
DETERMINED BY CSA OR CANADIAN AUTHORITIES
HAVING JURISDICTION.
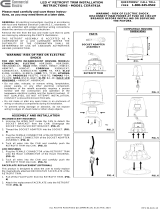
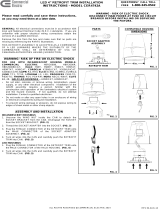
WARNING – RISK OF ELECTRIC SHOCK. INSTALL THIS
TRIM IN RECESSED HOUSINGS THAT HAVE
DIMENSIONS SHOWN IN FIG. 1, WHICH INCLUDE THE
FOLLOWING LUMINAIRES: COMMERCIAL ELECTRIC
MODELS HBR2000R, HBR2000B, HBR2000BICAT; HALO
MODELS H99T, H99RT, H99ICT, H99TAT, H99RTAT,
H99ICAT; CORDELIA MODLES X2000LICAT,
X2000LRICAT, X2000LICATB; CAPRI MODELS R4, RR4;
ELCO MODELS EL99A, EL99RA, EL99ICA; JUNO
MODELS TC1, TC1R; LITHONIA MODELS L3, L3R;
PROGRESS MODELS P832-TG, P830-TG; THOMAS
MODEL; PS4, PS4-RM; NORA MODEL NSCIC-40IAT;
ELITE MODELS B4, 4R.
_______________________________
ASSEMBLY AND INSTALLATION
INCANDESCENT HOUSINGS
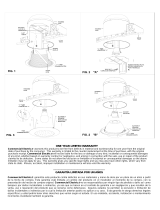
1.Unscrew the WING NUT inside the CAN to detach the
SOCKET BRACKET from the CAN. Disengage the
SOCKET from the SOCKET BRACKET. (FIG. 2)
2.Thread the SOCKET ADAPTER into the SOCKET. (FIG. 3)
3.Attach the GROUND WIRE to the CAN using the provided
self-tapping GROUND SCREW and star washer. Make sure
that the GROUND SCREW does not interfere with the entry
of the RETROFIT TRIM into the HOUSING.
4.Plug the FEMALE CONNECTOR of the RETROFIT TRIM
onto the MALE CONNECTOR of the SOCKET ADAPTER
ASSEMBLY. (FIG. 4)
5.Tuck all wires into the CAN and carefully push the
RETROFIT TRIM into CAN. (FIG. 5)
LED HOUSINGS
1.Plug the FEMALE CONNECTOR of the RETROFIT TRIM
onto the MALE CONNECTOR of the HALO HOUSING.
(FIG. 4)
2.Tuck all wires into the CAN and carefully push the
RETROFIT TRIM into CAN. (FIG. 5)
QUESTIONS? CALL TOLL
FREE 1-800-345-0542
5 ½ in.
4 in.
FIG. 1
FIG. 2 FIG. 3
PARTS
SOCKET ADAPTER
ASSEMBLY
HOUSING DIMENSIONS
ALL RIGHTS RESERVED. COPYRIGHT COMMERCIAL ELECTRIC 2013
RETROFIT TRIM
FIG. 5
FIG. 4

ALL RIGHTS RESERVED. COPYRIGHT COMMERCIAL ELECTRIC 2013
_______
DIMMING
Although this product is compatible with most common
residential type dimmers, dimming performance depends on
dimmer, dimmer setting (for dimmers with brightness range
adjustments), wiring method, and the number of LED modules.
For best results, set dimmer position at maximum before
adjusting to a lower light level.
Recommended Dimmers (minimum load of four LED modules
may be required for optimal dimming performance): Leviton
Decora – 6631, IPI06, Lutron Skylark – S-603PGH, and Lutron
Diva – DVWCL-153PDH, CTCL-153PDH, and TGCL-153PH.
____________________
DRIVER REPLACEMENT
To replace a malfunctioning driver:
1. DISCONNECT MAIN POWER AT FUSE OR CIRCUIT
BREAKER.
2. Pull the RETROFIT TRIM down from the RECESSED
HOUSING. Unplug the FEMALE CONNECTOR of the
RETROFIT TRIM from the MALE CONNECTOR of the
SOCKET ADAPTER ASSEMBLY.
3. Separate the LED DRIVER CONNECTOR from the
RETROFIT TRIM CONNECTOR.
4. Remove the LED DRIVER SCREWS and separate the OLD
LED DRIVER from the RETROFIT TRIM and replace it with
the NEW LED DRIVER, securing it in place using the LED
DRIVER SCREWS.
5. Connect the LED DRIVER CONNECTOR to the RETROFIT
TRIM CONNECTOR.
6. Re-install the RETROFIT TRIM into the RECESSED
HOUSING.
_____________________________
THREE-YEAR LIMITED WARRANTY
Commercial Electric
warrants this product to be free from
defects in material and workmanship for three years from the
original date of purchase by the consumer. This warranty is
limited to the counter replacement at the time of purchase, with
the original purchase receipt. Commercial Electric
will not
be liable for the loss or damage of any kind, incidental or
consequential damages of any kind, whether based on
warranty contract or negligence, and arising in connection with
the sale, use or repair of the product claimed to be defective.
Some states do not allow the exclusion or limitation of
incidental or consequential damages so the above limitation
may not apply to you. This warranty gives you specific legal
rights and you may also have other rights, which vary from
state to state. Misuse, accident, improper installation or
maintenance will also void the warranty.
Max Case
Temperature 90°C
Dimmable •
tc
LPS Power Supply
AC INPUT:
120 Vac/ 200mA
60 Hz
AC INPUT
L-BLACK
N-WHITE
Made in China
MODEL: RHPS311AL-JW0
DC OUTPUT:
Regulated current 350 mA
Voltage range 18-32V
Maximum power 11.2 W
Maximum voltage 37 V
+ RED
- BLACK
CDL
This device complies with part 15 of the FCC Rules. Operation is
subject to the following two conditions:
1. This device may not cause harmful interference, and
2. This device must accept any interference received, including
interference that may cause undesired operation.
NOTE: This equipment has been tested and found to comply with
the limits for a Class B digital device, pursuant to Part 15 of the
FCC Rules. These limits are designed to provide reasonable
protection against harmful interference in a residential installation.
This equipment generates, uses and can radiate radio frequency
energy and, if not installed and used in accordance with the
instructions, may cause harmful interference to radio
communications. However, there is no guarantee that interference
will not occur in a particular installation. If this equipment does
cause harmful interference to radio or television reception, which
can be determined by turning the equipment off and on, the user is
encouraged to try to correct the interference by one or more of the
following measures:
• Reorient or relocate the receiver antenna.
• Increase the separation between the equipment and receiver.
• Install the product onto on a circuit different from that to
which the receiver is connected.
• Consult with the dealer or an experienced radio/TV
technicianfor help.
CAUTION: Any changes made to the electronics circuit will void
this equipment’s compliance with Part 15 of the FCC Rules and
should not be operated.
/