Page is loading ...

52” Ceiling Fan with lamp
Model : UCF-699
Instructions Manual
Read these instructions before use.
Keep these instructions in safe place for future reference.

SAFETY INSTRUCTIONS
Warning: To reduce the risk of fire, electric shock, or personal injury, read the
following instructions very carefully:
READ THESE INSTRUCTIONS
1. The fan should not be connected to any power point. Install the fan on the ceiling.
2. The minimum distance between the blades and the floor must be 2.3m. If you
use a hook to hang the fan, the maximum weight capacity is 100kg.
3. Make sure that you cap with wire connectors. Make sure to cap the wires you will
not use with a wire connector.
4. Disconnect the fan from the mains power before mounting or repairing.
5. The cable must be properly earthed in order to avoid any risk of electrocution.
6. Installation by a qualified electritian is highly recmmended.
7. Never install the fan in a room with a high degree of humidity.
8. Be careful when you are close to the fan blades.
9. If the supply cord is damaged it must be replaced by the manufacturer, its service
agent or similarly qualified persons in order to avoid a hazard.
10. This appliance must be installed following the national regulations for electrical
installation.
11. This appliance is designed for dry places (Don’t use in wet places).
12. This appliance is not intended for use by persons (including children) with
reduced physical, sensory or mental capabilities, or lack of experience and
knowledge, unless they have been given supervision or instruction concerning
use of the appliance by a person responsible for their safety.
13. Children should be supervised to ensure that they do not play with the appliance.
14. WARNING: In order to ensure children’s safety, please keep the contents of the
package out of their reach (plastic bags, polystyrene, boxes etc.).
15. Important: always turn off the electricity supply to the ceiling fan during
installation or maintenance. It is recommended to remove the fuse or turn off the
circuit – breaker connector when handling (switching it off is not enough).
16. Before operation make sure that all connections are secured, to prevent the fan
from falling.

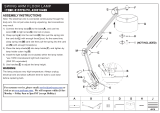
INSTALLATION OF THE FAN
1. Secure the hanger bracket to the ceiling and tighten with two long screws.
2. Insert the blades through the lateral slots and secure them with two screws.
Repeat this procedure for all blades.
3. Insert the male connector into the female connector securely, then secure the
light kit onto the light kit bracket by tightening the 3 set screws and spring
screws.
4. Hang the ball joint and the fan onto the bracket. Make sure the guide pin of the
bracket is fitted into the slot of the ball joint.
5. Insert the remote control receiver between the bracket and the down rod.
6. Connect the male/female connector from the bracket to the remote control
receiver and connect the male/female connector from the remote control
receiver to the fan. Connect the wires from the supply and the bracket to the
wiring terminals as follow:
Brown Wire L
Blue Wire N
Green/Yellow Stripes Wire < >
7. Attach the canopy to the bracket by aligning the canopy holes with the brackets
side holes and secure with the screws.
8. Install the bulbs to the lamp-sockets. Switch the power on and check operation
of the light kit and fan. (suitable bulbs: E14, Max. 2X40W, not supplied)
9. Tighten the lampshade onto the lamp holder by rotating clockwise.

DIRECTION SWITCH
In cold weather: Push the switch to the right so that the blades rotate clockwise.
In hot weather: Push switch to the left so that the blades rotate anti-clockwise.
NOTE: The fan must be turned off and stopped before reversing the direction.
TRANSMITTER FUNCTIONS
ON: Turns on the ceiling fan
OFF: Turns the ceiling fan off.
HI: Turns on the ceiling fan at high speed.
MED: Turns on the ceiling fan at medium speed.
LOW: Turns on the ceiling fan at low speed.
LIGHT ON: Turns on the light.
LIGHT OFF: Turns off the light.
Use the timer to turn OFF the fan after a specific
period of time by pressing the relative button on the
remote control (1H for 1 hour, 3H for 3 hours, 6H for
6 hours).
WIRING INSTALLATION INSTRUCTIONS:
ATTENTION
Incorrect wiring connection will damage this receiver.
1. The ceiling fan must be set at HIGH after installation.
2. Make the wiring connection as shown in Fig. 1.1 and 1.2. The IR sensor must be
stuck outside the canopy. Its position depends on IR receiving condition (Fig. 2).
To operate the ceiling fan using the remote controller, you should hold the
transmitter pointing to the I.R. Sensor.

3. Once the connection has been made, the receiver needs to be inserted into the
drop rod hanging bracket. The canopy comes up to cover the receiver and
bracket (Fig. 1.2).
4. In order to replace the batteries, open the battery housing cover by sliding out the
cover downward to the arrow shown direction, while pressing down the cover with
your thumb. (1.5V/ AAA, 2PCS) (Fig. 3) Holder for transmitter: if desired, install
onto the wall with screws. (Fig. 4)
Fig. 1.2
Fig. 1.1
Fig. 3
Fig. 4
Fig. 2

MAINTENANCE
In order to replace the light bulb:
1. Switch the device off (preferably, turn it off at the circuit breaker) and leave it to
cool down. (Caution: light bulbs can get very hot when in use.)
2. Remove the bulb by holding it firmly and turning it anti-clockwise.
3. Take a new bulb and place it carefully into its holder. Screw it in clockwise.
4. Put the power supply on again and switch on.
Note: Suitable lamps for this fan are E14 lamps (Max. 2x40W)
CLEANING
To clean the ceiling fan, use a soft, dry cloth. Do not use scouring pads, abrasive
or chemical cleaners. Do not allow condensation come in contact with the
electrical components of the appliance.
NOTICE ABOUT RECYCLING
Your product is designed and manufactured with high quality
materials and components which can be recycled and reused.
This symbol means that electrical and electronic equipment, at their
end-of-life, should be disposed of separately from your household
waste. Please dispose of this equipment at your local community
waste collection/ recycling centre.
In the European Union there are separate collection systems for used electrical and
electronic products.
Please help us to conserve the environment we live in!
DECLARATION OF CONFORMITY
Herewith, Amiridis-Savvidis S.A. states that this product, complies with the
requirements of below directives:
EMC-Directive: 14 / 30 / EU
Low Voltage Directive: 14/ 35 / EU
CE Marking: 93 / 68 / EEC
RoHS Directive: 11 / 65 / EU
The detailed declaration of conformity can be found at
www.united-electronics.gr
Exclusive importer in Greece:
Amiridis – Savvidis S.A.
87A, 17
th
Noemvriou str, P.C. 55534
Thessaloniki – Greece
T: +302310944944 | F: +302310944940
www.amiridis-savvidis.gr
/