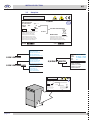
Bartscher 110415 Owner's manual
- Category
- Dishwashers
- Type
- Owner's manual

Instructions for Installation, Use and
Maintenance
EN
COD.: 3000E
Ed. 03 - 09/2009
APPLICARE ETICHETTA
MATRICOLA

Thank you for choosing our appliance.
The installation, use and maintenance instructions given in this manual have been pre-
pared to ensure the long life and correct operation of your appliance.
Follow these instructions carefully.
We have designed and manufactured this appliance according to the latest technological
developments. Now, it is in your care.
Your satisfaction is our greatest reward.

EN
page 21
SUMMARY Page
IMPORTANT INFORMATION 22
INSTALLER SECTION
1. MACHINE INSTALLATION 25
1.1 Receipt of the appliance 25
1.2 Water connection 25
1.3 Electrical connection 25
1.4 Temperature adjustment 26
1.5 Rinse aid dispenser operation 26
2. DETERGENT DISPENSER INSTALLATION 28
2.1 Electrical connection 28
2.2 Water connection 28
2.3 Dispensing the detergent 28
3. PUMP TECHNICAL DATA AND INFORMATION 29
3.1 Emptying pump (optional) 29
3.2 Pressure increase pump (optional) 29
3.3 Dataplate 30
USER SECTION
4. CONTROL PANEL AND RELATIVE SYMBOLS 31
5. OPERATION 31
5.1 Use of detergent 32
5.2 Use of rinse aid 32
5.3 Discharge pump system (optional) 32
5.4 Regeneration device (optional) 32
5.5 Compliance with hygiene regulations and H.A.C.C.P. 33
6. MAINTENANCE 34
6.1 Regular maintenance 34
6.2 Special maintenance 34
7. ALARMS 34
8. ENVIRONMENTAL FEATURES 35
8.1 Packing 35
8.2 Disposal 35
9. ECOLOGICAL FEATURES 35
9.1 Recommendations for optimum energy, water, and additive consumption 35
GENERAL INFORMATION
10. TROUBLESHOOTING 36
WARNING: FAILURE TO COMPLY (EVEN PARTIALLY) WITH THE RULES
GIVEN IN THIS MANUAL WILL INVALIDATE THE PRODUCT WARRANTY
AND RELIEVES THE MANUFACTURER OF ANY RESPONSIBILITY.
READ THE INSTRUCTIONS CAREFULLY BEFORE INSTALLING THE
MACHINE.
TRANSLATION OF THE ORIGINAL INSTRUCTIONS

EN
page 22
INSTRUCTIONS
This instruction booklet must be kept with the dishwasher for future consultation. If the
dishwasher is sold or transferred to another user, make sure the booklet always goes with
the appliance so that the new owner can have the necessary information on operation and
the relative instructions.
The instruction booklet must be carefully read before installation and rst use of the di-
shwasher.
These instructions are supplied to safeguard the user in compliance with Directive 2006/95/
CE as amended and the “harmonized product Technical Standard” EN 60335-1 and EN
60335-2-58.
· ADAPTATION OF THE ELECTRICAL AND WATER SYSTEMS FOR DISHWASHER
INSTALLATION MUST ONLY BE CARRIED OUT BY QUALIFIED OPERATORS.
· This dishwasher must only be used by adults. This is a professional machine to be used by
qualied personnel, and installed and repaired exclusively by a qualied technical assistance
service. The Manufacturer declines any responsibility for improper use, maintenance or
repair.
· The appliance is not to be used by children or persons with reduced physical, sensory or
mentalcapabilities, or lack of experience and knowledge, unless they have been given supervision
or instruction.
· Children being supervised not to play with the appliance.
· Accompany the door in opening and closing.
· Make sure the dishwasher is not resting on the power cord or the lling and drain hoses. Level
the machine by adjusting the support feet.
· Do not use the appliance or any part of it as a stepladder or means of support as it has been
designed exclusively to bear the weight of the dishrack containing dishes to be washed.
· The dishwasher is designed only and solely for washing plates, glasses and various pots
and pans with human food type of residue. DO NOT wash articles polluted with petrol,
paint, bits of steel or iron, fragile objects or material not resistant to the washing process.
Do not use acidic corrosive chemical products or alkaline and solvents or chlorine based
detergents.
· Do not open the dishwasher door when it is working. In any case, the dishwasher has a special
safety device which immediately stops it if the door is accidentally opened, thus preventing water
spillage. Remember to always switch the dishwasher off and empty the tank before accessing
the inside for cleaning or any other purpose.
· After use, at the end of the day and for any kind of maintenance, it is advisable to
disconnect the dishwasher from the power supply by means of the service switch and
the main wall switch. Close the water supply cock.
· The user must not carry out any repair and/or maintenance operations. In any case contact
qualied personnel.
· Servicing of this dishwasher must be performed by authorized personnel.
N.B.: Only use original replacement parts. Otherwise the product warranty is invalidated
and the manufacturer is no longer responsible.
· Do not use old load pipe, but only new ones.
· Some important rules must be followed for using this appliance:
1) never touch the appliance with wet hands or feet;
2) never use the appliance when barefoot;
3) do not install the appliance in places exposed to water sprays.
· Do not dip bare hands into water containing detergent. If this should occur, wash them immediately
with plenty of water.
· Only follow the instructions given in the manufacturer’s booklet for cleaning operations (chap.
6)
· This appliance is designed to work at room temperatures up to a max. 35°C, in a suitable place
with temperature not below 5°C.

EN
page 23
· Do not use water to put out res on electrical parts.
· Do not clog the intake or dissipation grids.
· Only qualied personnel can access the control panel after power is switched off.
· The machine has an IPX3 rating of protection against accidental splashes of water. It is not
protected against pressurized jets of water, so it is recommended that pressure cleaning systems
not be used.
CAUTION: WAIT 10 MINUTES AFTER THE APPLIANCE HAS BEEN TURNED OFF BEFORE
CLEANING THE INSIDE.
CAUTION: DO NOT PUT HANDS IN THE APPLIANCE AND/OR TOUCH THE PARTS ON THE
BOTTOM OF THE TUB DURING AND/OR AT THE END OF A WASHING CYCLE.
NOTE: The manufacturer declines any responsibility for accidents to people or things deri-
ving from failure to observe the rules stated above.


EN
page 25
INSTALLER SECTION
ATTENTION:
At the end of installation make sure to remove the parts of this booklet relevant to the installer,
for future consultation.
1. MACHINE INSTALLATION
1.1 Receipt of the appliance
After removing the packing, ensure that the appliance has not been damaged in transport.
If it has, inform the retailer. If safety has been compromised, do not install the machine. For
disposal of the packing, see ch.8.
1.2 Water connection
Connect the machine's water supply with an interrupt valve capable of quickly and completely
shutting off water intake.
Make sure that the water supply pressure comes within the values given in the Table 1.
If it is less than 2 bar dynamic pressure (200 kPa) a pressure pump must be installed to
guarantee optimal machine operation (by request, the dishwasher can be supplied with a
pump).
If, however, the water supply pressure is greater than 400 kPa, a pressure reducing device
must be installed.
For water with average hardness greater than 10°Fr., a water softener must be used.
This will result in cleaner dishes and longer life of the appliance.
By request, the machine can be equipped with a water softener (see chap. 5.4).
All damages caused by the hydraulic limestone (calcareous water higher-up than 10°F and
without watersoftner) are not are not covered by warranty.
In order to ensure the optimum performance, the water supply temperature must come
within the range given in table 2.
Each machine is provided with a rubber tube with a ¾" threaded attachment for water
lling.
Connect the emptying tube, supplied with the appliance, to the union elbow located under
the tub so that water ows freely. If it is not possible to empty the water at a level lower
than the drain of the appliance, it is advisable to install an emptying pump, which can be
provided by request.
The emptying tube should always be connected to a siphon to prevent odor back-up from
the screen.
1.3 Electrical connection
The electrical connection must be made according to current technical standards.
Ensure that the mains voltage corresponds to the value given on the machine dataplate.
Install a suitable omnipolar thermal magnetic circuit breaker, dimensioned according
to absorption, with a contact opening of at least 3 mm.
This circuit breaker must be exclusively used for this purpose and installed in the
immediate vicinity.
Make sure that the electrical systems are suitably earthed.
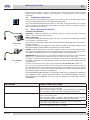
On the back of the appliance there is a terminal marked with the symbol (see Pict.
1), which is provided for equipotential connection between different appliances (see
electrical safety standards).
FOR APPLIANCES USING A THREE-PHASE POWER SUPPLY, FOLLOW THE
INSTRUCTIONS AND WIRING DIAGRAM ATTACHED TO THE APPLIANCE.
ATTENTION TO CORRECT SENSE OF TRI-PHASES PUMPS ROTATION (if
present).
pict. 1
Pressure
Table
Min. Max.
kPa kPa
Static Pressure
250 400
Dynamic Pressure
200 350
Water hardness
2°f 10°f
H
2
O supply temperature table
Machine upon
request
Standard Macchine
from catalogue
H
2
O Cold H
2
O Hot
5°C ≤ t < 50°C 50°C≤ t ≤ 60°C
table 2table 1

EN
page 26
INSTALLER SECTION
C
D
B
A
code 10799
pict. 2
PROBLEMS CAUSES AND SOLUTIONS
Water exits from the rinse aid suction tube. The suction valves 10805 - 10705/D and delivery do not seal due to
foreign bodies in the closing seats.
Clean the valves 10805 - 10705/D, check that the rinse aid suction
lter is present, and lter the water entering the dishwashwer.
The dispenser does not draw rinse aid. a) the delivery valve 10805 - 10705/D does not seal due to foreign
bodies in the closing seats.
Clean the valve 10805 - 10705/D, check that the rinse aid suction
lter is present and lter the water entering the dishwasher.
b) The piston seal 10806 does not hold because it is damaged.
Replace the seal 10806 with an original.
c) check the diaphragm 10807 - 10705/O.
code 10799/G
pict. 3
C
D
B
A
Feed cable: the retailer - importer - installer must ensure that the feed cable complies
with the cable insulation category of the workplace, in conformity with current Technical
Standards.
1.4 Temperature adjustment
If necessary, the water temperature of the wash and rinse cycles can be adjusted by means
of the ne-adjustment screws on the respective thermostats.
The recommended temperatures are 55°C for the wash cycle (tub) and 85 - 90°C for the
rinse cycle (boiler). Machines with boiler inside the washing tub have only one thermostat
which should be set at 75-80°C.
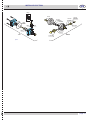
1.5 Rinse aid dispenser operation
Technical characteristics
Operation: It utilizes the difference in combined pressure caused by turning the washing
pump on and off, and the rinse pressure.
Water connection:
1) Connect the dispenser tube tting (A) to the pump, by means of the rubber tube installed
in the appliance (pump pressure).
2) Connect the small black rubber tube by the brass delivery tting (B) to the connection in
the boiler (injector).
3) Make sure that the green product suction tube is inserted on the special tting (C) and
that the small lter and the ballast are inserted in the rinse aid tank.
Priming: To prime the dispenser, turn on the appliance and carry out several complete wash
cycles or press the adjustment screw (D) during the wash cycle and open and close the door
combined with pressing the pin (D). This method speeds up the rell process.
Adjustment: With each rinse cycle, the dispenser draws an amount of rinse aid, adjustable
from 0 to 4 cc, equivalent to a length of 0 to 30 cm drawn into the suction tube.
In order to regulate the dispenser to the minimum amount, turn the adjustment screw (D)
completely clockwise. For the maximum amount, turn the screw anticlockwise about 20
complete turns.
For the correct amount of rinse aid, see the paragraph “Use of rinse aid”.(chap. 5.2).
N.B.: for each turn of the screw the amount of the product drawn into the tube varies by 1.6
cm, equivalent to 0.2 cm³/turn (about 0.21g/turn with a concentration of 1.05 g/cm³ of rinse
aid). The rinse aid cannot function properly if the difference in level between the bottom of
the machine and the container exceeds 80 cm.
THE DISPENSERS ARE PRE-SET TO A 5 CM OF TUBE (0,65 gr.) INTAKE OF PRODUCT
FOLLOWING A TEST PHASE SYSTEM CHECK. THIS MEASUREMENT SHOULD
BE ADJUSTED ACCORDING TO THE TYPE OF RINSE AID USED AND WATER
HARDNESS.

EN
page 27
INSTALLER SECTION
10805
10805
10806
10799
10805
10807
10808
12506
10705/O
10705/N
10705/M
10705/D
10705/C
10705/T
10705/E
10705/R
10705/G
10705/C
10799/G
10705/D
pict. 4

EN
page 28
INSTALLER SECTION
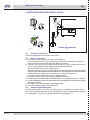
2. DETERGENT DISPENSER INSTALLATION
A
B
C
min 3
cm
Point B
pict. 6
GERMAC
15185
Ø 8
SEKO
15108/E
Ø 10
CONNECTION DIAGRAM
pict. 5
2.1 Electrical connection
Follow the wiring diagram attached to the machine.
2.2 Water connection
a) A Ø12 hole must be made on the back of the appliance.
In some appliances the hole has already been made and is closed with a plastic cap.
Remove the cap from the hole and t the delivery connection.
b) Otherwise, drill one of the same diameter as the injector on the back part of the tub (see
pict. 5. This operation must be carried out by the Technical Service.
The hole must be made above the water level.
Important: make the hole in a position distant from the overow tube, so that detergent
does not ow out immediately. Fix the dispenser in a vertical position with tube connectors
turned downwards, making sure not to place it on energized components.
Clean the inside of the machine from any drilling residual.
c) Correctly mount the injector (C) using the appropriate xtures.
d) Connect the suction tube to the suction attachment of the dispenser (see pict. 5 point A).
e) Connect the delivery tube to the other attachment of the dispenser, and the delivery tting
(see pict. 5 point B).
f) Insert the suction tube with lter in the detergent tank.
g) Prime the detergent and proceed to dispense.
2.3 Dispensing the detergent
The detergent dispenser capacity can be adjusted using a screwdriver as shown in pict. 6.
Every 2 cm of product drawn into the tube corresponds to 0.25 cm³ equivalent to 0.3 g (with
a concentration of 1.2g/cm³). For proper dispensing see paragraph 5.1.

EN
page 29
INSTALLER SECTION
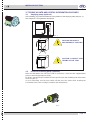
3. TECHNICAL DATA AND USEFUL INFORMATION ON PUMPS
3.1 Emptying pump (optional)
How installing, pay particular attention to the position of the emptying tube (see pict. 7).
See chapter 5.3. for operations description.
3.2 Pressure increasing pump (optional)
When the dishwasher has not been used for some time, check that the supplementary
pressure increasing pump turns freely.
To do this, operate using a screwdriver in the special slot on the ventilating side of the motor
shaft (see pict. 8).
In case of blocking, turn the main switch off and move the motor shaft, inserting the
screwdriver in the notch, turning it clockwise and anticlockwise.
MAX 0,8m
pict. 8
CAUTION: INCORRECT
POSITIONING OF THE TUBE.
CAUTION: CORRECT POSI-
TIONING OF THE TUBE
pict. 7

EN
page 30
INSTALLER SECTION
3.3 Dataplate
Model S/N
Code DW 999XXYYYY
Model DESCRIPTION
S/N DW A 1015770 Type ..........
400V 3N 50HZ 8A
3500W
16A
200-500 kPa
IPX3
MADE IN ITALY
Temperatura massima acqua in ingresso 60°C
Temperature max eau a l'entre
Maximale Temperatur Wasseranschl
Maximum Water temperature in-feeding
Pressione Dinamica alimentazione idrica
Pression dynamique arriveè d'eau
Dynamic pressure water supply
Dynamischer Druck asserreinlauf
Pressione dinamica vapore saturo
Pression dynamique vapeur satueèè
Dymanischer Druck gesattigter Dampf
Pression Dinamica Vapor Saturado
CL/Part
S/N DW A 1015770
ANNO
YEAR
ANNÉE
AN“O
JAHR
NUMERO DI SERIE
SERIAL NUMBER
NUMÉRO DI SÉRIE
NUMERO DI SERIE
SERIENNUMMER
TECHICAL SPECIFICATION
500W
A=2006 - 2007
B=2007 - 2008
C=2008 - 2009
D= .... - ....
CODE DW 009M
FAMIGLIA PRODOTTO
FAMILY PRODUCT
FAMILLE DU PRODUIT
FAMILIA PRODUCTO
FAMILIE DES PRODUKTES
CODE DW 009M.0003
FAMIGLIA PRODOTTO
FAMILY PRODUCT
FAMILLE DU PRODUIT
FAMILIA PRODUCTO
FAMILIE DES PRODUKTES
CODICE MODELLO
CODE MODEL
CODE ARTICLE
CODIGO MODELO
KODE VON MODELL
Model S/N
Code DW 999XXYYYY
Model DESCRIPTION
S/N DW A 1015770 Type ..........
400V 3N 50HZ 8A
3500W
16A
200-500 kPa
IPX3
MADE IN ITALY
Temperatura massima acqua in ingresso 60°C
Temperature max eau a l'entre
Maximale Temperatur Wasseranschl
Maximum Water temperature in-feeding
Pressione Dinamica alimentazione idrica
Pression dynamique arriveè d'eau
Dynamic pressure water supply
Dynamischer Druck asserreinlauf
Pressione dinamica vapore saturo
Pression dynamique vapeur satueèè
Dymanischer Druck gesattigter Dampf
Pression Di
namica Vapor Saturado
CL/Part
TECHICAL SPECIFICATION
500W

EN
page 31
USER SECTION
4. CONTROL PANEL AND RELATIVE SYMBOLS
5. OPERATION
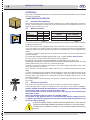
• Check that the lter (B) is correctly tted in its seat (pict. 9-10).
The lter must be cleaned after every 20 wash cycles and whenever necessary.
DO NOT use the appliance without the lter.
• Insert the overow tube (A) in the special seat inside the tub (pict. 9-10)
• Close the dishwasher door.
• Insert the special rinse aid dispenser tube in the liquid container and check that the
quantity of additive is sufcient for daily use (see chap. 5.2 "Use of rinse aid").
• Open the water tap and plug in the main switch.
• Turn switch 0-1 1(see chap. 4) to position 1 (pressed).
The operation is signalled by the switch indicator lighting up or by the indicator with the
symbol (a) (see chap. 4).
The machine will automatically ll the tub with water; (indicator (b) - see chap. 4 - when
present will turn on, indicating the tub is full) then the heating phase begins.
Indicator (e) (see chap. 4) comes on when the water temperature is reached.
• Insert the rack lled with dishes to wash.
The plates must be correctly placed in the rack (see pict. 11).
• On machines with selector 6 (see chap. 4), select the wash cycle required.
• Before starting the wash-cycle, in absence of an automatic dosing system, pour the
detergent in the wash-tank.
When the temperature indicator (e) will turn on, press the START 2 button (see chapter
4) for at least a second. The beginning of the cycle is indicated either by the light on the
button itself or on the (c) lamp.
At the end of the washing cycle, a hot rinse cycle will take place.
The indicator light of the START button 2 or the (c) lamp (see chap. 4) will turn off when
the cycle has nished.
At cycle end with the door closed, dishes do not get dried. Take out the baset or keep
the door open to allow the evaporation and the drying of the dishes.
To carry out a cooling glasses cycle, on appliances equipped with this option, press button 3
(see chap. 4) and hold it down for the desired length of time after the indicator light C goes
off. After this cycle, the glasses remain wet.
• The appliance is now ready for a new wash.
• At the end of the day, clean the machine (see chap. 6 "Maintenance").
• Turn off the machine and the water tap.
• Turn off the main wall switch.
CONTROLS
Cycle START button
Main switch 0-1
Cooling glasses button
(optional)
Manual empty button
(optional)
Wash type selector
(if provided)
Regeneration START
button (optional)
INDICATORS
Tub full indicator
Power on indicator
Washing cycle
indicator
Temperature
indicator
Regeneration cycle
indicator
a
b
c
d
e
B
A
B
A
pict. 10
pict. 11
pict. 9

EN
page 32
USER SECTION
5.1 Use of detergent
ONLY use NON FOAMING types suitable for industrial glass-washers and dishwashers.
It is advisable to use liquid detergents.
Put the detergent directly in the tub.
The correct amount will be suggested by the product manufacturer according to the water
hardness. By request, the dishwasher can be equipped with an electric detergent dispenser
(always recommended).
1cm. of the product drawn into the tube is equal to about 0.15 g. A correct amount of deter-
gent is very important for a successful wash.
5.2 Use of rinse aid
The machine is equipped with a rinse aid dispenser.
The machine automatically draws the product.
The amount dispensed can be regulated by operating the ne-adjustment screw on the
dispenser.
Reduce the amount by turning the screw clockwise, increase by turning it anticlockwise.
The recommended amount is 2-5 cm of product measured on the suction tube. 1 cm of the
product drawn into the tube is equal to about 0.13g. A correct amount of rinse aid is very
important for a quick and clean drying.
5.3 Discharge pump system (optional)
To drain completely the wash-tank keep the machine ON, extract the over ow pipe and shut
the door. Press the button (5 - see chap. 4) for at least a second: the discharge pump will
automatically drain the wash-tank.
When the drain is completed, turn the machine OFF.
Turn the machine OFF and, after 5 seconds, ON (button 1 - see chap. 4) to ll the wash-
tank and run a new cycle.
Opening the door will stop the machine that will re-start when the door is shut.
During the wash-rinse cycle the water in excess is automatically drained.
5.4 Regeneration device (optional)
Resin regeneration by the water softener is very important.
Resin regeneration: resin regeneration should be carried out according to the number of
cycles as indicated in the picture below. Ex. 27°f (or 15°D) = 39 cycles.
To carry out the purifying cycle, follow these instructions:
• Open the the water tap and plug in the main switch.
• Turn the main switch 1 (see chap. 4) to 1 (OFF).
• Open the door.
• Remove the over ow tube and empty all the water in the tub.
• Once the tank is empty check and fully replenish the salt, being careful not to spill it on
the tank itself. A strong concentration of salt can negatively affect the correct functioning
and service life of the machine.Fill the special container, placed on the inside of the tub,
(see pict. 12) with coarse salt (1-2 mm. grains - the maximum capacity of the bowl is 500
gr.).
• Close the door, press button (4 - see chap. 4) for 5 seconds and wait for the turn on of
the indicator light (d) - see chap. 4. The indicator light (d) will come on when the cycle is
activated. The resins contained in the puri er will be automatically regenerated in about
20 minutes. The cycle is completed when the indicator light (d) goes off. Wait 20 seconds
before opening the door.
Before opening the door, please wait 20 seconds.
After the softening cycle, switch the machine off with button (1 - see chap. 4).
Turn off the main wall switch.
P.S.: once the cycle has begun it cannot be stopped.
If a water conditioner is installed externally, follow the instructions given in the relative
manual to regenerate the resins.
• The ashing of the cycle lamp during the softening cycle, indicates a malfunction or a
missed draining of the wash-tank (see chapter 7).
DETERGENT
SALT
pict. 12
RINSE AID

EN
page 33
USER SECTION
In the case of water hardness above 35°f it is advisable to install an external water
softener.
5.5 Compliance with hygiene regulations and H.A.C.C.P.
• The machines are equipped with a temperature indicator (e - chap. 4) which lights up
when the boiler and the tub have reached the preset temperature (values set by the
manufacturer). It is recommended to wait for this light to go on before starting the next
cycle.
• Scrape food from the dishes carefully in order not to clog the lters, nozzles and pipes.
• Unload the wash tub and clean the lters at least twice a day.
• Check that the amount of detergent and rinse aid dispensed is correct (as suggested by
the supplier of the product). In the morning before starting up the machine, check that
there is enough product in the containers for daily use.
• Always clean the support oor of the dishes.
• Remove the rack from the dishwasher with clean hands or gloves so as not to dirty the
cutlery.
• Do not dry or polish the dishes with non-sterilized cloths, brushes, or dusters.

EN
page 34
USER SECTION
6. MAINTENANCE
6.1 Regular Maintenance
WARNING: The machine is not protected against water jets, therefore do
not use pressure cleaning systems.
Contact your cleaning products retailer for detailed instructions on the
methods and products to use for periodic sanitizing of your appliance.
DO NOT use bleach or chlorine-based detergents for cleaning the
appliance.
In order to ensure perfect performance, the appliance must be completely cleaned at least
once a day in the following way:
• Turn the switch to 0 (1 - see chap. 4).
• Switch off the main switch.
• Turn off the water tap.
• Remove the overow tube to empty the water.
For appliances provided with emptying pump follow the indications as described on
paragraph 5.3.
• Remove the lter and clean it with a brush under running water.
• Remove the rotors by loosening the xing screws, and thoroughly clean the nozzles and
cleaning and rinsing arms under running water.
• Reassemble all parts and ret the rotors in their seats, xing them with the relative
screws.
• Clean the tub thoroughly using specic products.
• At the end of the day, it is advisable to leave the dishwasher door open.
N.B.: It is advisable to replace the tub water by relling the tub at least every 20 wash
cycles, or twice a day. Do not use metal brushes or corrosive products which can
damage the machine.
6.2 Special Maintenance
Once or twice a year have a qualied technician inspect the machine:
1 To clean the electrovalve lter.
2 To remove residual deposits.
3 To check the watertight of the seals for water loading and unloading connections.
4 The condition and/or wear of the components.
5 The operation of the dispensers.
7. ALARMS
TYPE OF ALARM CAUSE REMEDIES
Flashing of the cycle
lamp
Missed rell of water in the
wash-tank
Verify the full opening of the
water inlet valve or the right
positioning of the overow pipe.
Switch the machine OFF and
ON to reset the alarm
Missed heating of the water
boiler (in machines equip-
ped with Thermostop)
Boiler thermostat or boiler
heating element out of order.
Check them or call for Service
Flashing of the softening
lamp
Missed tank emptying remove the overow pipe and
drain the tank. Switch the
machine OFF and ON to reset
the alarm

EN
page 35
USER SECTION
8. ENVIRONMENTAL FEATURES
8.1 Packing
The packing consists of the following:
• a wood pallet;
• a nylon bag (LDPE);
• multi-layered cardboard;
• polyurethane foam (PS);
• polypropylene support (PP).
We kindly advise you to dispose of the above-mentioned material in accordance with current
environmental regulations.
8.2 Disposal
The use of the WEEE Symbol indicates that this product may not be treated as householdwaste.
By ensuring this product is disposed of correctly, you will help protect the environment. For more
detailed information about the recycling of this product, please contact your local authority, your
household waste disposal service provider or the shop where you purchased the product.
For the disposal of the machine or one part of its, please follow the directives 2002/95/CE,
2002/96/CE and following changes and/or the legislative decrees of application.
This product or parts of it cannot be disposed of as domestic waste but must be treated by means
of separate collection (see barred waste container symbol on product).
At the time of product disposal, the user must refer to the speci c waste collection systems for
electric and electronic appliances (WEEE).
The manufacturer guarantees the absence of dangerous substances in the EEE’s used in
compliance with the 2002/95/CE Directive.
In the case of failure to comply with that prescribed, the user will be subject to the sanctions
envisioned by the individual European Community member.
Disconnect the machine from the electrical and water supply before disposal.
Cut off the electrical cable in order to make any other use impossible.
All the metal parts are recyclable as they are in stainless steel.
Recyclable plastic parts are marked with the symbol of the plastic material.
9. ECOLOGICAL FEATURES
9.1 Recommendations for optimum energy, water, and additive consumption
Dispensing of salt
A pre-set quantity (by the manufacturer) of salt is injected in the resins every regeneration cycle.
It is important to observe the number of regeneration cycles recommended in paragraph 5.3 in
order to avoid salt spills or lime deposits.
If possible operate the machine at full capacity.
Thus avoiding a waste in detergent, rinse aid, and electrical and water consumption.
Detergents and rinse aids
Out of respect for the environment, use detergents and rinse aids with the highest biodegradability.
Check the correct amount according to the water hardness at least once a year. An excessive
amount of the product will pollute rivers and seas, an inadequate quantity will preclude proper
washing and/or cleanliness of the dishes.
Temperature of the tub and boiler
The temperature of the tub and boiler are set by the manufacturer in such a way as to ensure
the best washing results from the majority of detergents on the market. These may be re-set by
the installer according to your detergent (see chap.1.4).
Removal of food
Carefully scrape food from the dishes using lukewarm water in moderation to help in the removal of
animal fat. To successfully remove caked on material, soaking in hot water is recommended.
Note:
Wash dishes as soon as possible to prevent hardening of the deposits and compromising the
effectiveness of the washing.
For an effective washing process, regular cleaning and maintenance of the dishwasher is
recommended (see chap.6).
Non-compliance with the above recommendations or with any and all information within
the manual could result in a waste of energy, water, and detergent, further causing an
increase in user costs and/or a reduction in performance.

EN
page 36
USER SECTION
10. TROUBLESHOOTING
N.B. For any other problems, contact the Technical Assistance service.
The manufacturer reserves the right to alter the technical characteristics without prior notice.
Type of Problem Possible Causes Cure
The appliance does not start The main switch is turned off Turn on the switch
The appliance does not
draw water
The water tap is closed Open the water tap
The rinsing arm nozzles or the
electrovalve lter are clogged and/or
caked with lime deposits
Clean the rinsing arm nozzles, the pipes and the electrovalve
lter. If the machine has a water purier check the salt content
or regenerate the resins more often
Faulty pressure switch Replace the pressure switch (call the Technical Assistance
service)
Flashing of the cycle lamp See chapter 7 "Alarms"
Unsatisfactory washing
results
The washing nozzles are clogged or
the washing arms do not rotate
Unscrew and clean the nozzles and the rotating column, ret
them correctly in their seats
Unremoved grease or starch Detergent concentration too low
The lter is too dirty Remove the lter, clean it with a brush under running water and
ret in its seat
Check the tub temperature (it must
be between 50°C and 60°C)
Adjust the thermostat or check correct heating element opera-
tion
Length of washing cycle inadequate
for type of grime build-up
Choose a longer cycle if possible, otherwise repeat wash cycle
Wash water too dirty Empty water from the tub, clean lters; rell the tub and correct-
ly reposition the lters
Presence of foam Use of unsuitable products Use non-foaming detergent or use less of same detergent
Tub temperature too low Adjust the thermostat or check correct heating element opera-
tion
Glasses or dishes are not
completely dry
Insufcient rinse aid Increase the amount of rinse aid by turning the screw on the
dispenser (see paragraph "Rinse aid dispenser")
The rack is unsuitable for the glasses
and dishes
Use a suitable rack enabling the dishes to be tilted so water can
run off
The dishes have been too long in the
tub
As soon as the wash cycle is nished, pull the rack out imme-
diately, allowing the air to dry the glasses and dishes more
quickly
Rinse water temperature is less than
75°C - 80°C
Check the temperature of the boiler thermostat
Surface of dishes and glasses too
rough or porous for material wear
Replace type of dishes and glasses used
Streaks and spots on glas-
ses and dishes
Too much rinse aid Decrease the amount of rinse aid by turning the ne-adjustment
screw on the dispenser (see paragraph "Rinse aid dispenser")
The water is too hard Check the water hardness. Water should not be harder than
5-10 °f
For appliances with conditioners:
too little salt in the salt container or
the resins have not been properly
regenerated
Fill the salt container (coarse salt: 1-2 mm grains) and regene-
rate the resins more often. If lime deposits are also observed on
the body of the machine, have a qualied technician check the
operation of the purier
Salt present in dishwasher tub Thoroughly clean and rinse the appliance, and avoid spilling salt
when lling the container
The appliance suddenly
stops during the cycle
The appliance is connected to an
overloaded circuit
Connect the appliance separately (call the Technical Assistance
service)
A safety device has been activated Check safety devices (call the Technical Assistance service)
During wash cycle the
machine stops and draws
water
Water from the previous day has not
been replaced
Empty the tub and rell it
The tub water temperature is too high Have the Technical Assistance service check the thermostat and
the pressure switch
Faulty pressure switch
The overow tube is incorrectly
positioned
Remove the overow tube and correctly reposition it
The booster pump can't
prime
Little pressure on feeding Take out the boiler pipe and drain the pump
-
 1
1
-
 2
2
-
 3
3
-
 4
4
-
 5
5
-
 6
6
-
 7
7
-
 8
8
-
 9
9
-
 10
10
-
 11
11
-
 12
12
-
 13
13
-
 14
14
-
 15
15
-
 16
16
-
 17
17
-
 18
18


Bartscher 110415 Owner's manual
- Category
- Dishwashers
- Type
- Owner's manual
Ask a question and I''ll find the answer in the document
Finding information in a document is now easier with AI
Related papers
-
Bartscher Deltamat TF 641 Owner's manual
-
Bartscher 109558 Operating instructions
-
-
-
-
-
-
Bartscher 109343 Operating instructions
-
Other documents
-
Midmark 6251, 6252, 6256 (Powered Carts - DC) Installation guide
-
Metos Master Aqua 50 Mono Owner's manual
-
 Elettrobar 570056 User manual
-
Hobart GLG25DNA-10 User manual
-
 Elettrobar 570075 User manual
-
Modular 316530 User manual
-
Metos LUX2 60EL DDE PS 230/1N Owner's manual
-
-
Smeg CW522D Owner's manual
-

