Page is loading ...

Loop B ased Digital Recorder

THE LIGHTNING FLASH WITH ARROWHEAD SYMBOL, WITHIN AN
EQUILATERAL TRIANGLE, IS INTENDED TO ALERT THE USER TO THE
PRESENCE OF UNINSULATED ÒDANGEROUS VOLTAGEÓ WITHIN THE
PRODUCTÕS ENCLOSURE THAT MAY BE OF SUFFICIENT MAGNITUDE
TO CONSTITUTE A RISK OF ELECTRIC SHOCK TO PERSONS.
THE EXCLAMATION POINT WITHIN AN EQUILATERAL TRIANGLE IS
INTENDED TO ALERT THE USER TO THE PRESENCE OF IMPORTANT
OPERATING AND MAINTENANCE (SERVICING) INSTRUCTIONS IN THE
L I T E R A TURE ACCOMPANYING THE PRODUCT.
1. READ ALLTHE INSTRUCTIONS BEFORE USING THE PRODUCT.
2. DO NOT USE THIS PRODUCT NEAR WATER - FOR EXAMPLE NEAR A
BATHTUB, WASHBOWL, KITCHEN SINK, IN A WET BASEMENT, OR NEAR A
SWIMMING POOL.
3. THIS PRODUCT, EITHER ALONE OR IN COMBINATION WITH AN AMPLIFIER
AND HEADPHONES OR SPEAKERS, MAY BE CAPABLE OF PRODUCING
SOUND LEVELS THAT COULD CAUSE PERMANENT HEARING LOSS. DO
NOT OPERATE FOR LONG PERIOD OF TIME AT HIGH VOLUME OR AT AN
UNCOMFORTABLE LEVEL. IF YOU EXPERIENCE ANY HEARING LOSS OR
RINGING IN THE EARS, CONSULT AN AUDIOLOGIST.
4. THIS PRODUCT SHOULD BE LOCATED WITH SUFFICIENT AIR SPACE FOR
PROPER VENTILATION.
5. THE PRODUCT SHOULD BE LOCATED AWAY FROM HEAT SOURCES SUCH
AS RADIATORS, HEAT REGISTERS, OR OTHER HEAT PRODUCING PROD-
UCTS.
6. CLEAN ONLY WITH A DRY CLOTH. BEFORE CLEANING THE UNIT, TURN
OFF THE POWER AND UNPLUG THE POWER CORD FROM THE OUTLET.
7. THE POWER SUPPLY CORD OF THE PRODUCT SHOULD BE UNPLUGGED
FROM THE WALLOUTLET DURING LIGHTNING STORMS OR WHEN LEFT
UNUSED FOR A LONG PERIODS OF TIME.
8. DO NOT DEFEAT THE SAFETYPURPOSE OF THE POLARIZED OR
GROUNDING-TYPE PLUG. A POLARIZED PLUG HAS TWO BLADES WITH
ONE WIDER THAN THE OTHER. A GROUNDING TYPE PLUG HAS TWO
BLADES AND A THIRD GROUNDING PRONG. THE WIDE BLADE OR THE
THIRD PRONG ARE PROVIDED FOR YOUR SAFETY. IF THE PROVIDED PLUG
DOES NOT FIT INTO YOUR OUTLET, CONSULT AN ELECTRICIAN FOR
REPLACEMENT OF THE OBSOLETE OUTLET.
9. PROTECT THE POWER CORD FROM BEING WALKED ON OR PINCHED
PARTICULARLYAT PLUGS, CONVENIENCE RECEPTACLES, AND THE POINT
WHERE THEY EXIT FROM THE APPLIANCE.
10. USE ONLY WITH ATTACHMENTS/ACCESSORIES SPECIFIED BYTHE MAN-
UFACTURER.
11. THE PRODUCT SHOULD BE SERVICED BYQUALIFIED SERVICE PERSON-
NELWHEN:
A. THE POWER SUPPLY CORD OR THE PLUG HAS BEEN DAMAGED; OR
B. OBJECTS HAVE FALLEN, OR LIQUIDS HAS BEEN SPILLED INTO THE
PRODUCT; OR
C. THE PRODUCT HAS BEEN EXPOSED TO RAIN; OR
D. THE PRODUCT DOES NOT APPEAR TO BE OPERATE NORMALLY OR
EXHIBITS A MARKED CHANGE IN PERFORMANCE; OR
E. THE PRODUCT HAS BEEN DROPPED, OR THE ENCLOSURE DAMAGED.
12. DO NOT ATTEMPT TO SERVICE THE PRODUCT BEYOND WHAT HAS
BEEN DESCRIBED IN THE USER MAINTENANCE INSTRUCTIONS. ALL
OTHER SERVICING SHOULD BE REFERRED TOQUALIFIED SERVICE PERSONNEL.
For the UK
WARNING -- WHEN USING ELECTRICAL PRODUCTS, BASIC PRECAUTIONS SHOULD ALWAYS BE TAKEN, INCLUDING THE FOLLOWING:
This equipment has been tested and found to comply with the limits for a class Adigital device, pur-
suant to part 15 of the FCC rules.
These limits are designed to provide reasonable protection against harmful interference in a resi-
dential installation.
This equipment generates, uses and can radiate radio frequency energy and, if not installed and
used in accordance with the instructions, may cause harmful interference to radio communications.
However, there is no guarantee that interference will not occur in a particular installation.
If this equipment does cause harmful interference to radio or television reception, which can be
determined by turning the equipment on and off, the user is encouraged to try to correct the inter-
ference by one or more of the following measures:
• Reorient or relocate the receiving antenna.
• Increase the separation between the equipment and the receiver.
• Connect the equipment into an outlet on a circuit different from that to which the receiver is connected.
• Consult a qualified dealer or an experienced radio / TV technician for help.
The user may find the following booklet, prepared by the Federal Communications Commission,
helpful: “How to identify and Resolve Radio/TV interference Problems.”
This booklet is available from the USGovernment Printing Office, Washington, DC 20402, USA.
Stock No. 004-000-0034-4.
Caution:
You are cautioned that any change or modifications not expressly approved in this manual could
void your warranty.
For the customers in Canada:
This Class B digital apparatus meets all requirements of the Canadian Interference-Causing
Equipment Regulations.
Cet appareil Numerique de la Classe B respecte toutes les exigences du Reglement sur le materiel
brouilleur du Canada.
Certificate of Conformity
Electrix, a div. of IVL Technologies Ltd., hereby declares on their own responsibility that the follow-
ing product:
Electrix Repeater is covered by this certificate and marked CE-label conforms with the following
standards:
• EN 60065: Safety requirements for mains operated Electronic and related apparatus for house-
hold and similar general use
• UL6500-99 Audio/Video and Musical Instrument Apparatus for Household, Commercial and
Similar General Use.
• EN 55103-1: Product family standard for audio, video, audio-visual and entertainment lighting
control apparatus for professional use. Part 1: Emission
• EN 55103-2: Product family standard for audio, video, audio-visual and entertainment lighting con-
trol appratus for professional use.
Part 2: Immunity
With reference to regulations in following directives:
72/23/EEC, 89/336/EEC as amended by directive 93/68/EEC
Issued in Victoria, February 15, 2000 by Brian Gibson, Executive Vice-President, Research and
Development

INVENTORY INSPECTION:
The uniquely styled Electrix carton should containÉ
o Electrix Repeater
o Warranty Card
o Repeater User Manual
o International Switching Power Supply (with a power cord appropriate for your region)
o Rackmount Screws (in a small envelope)
Note: If any of the above are missing, please inform your local Electrix distributor, agent or dealer immediately.
WELCOME TO ELECTRIX!
We would like to thank you for purchasing Repeater, possibly the first "intelligent" loop based recorder to reach planet
earth. Repeater's powerful custom software and intuitive design will make sampling and looping an integral part of
your live and studio music production.
Repeater, like its other Electrix siblings, represents an entirely new concept in musical electronics, unique in both its
'hands on' ease of use and 'future-retro' design.
This manual describes the behaviour of Repeater running OS1.10. Further upgrades of system firmware may be made
available from time to time.
ELECTRIX DOES LOOP BASED RECORDING?
First we shook up FX processing (with our popular Filter and Warp Factories, MoFX, and the MOD's), now we're chal-
lenging the contemporary notion of linear recording. Why? Because we realized that many of our Electrix friends are
producing music in loops and phrases. So we put our heads together to come up with an intuitive way to record and
manipulate loops in music composition. Whatever the genre you like to work in, Repeater will benefit your creative
process by allowing you to quickly sketch and manipulate musical phrases and parts.
THE FEEDBACK LO O P
Repeater was designed for creative people, and as a tool to spark the creative process. Along those lines, we would
like to hear what you can do with Repeater and other Electrix gear. If youÕre so inclined, please send your original
ideas on CD, MD, MP3, vinyl or cassette to us at the address on the back page of this manual. You just may become a
legend of our lunchroom!
Want to find out more about other Electrix products?
Check out our Web site at: http://www.electrixpro.com
Again, thanks for purchasing Repeater.
English... 3
BEFORE YOU BEGIN

English... 4
TABLE OF CONTENTS

English... 5
TABLE OF CONTENTS

Throughout this book we'll be discussing many terms and ideas. Two of these terms are important to understand at
the get go. Don't worry, there won't be any tests! So here you goÉ
TERM #1: LO O P S
When we talk about loops, we're simply making reference to a repeating
musical figure. Looping is unique in the way it allows you to record and
arrange your music. When Repeater hits the end of the loop it will imme-
diately start playing again from the beginning.
L o o pB a s i c s
¥Repeater can store up to 999 Loops per CFC card.
¥Repeater can store an additional 16 loops in its internal memory.
¥Only one Loop can play at a time.
¥Each Loop is comprised of 4 mono Tracks (or 2 stereo).
¥Tracks levels can be independently controlled
¥You can cued up another Loop to play immediately after the current Loop.
TERM # 2: TRACKS
A track is a unique place to record audio within a loop. Tracks on Repeater
are much like tracks on any hard disk or tape based recorder. Each track has
level, pan, pitch shift and time slip controls.
WHY LOOP BASED RECORDING
Regardless of the genre of music or ability of the musician, recording with loops can be an efficient way to establish
the feel of a song. Loops can also benefit the arranging process, allowing the composer to focus on a single section
of a song, shaping and refining until that phrase feels just right. Loop based recording makes for a great musical
scratch pad, allowing you to quickly sketch out a tune. It is also an indispensable tool for creating grooves and tex-
tures both live and in the studio.
Loop based recording essentially gives all musicians access to the same arranging power that a MIDI sequencer gives
a keyboard player. But now you can use live drums, real bass, layered guitars and vocals to shape your masterpiece.
For the music producer, loop-based recording allows you to quickly build up a unique groove. Refine a 2-bar progres-
sion or work an 8-bar verse until it sits just right. Overdub parts and licks until you've created the perfect supporting
bed.
Loop based recording benefits the live player too. Imagine harnessing the power of a multitrack recorder for live
spontaneous use. Layer harmonies, add percussion, drop in licks, and paint ambiences. Before you or your audience
knows it, you've become a one man band.
English... 6
OVERVIEW
How your recording becomes a loop
Each loop has 4 tracks

KEY FEATURES OF REPEAT E R
Time Stretching gives Repeater the unique ability to change tempo without affecting the pitch of the loop.
Pitch Shifting lets you change the pitch or key of each track independently. Repeater uses instrumental pitch
shifting that is specially engineered for music.
Loop Point Assistª (LPA) is an automatic loop trimming feature. It automates the tedious "pre-production"
process of manually trimming a loop to match a given BPM. LPA works in real time. The moment Repeater
leaves record, it will begin playing the automatically trimmed loop. You can over-ride LPA with the loop trim
function. Learn more about this in LOOP EDITING.
Compact Flash Cards (CFC) are Repeater's main storage mechanism. They supplement Repeater's internal 8MB of
memory with up to 512MB of additional storage space. Loops on the CFC are in .WAV file format. With the
addition of an inexpensive CFC USB card reader, you can export loops and tracks from Repeater to your PC with-
out any special software.
MIDI Clock makes syncing Repeater up to your sequencer or drum machine easy. When you adjust your tempo,
Repeater will time stretch the loop to match the tempo without affecting the key. How cool is that?
Beat Detection keeps Repeater in sync with incoming audio like a live drummer or a vinyl source. (Okay, this one
may be even cooler that the MIDI sync above.)
The FX Insert allows external effects to be applied to individual tracks, the input of Repeater, or the entire output.
Alternatively you can use the FX insert to achieve independent track outputs.
Reverse Play is a fun way to realize reverse solos and ambient textures.
These are just a taste of some of the great features in Repeater. So call your friends and tell them how smart you are
for buying Repeater, then sit down and learn how to use it. Trust us, it's quite easyÉ
ALL THINGS RELATED TO POWER
Repeater comes with an external switching power supply. It will work with line voltages from just about anywhere
around the world without any modification. If you should happen to lose your Power Supply, get in touch with
Electrix and ask for a TFR0035. The Electrix TFR0035 is the only Power Supply that will work with Repeater.
RepeaterÕs power supply features a locking connector.
To insert the connector:
¥ Pull back the housing
¥ Insert the connector
¥ Release the housing
SLEEP MODE
Repeater does not have a power switch. It does, however, have an
energy saving sleep mode. To enter sleep mode:
¥Press Reverse and Stop at the same time and hold for 3
seconds
¥ You will not lose any of the data stored in internal or external
memory.
TO WAKE REPEATER PRESS ANY BUTT O N
English... 7
OVERVIEW
Sleep Mode
Pull back the housing to insert

English... 8
FRONT PANEL
1
2
3
4
5
6
7
8
9 1 0
1 1
1 2
1 4
1 5
1 6
1 7
Input Level - controls the input level to Repeater.
Set this control so that the input level indicator is
Orange most of the time, and rarely clips (goes red).
Instrument Input - a high-impedance input opti-
mized for instrument level sources. When a cable is
plugged into this input, the rear inputs are disabled.
Loop - selects the current loop.
Trim - allows the length of a loop to be modified
either by bar or in 1/100ths of a second. This is use-
ful for trimming an 8-bar loop down to 4 or for over-
riding the LPAª function to manually trim the loop.
See LOOP EDITING for details.
Multiply Loop - lets you multiply out your loop.
With Multiply Loop, you can overdub an eight bar
progression over a 1 bar drum loop. See LOOP EDIT-
ING for details.
Repeater's Display indicates the status of four crucial
parameters:
Loop - shows the current loop number (internal
memory loops have a little ' in front of the number)
Bar - when stopped, the bar display shows the loop
length (in bars). During an initial record it shows esti-
mated beats. While playing or overdubbing this dis-
play shows the current bar.
Beat/Div - shows the time signature of the current
loop while stopped, and counts beats while in Play or
Record.
BPM - indicates the current tempo (Beats Per Minute)
Compact Flash Card Slot - insert a Type 1 CFC here.
The CFC is slotted so that the card can only be
plugged in right side up. Check our website for CFCs
that will work. On the first insertion, Repeater will
format the CFC for you. See FILE MANAGEMENT for
more information.
UNDO/ Erase - a single press will UNDO the last
operation or overdub. Pressing and holding will put
you in the ERASE mode, where tracks or the entire
loop can be selected for erasing.
Copy - makes a duplicate of the current loop in any
available loop location. Copy can be used to make
multiple revisions on a single bed, or to copy materi-
al stored internally to the CFC. Press and hold COPY
to see remaining record time.
Overdub - sets Repeater's record mode. When the
Overdub indicator is lit, the recording will be mixed
together with any existing material on a given track.
Alternatively Replace mode is available to replace the
content of the selected track when recording is
engaged. Replace mode is active when the Overdub
indicator is off. See RECORDING LOOPS for details.
Reverse - reverses the direction for both Recording
and Playback. See RECORDING LOOPS for details.
Stop - stops playback or record operations.
Sleep Mode - press Reverse and Stop at the
same time and hold for 3 seconds to enter the ener-
gy saving sleep mode. You will not lose any of the
data stored in internal or external memory. To revive
press any button.
1 3
1
2
3
4
5
6
1 0
1 1
1 2
1 3
9
8
7

English... 9
FRONT PANEL
1 8
1 9 2 0
2 1
2 2
2 32 3 2 3 2 3
2 4
2 4
2 4
2 4
2 5
2 6
2 7
2 8
Play - Play immediately starts the loop at the begin-
ning. To achieve a stuttering effect, press and hold
Stop then rhythmically press Play to trigger the
loop. You can restart the loop even while it is playing
by pressing Play.
Record - press Record to enter and leave record-
ing. Pressing Record on Repeater also engages
P l ay for you. With an empty loop, pressing
Record also defines the downbeat. Recording can
be undone with the UNDO feature.
Tempo - can adjust the tempo of the loop in real-
time. The range of the tempo control may be limited
by the speed of the storage device. Repeater's has a
tempo range of 1 BPM up to 150% of the recorded
tempo. See LOOP EDITING for details. This control is
also used for Slip, Pan and Pitch edits.
Sync - selects the clock master. In beat detection
mode Repeater tracks the tempo of the incoming
audio and acts as a master clock with MIDI. In MIDI
mode, Repeater slaves to incoming MIDI clock. In User
mode, Repeater will clock to the tempo set with the
Tempo knob or the Tap Tempo Function. See
LOOP SYNC for details.
Slip - offsets the start point of a given track or com-
bination of selected tracks with the tempo knob. See
LOOP EDITING for details. Twist the Tempo encoder
quickly for larger steps and slowly for divisions of
each beat.
Pan - selected tracks are panned with the Tempo
knob.
Pitch - selected tracks are pitch shifted within a
range of -2 octaves through +1 octave. Twist the
Tempo encoder quickly for large steps and slowly
for cents.
Tap Tempo - in User Sync mode, the Tap Tempo
is used to establish the tempo of the current loop. In
Beat Detection mode, the Tap Tempo button can
be used to help the software find the beat of the
incoming audio by tapping along with the beat.
Tempo Lock - In beat detect mode, activation of
the tempo lock feature locks the unit tempo to the
currently detected beat, allowing only minor varia-
tions for tracking. In user mode, activation of tempo
lock forces all newly loaded loops to run at the
current user tempo.
Track Select Buttons - operations such as
record, re-sample, pan, pitch, slip, and FX insert all
use the Track Select buttons to determine which
tracks an operation is carried out on. You can select
any or all tracks for editing.
Track Levels - these control the levels of each
track to the main outputs.
FX Insert - assigns the FX loop to the input, an
individual track, or any combination of tracks. The FX
loop is post fader and pan. See RECORDING LOOPS for
details.
Re-sample - records the selected tracks and the FX
inserts to an individual track or a stereo pair of tracks.
See GETTING STARTED for details.
Headphone Output & Level - a headphone output
and volume control makes Repeater a stand-alone
recording device. Especially suitable for that 3:00
A.M. inspiration that can't wait 'til morning.
1 4
1 5
1 6
1 7
1 8
1 9
2 0
2 1
2 2
2 3
2 4
2 5
2 6
2 7
2 8

Power Input - accepts only the Repeater power supply. Pull back the
connector housing to insert the jack into Repeater.
Footswitch - plug in a Digitech FS-300 three button footswitch here.
Undo, Play/Stop, and Record are supported with the footswitch. A sin-
gle momentary footswitch will control the Record function. Please con-
nect the footswitch before powering up Repeater.
MIDI Thru - sends a perfect copy of the MIDI information received at
the MIDI in.
MIDI Out - transmits the best of the front panel commands to facilitate
the use of multiple Repeaters in loop based recording setups and live
rigs.
MIDI In - full support for MIDI control change, program change and
MIDI clock messages to control all front panel functions.
MIDI Channel Select - selects the receiving/transmitting MIDI channel.
Digital Output - 44.1kHz, 16 bit S/PDIF Coaxial 75Ω main output for
those who know better than to use the analog inputs on their Sound
Blasters.
Main Outputs - stereo mix outputs.
FX Send - a post fader, post pan FX send activated by the front panel
control. Connect this to the input of an Electrix MOFX or Filter Factory
for some serious FX mayhem. The FX send also serves as multiple out-
puts. Just assign Tracks 3 & 4 to the FX sends and pan them hard left
and right. Tracks 1 & 2 will be on the main outputs while 3 & 4 come
out the FX sends. See ADDING EXTERNAL FX for details.
FX Return - Connect the outputs of your FX device here. The FX return
is mixed in with the other tracks on the main bus that is sent to the
main and digital outputs. See page 12 for details.
Main Inputs - Stereo unbalanced 1/4" inputs. (Don't forget the mono
instrument input of the front as wellÉ)
RCA & Phono Pre inputs - the RCA's and the phono pre afford quick
and easy setup with CD players and turntables.
English... 10
REAR PANEL
1
1
2
2
3
3
4
4
5
5
6
6
7
7
8
8
8
9
9
9
1 0
1 0
1 0
1 1 1 1
1 1
1 2
1 2
1 2

R E C O R D I N G B A S I CS
Loop recording works a little differently
than conventional recording. Capturing
a good loop is all about being in touch
with the rhythm of your musical figure.
¥Start by playing your groove to get a feel for the tempo.
¥Press Record right on the downbeat of the first bar of the loop to start recording.
¥Assuming a four bar loop, press Record again on the downbeat of bar five to end
recording (bar five is essentially the first bar repeated).
Now you've captured a complete 4 bar loop that will play back perfectly every time.
Sound Design Considerations
Repeater is a great sound design tool for music production. By using Repeater's excep-
tional time stretching algorithms you can combine and synchronize loops of different
tempos together into one new loop (see sidebar). By utilizing Repeater's FX loop you can
add an external Filter or effects unit to shape the sound of each track. Once you're satis-
fied you can re-sample the loop and export it to your PC via the CFC or Digital output.
Recording a Loop
Set your levels so that the Signal bi-color LED goes red every once in a while.
Keeping it in the yellow will assure great
levels and no harsh digital clipping.
¥Select a track or a pair of tracks to record
to by pressing the Track Select but-
tons (above the Track Level faders.)
¥Set the Track Level(s) to the top which
is unity.
¥Press Record to start recording. The
next time you press Record or Play,
the recording will finish, and the loop will
immediately start playing back.
¥Selecting a pair of tracks simultaneously
sets Repeater to record in stereo. The
Stereo LED will go on to indicate that the pair of tracks have
been linked for stereo.
Note. If you are recording in stereo on your initial pass,
Repeater automatically pans the tracks hard Left and hard Right.
English... 11
GETTING STARTED
Recording and
Combining Loops
at Different
Tempos
Say you've got a drum
loop at 100 BPM and
you want to add a shak-
er loop to a new track
but its tempo is 94 BPM.
With Repeater you can
record samples that
were different tempos
and synchronize them
into the same loop,
here's how:
á First load the drum
loop just like we've been
teaching you.
á Now select BEAT
DETECT SYNC.
á Play your new sample
at the new tempo.
á Wait for Repeater to
get a lock on the tempo
á You will now hear that
the two samples are syn-
chronized.
á press Record on
the downbeat and press
Record again to
stop the recording.
á Now switch back to
USER SYNC and set the
tempo back to 100 BPM.
Press both tracks to create a stereo pair
Track Select Buttons
A typical 4 bar loop

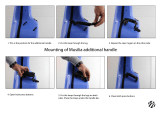
O V E R D U BBING ADDITIONAL PARTS
Now that you've got your first loop down, you can continue to overdub onto the
existing track. If you want this new part to be quieter, try adjusting the Input Level
or the volume of your instrument to get the balance just right. Repeater has a default
feedback amount that reduces the level of the original recording as the overdub is
recorded onto it. This prevents undesirable gain increases throughout the recording
process. See RECORDING LOOPS for details.
RECORDING TO A NEW TRACK
Additionally, you may select a new track to record another part. Recording to a new track affords more control and
access to Repeater's track parameters, like Pitch and Level. Later you can bounce your tracks, after you've mixed them
to taste, down to one or two tracks.
LOOP MANIPULATION
Now that you've got your basic tracks down, there is so much more you can do.
Start by tweaking the pitch of the loop.
¥Press the Pitch button, select the tracks youÕve recorded on and turn the
Tempo knob to pitch shift the tracks.
If you think that's cool, use the Slip function to slip a track out by an 1/8th note.
(You can slip through the entire range of the loop until you eventually get right back to the beginning. Yeah, baby!)
ADDING EXTERNAL FX
If you have an external FX unit connected to RepeaterÕs FX
Insert you can apply FX to the input and record the effects as
a part of the loop, or you can apply the FX to any number of
tracks during playback.
To set the FX Insert location:
¥ Press and hold FX Insert button
¥Select the tracks that youÕd like the FX inserted on by
using the Track Select buttons. If you de-select all of the tracks, the FX will be applied to the input. (The
Input>Insert LED will light.)
USING THE METRONOME
Repeater has a great training feature that will help you to develop a consistent meter with some practice. Repeater
will produce a metronome sound at the current tempo when you press and hold the Tempo Lock button for 1 sec-
ond. While the metronome is playing Repeater will quantize the initial record to the beat of the metronome. To dis-
engage the metronome press and hold Tempo Lock for 1 second. You can set the metronome level by pressing
and holding Tempo Lock while tempo Lock is engaged. Use the Tempo knob to adjust the level while holding
down the Tempo Lock button. When the metronome is active in user sync mode, recordings will be quantized to
the beat as they are in MIDI or Beat Detect sync modes.
English... 12
GETTING STARTED

ACOUSTIC GUITA R
Here's a basic setup to get an acoustic guitar up and running with Repeater - without the need of any help from your
"pocket protector" friendsÉ
Making a Connection
Plug in your guitar here.
Connect the optional Digitech FS-300 or a single momentary footswitch to engage/disengage the Record function
here.
Connect Repeater's outputs to your monitoring system.
ELECTRIC GUITA R
Now for the guitar player for whom effects have become an integral
part of their sound... Try integrating Repeater in this format:
Using an amp without an effects loop
You can plug Repeater into the guitar input of your amp if you take
the following precautions:
¥Turn down the Input Level to at least half of what you usually
run. Repeater's output is at line level, and this is substantially hot-
ter then the average guitar.
¥Use the clean channel of your guitar amp. If you try to run
Repeater into a high gain or lead channel you will most likely be
unhappy with the unnecessarily noisy results.
¥To get distorted or lead sounds try using one of the many avail-
able distortion pedals or a tube preamps before connecting to
your Repeater.
English... 13
GETTING STARTED
1
1
2
2
3
3
Trigger Record
If you don't have a foot switch you may benefit
from using Repeater's handy Trigger Record fea-
ture. Trigger Record will set Repeater to start
recording as soon as signal is present at the
audio input.
To set Repeater for Trigger Recording:
á Press and hold Stop and press Record
á Repeater's Record LED will flash indicating
that it is armed and ready for recording
á Start playing
As soon as Repeater detects audio at the input it
will start recording.

Using an amp with an effects loop
It is best to plug Repeater into the Effects Loop of your amp if it has one. Connecting this way will ensure safe
passage of your tone through Repeater. If your amp has a Wet/Dry Mix, set it to 100% wet for best results.
Using a Fo o t s w i t c h
If you're thinking "How am I supposed to do all this button pressin' while I'm playin' my guitar" then you may ben-
efit from picking up a Digitech FS-300 3 button footswitch. The FS-300 will let you control Undo, Play/Stop and
record with your feet. This should free up your hands for some serious bo-jangelin'.
Accessing Repeater's features from a MIDI Foot Controller
If you want to control Repeater from the floor you will be glad to know that you
can access all of Repeater's front panel parameters and controls via MIDI
Program Changes or Control Change messages. Pick up a MIDI floor controller
like a Digital Music Corp. Ground Control, Yamaha MFC10, Lexicon MPX-R1, or a
Digitech Control 8. You can control Repeater with Program Change messages
and/or Control Change messages. Basically that means that just about any MIDI
foot controller is capable of controlling Repeater.
Don't have a bass guitar?
One of the advantages of Repeater's pitch shifting being on the loop output, as
opposed to the input, is that you can quickly achieve great pitch shift effects
automatically on playback. Try this on for size: Set the pitch shift of Track 4 to
-12. Now create a rhythm loop with your guitar on Track 1. Select Track 4 to
record and play a bass line on your low E string. You will not hear the pitch shift
effect until you are done recording. As soon as the loop starts playing back Track
4 will be pitch shifted an octave down, and you'll have snuck in a bass line with-
out anyone knowing what happened.
English... 14
GETTING STARTED
123
From Amp Send
To Amp Return
Footswitch
1
2
3
Create Ambient Tracks
A looping recorder is a great way
to create ambient textures. By
using external effects and
Repeater's own arsenal of time
stretching and pitch shifting,
thick and organic textures are
within your reach. Use delay,
reverb, and filtering to shape
sounds giving them depth and
resonance. Layer these sounds
being careful to record only the
sustaining portions of each note.
Experiment with Reverse mode
and the Overdub feedback level
to facilitate ever changing loops
and ambiences.

English... 15
LIVE SAMPLING
Repeater is set up to take just about any kind of signal; from a sub-mixer to your mixer's FX send, a group output, or
even a vinyl source. In addition, you can connect an effects processor to Repeater's FX Insert for easy patching of
the effect onto the overall input or individual tracks.
L PAª Considerations
If Repeater is in Beat detect, MIDI Sync, or the metronome is turned on in User mode then as long as you press
Record near the downbeat of your track, Repeater will automatically tweak the loop start time to the nearest
division of the beat. To stop recording press Record close to the downbeat of the next bar. Repeater will auto-
matically tweak the end point to match up with the start point and immediately begin playing the trimmed loop.
If you are just in user mode with no metronome then no LPA is applied to your recording.
Trigger Recordi n g
Repeater has a great little feature we call Trigger Recording. Pressing Stop and Record at the same time will
arm Repeater. In this mode, Repeater will automatically trigger the Record operation when an audio signal is pres-
ent at the inputs. This is useful when sampling from CDs or in facilitating a hands-off approach to recording and
overdubbing.
Input Mute
In some situations it may be desirable that the dry signal is not passed through Repeater and mixed with the track
outputs. To activate this feature, hold down Stop and press the Overdub button. The display will state 'Dry
Muted' or 'Dry unmuted' depending on whether you are activating or deactivating the feature. This feature can
also be accessed via MIDI.
GETTING STARTED
OR

English... 16
GETTING STARTED
THE ALL REPEATER BAND
One day every person in every band will integrate Repeater into their live show. Imagine a band that utilizes
Repeaters, allowing them to loop themselves, then move on and overdub additional parts. All in perfect sync with
each other via MIDI. The air would fill with harmonies, licks, ambient loops, and grooves, grooves, grooves. Hey you
could load your part into Repeater, put down your instrument and go and dance with your honey...hmmmm...
The All Repeater Band, a little obsessive we know...

S T U D I O
In the studio Repeater can serve
many purposes. It makes a great
scratch pad for getting ideas or
grooves down quickly. It also
makes for a great loop player with
its unique ability to record and
play loops without the need for
manual trimming. Repeater can
also function as a great sound
design tool. Check it out..
If you've got a modest home stu-
dio setup try connecting Repeater
like this:
Utilizing Multiple Outputs
For those of you with large for-
mat expensive consoles with
great EQ and routing capabili-
ties, Repeater's 25mm faders
may not quite be your cup of
teaÉ Well, we thought about
you, and how much we'd like
to be you, but in the meantime
here's how to set up Repeater
to send each channel out a
unique output.
¥ First make sure Tracks 1 & 3
are panned hard Left, and
Tracks 2 & 4 hard Right.
¥Now press and hold F X
Insert and select Tracks 3 &
4.
¥ You will now find Tracks 1 &
2 on the main outputs, and
Tracks 3 & 4 on the FX Sends.
¥Simply set the Tra ck
Levels to the top, (Unity
Gain) and take command from the
bridge of your own console, captain.
English... 17
GETTING STARTED
Bus or
ALT Output
MainOutput
MIDI OUT
FOOT
SWITCHPOWER
Phono
Line
LEFTLEFT
R
L RIGHT
INPUT
RETURNSEND
DIGITAL
SPDIF
RIGHT
FX INSERTOUTPUT
15WATTS
USE ONLY WITH ELECTRIX POWER SUPPLY MODEL TFR0035
INTHRU MIDI
CHANNEL
OUT
MIDI
1 2 3 4
TRACK OUTPUT
ASSIGN TRACKS 3 AND 4 TO THE FX INSERT
LEFT RIGHTLEFT RIGHT
REPEATER
LOOP BASED RECORDER
161 15
2 14
3 13
8
124
5 11
6
10
7 9
Sampling from Sample CDs
If you need help capturing a loop from a sample CD try using
Repeaters ÒSingle Bar CaptureÓ mode. Put Repeater into Beat
Detect sync mode, arm the Audio Trigger by pressing Stop and
Record together. Now play the sample. Repeater will start recording
automatically when the audio kicks in. Now press Record near the
downbeat of the end of your track, as long as youÕre close Repeater
will automatically tweak the loop end to the nearest transient. DonÕt
worry about your loop speeding up when youÕre done. This is because
you have now left ÒSingle Bar CaptureÓ and are in Beat Detect mode.
Just put Repeater into user sync mode and hold down the Tap
Tempo button to reset to the native tempo of the just-captured loop.

B E LOVED PROPELLERHEADS
For those of you that are still reading this manual - and not busy making freak-a-delic loops that will earn you a
Grammy - we offer these thoroughly entertaining and highly technical discussions regarding the finer points of the
micro-technology blinking before you. This section was lovingly prepared for you by our really smart, and talented
engineering folks. The smirky text is courtesy of the marketing department. Please keep your arms and legs inside the
tram at all times. Your mileage may vary. Void where prohibited.
EMPTY LO O P S
Dial around with the loop encoder and find yourself an empty loop. An empty
loop location shows up on the display as a loop with the bar/beat division dis-
play as ' '. If browsing to this loop in User Sync mode without Tempo
Lock, the BPM display will also show the last known loop tempo. DonÕt worry
this tempo will not affect your initial recording in User Sync mode.
Initial Recording
The first recording/overdub on an empty loop defines the length of the
loop. During this initial recording the display will change to indicate the
estimated beats. Once the initial recording is completed, Repeater esti-
mates the tempo and calculates the loop length.
Setting the S y n cM o d e
Repeater defaults to User Sync mode on power up. If you wish to Record while syncing to MIDI or Beat
Detection, select the appropriate Sync mode before starting your Recording.
Setting L e v e l s before Recording
The Input Level knob on the front panel of Repeater controls the front and back input levels. To set the level,
plug in your instrument and tweak the Input Level knob until the LED flickers red just on the loudest notes.
The Signal LED beside the Input Level knob indicates the audio level.
¥Green: Repeater hears audio somewhere in the range of -20dBu to +12dBu, optimum level is +4dBu.
¥Orange: Optimal level, this is where you want to be.
¥Red: The audio signal is causing saturation or clipping (some consider this bad), borderline on distortion.
The LINE/PHONO switch on the back panel sets the RCA inputs for either
phono or line input levels.
Track Selection
The default state of the unit is ready for recording. Press the Track Select
buttons to select the target track(s) for recording/overdubbing. Selected
tracks are indicated by the lit LEDs surrounding the Track Select buttons.
If one of the Pitch, Pan or Slip edit parameters are selected, the Track Select buttons LEDs will flash to indi-
cate the selected tracks for that particular operation. Make sure the track parameters are deselected before you
attempt to select a track for recording.
English... 18
RECORDING LOOPS
Empty loop with Tempo

When selecting tracks for recording, the Track Select buttons operate as 'radio' style buttons. Pressing a new
button deselects the previous track and chooses the one you just pressed, extinguishing and lighting the appro-
priate LEDs. You can select single tracks or stereo pairs. Stereo pairs are selected and deselected with a simultane-
ous press of both tracks. Tracks 1 & 2 can be paired as can Tracks 3 & 4.
Audio Triggered Recordi n g
You still have to press record manually to finish the loop recording, but try this on for size:
Repeater can begin recording when it hears something, rather
than in response to a button being pressed. Here is how to do
it:
¥ Press and hold Stop and then press Record. This puts the
unit into audio triggered mode.
¥ Whilst record is held down the trigger level can be adjusted
using the tempo encoder.
¥ The audio trigger is activated when Record is released. This is indicated by the record button LED flashing.
¥ The audio triggered record will start when audio is detected above the selected trigger level.
¥ Audio triggered record can be cancelled by pressing the Stop button
O V E R D U B VS. R E P L A C E
Repeater normally operates in Overdub mode. In overdub mode, Repeater will mix the recording with the existing
material on the selected track without erasing the original recording. In Replace mode, Repeater will replace the
existing material on the track with the new recording like a conventional tape based recording device. Pressing the
Overdub button will extinguish the Overdub LED and put Repeater into the Replace mode. Overdub lets you
infinitely stack and layer additional parts much like you would on the JAMMANª or Digital Echoplex Proª.
Setting Overdub Fe e d b a c kL e v e l
The Overdub Feedback reduces the level of the original
recording as a new part is recorded on top of it. This pre-
vents an undesirable gain increase. This level can be cus-
tomized, and here's Johnny to tell you howÉ
To change the default overdub feedback levelsÉ
¥Press and hold Overdub for a half a second.
¥The display changes to show the feedback value (level), which you can
modify using the Tempo knob.
¥Press Overdub again to exit and overdub with the new feedback level.
Every time you overdub to a track, the original track content is mixed in
with the new material from the overdub. The Feedback control adjusts how
much of this signal is mixed in. Try setting it to 30% for example. Now every
time you overdub a new part the original track(s) will quickly get quieter
with every pass. Repeater defaults to 94% which works most like a multi-
track recorder when overdubbing. Settings of 85% and less will create
dynamic loops that will evolve over time with each new overdub.
English... 19
RECORDING LOOPS
Setting up for Trigger Recording

0% Fe e d b a c k
0% feedback will completely erase the original loop track after the completed overdub cycle. This differs from
Replace mode in that Replace will mute the track during the record cycle. In Overdub, at 0% feedback ,the record
destination track will not be muted during the record cycle.
UNDO /REDO
Repeater features one level of Undo for overdubbing operations. Additionally you can Redo what you just undid, and
then carry on to Undo the Redo if you just canÕt make up your mind.
E R A S E
Erase lets you erase any or all tracks within a loop even while the loop is playingÉ
¥Press and hold the Erase/UNDO button until the display changes to
look like " " and the Track Select and Erase/UNDO
buttons all flash in unison.
¥The track select buttons will flash only for full tracks, thus in the example shown, you have a loop with four full
tracks.
¥You can select tracks to erase by pressing the Track Select buttons.
¥Press Erase/UNDO to erase the selected tracks, Stop will take you out of Erase mode without erasing any-
thing.
¥Erasing all tracks will completely erase the loop.
R E S A M P L I N G / B O U N C I N G
Once you've built up a multitrack loop, you can bounce it down to one or two tracks.
Resampling will cement any modifications you've made to your loop, including pitch
shift, track slip, pan, level, FX and tempo. Resampling can bounce the contents of all
four tracks down to a mono or stereo pair of tracks. You can only bounce down to a
stereo pair if one is already made. You cannot record a stereo pair over two mono tracks.
To Bounce (Resample) TracksÉ
¥Set the Levels, Pan, Pitch and FX Inserts just how you want it to sound
for the new resampled track.
¥Use the Track Select buttons to select the track(s) you wish to record to.
¥Press Resample. The display will show " "
¥Use the Track Select buttons to select the tracks you wish to be
a part of the new mixed track(s).
¥Press Resample again to confirm your settings.
¥Now press Record to engage the resample. Repeater will stay in record and play until you press Record
again. If you press Record before an entire loop cycle is completed then the record light will begin to flash.
DonÕt panic. Resample needs to record through one entire loop cycle . When the Resample operation is com-
plete the Record light will stop flashing and youÕre done. Pressing the Record button before the loop is fin-
ished is a good way to automate the resampling to a single loop cycle.
English... 20
RECORDING LOOPS
/