Page is loading ...

Home » metabo » metabo NMP 18 LTX BL M10 Cordless Rivet Nut Gun Instruction Manual
Contents
1 metabo NMP 18 LTX BL M10 Cordless Rivet Nut
Gun
2 Declaration of Conformity
3 Specified Conditions of Use
4 General Safety Information
5 Special safety instructions
6 Overview
7 Initial operation
8 Use
9 Maintenance and Cleaning
10 Accessories
11 Repairs
12 Environmental Protection
13 Technical Data
14 Documents / Resources
14.1 References
15 Related Posts
metabo NMP 18 LTX BL M10 Cordless Rivet Nut Gun
metabo NMP 18 LTX BL M10 Cordless Rivet Nut Gun
Instruction Manual
Manuals+ — User Manuals Simplified.

Declaration of Conformity
We, being solely responsible: Hereby declare that these rivet nut guns, identified by type and serial number *1),
meet all relevant requirements of directives *2) and standards *3). Technical documents for *4)
For UK only:
We as manufacturer and authorized person to compile the technical file, see *4) on page 3, hereby declare under
sole responsibility that these rivet nut guns, identified by type and serial number *1) of the Original Instructions,
fulfil all relevant provisions of following UK Regulations S.I. 2016/1091, S.I. 2008/1597, S.I. 2012/3032 and
Designated Standards *3).
Specified Conditions of Use
The rivet nut gun may only be used for installing blind rivet nuts and blind rivet studs as described in these
operating instructions. The machine may only be operated in rooms where the air temperature is between 0-55 °C

and the relative air humidity is at 20-80/100 % RH. It must be ensured that the hall illumination on the operational
side is sufficient.
The user bears sole responsibility for any damage caused by inappropriate use. Generally accepted accident
prevention regulations and the enclosed safety information must be observed.
General Safety Information
For your own protection and for the protection of your power tool, pay attention to all parts of the text that are
marked with this symbol!
WARNING – Read the operating instructions to reduce the risk of injury.
WARNING – Read all safety warnings, instructions, illustrations and specifications provided with this power tool.
Failure to follow all instructions listed below may result in electric shock, fire and/or serious injury.
Keep all safety instructions and information for future reference.
Always include these documents when passing on your power tool.
Special safety instructions
Wear safety glasses.
Personal protective equipment such as protective clothing, a safety helmet, non-slip shoes, and fall protection is
recommended.
Wear protective gloves
Wear ear protectors. Exposure to noise can cause hearing loss.
Attention: The device is not suited for operation in an ATEX zone.
The following safety regulations must be observed to protect against electric shock, injury and fire:
Do not overload the riveting tool. Work in the stated power range.
Never use the riveting tool in a moist / wet environment or near flammable liquids and gases. Danger of
explosion!
Ensure that the battery pack is firmly pushed into the handle.
Always remove the battery pack when the riveting tool is not in use and during maintenance work.
The riveting tool may not be used as an impact tool.
The battery pack may only be charged between 0°C and +55°C.
The riveting tool may only be stored in a dry, closed room and must be stored in an area not accessible to
children.
The ventilation slots for the motor may not be closed; do not insert objects into slots.
Secure the riveting tool against falling during storage.
Only use original spare parts for repairs.
Repairs may only be carried out by a qualified technician. In case of doubt send the riveting tool to the
manufacturer.
CAUTION Do not stare at operating lamp.
Remove the battery pack from the device before making any adjustments, changing tools, maintaining or
cleaning.
Protect battery packs from water and moisture!
Do not expose battery packs to fire!

Do not use faulty or deformed battery packs!
Do not open battery packs!
Do not touch or short circuit battery pack contacts!
A slightly acidic, flammable fluid may leak from defective Li-Ion battery packs!
If battery fluid leaks out and comes into contact with your skin, rinse immediately with plenty of water. If battery
fluid leaks out and comes into contact with your eyes, wash them with clean water and seek medical attention
immediately!
If the device is defective, remove the battery pack from the device.
Transport of Li-Ion battery packs:
The shipping of Li-Ion battery packs is subject to laws related to the carriage of hazardous goods (UN 3480 and
UN 3481). Inform yourself of the currently valid specifications when shipping Li-Ion battery packs. If necessary,
consult your freight forwarder. Certified packaging is available from Metabo. Only send the battery pack if the
housing is intact and no fluid is leaking. Remove the battery pack from the machine for sending. Prevent the
contacts from short-circuiting (e.g. by protecting them with adhesive tape).
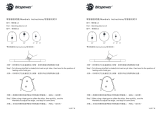
Overview
1. Threaded mandrel
2. Mouthpiece
3. Lock nut
4. Light
5. Mount
6. Locking screw
7. S-button
8. Display
9. Switch
10. Battery pack release button
11. Battery pack *

12. Capacity and signal indicator *
13. Button of capacity display*
14. Cover
15. Locking sleeve
16. Hexagon socket
Initial operation
Before initial operation of the rivet nut gun, select the threaded mandrel (1) and the nose piece (2) that match the
nut dimensions
Changing the threaded mandrel (fig. 3)
Remove the battery pack (11) from the tool
Undo the lock nut (3) using a double open-end wrench (AF 24/27)
Unscrew nose piece (2)
Push the locking sleeve (15) back as far as the stop.
Unscrew the threaded mandrel (1)
Bring the threaded mandrel (1) into alignment with the hexagon surface in the locking sleeve (15)
Screw on a nose piece (2) with a lock nut (3) matching the thread dimensions
Setting the length of the threaded mandrel “X” (fig. 4)
Undo the lock nut (3).
Set the threaded mandrel length “X” to the nut length by turning the nose piece (2).
Use the full thread depth for closed blind rivet nuts.

Slightly secure the nose piece (2) with lock nut (3) against turning by using the double open-end wrench (AF
24/27)
Adjusting the setting force
The rivet nut gun is set to an setting force suitable for the respective blind rivet nut size (e.g. M5). This ensures
that all blind rivet nuts of one thread dimension (e.g. M5) can always be inserted exactly, even with different nut
lengths (e.g. M5x11.5 and M5x13.5), even in materials of different thicknesses.
The setting force is set as follows:
1. Determine the value for the setting force by using the setting force info card fig. 6. To this end, the appropriate
numerical value is selected on the setting force info card on the basis of the nut size and the nut material.
2. Then the value determined on the setting force info card is transferred to the display (8) on the riveting tool by
pressing the plus or minus button. Pressing the plus button increases the numerical value. Pressing the minus
button decreases the numerical value. If a button is pressed for longer than one second, the numerical value
changes in steps of 10.
Since the setting behaviour of different nut types from different suppliers can vary greatly, a trial riveting can be
carried out after setting the value for the setting force.
Threading on the blind rivet nut to be inserted (see point 6.1). Insert the blind rivet nut with the riveting tool into
the material to be riveted. If possible, select the thickest material for materials of different thicknesses.
Trigger the setting process by pressing the switch (9) until the threaded mandrel is released. Afterwards check
the inserted nut. If the nut is not sufficiently deformed, the numerical value on the display must be carefully
increased step by step. Subsequently, repeat the setting procedure with a new nut and check again. The blind
rivet nut must form a pronounced closing head. If the nut is deformed too much (e.g. removal of threaded
mandrel difficult, nut thread deformed), thenumerical value must be reduced step by step. Subsequently,
repeat the setting procedure with a new nut and check again.
Increasing the numerical value on the display (8) increases the setting force of the rivet nut gun, reducing the
numerical value reduces the setting force!
6.4 Saving and loading the setting force
The rivet nut gun is able to store the set force in the integrated programme memory and to reload when required.
The numerical values are stored as follows:
Determine the numerical value to be programmed and set (see point 6.3).
If the S-button (7) is pressed for longer than one second (> 1 sec), you can access the programme memory
(initial value P0) to store the set numerical value.
By pressing the plus or minus button, a programme memory location between P0 and P9 can be selected.

After pressing the S-button (7) again (> 1 sec) the numerical value is stored and the numerical value appears
again on the display.
Already stored numerical values are accessed as follows:
If the plus and minus button is pressed at the same time for longer than two seconds (> 2 sec), you can access
the programme memory to load a numerical value.
By pressing the plus or minus button, a previously stored numerical value between P0 and P9 can be selected.
After pressing the S-button (7) again (> 1 sec) the selected programme is loaded and the corresponding force
appears.
The storage or loading process can be interrupted at any time by pressing the plus and minus button
simultaneously (> 2 sec).
Battery pack
Charge the battery pack (11) before use.
Recharge the battery pack (11) if performance diminishes.
Instructions on charging the battery pack can be found in the operating instructions of the Metabo charger.
Li-Ion battery packs “Li-Power, LiHD” have a capacity and signal indicator (12):
Press the button (13); the LEDs indicate the charge (12) level.
If one LED (12) is flashing, the battery pack (11) is almost empty and must be recharged.
6.6 Removing and inserting the battery pack
Removing:
Press the battery pack release (10) button and remove the battery pack (11).
Inserting:
Slide in the battery pack (11) until it engages.
Use
Threading on the blind rivet nut
Position the blind rivet nut without canting on the threaded mandrel (1).
It is recommended that the blind rivet nut be unscrewed by hand at approximately ½ turn to facilitate threading
of the threaded mandrel (1).
Start the setting process by pressing the switch (9).
Keep the switch (9) pressed until the setting process is automatically terminated. During the entire setting
process hold the blind rivet nut against twisting. After the setting process, the blind rivet nut must be in correct
contact with the nose piece (2). Otherwise, correct the setting of the threaded mandrel length (see point 6.2).
If the switch (9) is released too early, the nut will be removed again!

7.2 Manual removal of the blind rivet nut
If e.g. the blind rivet nut is not positioned correctly during the threading on process or if the thread of the blind
rivet nut is defective, the blind rivet nut will not be positioned correctly on the nose piece after threading on. In
such cases, the blind rivet nut can be removed and changed by tapping the switch (9) very briefly. We do not
recommend to continue using a damaged blind rivet nut.
If the setting force selected for a nut size is considerably too high (incorrect setting!), the blind rivet nut and the
nut thread may be severely deformed, resulting in extremely high removal forces. This can lead to the
threaded mandrel of the rivet nut gun not being able to be removed and the tool switching off due to overload.
The overload is shown as error message “E3” on the display and by rapid flashing of the illuminated ring. In
such cases, remove the battery pack. Afterwards, the threaded mandrel (1) must be removed by hand. To this
end, insert the enclosed hexagon screwdriver AF 4 into the hexagon socket (16) at the rear end of the tool and
carefully loosen the threaded mandrel (1) by turning it to the left (see fig. 5).
After unscrewing the deformed nut, the battery pack is pushed back in . After pressing and releasing the switch
(9), the tool moves back to the front end position in a slow reference movement.
The last set value for the tractive force appears again on the display.
Attention: Now set the correct setting force (see point 6.3).
Hold the switch (9) until the setting process has been completed and the release process is started
automatically.Afterwards the switch (9) can be released.
Incorrect setting process with error message E1:
If the setting process is interrupted before the set setting force is reached by prematurely releasing the switch, the
setting process stops and the tool automatically returns to the front end position, whereby the mandrel is removed
from the incorrectly set nut. Error message “E1” appears on the display. The error is indicated visually and
acoustically be rapid flashing of the illuminated ring (4) and rapid beeps. The tool cannot be operated until the
error and the corresponding displays are acknowledged by pressing the S-button (7) (> 1 sec).
The display now shows rS (reSet). In this mode, the incorrectly set nut can be readjusted at reduced speed
until the nut is set correctly. To this end, thread on the already set nut again (see 7.1) and keep the switch (9)
pressed again until the removal process is started automatically. After the one-time rS-setting process, the last
set value for the setting force appears again on the display (8).
Re-setting one or several blind rivet nuts:
If one or several nuts have been set with too low a force value, these nuts can be re-set in rrmode (reWork).
To this end, it is first necessary to determine the correct numerical value for the setting force and to correct it on
the display (see point 6.3). – Subsequently, press the S-button (7) and skip the memory locations (P1-9) until rr
appears in display 7.
Afterwards, all incorrectly set nuts can be re-set with the corrected value for the setting force, by threading on
the corresponding nuts again and starting a new setting process by pressing the switch (9) until the automatic
removal process is started.
When all blind rivets are re-set, you can switch to normal mode by pressing the S-button again.
Light

The rivet nut gun has 3 LEDs to illuminate the workplace, which can be switched on by turning the black ring
behind the LEDs. There are 3 positions, indicated by the arrow injected into the housing and the “light sign” icon
(see P.2 fig. 3):
Continuous light/torch function I:
The illumination is switched on after a riveting process and stays on for about 10 minutes. Then all LEDs go out
automatically.
Zero position 0:
Light switched off.
Working light A (fig. 3):
Illumination is switched on at the start of the riveting process. The LEDs light up for about 10 seconds and then
go out automatically.
Maintenance and Cleaning
Remove the battery pack before completing any maintenance or cleaning on the device! The rivet nut gun
maintenance is limited to the replacement of work threaded mandrels and nose pieces as required (for
replacement of the threaded mandrels, see item 6.1). Regular maintenance will extend the service life of your
machine and should be carried out at least every 2 years by an authorised workshop or Metabo service. More
frequent maintenance is recommended for intensive use.
Accessories
Use only original Metabo or CAS (Cordless Alliance System) battery packs and accessories. Use only
accessories that fulfil the requirements and specifications listed in these operating instructions. Fit accessories
securely.
Charger: ASC 30-36, etc
Battery packs with different capacities. Buy battery packs only with voltage suitable for your power tool.
Order no.: 6.25367 …. 4,0 Ah (LiHD)
Order no.: 6.25596 …. 2.0 Ah (Li-Ion)etc.
Repairs
Repairs to electrical tools must ONLY be carried out by qualified electricians! Contact your local Metabo
representative if you
have Metabo power tools requiring repairs. For addresses see www.metabo.com.
You can download a list of spare parts from www.metabo.com.
Environmental Protection
Observe national regulations on environmentally compatible disposal and on the recycling of disused machines,
packaging and accessories. Only for EU countries: never dispose of power tools in your household waste!
According to European Directive 2012/96/EU on Waste from Electric and Electronic Equipment and
implementation in national law, used power tools must be collected separately and recycled in an environmentally-
friendly manner. Discharge the battery pack in the power tool before disposal. Prevent the contacts from short-
circuiting (e.g. by protecting them with adhesive tape).
Technical Data

Explanatory notes on the specifications on page 3. Subject to change in accordance with technical progress.
U = Voltage of battery pack
m = Weight (with smallest battery pack)
H =Total stroke
F = Setting force
Dsteel = Rivet diameter for steel rivets
Dssteel = Rivet diameter for stainless steel rivets
Dalu = Rivet diameter for aluminium rivets
Measured values determined in conformity with EN 62841. Permitted ambient temperature during operation: – 20
°C bis 50 °C (limited performance with temperatures below 0 °C). Permitted ambient temperature for storage: 0
°C to 30 °C
The technical specifications quoted are subject to tolerances (in compliance with the relevant valid standards).
Explanatory notes on the specifications on page 2.
Aluminium
Steel
Stainless steel
Emission values
These values make it possible to assess the emissions from the power tool and to compare different power tools.
The actual load may be higher or lower depending on operating conditions, the condition of the power tool or the
accessories used. Please allow for breaks and periods when the load is lower for assessment purposes. Arrange
protective measures for the user, such as organisational measures based on the adjusted estimates.
Vibration total value (vector sum of three directions) determined in accordance with EN 62841:
ah = vibration emission value
Kh = Uncertainty
Typical A-effective perceived sound levels:
LpA = sound-pressure level
KpA, = Uncertainty
During operation the noise level can exceed 80 dB(A).
Wear ear protectors
Metabowerke GmbH
Metabo-Allee 1
72622 Nuertingen
Germany
www.metabo.com
Documents / Resources

/