Datalogic Magellan 9800i Quick Reference Manual

Type
Quick Reference Manual

Datalogic Magellan 9800i is a multi-plane imaging bar code scanner with an optional integrated scale, designed for supermarket peripheral lanes. It features SurroundScan technology for efficient scanning items in any direction. The optional Top Down Reader contributes to the overall bar code read zone and can also be used for scanning coupons and taking pictures. The scanner can optionally deactivate Sensormatic or Checkpoint EAS tags automatically or manually. The unique platter design allows accurate weighing of items placed anywhere on its surface or leaning against its vertical section.

Datalogic Magellan 9800i is a multi-plane imaging bar code scanner with an optional integrated scale, designed for supermarket peripheral lanes. It features SurroundScan technology for efficient scanning items in any direction. The optional Top Down Reader contributes to the overall bar code read zone and can also be used for scanning coupons and taking pictures. The scanner can optionally deactivate Sensormatic or Checkpoint EAS tags automatically or manually. The unique platter design allows accurate weighing of items placed anywhere on its surface or leaning against its vertical section.

Magellan
TM
9800i
Scanner and Scanner-Scale with Imaging Technology
Quick Reference Guide
Datalogic ADC, Inc.
959 Terry Street
Eugene, OR 97402
USA
Telephone: (541) 683-5700
Fax: (541) 345-7140
©2012 - 2015 Datalogic, Inc.
An Unpublished Work - All rights reserved. No part of the contents of this documentation or the procedures described
therein may be reproduced or transmitted in any form or by any means without prior written permission of Datalogic
ADC, Inc. or its subsidiaries or affiliates ("Datalogic" or “Datalogic ADC”). Owners of Datalogic products are hereby granted
a non-exclusive, revocable license to reproduce and transmit this documentation for the purchaser's own internal busi-
ness purposes. Purchaser shall not remove or alter any proprietary notices, including copyright notices, contained in this
documentation and shall ensure that all notices appear on any reproductions of the documentation.
Should future revisions of this manual be published, you can acquire printed versions by contacting your Datalogic repre-
sentative. Electronic versions may either be downloadable from the Datalogic website (www.datalogic.com) or provided
on appropriate media. If you visit our website and would like to make comments or suggestions about this or other Dat-
alogic publications, please let us know via the "Contact Datalogic" page.
Disclaimer
Datalogic has taken reasonable measures to provide information in this manual that is complete and accurate, however,
Datalogic reserves the right to change any specification at any time without prior notice.
Datalogic and the Datalogic logo are registered trademarks of Datalogic S.p.A. in many countries, including the U.S.A. and
the E.U. All other brand and product names may be trademarks of their respective owners.
Magellan is a registered trademark of Datalogic ADC, Inc. in many countries, including the U.S.A. and All-Weighs, First-
Strike, SmartSentry and SurroundScan are registered trademarks of Datalogic ADC, Inc. in the U.S.A. OmegaTek, Produce
Rail, Productivity Index Reporting, and ScaleSentry are all trademarks of Datalogic ADC, Inc.
Patents
See www.patents.datalogic.com for patent list.
This product is covered by one or more of the following patents:
See the Regulatory Addendum included with your product
for additional regulatory, safety and legal information.
Quick Reference Guide 1
Introduction
The Magellan
TM
9800i is a multi-plane imaging bar code scanner with an optional
integrated scale, designed to serve in supermarket peripheral lanes. This manual
describes its basic operation. For more detailed information about setup, instal-
lation and programming, see the Product Reference Guide for this product. These
manuals are provided in Portable Document Format (PDF) for viewing and print-
ing from the website listed on the back cover of this manual. Additionally, printed
manuals can be ordered from your dealer/distributor.
Operation
CAUTION
If applicable, apply power to the EAS Controller box
before powering on the scanner.
2 Magellan
TM
9800i
Certification Label
At the time the local scale regulatory authority certifies the scanner/scale for use,
a certification label is affixed to the unit. Depending upon the size and shape of
the label, placement can be made in one of the locations shown in
Figure 1.
Figure 1. Affixing the Scale Certification Label
1
2
3
5 6
4
1 Left end of scanner bonnet 4 Remote Display Post
2 Right end of scanner bonnet 5
Atop the Bonnet underneath the Platter
3 Back of Remote Display Head 6
Quick Reference Guide 3
Scanning Items
Slide or push items through the SurroundScan
TM
scan zone in a right-to-left or
left-to-right movement. The scanner is equally efficient at scanning items in
either direction. It is unnecessary to shift the position of the bar code, as the
scanner can “read” it from the bottom, top, left, right, front and back side of an
item, as long as it is fully within the scan zone.
Figure 2. Scan Zones
For best scanning results...
Keep items in their natural orientation. Don’t favor any of the scan win-
dows.
Push or slide items instead of lifting them. Avoid unnecessary hand and
wrist movements such as rotation, gripping or twisting, as this can cause
repetitive motion injuries. This helpful technique can also allay the possi-
bility of lifting thousands of pounds per day
3
1
2
1 Scan Zone for Main Scanner
2
Optional Top Down Reader (TDR) Scan
Zone
3
Slide items over the center of the hori-
zontal window for best scan coverage.
NOTE
If a POS terminal holds the scanner in a dis-
abled state, the scanner enters limited scan-
ning mode which allows reading of
programming labels but ‘chirps’ other labels.
4 Magellan
TM
9800i
Scan Motion
The SurroundScan™ scan pattern and advanced FirstStrike™ decoding software
ensures the scanner will read most hard-to-read codes quickly and without a
need to particularly reorient items.
It is important to verify that the platter has been installed flush with the counter-
top to enhance slide-through scanning (see Figure 1). If the platter is not flush
with the counter, contact the installer or your technical support team for assis-
tance.
Figure 3. Verify Flush Installation
Scanner Mounted Flush — Correct
Scanner Mounted
Above Flush — Incorrect
Scanner Mounted
Below Flush — Incorrect
Quick Reference Guide 5
Cleaning
Exterior surfaces and scan windows exposed to spills, smudges or debris accu-
mulation require periodic cleaning to assure best performance during scanning
and weighing operations. Use a clean, lint-free cloth or paper towel dampened
with a nonabrasive, mild, water-based window cleaner to wipe away stains,
smudges, fingerprints, spills, etc. from the scan window and exterior surfaces
(
Figure 4a).
Figure 4. Cleaning the Scanner
Daily, clean the debris chutes between the platter and the outer housing
(
Figure 4b). Most items can be cleared from the debris chutes by carefully run-
ning a thin, stiff object like a credit card along all sides of the weighing surface. If
necessary, remove the platter (
Figure 4c) to clean the debris chutes and drip rail.
(Models vary)
ab
c
CAUTION
DO NOT spray
cleaners directly
on the scanner!
CAUTION
DO NOT use abrasive cleaning agents or abrasive pads
to clean this product. Harsh chemicals, disinfectants,
and cleansers can cause damage which will adversely
affect scanning and weighing performance.
6 Magellan
TM
9800i
Weighing Items (Scale Models)
The unique platter design allows you to place items anywhere on its surface,
including leaning atop its vertical section, to be weighed accurately. In addition,
the Produce Rail
TM
allows items to rest above the counter and other non-weigh-
ing surfaces. See
Figure 5.
Once weighed items have been positioned, enter PLU (price Look-Up) data as
described in your POS system instructions. Item weight is displayed on the
Remote Display and/or the host display.
Figure 5. Weighing Items
Scale Sentry
TM
Option
The optional ScaleSentry feature monitors items placed on the platter to detect
and indicate if they are overhanging non-weighing surfaces. If the system’s infra-
red (IR) beams sense items encroaching past the sides of the weigh platter, the
speaker will sound a unique tone and/or the ScaleSentry LED indicator will illumi-
nate to indicate a ScaleSentry error condition. A scale transaction cannot be com-
pleted until the item(s) are repositioned to rest fully on the platter (move them
towards the center), clearing the condition. Reference the PRG for more
ScaleSentry options and details.
Quick Reference Guide 7
Top Down Reader (TDR) Option
The scanner’s exclusive Top Down Reader (TDR) is an optional feature of the
scanner, and is available in two different heights in order to provide flexibility for
installations. The TDR can perform multiple functions:
The TDR contributes significantly to the overall bar code read zone by
scanning items from a unique top-down angle.
The eCommerce option allows customers to use the TDR to conveniently
scan coupons and other bar codes presented ...even those displayed on
their cell phone. Depending upon the way this feature is programmed
into the scanner, coupons are either simply presented to the customer-
facing E-commerce scanner as shown in
Figure 6, or the sales associate
must push the E-commerce button to read a coupon as it is presented to
that screen.
The TDR also has an optional ability to take pictures. The scanner must
be configured for TDR image capture and a microSD card must be
installed in the card slot provided for it. Position the photo subject within
the field of view of the downward-facing TDR imager, then use the Cam-
era button located on the Control Panel to take the picture. The scanner’s
speaker will sound a “shutter click” sound and/or the Camera indicator
LED will light to indicate image capture. Photos are stored on the
microSD card and automatically numbered from image000 to image999.
Figure 6. Scanning a Bar Code from a Cell Phone
Your
Coupon
8 Magellan
TM
9800i
Electronic Article Survellance (EAS) Deactivation Options
Deactivation of Sensormatic® or Checkpoint® EAS tags is an optional function.
The scanner must be expressly enabled to perform in either capacity.
Sensormatic Coupled Mode
When the scanner is configured to use Coupled EAS Deactivation Mode, deactiva-
tion of a given item happens automatically following its bar code being success-
fully read.
Sensormatic Decoupled Mode
When in Decoupled Mode, the sales associate must press the Manual EAS Deac-
tivation button in order to deactivate an item. In this mode, deactivation is inde-
pendent of the scanning function.
Controls and Indicators
The scanner features two prominent LED indicator bars on top of its vertical
“bonnet” (item #2 in
Figure 7) as well as (optionally) another highly visible LED
indicator for indicating E-commerce reading activities atop the Top Down Reader
(if a TDR is present) which is item #1 in
Figure 7.
As
Figure 8 illustrates, two panels on either side of the vertical scan windows
contain control buttons and more LED indicators. Additionally, a configurable
speaker is used to sound scanning, weighing and EAS deactivation indications.
See the LED and Beeper Indications section for more details.
Figure 7. Top Side LED Indicators
1
2
Quick Reference Guide 9
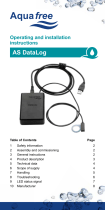
Figure 8. Control Buttons and Indicator LEDs
a. Some audible indications are configurable to be on or off, as well as offer their own program-
mable options for pitch, volume, etc.
1
Scale Zero Button 6 ScaleSentry Indicator LED (Red)
With all weight removed from the scale,
push this button to set the scale to
zero.
This LED indicates the current ScaleSentry condition. See the
LED and Beeper Indications section for more information.
2
Manual EAS Deactivation Button 7 Speaker
When in EAS Manual Deactivation
Mode, push this button to deactivate an
item.
Sounds
a
beeps, error tones and other audible signals to indi-
cate good read, ScaleSentry alert, system error and other
conditions.
3
ScaleSentryOverride Button 8 Scanner Control Button
When configured to do so, a push of
this button will override a detected
scale overhang condition.
-If the scanner is “asleep”, press this button to wake it up.
-Press this button momentarily to enter beeper volume
change state. Select one of five volume settings.
-Press this button between 1 and 4 seconds to enter beeper
tone change state.
-Press this button between 5 and 9 seconds to enter Scan-
ner Diagnostics Mode.
-Press this button for 10 seconds to initiate a soft reset.
4
Scale Indicator LED (Yellow) 9 Camera Button
This LED indicates scale functions. See
the Indicator Table for more informa-
tion.
This button is used to take pictures with the Top Down
Reader (TDR) when images are captured to a microSD card.
See the PRG for details about this option.
5
EAS Indicator LED (Red/Green/Orange) 10 eCommerce Button
This LED indicates EAS functions with
red, green OR orange color. See the
Indicator Table for more information.
If an optional TDR is configured so, press this button to place
the scanner in eCommerce state. Bar code(s) can be read by
the E-commerce Reader while in this state.
1
2
3
8
4
9
5
6
7
10
10 Magellan
TM
9800i
NOTES
Quick Reference Guide 11
LED and Beeper Indications
The scanner’s beeper sounds and its lamps and indicator LEDs illuminate to indicate various functions or errors. The tables in
this section list some of these indications. Reference the PRG for a more complete listing. One exception to the behaviors
listed in the tables is that some functions are programmable, and may or may not be turned on. For example, certain indica-
tions such as the power-up beep can be disabled using programming bar code labels.
INDICATION Scanner LED
BEEPER
COMMENT
Count Frequency Volume Duration
Pre-operating Mode OFF OFF
Power-up Beep N/A Unique WAV file sound. Default sound is a synthesized chord ending with two light bells.
Good Read Beep Bright flash 1 Current Current Current Frequency, volume and duration are configurable.
ROM Failure
200ms ON
200 ms OFF
1ErrorHighest
200ms ON
200ms OFF
Indicates either Boot or Program ROM failure.
Scanner Active
Mode
On steady and
dim
N/A
The scanner is ready for operation. Scanning is immediately avail-
able.
Scanner Disabled
Continuous
blink 100ms ON
/ 900ms OFF
N/A The Host has disabled scanning.
Sleep Mode
10ms ON
1990ms OFF
N/A
The scanner has been inactive for a period and is in a power-saving
mode.
Chirp Indications
(see comment)
N/A 6 Highest Current
20ms ON
20ms OFF
A “Chirp” is used to indicate the following:
-Reading labels while in limited scanning mode.
-Label rejection during label programming.
-A label with no data.
-Labels rejected through the auxiliary port when in Scanner
Diagnostics Mode.
INDICATION Scale LED BEEPER COMMENT
Scale at Zero On steady N/A
The scale is at rest and reads zero weight. The scale is ready to
weigh.
Scale Error
Reporting
Coded sequence N/A
When the scanner is in Scale Diagnostics Mode, the Remote Scale
Display and the Scale LED indicator can communicate specific scale
failures. See the PRG for more details.
12 Magellan
TM
9800i
Error Codes
Upon startup, if the scanner sounds a long error
tone followed by alternating flashing of the green
and yellow LED indicators, and an error code is
displayed on the Health & Status Indicator, this
means the scanner has not passed its automatic
Selftest and has entered FRU (Field Replaceable
Unit) isolation mode. The scanner remains in
this mode, until any button is pushed.
After a button is pushed, the scanner flashes the
green LED a set number of times to indicate the
error code. After one cycle of flashing has passed, another button push
resets the scanner. The PRG describes the LED flash codes associated with
an error found. If your scanner indicates any of these errors, note the code
number, then contact Helpdesk for assistance.
Sensormatic
®
EAS Indications
If the scanner is equipped with the optional Sensormatic EAS opton, various deactivation and validation indications will be
enabled.
INDICATION EAS LED
BEEPER
COMMENT
Count Frequency Volume Duration
Entering EAS
Coupled Mode
Green ON N/A
Upon sensing an
inactive to active
transition
Red ON
Green OFF
N/A While in EAS Coupled Mode.
Upon sensing an
active to inactive
transition
Red OFF
Green ON
N/A While in EAS Coupled Mode.
Upon receiving
validation of EAS tag
deactivation
Orange ON until
EAS beeper
turns OFF
1 ~ 1500 Hz Current Configurable While in EAS Coupled Mode.
EAS Bad Beep N/A Same as FRU error tone While in EAS Coupled Mode.
Label Programming Mode
Indications
These indications occur only when the scan-
ner is in
Programming Mode or when placing the scan-
ner in
that mode.
INDICATION LED BEEP(S)
Label
Programming
Mode Entry
Continuous
blink 1 sec. ON
/ 1 sec. OFF
Same as good
read indication
Acceptance of
Partial Labels
N/A 1
Partial Label
Reading Cancel
N/A 6
Acceptance of
Complete Labels
N/A 3
Indicator
Health & Status
Quick Reference Guide 13
Warranty
Datalogic warrants to Customer that this product will be free from defects in
materials and workmanship for a period of 1 year from product shipment.
Datalogic ADC Limited Factory Warranty
Warranty Coverage
Datalogic ADC (“Datalogic”) hardware products are warranted against defects in
material and workmanship under normal and proper use. The liability of Data-
logic under this warranty is limited to furnishing the labor and parts necessary
to remedy any defect covered by this warranty and restore the product to its
normal operating condition. Repair or replacement of product during the war-
ranty does not extend the original warranty term. Products are sold on the basis
of specifications applicable at the time of manufacture and Datalogic has no
obligation to modify or update products once sold.
If Datalogic determines that a product has defects in material or workmanship,
Datalogic shall, at its sole option repair or replace the product without additional
charge for parts and labor, or credit or refund the defective products duly
returned to Datalogic. To perform repairs, Datalogic may use new or recondi-
tioned parts, components, subassemblies or products that have been tested as
meeting applicable specifications for equivalent new material and products.
Customer will allow Datalogic to scrap all parts removed from the repaired prod-
uct. The warranty period shall extend from the date of shipment from Datalogic
for the duration published by Datalogic for the product at the time of purchase
(Warranty period). Datalogic warrants repaired hardware devices against defects
in workmanship and materials on the repaired assembly for a 90 day period
starting from the date of shipment of the repaired product from Datalogic or
until the expiration of the original warranty period, whichever is longer. Datalogic
does not guarantee, and it is not responsible for, the maintenance of, damage to,
or loss of configurations, data, and applications on the repaired units and at its
sole discretion can return the units in the “factory default” configuration or with
any software or firmware update available at the time of the repair (other than
the firmware or software installed during the manufacture of the product). Cus-
tomer accepts responsibility to maintain a back up copy of its software and data.
14 Magellan
TM
9800i
Warranty Claims Process
In order to obtain service under the Factory Warranty, Customer must notify
Datalogic of the claimed defect before the expiration of the applicable Warranty
period and obtain from Datalogic a return authorization number (RMA) for return
of the product to a designated Datalogic service center. If Datalogic determines
Customer’s claim is valid, Datalogic will repair or replace product without addi-
tional charge for parts and labor. Customer shall be responsible for packaging
and shipping the product to the designated Datalogic service center, with ship-
ping charges prepaid. Datalogic shall pay for the return of the product to Cus-
tomer if the shipment is to a location within the country in which the Datalogic
service center is located. Customer shall be responsible for paying all shipping
charges, duties, taxes, and any other charges for products returned to any other
locations. Failure to follow the applicable RMA policy, may result in a processing
fee. Customer shall be responsible for return shipment expenses for products
which Datalogic, at its sole discretion, determines are not defective or eligible for
warranty repair.
Warranty Exclusions
The Datalogic Factory Warranty shall not apply to:
(i) any product which has been damaged, modified, altered, repaired or
upgraded by other than Datalogic service personnel or its authorized rep-
resentatives;
(ii) any claimed defect, failure or damage which Datalogic determines was
caused by faulty operations, improper use, abuse, misuse, wear and tear,
negligence, improper storage or use of parts or accessories not approved
or supplied by Datalogic;
(iii) any claimed defect or damage caused by the use of product with any
other instrument, equipment or apparatus;
(iv) any claimed defect or damage caused by the failure to provide proper
maintenance, including but not limited to cleaning the upper window in
accordance with product manual;
Quick Reference Guide 15
(v) any defect or damage caused by natural or man-made disaster such as
but not limited to fire, water damage, floods, other natural disasters, van-
dalism or abusive events that would cause internal and external compo-
nent damage or destruction of the whole unit, consumable items;
(vi) any damage or malfunctioning caused by non-restoring action as for
example firmware or software upgrades, software or hardware reconfig-
urations etc.;
(vii)the replacement of upper window/cartridge due to scratching, stains or
other degradation and/or
(viii)any consumable or equivalent (e.g., cables, power supply, batteries, key-
pads, touch screen, triggers etc.).
No Assignment
Customer may not assign or otherwise transfer its rights or obligations under
this warranty except to a purchaser or transferee of product. No attempted
assignment or transfer in violation of this provision shall be valid or binding
upon Datalogic.
DATALOGIC'S LIMITED WARRANTY IS IN LIEU OF ALL OTHER WARRANTIES,
EXPRESS OR IMPLIED, ORAL OR WRITTEN, STATUTORY OR OTHERWISE, INCLUD-
ING, WITHOUT LIMITATION, ANY IMPLIED WARRANTIES OF MERCHANTABILITY,
FITNESS FOR A PARTICULAR PURPOSE, OR NONINFRINGEMENT. DATALOGIC
SHALL NOT BE LIABLE FOR ANY DAMAGES SUSTAINED BY CUSTOMER ARISING
FROM DELAYS IN THE REPLACEMENT OR REPAIR OF PRODUCTS UNDER THE
ABOVE. THE REMEDY SET FORTH IN THIS WARRANTY STATEMENT IS THE CUS-
TOMER’S SOLE AND EXCLUSIVE REMEDY FOR WARRANTY CLAIMS. UNDER NO
CIRCUMSTANCES WILL DATALOGIC BE LIABLE TO CUSTOMER OR ANY THIRD
PARTY FOR ANY LOST PROFITS, OR ANY INCIDENTAL, CONSEQUENTIAL IN-
DIRECT, SPECIAL OR CONTINGENT DAMAGES REGARDLESS OF WHETHER DATA-
LOGIC HAD ADVANCE NOTICE OF THE POSSIBILITY OF SUCH DAMAGES.
16 Magellan
TM
9800i
Risk of Loss
Customer shall bear risk of loss or damage for product in transit to Datalogic.
Datalogic shall assume risk of loss or damage for product in Datalogic’s posses-
sion. In the absence of specific written instructions for the return of product to
Customer, Datalogic will select the carrier, but Datalogic shall not thereby
assume any liability in connection with the return shipment.
820067814 (Rev. E) March 2015
www.datalogic.com
© 2012-2015 Datalogic ADC, Inc. • All rights reserved. •
Datalogic and the Datalogic logo are registered trademarks of
Datalogic S.p.A. in many countries, including the U.S.A. and the E.U.
Datalogic ADC, Inc.
959 Terry Street
|
Eugene
|
OR 97402
|
USA
Telephone: (1) 541-683-5700
|
Fax: (1) 541-345-7140
  • Page 1 1
  • Page 2 2
  • Page 3 3
  • Page 4 4
  • Page 5 5
  • Page 6 6
  • Page 7 7
  • Page 8 8
  • Page 9 9
  • Page 10 10
  • Page 11 11
  • Page 12 12
  • Page 13 13
  • Page 14 14
  • Page 15 15
  • Page 16 16
  • Page 17 17
  • Page 18 18
  • Page 19 19
  • Page 20 20

Datalogic Magellan 9800i Quick Reference Manual

Type
Quick Reference Manual

Datalogic Magellan 9800i is a multi-plane imaging bar code scanner with an optional integrated scale, designed for supermarket peripheral lanes. It features SurroundScan technology for efficient scanning items in any direction. The optional Top Down Reader contributes to the overall bar code read zone and can also be used for scanning coupons and taking pictures. The scanner can optionally deactivate Sensormatic or Checkpoint EAS tags automatically or manually. The unique platter design allows accurate weighing of items placed anywhere on its surface or leaning against its vertical section.

Ask a question and I''ll find the answer in the document

Finding information in a document is now easier with AI