Page is loading ...

Low and High Level
Dissolved Oxygen Monitor
9438
User Guide
IM/9438_6

ABB
The Company
We are an established world force in the design and manufacture of instrumentation for industrial
process control, flow measurement, gas and liquid analysis and environmental applications.
As a part of ABB, a world leader in process automation technology, we offer customers
application expertise, service and support worldwide.
We are committed to teamwork, high quality manufacturing, advanced technology and unrivalled
service and support.
The quality, accuracy and performance of the Company’s products result from over 100 years
experience, combined with a continuous program of innovative design and development to
incorporate the latest technology.
The UKAS Calibration Laboratory No. 0255 is just one of the ten flow calibration plants operated
by the Company and is indicative of our dedication to quality and accuracy.
Health and Safety
To ensure that our products are safe and without risk to health, the following points must be noted:
1. The relevant sections of these instructions must be read carefully before proceeding.
2. Warning labels on containers and packages must be observed.
3. Installation, operation, maintenance and servicing must only be carried out by suitably trained personnel and in accordance with the
information given.
4. Normal safety precautions must be taken to avoid the possibility of an accident occurring when operating in conditions of high pressure and/
or temperature.
5. Chemicals must be stored away from heat, protected from temperature extremes and powders kept dry. Normal safe handling procedures
must be used.
6. When disposing of chemicals ensure that no two chemicals are mixed.
Safety advice concerning the use of the equipment described in this manual or any relevant hazard data sheets (where applicable) may be
obtained from the Company address on the back cover, together with servicing and spares information.
EN ISO 9001:2000
Cert. No. Q 05907
R
E
G
I
S
T
E
R
E
D
EN 29001 (ISO 9001)
Lenno, Italy – Cert. No. 9/90A
0255
Stonehouse, U.K.
Warning – Refer to the manual for instructions
Caution – Risk of electric shock
Protective earth (ground) terminal
Earth (ground) terminal
Direct current supply only
Alternating current supply only
Both direct and alternating current supply
The equipment is protected
through double insulation
Electrical Safety
This equipment complies with the requirements of CEI/IEC 61010-1:2001-2 "Safety requirements for electrical equipment for
measurement, control, and laboratory use". If the equipment is used in a manner NOT specified by the Company, the protection
provided by the equipment may be impaired.
Symbols
One or more of the following symbols may appear on the equipment labelling:
Information in this manual is intended only to assist our customers in the efficient operation of our equipment. Use of this manual for
any other purpose is specifically prohibited and its contents are not to be reproduced in full or part without prior approval of the
Technical Publications Department.

1
1 INTRODUCTION ........................................................... 2
2 MECHANICAL INSTALLATION .................................... 3
2.1 Siting Requirements ............................................ 3
2.1.1 Instruments ........................................... 3
2.1.2 Dissolved Oxygen Flowcell .................... 3
2.2 Mounting the Instrument ..................................... 3
2.2.1 Wall-mounted Instrument ...................... 3
2.2.2 Panel-mounted Instrument .................... 4
2.3 Installing the Dissolved Oxygen Flowcell ............. 5
2.3.1 Flowcell Dimensions (Overall)7 .............. 5
2.3.2 Enclosure Dimensions (Optional) ........... 5
2.3.3 Connecting the Sample Lines ................ 5
3 ELECTRICAL CONNECTIONS ..................................... 6
3.1 Access to Terminals ............................................ 6
3.1.1 Wall-mounted Instruments .................... 6
3.1.2 Panel-mounted Instruments .................. 6
3.2 Connections, General ......................................... 7
3.2.1 Relay Contact Protection
and Interference Suppression ................ 7
3.2.2 System Wiring Schematic ..................... 8
3.3 Wall-mounted Instrument Connections ............... 8
3.4 Panel-mounted Instrument Connections ............. 9
3.5 Selecting the Mains Voltage .............................. 10
3.5.1 Wall-mounted Instrument .................... 10
3.5.2 Panel-mounted Instrument .................. 10
3.6 Flowcell Solenoid Valve Connections ................ 11
4 SETTING UP ............................................................... 12
4.1 Fitting the Dissolved Oxygen Sensor ................. 12
4.2 Connecting the Flowcell .................................... 13
4.3 Checking Sample Flow ..................................... 13
5 CONTROLS AND DISPLAYS ..................................... 14
5.1 Displays ............................................................ 14
5.2 Switch Familiarization ........................................ 14
6START UP AND OPERATION ..................................... 15
6.1 Instrument Start-up........................................... 16
6.2 Operation – Dissolved Oxygen
Measurement Mode .......................................... 16
6.2.1 Operation Page ................................... 16
6.2.2 Calibration Page .................................. 17
7 PROGRAMMING AND ELECTRICAL CALIBRATION 18
7.1 Access to Secure Parameters ........................... 18
7.2 Language Page ................................................ 18
7.3 Set Up Parameters Page .................................. 18
7.4 Set Up Alarm Page ........................................... 19
7.5 Set Up Retransmission Page ............................ 21
7.6 Electrical Calibration ......................................... 24
7.6.1 Equipment Required ........................... 24
7.6.2 Preparation ......................................... 24
7.7 Factory Settings Page....................................... 25
8 MAINTENANCE .......................................................... 28
8.1 Introduction ...................................................... 28
8.2 Cleaning/Changing the Sensor ......................... 28
8.2.1 Cleaning .............................................. 28
8.2.2 Changing the Sensor .......................... 28
9 SIMPLE FAULT FINDING ........................................... 29
9.1 Diagnostic Messages ........................................ 29
9.2 Low Sensor Efficiency/Slow Sensor Cal.
or no Response to D.O. Changes ..................... 30
9.3 Checking the Temperature Input ....................... 30
9.4 High Sample Readings ..................................... 30
10 SPECIFICATION ......................................................... 31
11 SPARES ...................................................................... 32
11.1 Strategic Spares ............................................... 32
APPENDIX A – 9438 080 24 V DC
POWER SUPPLY UNIT (OPTIONAL) .......................... 34
A.1 Description ....................................................... 34
A.2 PSU Dimensions ............................................... 34
A.3 Accessing PSU Terminals ................................. 34
A.4 PSU Connections ............................................. 35
A.5 Wiring Schematic .............................................. 35
A.6 Specification ..................................................... 35
APPENDIX B – CALIBRATION DIAGNOSTICS ................... 36
B.1 During Calibration ............................................. 36
B.2 Low Sensor Efficiency ....................................... 36
CONTENTS

2
1 INTRODUCTION
Model 9438
Panel-Mounted Transmitter
9438 080
24 V DC P.S.U.
(optional)
Dissolved Oxygen 9438
Sensor mounted in
optional enclosure
Model 9438
Wall-Mounted Transmitter
4
6
0
0
ABB
4600
AB
B
D
.O
.
g/
kg
18 . 1
A
1
A
2
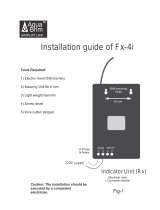
This manual describes how to install and operate the 9438 Low
Level Dissolved Oxygen Monitoring system. Fig. 1.1 shows the
main elements of the system. Mechanical and electrical
installation details of the optional power supply unit are in
Appendix A.
The Dissolved Oxygen (D.O.) transmitters and associated
flowcell have been designed for continuous monitoring and
control of power station boiler feed water/steam condensate.
Calibration of the sensor can be manually initiated when
required, or set to automatic with the programmable
frequencies: 1 day, 1 week and 4 weeks.
System status can be assessed remotely using programmable
alarm and/or current output diagnostic functions.
The 9438 500 transmitter is a wall-mounted instrument and the
9438 501 model is a panel-mounted,
1
/4 DIN-sized instrument.
Both instruments have a single programmable D.O. input
channel, and a single temperature input channel. The sample
temperature is sensed by a Pt1000 resistance thermometer
incorporated in the flowcell.
Instrument operation and programming is via four tactile
membrane switches located on the front panel. Programs are
protected from unauthorized alteration by a five-digit security
code.
Fig. 1.1 System Elements

3
68
(2.68)
42
(1.65)
Fixing Centers
160 (6.3)
69 (2.72)
Fixing Centers
Allowance for
Cable Bends
200 (7.9)
61 (2
3
/
8
) o.d.
Vertical Post
214
(8.43)
232
(9.13)
Three holes Ø6.3
suitable for M6
fasteners
Dimensions in mm (in)
250
(9.84)
Maximum distance
30 metres
C – Within Environmental Limits
55 C
Max.
–20 C
Min.
B – Within Temperature Limits
A – Maximum Distance of Instrument to Unit
Locate to suit
IP66
IP65
IP54
Environmental cover
Dissolved Oxygen 9438
IP65
Liquid handling panel
Mark fixing centers
(see Fig. 2.3)
Drill suitable
holes
Fix instrument to wall using
suitable fixings
1
2
3
2.1.2 Dissolved Oxygen Flowcell – Fig 2.7
Allow sufficient clearance (200 mm all around) for easy removal
of the flowcell assembly for maintenance when not installed in
the optional enclosure – see Section 2.3.1 for overall dimensions
of units.
Note. To eliminate the risk of bubbles accumulating at the
sensor, and hence giving erroneous readings, the flowcell
assembly must be mounted vertically.
2.2 Mounting the Instrument
2.2.1 Wall-mounted Instrument – Figs 2.2 to 2.4
Fig. 2.1 Siting Requirements – Instrument/Sensor
Fig. 2.2 Overall Dimensions
Fig. 2.3 Wall Mounting
2 MECHANICAL INSTALLATION
2.1 Siting Requirements
2.1.1 Instruments – Fig. 2.1
Caution.
• Mount instruments in a location free from excessive
vibration.
• Mount away from harmful vapours and/or dripping fluids.
Information. It is preferable to mount the transmitter at eye
level thus allowing an unrestricted view of the front panel
displays and controls.

4
…2 MECHANICAL INSTALLATION
Position ‘U’ bolts on pipe
Position plates over ‘U’ bolts
Secure transmitter to mounting plate
Secure plates
1
2
3
4
191 (7.52)
12 (0.47)
Panel Cut-out
96 (3.78)
96
(3.78)
+0.8
–0
92
(3.62 )
+0.03
–0
+0.8
–0
92 (3.62 )
+0.03
–0
Dimensions in mm (in)
Cut a hole in the panel (see Fig. 2.5 for dimensions).
Instruments may be close stacked to DIN 43835.
Insert the instrument into the
panel cut-out.
Refit the panel clamps to the case, ensuring
that the panel clamp anchors are located
correctly in their slot.
Secure the instrument by
tightening the panel clamp
retaining screws.
Loosen the retaining screw
on each panel clamp.
Remove the panel clamp and
anchors from the instrument case.
4
5
6
1
3
2
3
2.2.2 Panel-mounted Instrument – Figs 2.5 and 2.6
Fig. 2.4 Pipe Mounting
Fig. 2.5 Overall Dimensions
Fig. 2.6 Panel Mounting
…2.2.1 Wall-mounted Instrument – Fig 2.4

5
2MECHANICAL INSTALLATION
Dissolved Oxygen 9438
Ø 8.5
for M8 fastener in
four positions
Dimensions in mm.
25
25
25
160 mm space required below sensor
panel, to allow for the opening of the
optional environmental cover.
160
440
200
325
Secure the enclosure to a
vertical surface using the four
fixing holes and suitable
screws/bolts.
100
85
175
190
116
approximately
140
310
142
approximately
Ø 5.5
for M5 fastener in
four positions
Dimensions in mm.
Flow Gauge
(ml/min)
Needle
Valve
(to set flow
rate)
Solenoid
Sample
Outlet
Solenoid-
operated
Valve
Sample
Drain
User supplied
10 mm i.d.
rubber tubing
User supplied
10 mm i.d.
rubber tubing
1 m maximum
Drain – see
Note
Sample
Outlet
Sample inlet via
shut off valve if
required.
Sample drain during
automatic calibration
2.3 Installing the Dissolved Oxygen Flowcell
2.3.1 Flowcell Dimensions (Overall) – Fig. 2.7
2.3.2 Enclosure Dimensions (Optional) – Fig. 2.8
2.3.3 Connecting the Sample Lines – Fig. 2.9
Mount the flowcell vertically (with or without the enclosure) as
shown in Figs 2.7 and 2.8. Connect the sample inlet and outlet
tubes as shown in Fig. 2.9.
Note.
• The sample flowrate must be between 100 and
400 ml min
–1
.
• The Company recommends that stainless steel tubing is
used for sample inlet lines.
• All sample drains should be kept as short as possible and
be vertical to allow the sample to drain freely.
Fig. 2.7 Flowcell Dimensions
Fig. 2.8 Enclosure Dimensions
Fig. 2.9 Connecting the Sample Lines
Note. Drain tubes must be straight and
vertical to allow the sample to flow freely.

6
3 ELECTRICAL CONNECTIONS
1
2
3
4
2
Earth Studs
slide
down
Pull out
slightly. . .
. . . and
slide off
Remove
protection
cover
Slacken
captive
screws
Remove nuts and
protection cover
Remove
mains cover
Mains
Cover
Earth Stud
1
2
Warning.
• Before making any connections, ensure that the power supply, any high voltage-operated control circuits and high common
mode voltage are switched off.
• Although certain instruments are fitted with internal fuse protection, a suitably rated external protection device, e.g. fuse or
miniature circuit breaker (m.c.b.), must also be fitted by the installer.
3.1 Access to Terminals
3.1.1 Wall-mounted Instruments – Fig. 3.1
3.1.2 Panel-mounted Instruments – Fig. 3.2
Fig. 3.1 Access to Terminals –
Wall-mounted Instrument
Fig. 3.2 Access to Terminals – Panel-mounted
Instrument (Rear View)

7
3 ELECTRICAL CONNECTIONS…
NC C NO
External
DC Supply
+–
Relay Contacts
Load
Diode
NC C NO
External
AC Supply
LN
Relay Contacts
C
R
Load
A – AC Applications B – DC Applications
3.2 Connections, General
Information.
• Earthing (grounding) – stud terminals are fitted to the transmitter case for bus-bar earth (ground) connection – see Fig. 3.1 or
3.2.
• Cable lengths – The cable length between the flowcell and the electronics unit is provided as ordered, and suitably terminated
at both ends.
• Cable routing – always route the signal cable and mains-carrying/relay cables separately, ideally in earthed metal conduit.
Ensure that the cables enter the transmitter through the glands nearest the appropriate screw terminals and are short and
direct. Do not tuck excess cable into the terminal compartment.
• Cable glands & conduit fittings – ensure a moisture-tight fit when using cable glands, conduit fittings and blanking plugs/
bungs (M20 holes). The M16 glands ready-fitted to wall-mounted instruments accept cable of between 4 and 7 mm diameter.
• Alarm Relay –the relay contacts are voltage-free and must be appropriately connected in series with the power supply and the
alarm/control device which they are to actuate. Ensure that the contact rating is not exceeded. Refer also to Section 3.2.1 for
relay contact protection details when the relays are to be used for switching loads.
• Retransmission output – Do not exceed the maximum load specification for the selected current retransmission range – see
Section 7.
Since the retransmission output is isolated the –ve terminal must be connected to earth (ground) if connecting to the isolated
input of another device.
3.2.1 Relay Contact Protection and Interference Suppression – Fig. 3.3
If the relays are used to switch loads on and off, the relay contacts can become eroded due to arcing. Arcing also generates radio
frequency interference (RFI) which can result in instrument malfunction and incorrect readings. To minimize the effects of RFI, arc
suppression components are required; resistor/capacitor networks for AC applications or diodes for DC applications. These
components can be connected either across the load or directly across the relay contacts. On 4600 Series instruments the RFI
components must be fitted to the relay terminal block along with the supply and load wires – see Fig. 3.3.
For AC applications the value of the resistor/capacitor network depends on the load current and inductance that is switched. Initially,
fit a 100R/0.022 µF RC suppressor unit (part no. B9303) as shown in Fig. 3.3A. If the instrument malfunctions (incorrect readings) or
resets (display shows 88888) the value of the RC network is too low for suppression – an alternative value must be used. If the correct
value cannot be obtained, contact the manufacturer of the switched device for details on the RC unit required.
For DC applications fit a diode as shown in Fig. 3.3B. For general applications use an IN5406 type ( 600 V peak inverse voltage at
3A – part no. B7363)
Note. For reliable switching the minimum voltage must be greater than 12 V and the minimum current greater than 100 mA.
Fig. 3.3 Relay Contact Protection

8
…3 ELECTRICAL CONNECTIONS
Power
Supply
Retransmission
Relay 1
Relay 2
Serial
Power
Supply
Retrans.
Relay 1
Relay 2
12 34567 +– N L
Serial
(If fitted)
12 3
45 6
12 3
45 6
1
2
3
4
5
6
4
5
–
–
–
–
–
–
–
–
Rx+
Rx–
Tx+
Tx–
0V
Retrans.
Output
Relays
1
2
3
5
6
–
–
–
–
–
NC
C
NO
C
NO
Relay 1
Solenoid
valve
Calibration
Relay
Mains Supply
N
L
–
–
Neutral
Line
–
Earth
Output
RS422/
RS485
Earth Stud (on case) –
see Fig. 3.1
NC
C
NO
Normally Closed
Common
Normally Open
=
=
Channel 2Channel 1
1
3
–
–
+ve (Red)
–ve (Black)
Braid
D.O. Sensor
Earth Stud (on case)
– see Fig. 3.1
Channel 2Channel 1
PT1000
Temperature Compensator
5
6
7
–
–
–
White
Green
Link
+
Retrans 2 Output (if fitted)
-ve
+ve
3.2.2 System Wiring Schematic – Fig. 3.4
The wiring of a single solenoid/sensor system from a user-
supplied 24 V DC supply is shown in Fig. 3.4.
If the 9438 080 power supply unit is employed, refer to
Appendix A for wiring details.
3.3 Wall-mounted Instrument Connections – Fig. 3.5
Note. Refer to Fig. 3.1 for access to terminals.
Caution. Slacken terminal screws fully before making
connections.
Warning. The power supply earth (ground) must be connected to ensure safety to personnel, reduction of the effects of
RFI and correct operation of the power supply interference filter.
Fig. 3.4 Wiring Schematic
(see Appendix A for wiring using optional PSU)
Fig. 3.5 Wall-mounted Instrument Connections
9438 Transmitter
Customer 24 V DC supply
Relay 2
C NO
Solenoid Valve
Solenoid valve powered from
user supplied 24 V DC source
+ve
–ve

9
3 ELECTRICAL CONNECTIONS…
+
–
Normally Closed
Common
Normally Open
Common
Normally Open
Neutral
Live
Earth
TBA
Relay 1
Solenoid Valve
Calibration
Relay
1
2
3
4
5
6
8
9
E
N
L
1
2
3
4
5
6
7
8
10
12
Mains Supply
Retransmission
Output
0V
Rx–
Rx+
Tx–
Tx+
Link
Green
White
–ve (Black)
+ve (Red)
TBB
RS422/RS485
Serial Interface
(if fitted)
D.O. Sensor
1
2
3
4
5
6
7
8
9
E
N
L
1
2
3
4
5
6
7
8
9
10
11
12
Earth Stud
Earth Stud (on case)
Earth Stud (on case)
Pt1000
Temperature
compensator
Braid
Retrans 2
Output (if fitted)
–ve
+ve
4
5
3.4 Panel-mounted Instrument Connections – Fig. 3.6
Note. Refer to Fig. 3.2 for Access to Terminals.
Caution. Slacken terminal screws fully before making connections.
Warning. The power supply earth (ground) must be connected to ensure safety to personnel, reduction of the effects of
RFI and correct operation of the power supply interference filter.
Fig. 3.6 Panel-mounted Instrument Connections

10
…3 ELECTRICAL CONNECTIONS
Remove cover (see Fig. 3.1)
Remove front
panel screws
Remove front
panel
Remove cap
and screw
Slacken
captive
screws and
remove
protection
cover
240 V AC
110 V AC
230
or
1
3
4
3
5
2
5
Undo captive
screw
Slide instrument
out of case
240 V AC
110 V AC
230
or
3
4
1
2
3.5 Selecting the Mains Voltage
3.5.1 Wall-mounted Instrument – Fig. 3.7
3.5.2 Panel-mounted Instrument – Fig. 3.8
Information. Use a small, flat-
blade screwdriver to remove the
screw caps from the case.
Fig. 3.7 Selecting the Mains Voltage –
Wall-mounted Instrument
Fig. 3.8 Selecting the Mains Voltage –
Panel-mounted Instrument
Note. Some versions are fitted
with a switch in place of links. The
applied voltage should be as
indicated on the switch, when
positioned.
Note. Some versions are
fitted with a switch in place
of links. The applied voltage
should be as indicated on
the switch, when positioned.

11
3 ELECTRICAL CONNECTIONS
Specification to BS 6500
Cross sectional area = 0.5 mm
2
Minimum current rating = 3 A
Construction = 16/0.2 mm
Nominal diameter = 5.4 mm (minimum 5.0 mm)
Remove cover to expose terminals
and thread the cable through the cable
gland.
Connect the wires as shown. Ensure
that the diode remains in the position
indicated (cathode to terminal 1 and
anode to terminal 2).
Fit the cover and tighten the cable
gland.
Solenoid
Valve
1
2
3
+24 V DC via N/O of relay
in 9438 transmitter
(see Fig. 3.4)
0 V
Cable Gland
Diode
See Appendix A if
9438 080 PSU is
supplied.
Customer supplied cable to transmitter or PSU
2
1
3
3
2
1
3.6 Flowcell Solenoid Valve Connections – Fig. 3.9
Fig. 3.9 Solenoid Connections
Note.
Use 2 core cable with 9438 080 PSU
(ABB part number 0233 731).
Use 3 core cable with customer supplied 24 V DC supply.

12
4 SETTING UP
1
2
3
4
5
7
Optional enclosure not shown for clarity
Slip the connector nut over
the connector body and screw
on to the oxygen sensor firmly.
Insert the complete assembly into
the flowcell ensuring that the O-
ring is in place.
Remove the top from the oxygen sensor
container.
Unscrew the protective cap from the rear of the
oxygen sensor
Use the clamping screw to secure the
assembly. Screw in firmly using finger
pressure only.
Slide the thrust washer over
the connector body.
Place an O-ring (provided) as shown and
locate the connector body
on the oxygen sensor.
Flowcell
O-ring
Oxygen
Sensor
Connector
Body
O-ring
Clamping
Screw
Thrust
Washer
Connector
Nut
6
4.1 Fitting the Dissolved Oxygen Sensor – Fig. 4.1
Caution.
• Only install the oxygen sensor immediately prior to use, otherwise leave it
stored in its protective container. The sensor has a limited shelf life and should
NOT be stored longer than about 6 months. Store under cool conditions.
•Take special care to line up the two pins in the oxygen sensor with their
respective sockets before making the connection and tightening.
•Take care not to damage the delicate membrane on the end of the oxygen
sensor.
• Ensure that the mating surfaces (carrying the electrical connection) of the
oxygen sensor and connector body are clean and completely dry.
Caution. Do not overtighten the clamping screw.
Fig. 4.1 Fitting the Dissolved Oxygen Sensor

13
4 SETTING UP
Flow during normal
operation
Solenoid
Operated
Valve – Closed
Flow
Regulating
Valve
Sensor
Flow Indicator
Drain
Sample
In
Flow during calibration or
thermal overload condition
Solenoid
Operated
Valve – Open
Sample
In
Drain
Line up the red spots and
push the plug on firmly until
the locking ring engages.
Push the sensor connector on
firmly and tighten ONE TURN
clockwise.
4.2 Connecting the Flowcell – Fig. 4.2
4.3 Checking Sample Flow – Fig. 4.3
Note.
• The plug is a latching type to prevent it's
accidental removal. To remove, hold the
plug at its widest point and pull out.
• The plug is protected against spillage
and corrosion by a sleeve which slides
over it.
Fig. 4.2 Electrical Connections at the Flowcell
Fig. 4.3 Sample Flow Schematic
Check that the sample flows correctly in
both normal operation and during a
calibration or thermal overload.
To simulate a calibration manually, open the
valve – see Section 6.2.1 Operating Page
Carefully remove the dissolved oxygen
sensor and check that the flowcell is empty.
If sample still flows, check that the
installation complies with Section 2.3.3.

14
5 CONTROLS AND DISPLAYS
18.1
D.O. g/kg
Alarm
LEDs
Upper
Display Line
Lower
Display Line
Membrane Switches
A – Advancing to Next Page
Parameter 1
Parameter 2
Parameter 3
Parameter 4
Page 1
Parameter 1
Parameter 2
Parameter 3
Page 2
Advance to
next page
For majority
of parameters
or
B – Moving Between Parameters
C – Adjusting and Storing a Parameter Value
New value is
automatically stored
Parameter Value
Adjust
D – Selecting and Storing a Parameter Choice
Parameter X
Y
Z
Select
Parameter 1
Parameter 2
Parameter 3
Page X
Parameter 4
Advance to
next parameter
or
New value is
automatically stored
or
5.1 Displays – Fig. 5.1
The display comprises a 5-digit, 7-segment digital upper display
line and a 16-character dot-matrix lower display line. The upper
display line shows numerical values of dissolved oxygen
concentration, temperature, alarm set points or programmable
parameters. The lower display line shows the associated units or
programming information.
5.2 Switch Familiarization
Fig. 5.1 Location of Controls and Displays
Fig. 5.2 Membrane Switch Functions

15
6START UP AND OPERATION
Operating parameters.
Available only when 2
nd
retransmission output is fitted.
Secure parameters.
Linear
FACTORY SETTINGS
–––––
uA Zero
XXXX
FACTORY SET CODE
0 0 0 0 0
ELECTRICAL CAL
–––––
Calibrate YES
NO
–––––
uA Span
XXXX
Temp Zero (1k0)
XXXX
Temp Span (1k5)
XXXX
Adjust RTX Span
–––––
Cal Time 1 (min)
2
Cal Time 2 (min)
30
Alter Fact. Code
0 0 0 0 0
Adjust RTX Zero
–––––
Factory Settings Page
Section 7.6
D.O. g/kg
18 1
.
Calibrate YES
NO
–––––
Calibrating Air
879
.
SET UP PARAMETER
–––––
Pressure mmHg
760
Salinity ppt
0
Temp. Units (
C)
–––––
Disp. Units ug/kg
ug/l
ppb
–––––
SET UP ALARM
–––––
High Spt ug/kg
150.
–––––
A1 Action Hi/Lo
High
Low
A1 Type Status
Temp
DO
Off
–––––
Low Spt ug/kg
50.
Alter Sec. Code
0 0 0 0 0
Alter Cal. Code
0 0 0 0 0
SET UP RETRANS
–––––
SET UP RETRANS 1
–––––
200.
RTX Span mg/kg
20.
RTX Zero mg/kg
100.
Enter Input %
500.
Enter Output %
–––––
RTX Type 4-20
0-20
0-10
RTX. Log
Bi-Linear
Linear
–––––
Diagnostics YES
NO
SET UP RETRANS 2
–––––
Cal. Time s
30
Fail M.time s
30
Fail S.time s
30
RTX. Log
Bi-Linear
Linear
–––––
RTX O/P Temp
D.O.
–––––
200.
RTX Span mg/kg
o
C
20.
RTX Zero mg/kg
o
C
–––––
RTX Type 4-20
0-20
0-10
Bi-Linear
Bi-Linear
Linear
100.
Enter Input %
500.
Enter Output %
Cal. Time s
30
Fail M.time s
30
Fail S.time s
30
Test Retrans. (%)
00
Autocal Off
4Weeks
1Week
1Day
–––––
Temperature (
o
C)
200
.
Sensor O/P (
A)
–––––
Sensor Eff
–––––
High Set
g/kg
150
.
Low Set
g/kg
50
.
Operation Page
Section 6.2.1
Calibration Page
Section 6.2.2
Diagnostics YES
NO
Set Up Retransmission Page
Section 7.5
Set Up Parameters Page
Section 7.3
Set Up Alarm Page
Section 7.4
SECURITY CODE
00000
Access to Secure Parameters
Section 7.1
Secure Parameters
ENGLISH
–––––
Language Page
Section 7.2
Open Valve NO
YES
–––––
To Set up Retrans 2
If NO Retrans 2
Reset Cal. NO
YES
–––––
SENSOR CAL.
–––––
00000
Cal. User Code
Cal. Aborted
–––––
–––––
Sensor Eff
Recovery Period
520.
–––––
Slow Sensor Cal.
Fig. 6.1 Overall Programming Chart
Note. The values shown on the pages in this
illustration are the factory default values.

16
…6 START UP AND OPERATION
D.O. g/kg
Temperature ( C)
SENSOR CAL.
–––––
18 1
200
.
High Set g/kg
150
Open Valve NO
YES
.
°
.
Sensor Eff
–––––
Low Set g/kg
50
.
–––––
Sensor O/P (A)
–––––
6.1 Instrument Start-up – Fig. 6.1
Ensure all electrical connections have been made and switch on the power supply. If the instrument is being commissioned for the
first time, calibration and programming of parameters is required.
The overall operating and programming chart is shown in Fig. 6.1.
6.2 Operation – Dissolved Oxygen Measurement Mode
Operation in the Dissolved Oxygen measurement mode comprises an Operating Page and a Calibration Page. The Operating Page is
a general use page in which parameters are viewed only and cannot be altered. To alter or program a parameter, refer to the
programming pages in Section 7. The Calibration Page allows a calibration to be carried out. A 5-digit calibration code is used to
prevent unauthorized access to the sensor calibration page. The value is preset at 00000 to allow access during commissioning, but
should be altered to a unique value, known only to authorized operators, in the
Set Up Alarm page – see Section 7.2
6.2.1 Operation Page
Measured Dissolved Oxygen
The measured dissolved oxygen is displayed in µg/l, mg/l, ppb, ppm, mg/kg or µg/kg.
Auto ranging: 0.0 to 99.9 µg kg
–1
100 to 999 µg kg
–1
1.00 to 9.99 mg kg
–1
10.0 to 20.0 mg kg
–1
Press to advance to next parameter or press to advance to Calibration Page,
Section 6.2.2.
Sample Temperature
The sample temperature is displayed in either °C or °F – see Section 7.1.
Sensor Output
Raw current signal (µA) generated by the sensor.
Sensor Efficiency
Bar graph indication of the sensor performance, based on last calibration – see Section
6.2.2.
High Setpoint
The
High alarm setpoint value is only visible if the alarm is programmed for either D.O. or
Temperature and is set to
High or High/Low.
Low Setpoint
The
Low alarm setpoint value is only visible if the alarm is programmed for either D.O. or
Temperature and is set to
Low or High/Low.
Open Valve
Manually open the calibration valve to drain the flowcell prior to accessing the sensor. The
reading displayed when the valve is open does not represent the dissolved oxygen
content of air-saturated water at the prevailing ambient temperature.
Advance to Calibration Page, Section 6.2.2.

17
6START UP AND OPERATION
YES
NO
Abort
for 2 secs
Calibrating Air
879
.
SENSOR CAL.
–––––
00000
Cal. User Code
Cal. Aborted
–––––
–––––
Sensor Eff
Recovery Period
520.
D.O. g/kg
18.1
Calibrate YES
NO
–––––
–––––
Slow Sensor Cal.
OR
Press to advance to next parameter
or
Press to return to Operation Page, Section 6.1
Calibration Access
Enter the required calibration code number, between 00000 and 19999. If an incorrect
value is entered, access to calibration is prevented and
Calibration Page is displayed.
Select YES to enable manual calibration and press to start the calibration sequence.
Calibrating in Air
The calibration valve opens exposing the sensor to air. A flashing dot indicates that a
calibration is in progress and the displayed value is the sensor reading based on the LAST
calibration. See timings below.
Wait Period Where the sensor is exposed to air before the stability of the sensor is
checked. This is preset at 2 minutes (Cal Time 1).
Stability Period The readings are monitored for between 1 and 5 minutes until a stable
response is achieved.
When stability has been achieved the calibration valve closes allowing sample to flow
past the sensor.
Abort Calibration
Pressing
during Calibrating in Air aborts the calibration and the Cal. Aborted message
is displayed for 2 seconds. The calibration valve closes allowing the sample to flow past
the sensor again.
Note that the
A2 LED continues to indicate that a calibration is in progress, and will do so
for the duration of the programmed recovery period.
Sensor Efficiency
A five-bar display provides an indication of the sensor's performance.
>85% efficiency
>70% "
>60% "
Pass
>50% "
>40% "
<40% " Low sensor efficiency
Slow Sensor Response
If the output from the sensor does not stabilize during the 1 to 5 minute stability period the
calibration will not be accepted and Slow Cal. will be desplayed.
Recovery Period
Shows the sample reading as the sensor recovers at the lower sample value. The
Recovery Period is preset at 30 minutes (Cal Time 2).
The display automatically returns to the Operating Page at the end of this period.
6.2.2 Calibration Page
Calibration involves standardizing the instrument and the sensor by exposing the sensor to air.
During a calibration, retransmission and alarm outputs are automatically held to prevent inadvertent operation of ancillary equipment.

18
7 PROGRAMMING AND ELECTRICAL CALIBRATION
SECURITY CODE
00000
Espanol
–––––
SET UP PARAMETER
–––––
Pressure mmHg
760
Salinity ppt
0
Temp. Units (C)
–––––
Disp. Units ug/kg
ug/l
ppb
–––––
Autocal 4 Weeks
1 Week
1 Day
Off
–––––
SET UP ALARM
–––––
Reset Cal. NO
YES
–––––
_____
SET UP PARAMETER
–––––
Francais
Espanol
˜
7.1 Access to Secure Parameters
A 5-digit security code is used to prevent tampering with the secure parameters.
Security Code
Enter the required code number between 00000 and 19999 to gain access to the secure
parameters. If an incorrect value is entered, access to subsequent programming pages
is prevented and the display reverts to the
Operation Page.
Advance to Language Page, Section 7.2.
7.2 Language Page
Language Page
Select the language to be displayed on all subsequent pages: Español, Francais,
Deutsch or English.
Advance to Set Up Parameters Page, Section 7.3
7.3 Set Up Parameters Page
Press to advance to next parameter
or
Press to advance to Set Up Alarm Page, Section 7.4.
These two switches are used to advance to all subsequent parameters and pages. If a
parameter is changed it is automatically stored on operation of either switch.
Display Units
Select the required display units:
µg/kg, µg/l, or ppb.
Barometric Pressure Correction
Set the local barometric pressure in mm Hg (between 500 and 800).
If the local barometric pressure is unknown the default value, which is the standard sea-
level value of 760 mm Hg, should not be changed.
Salinity Correction
Required when monitoring sea water or other waters containing high concentrations of
dissolved salts.
Enter the appropriate value between 0 and 80 parts per thousand (ppt).
Leave at the default value of 0 ppt if correction is not required.
Temperature Units
Select either °C or °F.
Auto Calibration
Select the frequency of automatic calibrations: 1 Day, 1 Week or 4 Weeks. Select Off to
disable automatic calibrations. Only manual calibrations may be carried out.
Reset Auto Calibration
Select
YES to reset the timing for automatic calibrations. To fix the calibration to a specific
time of day select
YES at the correct time of day. (This will be automatically reset following
a power failure.)
Advance to Set Up Alarm Page, Section 7.4.
/