Page is loading ...

INSTALLATION, OPERATION &
MAINTENANCE INSTRUCTIONS
Intr
oduction
The Kicker
, by Slant/Fin meets a wide range of
supplementary heating requirements. It is commonly
installed horizontally at floor level in the toe space
(“kickspace”) under a kitchen cabinet or bathroom vanity.
The Kicker can also be wall mounted vertically using a
Slant/Fin accessory kit (sold separately). For a recessed
wall application use Accessory Kit RMK. For surface wall
mounting use Accessory Kit SMK. Each recessed or
surface mounted accessory wall kit includes the front
panel and all other necessary hardware and instructions
for installation.
To ensure years of dependable and efficient service,
follow all installation, operation and maintenance
instructions.
Locating and Securing The Kicker Under a Cabinet
1. Remove drawers and/or shelves from kitchen or
vanity cabinet to reveal the cabinet base (floor of
cabinet). See Figure 1.
2. Remo
ve or cut an opening in the cabinet base that
is large enough to pro
vide ample clearance to solder
(nominal)
1
⁄2" tube connections
, to wire 120 volt
electrical power, and to install The Kicker through this
opening. Also, cut an opening beginning at the floor
le
vel, or 3
7
⁄
8
" x 19
3
⁄
4
" in the toe plate of the cabinet.
Then secure the grille over this opening using the
screws provided.
3. Rough in plumbing connections from the building’s
hot water space heating system.
Rough in 120V
electrical wiring. See Fig. 1 and instructions for
“Plumbing Connections” and “Electrical Connections”.
4. Place The Kicker through the cutout and secure
to floor through holes in chassis (fasteners NOT
provided). The discharge opening of The Kicker
should be tight against the inside of the toe plate
grille, with switch centered in switch cutout
opening of grille on the right side.
CAUTION: DO NOT exert pressure on the blower wheel
or coil when handling the chassis. This may cause
permanent damage and impair the performance of
the unit.
OVER
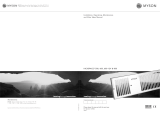
Surface and Recessed
Mounting Dimensions
for the Kicker

Plumbing Connections
U
se appropriate soft solder that conforms to the
requirements of the local authority having jurisdiction.
1. Solder (nominal)
1
⁄
2
" copper tubing from the
building’s hot water space heating system to the
hot water supply and return connections of the
heating coil, which are located at the rear, left side
of the unit.
NOTE: The RETURN is the header tube that
contains the
1
⁄
8
" NPT air vent fitting.
2.
CAUTION: Shield combustible materials from
torch flame while soldering connections.
3. After soldering the hot water tubing, fill the system
with water, vent the heat exchanger using air vent
assembled to header, and check soldered joints
for leaks and/or restrictions.
Electrical Connections
1. CAUTION: SHUT OFF electrical power before wiring.
DO NOT restore electrical power until installation is
complete.
2. All electrical connections must comply with either the
U.S. National Electrical Code, (latest ANSI/NFPA No.
70) or the latest Canadian Electrical Code, (CSA
Standard C22.1, Part 1), whichever code applies, plus
any current, applicable local codes.
3. Note that all electrical connections are located at
the rear, right side of the unit.
4. Refer to the wiring diagram, Fig. 2, and connect
the hot (120V) electrical service input to the black
lead with a wire nut. Similarly connect the neutral
to the white lead, and then fasten the ground wire
to the green screw provided on the chassis. Field
wire must be 75°C, minimum, and of adequate
gauge and over-current protection.
5. Upon completion of all plumbing and electrical
c
onnections, re-install or replace cabinet base,
which must completely cover the opening through
which chassis was placed on to the floor.
6. CAUTION: DO NOT electrically energize or run
the unit until cabinet base and grille are in place
and secured.
Operation
1. Press top of toggle switch for high-speed fan
operation and bottom of switch for low fan speed.
The center position of the switch shuts the fan off.
2. Note that to prevent air drafts, The Kicker’s fan
turns on only when hot water is circulating through its
coil. The circulation of hot water is generally
controlled by the space thermostat. If water is
circulating through the coil but the fan does not turn
on, the boiler water temperature must be raised. The
fan is activated when the temperature control senses
that the water circulating through the coil is at a
temperature of at least 130°F to 140°F.
3. When the fan is on, room air enters the left side of
the grille and heated air is discharged into the
room from the right side.
4.
CAUTION:
a. DO NOT block air flow in or out of grille.
b. DO NOT store perishable food above heater.
Maintenance
1. Turn off electrical power at the main supply (breaker)
prior to servicing the unit.
2. Remove shelves, drawers and cabinet base to
expose unit. Remove front grille if necessary.
3. Lightly clean blower wheel (fan) with a vacuum
cleaner, using soft brush attachment.
4. Vacuum front grille to remove dirt, dust or lint.
5. Replace cabinet base, front grille (if removed),
shelves and drawers of cabinet.
6. Turn on power at the main electrical supply panel.
Figure 2.
Dimensions, Models TK-70 and TK-90.
Speed Terminal Color
High #1 Black
Low #3 Red
SLANT/FIN CORPORATION, Greenvale, N.Y. 11548 • Phone: (516) 484-2600
FAX: (516) 484-5921 • Canada: Slant/Fin LTD/LTEE, Mississauga, Ontario
www.slantfin.com
©Slant/Fin Corp. 2003. Printed in the U.S.A. 305. Publication No. TK-40.
/