Page is loading ...

1
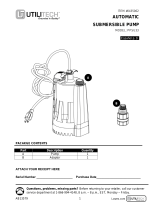
ITEM #0309016
NON-AUTOMATIC
SUBMERSIBLE UTILITY PUMP
MODEL: PPU6
Español p. 9_
PACAKGE CONTENTS
Part
Description
Quantity
A
Pump
1
B
Adaptor
1
ATTACH YOUR RECEIPT HERE
Serial Number ______________________ Purchase Date___________________________
Questions, problems, missing parts? Before returning to your retailer, call our customer
service department at 1-800-346-7611, 8 a.m. – 5 p.m., EST, Monday – Friday.
A
B
Utilitech® is a registered trademark
of LF, LLC. All Rights Reserved.

2
TABLE OF CONTENTS
Specifications ................................................................................................................................... 2
Construction ..................................................................................................................................... 2
Safety information ............................................................................................................................ 3
Performance .................................................................................................................................... 4
Preparation ...................................................................................................................................... 5
Installation instructions ..................................................................................................................... 5
Operation instructions ...................................................................................................................... 6
Airlock .............................................................................................................................................. 7
Care and maintenance ..................................................................................................................... 7
Troubleshooting ............................................................................................................................... 8
Warranty .......................................................................................................................................... 8
SPECIFICATIONS
Power supply required ............................................................................................ 115V, 60 HZ
Water temperature range ................................................................................. Max. 77°F (25°C)
Operation position .......................................................................................................... Vertical
Individual branch circuit required ..................................................................... 10-amp minimum
Operating water depth - beginning minimum ........................................................................1 in.
Ending water level - max ................................................................................................... 1/2 in.
Discharge connection .......... 3/4 in. garden hose thread or 1-1/4 in. hose with included adaptor
Discharge hose diameter .............................................................................5/8 in. minimum I.D.
Discharge hose length ............................................. 50 ft. maximum recommended hose length
Motor ............................................ Permanent Split Capacitor, with thermal overload protection
Power cord .......................................................................................... SJTW, 18AWG/3C, 10 ft.
CONSTRUCTION
Motor housing ...........................................................................................Flame retardant nylon
Volute (Intake screen)..................................................................................... Reinforced nylon
Impeller ...................................................................................... Glass reinforced thermo plastic

3
SAFETY INFORMATION
Please read and understand this entire manual before attempting to assemble, operate or install
the product. If you have any questions regarding the product, please call customer service at
1-800-346-7611, 8 a.m. - 5 p.m., EST, Monday - Friday.
WARNING
Always make sure the pump is unplugged as soon as the water level reaches 1/2 in. At
water levels less than 1/2 in., the pump is attempting to pump air, which will cause the
pump to overheat and wear out. Running the pump without sufficient water will damage
the pump and void the pump’s warranty.
Do not pump flammable or explosive liquids such as oil, gasoline, kerosene, ethanol, etc. Do not
use in the presence of flammable or explosive vapors. Using this pump with or near flammable
liquids can cause an explosion or fire, resulting in property damage, serious personal injury
and/or death.
Always disconnect the pump from its power source before inspection.
Do not stand in water when the pump is connected. Do not handle pump with wet hands.
Do not touch the pump housing while it is operating, as the pump may be HOT and can cause
serious skin burns.
Do not disassemble the motor housing. This pump has NO repairable internal parts, and
disassembling may cause an oil leak or dangerous electrical wiring issues.
CAUTION
This submersible utility pump is designed for portable applications. It can drain or remove water
from the following: pits, sinks, window wells, basements, swimming pool covers, boats, low
spots in yards, or other flooded areas. This pump has not been tested or approved for use in
swimming pools or in salt-water marine areas.
This pump is made of high-strength, corrosion-resistant materials. It will provide trouble-free
service for many years when properly installed, maintained, and used. However, inadequate
electrical power to the pump, or blockage by ice, dirt, or debris may cause the pump to fail,
potentially bringing about additional water damage. To minimize the potential for water damage
due to pump failure, please read the section of this manual regarding common pump problems
and remedies or call one of our pump experts at 1-800-346-7611.
This pump is not designed to function as a permanently installed sump pump. It is also not
engineered to be run continuously as a “fountain” or “waterfall” pump. Because this pump has
an oil-filled motor, it should NOT be used in water containing fish. The pump should be used
with a 5/8 in. or larger inside diameter garden hose, or use with hose kit (Item #0313726).
For safety, the pump motor has an automatically resetting thermal protector that automatically
will turn off the pump if it becomes too hot. Overuse of this feature will damage the pump
and void the warranty.
Once the thermal protector detects that the pump has cooled to a safe temperature, it will allow
the pump to operate normally. If the pump is plugged in, it may restart unexpectedly.

4
Additional Safety Precautions
1. Know the pump applications, limitations, and potential hazards.
2. Make certain the electrical power source is adequate for the requirements of the pump.
3. ALWAYS disconnect the power to the pump and drain all water from the system before
servicing.
4. Secure the pump on a solid base to keep the pump vertical and above mud and sand during
operation to maximize
pumping efficiency and prevent clogging and premature pump failure.
5. Secure the discharge hose before starting the pump. Pump torque may cause an unsecured
discharge hose to “whip”, possibly causing personal injury and/or property damage.
6. Before using the pump, check hose for holes or excess wear, which could cause leaks, and be
sure hose is not kinked or making sharp angles. A straight hose allows the pump to move the
greatest amount of water quickly.
7. Check that all hose connections are tight to minimize leaks.
8. Connect the pump DIRECTLY to a grounded, GFCI outlet.
9. Extension cords may not deliver sufficient voltage to the pump motor. Extension cords present a
life-threatening safety hazard if the insulation becomes damaged or the connection ends fall
into water.
10. Make certain the electrical circuit to the pump is protected by a 10-amp or larger fuse or circuit
breaker.
11. Periodically inspect pump and system components, to be sure pump inlets are free of mud,
sand, and debris. DISCONNECT PUMP FROM THE POWER SUPPLY BEFORE
INSPECTING.
12. Wear safety glasses at all times when working with pumps.
13. Follow all electrical and safety codes, particularly the National Electrical Code (NEC) and in the
workplace, the Occupational Safety and Health Act (OSHA).
14. This unit is designed only for use on 115 volts (single phase), 60 Hz, and is equipped with an
approved 3-conductor cord and 3-prong grounded plug. DO NOT REMOVE THE GROUND PIN
UNDER ANY CIRCUMSTANCES. The 3-prong plug must be directly inserted into a properly
installed and grounded 3-prong, grounding-type receptacle. Do not use pump with a 2-prong
wall outlet. Replace the 2-prong outlet with a properly grounded 3-prong receptacle (a GFCI
outlet) installed in accordance with the National Electrical Code and local codes and
ordinances. All wiring should be performed by a qualified electrician.
15. Protect the electrical cord from sharp objects, hot surfaces, oil, and chemicals. Avoid kinking the
cord. Do not use damaged or worn cords.
PERFORMANCE
Model
HP
GPH (GPM) of Water @ Total Feet (Meters) of Lift
Maximum Lift
5 ft.
(1.5 m)
10 ft.
(3 m)
15 ft.
(4.6 m)
20 ft.
(6.1 m)
25 ft.
(7.5 m)
26 ft.
(7.9 m)
PPU6
1/6
1,400
1,300
1,100
750
300
0
For best performance, the maximum recommended hose length is 50 ft. The pumping capacity or
water flow rate of any pump depends on several factors. Refer to the table below for the water flow
rate based on horizontal (0 ft. of Lift) garden hoses of various diameters and of various lengths and
a constant water pressure of 11 PSI.

5
Hose Size
25 ft. Hose
Length
50 ft. Hose
Length
75 ft. Hose
Length
100 ft. Hose
Length
INSIDE
DIAMETER
(RECOMMENDED LENGTHS)
(LENGTHS NOT RECOMMENDED)
3/4 in.
18.7 GPM
12.9 GPM
10.4 GPM
8.9 GPM
5/8 in.
11.6 GPM
8.0 GPM
6.4 GPM
5.5 GPM
The larger the inside diameter and the shorter the length of hose, the less pressure that is lost (or
the larger the flow rate). The maximum pressure produced by this pump is about 11 PSI. If the hose
runs uphill or is extra long, use a larger diameter hose or rigid pipe. Note: Regardless of hose size,
this pump will not lift more than 26 ft.
PREPARATION
WARNING: Always use handle to lift pump. Never use power cord to lift pump. To avoid
skin burns, unplug and allow time for the pump to cool after periods of extended use.
Before beginning assembly of product, make sure all parts are present. Compare parts with
package contents list and hardware contents above. If any part is missing or damaged, do not
attempt to assemble the product. Contact customer service for replacement parts.
Estimated Assembly Time (New installation): 5 minutes
Materials Required for Assembly (not included): Garden Hose or Hose Kit (Item #0313726)
The pump should rest on a level, solid base.
Do not suspend the pump by the discharge hose or power cord.
Keep the pump inlet screen clear.
Do not install pump directly on sand or dirt. A minimum water level of 1 in. is required to
prime the pump.
INSTALLATION INSTRUCTIONS
1. Attach a 5/8 in. inside diameter or larger garden hose (not included)
to the pump (A) outlet.
Note: Be sure the hose end has a rubber washer to minimize water
leaks.
A

6
2. If you would prefer to use a larger hose in order to pump
water away more quickly, attach the included adaptor (B)
to pump (A), and then securely attach the Hose Kit (Item
#0313726, sold separately) to the adaptor (B).
WARNING: Secure the discharge hose before plugging in
the pump. Pump torque may cause an unsecured
discharge hose to “whip”, possibly causing personal injury
and/or property damage.
OPERATION INSTRUCTIONS
NOTICE: Make certain you unwind the garden hose completely. Kinks in the hose will restrict the
pump, preventing it from priming, which is the first step to pumping water. The water level must be
at 1 in. for the pump to prime and operate.
1. Plug the pump (A) into a 115 volt GFCI power outlet.
WARNING: Do not let plug fall in water and do not stand in
water while the pump (A) is plugged in.
The pump (A) will start operating when the power cord is
plugged into the outlet.
Once the pump (A) has removed the water down to 1/2 in.,
unplug the pump. CAUTION: Failure to unplug it will result in
the pump going into thermal overload.
CAUTION: Do not run the pump (A) dry. Operating the
pump (A) without water will cause damage to seals and will cause the pump (A) to fail,
thereby voiding the pump’s warranty.
Remove the pump (A) and hose from the location when
finished pumping, as the hose still has water that can
drain back through the pump. Remove remaining water
with squeegee, mop, sponge, towel, wet/dry vac, etc.
B
A
A
B
A

7
AIRLOCK
This pump (A) is a centrifugal utility pump, designed to
efficiently remove water. However, it cannot move air. If air is
trapped inside the pump (A) (a condition called “airlock”), the
pump cannot pump water out even though the pump (A) is
completely submerged. This pump (A) has an airlock release
feature (see Fig. 1). Air flows out through the airlock release
feature, eliminating the airlock so that the pump can operate
properly. If debris blocks the anti-airlock hole or if the anti-airlock
valve cannot move freely, unplug the pump (A), clean out the
anti-airlock hole, and restart the pump (A). Alternately, drain the
water out of the garden hose, keep the end of the hose out of
the water, and plug in the power cord, restarting the pump (A).
CAUTION: This valve is for anti-airlock purposes. Leakage of air or water is NORMAL.
DO NOT REMOVE or PLUG THIS VALVE!
CARE AND MAINTENANCE
Periodically unplug the pump, making certain your hands are dry, and you are not standing in water.
When the power is disconnected, inspect the pump inlets and remove all debris, then plug pump
back into the grounded (GFCI) outlet.
1. To clear a pump clogged with debris, first, UNPLUG
PUMP from electrical power. Then, referring to Fig. 1,
unscrew the stainless screws (7), and remove the screen
(6), unscrew the stainless screws (5), and remove the
volute (4), and the seal gasket (3). Use a flathead
screwdriver to hold the shaft (1), then turn the impeller (2)
counterclockwise to release the impeller (2). Remove
debris from around the shaft (1) and on/under the
impeller (2). Reassemble.
Airlock
release
feature
2
1
3
4
5
6
7
A

8
TROUBLESHOOTING
If you have any questions regarding the product, please call customer service at 1-800-346-7611, 8
a.m. - 5 p.m. (EST), Monday – Friday.
Note: Do not disassemble the motor housing. This pump has NO repairable internal parts,
and disassembling may cause an oil leak or dangerous electrical wiring conditions.
Problem
Possible Cause
Corrective Action
Pump does
not start or
run
1. Blown fuse
2. Tripped breaker
3. Plug disconnected
4. Thermal overload
5. Corroded plug
6. Motor failed
1. Replace fuse
2. Reset breaker
3. Secure plug
4. Unplug the pump for 30 minutes,
then plug in
5. Clean plug prongs
6. Call 1-800-346-7611
Pump
cannot pump
water out
1. Screen blocked
2. Hose kinked, bent sharply, or coiled
3. Airlock
4. Hose diameter too small
5. Hose length too long
6. Impeller loose on shaft
7. Impeller broken
1. Clean screen
2. Straighten hose
3. Clean airlock release feature
4. Use larger diameter hose
5. Use shorter hose
6. Reassemble impeller (See Fig. 1 in
CARE AND MAINTENANCE)
7. Call 1-800-346-7611
WARRANTY
This product is warranted against manufacturing defects for a period of 12 months from the date of
purchase. Any misuse, abuse, or modification automatically voids this warranty. The distributor will
repair or replace the pump if, in its sole determination, the pump failed due to defects in materials or
workmanship.
WARRANTY EXCLUSIONS
1. Neither the distributor, nor the store that sold this pump shall in any event be liable for any labor
or similar expenses incurred in removing or repairing this pump.
2. The distributor specifically disclaims any implied warranties of merchantability and fitness for a
particular purpose.
3. In no event shall the distributor be liable for consequential, incidental, or special damages
resulting from or related in any manner to any distributor components or accessories.
4. The distributor disclaims all liability for improper installation or improper use of this product.
Some states do not allow the exclusion or limitation of incidental or consequential damages.
The above limitations and exclusions may not apply to you. In addition to the rights given
you by this warranty, you may also have other rights which vary from state to state.
For warranty claims, DO NOT RETURN PUMP TO THE STORE!
Call our customer service department at: 1-800-346-7611, Monday – Friday, 8:00 a.m. – 5:00 p.m.,
EST. Printed in China
/