Sunrise Medical Q500 H Owner's manual

Type
Owner's manual
Instructions For Use
P/N 248020 Rev. C
Seating System
SEDEO
®
PRO
Seating manual
Dealer signature and stamp
We at Sunrise Medical want you to get the best out of
your wheelchair. This Owner’s Manual will familiarize you
with the chair and its features. It contains hints on
everyday usage and general care in addition to
information on the high quality standards which we
adhere to and details about the guarantee.
Your wheelchair should be delivered fully configured for
your use; there are a wide range of components and
adjustments available. For further information about
these you should contact your Sunrise Medical authorized
dealer.
Your wheelchair will reach you in excellent condition
having been personally inspected before leaving our
factory. Following the guidelines for maintenance and
cleaning your wheelchair will maintain its first class
condition and give you complete satisfaction.
The wheelchair has been designed for use by an
individual on a daily basis. It is suitable for both indoor
and outdoor use. It is only intended for use as a
pavement vehicle, but may also be used when crossing
between pavements.
This vehicle has been designed for a single occupant of
limited mobility who has the cognitive, physical and visual
ability to control the vehicle safely. See page 8 and 11 for
maximum user weights. If you are in any doubt as to the
suitability of the wheelchair, contact your local Sunrise
Medical authorized dealer for clarification, prior to
commencing use.
It is very important to read the relevant section of the
owner’s manual when making any minor adjustments.
Consult your local Sunrise Medical authorized dealer for
more complex adjustments.
If you have any queries about the use, maintenance or
safety of your wheelchair, please contact your local
authorized Sunrise Medical service dealer. If you do not
know of an authorized dealer in your area or have any
other questions please write or telephone.
Thank you for choosing a Quickie Power Chair. We want to
hear your questions or comments about this manual, the
safety and reliability of your system, and the service you
receive from your authorized dealer. Please feel free to
write or call us at the address and telephone number below:
Sunrise Medical (US) LLC
Customer Service Department
2842 N. Business Park Ave
Fresno, CA 93727 USA
(800) 333-4000
Be sure to return your warranty card, and let us know if you
change your address. This will allow us to keep you up to
date with information about safety, new products, and
options to increase your use and enjoyment of this base
system.
You can also register your wheelchair at:
www.sunrisemedical.com/register or use the quick response
code below.
FOR ANSWERS TO YOUR QUESTIONS
Your authorized dealer knows your wheelchair best,
and can answer most of your questions about system
safety, use and maintenance. For future reference, fill in the
following:
Dealer: __________________________________________
Address: __________________________________________
_________________________________________________
Telephone: ________________________________________
Serial #:______________ Date/Purchased:_______________
INFORMATION YOU SHOULD KNOW
No component of this system was made with Natural Rubber Latex.
www.sunrisemedical.com/register
DISPOSAL AND RECYCLING INFORMATION
When this product reaches the end of its life, please take
it to an approved collection or recycling point designated
by your local or state government. This Seating system is
manufactured using a variety of materials. Your product
should not be disposed of as ordinary household waste.
You should dispose of your system properly, according to
local laws and regulations. Most materials that are used
in the construction of this product are fully recyclable.
The separate collection and recycling of your product at
the time of disposal will help conserve natural resources
and ensure that it is disposed in a manner that protects
the environment.
Ensure you are the legal owner of the product prior to
arranging for the product disposal in accordance with
the above recommendations.
248020 Rev. C
2
SEDEO PRO
Table of
Contents
1.0 User information
................................................. .. 4
1.1 This owner's manual ...................................................... ... 4
1.2 For further information .................................................. ... 4
1.3 Symbols used in this manual .......................................... ... 4
2.0 Safety ..................................................................
.. 5
2.1 Seating related symbols and labels used on the product
... 5
3.0 General description
............................................. 
.. 8
5
.0 Setting up the seating system .............................  .. 13
5.1 Pre-set backrest frame depth ........................................... 13
5.2 Pre-set armrests................................................................
14
5
.3 Pre-set backrest ................................................................ 15
5.6 Pre-set fixed center mount leg rest (short and long) ....... 20
5.7 Pre-set Sedeo Seating fixed centermount leg rest.. ....... 21
5.8 Pre-set power centermount leg rest ................................. 22
5.9 Pre-set swing away leg rest ............................................... 24
5.11 Pre-set fixed/swing away controller bracket ............... .... 26
5.12 Pre-set laterals ................................................................. 27
6.0 Using the seating system...................................  .. 29
6.1 Getting in and out of the wheelchair (transferring) ....... 29
6.2 Preparing for forward transfer....................................... 29
9.0 Maintenance and cleaning ...............................  .. 36
9.1 General Maintenance ..................................................... 36
9.2 Cleaning your seating system ......................................... 37
9.3 Hygiene measures when being re-used ......................... 37
9.4 General cleaning instructions ........................................ 37
9.5 Cleaning Accessories ...................................................... 38
9.6 Cleaning controls ............................................................ 38
9.7 Storage ........................................................................... 38
10.0 Technical specifications .................................  .. 39
10.1 Applicable norms / standards ...................................... 39
11.0 Guarantee / Warranty ...................................  .. 41
2.2 Safety: Temperature .....................................................
...... 5
2.4
Safety: Moving parts .......................................................... 7
2.5
Safety: Choking hazard ...................................................... 7
2.6 Safety: Accessory trays ......................................................... 7
2.3 Safety: General Warnings ................................................... 6
2.7
Safety: Stability................................................................... 7
4
.1 Armrests ............................................................................. 9
4
.3 Fasteners ............................................................................ 9
4
.4 Footplate and footrests ..................................................... 9
4
.5 Positioning belts ................................................................. 9
4
.2 Cushions ............................................................................. 9
4.6 Push handles ...................................................................... 9
4
.7 Seating systems ................................................................ 10
4
.8 Upholstery fabric .............................................................. 10
4
.10 Assignable controls......................................................... 10
4
.11 Power seating safety
.....................................................
10
4
.12 Power recline
.................................................................
11
4
.9 Wiring and connectors
.....................................................
10
4.13 Power leg rest
...............................................................
11
4
.14 Lift or lift/tilt combo
......................................................
11
4
.15 C-ME® lift
.
........................................................
.............
11
4
.17 Transit
............................................................................
12
4
.0 Warnings for components and options ...............  .. 9
5.10 Pre-set headrest .............................................................. 25
5.13 Lap seating positioning belt............................................. 28
6.3 Preparing for side transfer .............................................. 30
6.4 Headrest ......................................................................... 30
6.5 Swing away controller ..................................................... 31
6.6 Laterals ........................................................................... 31
6.7 Push handle height ......................................................... 31
7.0 Manual and Powerd seating options .................  .. 32
7.1 Manual seating options ................................................... 32
7.2 Power seating options ..................................................... 33
8.0 Reducing the seating system size for transportation 34
8.1 Flip down backrest quick release .................................... 34
8.2 Swing away leg rests ...................................................... 35
8.3 Single post removable armrest ...................................... 35
4.16 Swing away joystick arm
................................................
11
3
.1 Maximum user weight ...................................................... 8
5.4 Pre-set flip back armrest ................................................... 16
5
.5 Pre-set reclining flip back armrest .................................... 19
248020 Rev. C
3
SEDEO PRO
1.0 User information
If you are visually impaired,
this document can be
viewed in PDF format at
www
.SunriseMedical.com
Fig. 1.1
AB FG
D
CE
Congratulations on choosing a Sunrise Medical wheelchair
. Our high-
quality mobility products are designed to enhance your independence
and make your everyday life easier.
As a part of our ongoing product improvement initiative, Sunrise Medical
reserves the right to change specifications and design without notice.
Further, not all features and options offered are compatible with all
configurations of the wheelchair.
All dimensions are approximate and may be subject to change.
The intended lifetime of the wheelchair is five (5 years. Please DO NOT
use or fit any 3rd party components to the wheelchair unless they are
officially approved by Sunrise Medical.
1.1 This user manual
This user manual will help you to use and maintain your wheelchair safely.
This entire user manual for this wheelchair consists of three booklets:
The general wheelchair user manual (this booklet)
The user manual for the seating system
The user manual for the controller
When necessary
, this general user manual refers to other manuals
as shown below:
& Seating s
ystem: Refers to the user manual for the seating system.
& Controller: Refers to the user manual for the controller.
& Battery charger: Refers to the user manual for the
battery charger.
Do not use your wheelchair until this e
ntire manual (all
booklets) has been read and understood!
If one of the user manuals was not included with your wheelchair, please
contact your dealer immediately.
1.2 For further information
Please contact your local, authorized Sunrise Medical dealer if you have
any questions regarding the use, maintenance or safety of your
wheelchair. In case there is no authorized dealer in your area or you
have any questions, contact Sunrise Medical either in writing or by
telephone. For information about product safety notices and product
recalls, go to www.SunriseMedical.com
1.3 Symbols used in this manual
DANGER!
Potential risk of serious injury or death
WARNING!
Potential risk of injury.
CAUTION!
Potential damage to equipment.
NOTE:
General user advice.
Not following these instructions may result in physical injury, damage to
the product or damage to the environment!
248020 Rev. C
4
SEDEO PRO
2.0 Safety
Follow the instructions carefully next to these warning
symbols! Not paying careful attention to these instructions
could result in physical injury or damage to the wheelchair
or the environment. Wherever possible, safety information is
provided in the relevant chapter.
2.1 Seating related symbols and labels used on the product
The signs, symbols and instructions ..affixed to the wheelchair
comprise part of the safety facilities. They must never be covered
or removed. They must remain present and clearly legible
throughout the entire lifespan of the wheelchair.
Replace or repair all illegible or damaged signs, symbols and
instructions immediately. Please contact your authorized dealer
for assistance.
Fig 2.1: Warning – Danger of finger entrapment (pinch point).
Fig 2.2: Warning – Ensure that the seat interface quick release is
screwed in tight before using your wheelchair, especially
on a slope.
Fig 2.3: Warning – Do not drive your wheelchair on a slope with
the backrest reclined.
Fig 2.4: Warning – Maximum user weight for the wheelchair:
250 lbs (113 kg), 300 lbs (136 kg), 350 lbs (158 kg),
or 450 lbs (204 kg).
2.2 Safety: Temperature
WARNING!
Avoid physical contact with the wheelchair’s motors at all
times motors are continuously in motion during use and can
reach high temperatures. After use, the motors will cool
down slowly. Physical contact could cause burns. Allow the
motors at least 30 minutes to cool down, after using.
If you do not use the wheelchair, ensure that it is not exposed
to direct sunlight for lengthy periods of time. Certain parts of
the wheelchair, such as the seat, the back and the armrests
can become hot if they have been exposed to full sunlight for
too long. This may cause burns or allergic reactions to the
skin.
Fig. 2.1
Fig. 2.2
Fig. 2.3
Fig. 2.4
248020 Rev. C
5
SEDEO PRO
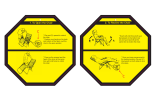
2.3 Safety: General warnings
Always ensure that you are able to operate all controls
from a comfortable position. Paying attention to your
posture is essential to ensure your continued comfort
and well being.
Always make sure that you can be seen clearly. Use the
lights, especially if you intend using your seating system
in poor light.
This seating system has been set up to match the needs
of a particular user. If used by another user then it may
need to be adjusted.
Do not let children or others use your seating system.
Avoid spilling liquids on to the controller or its
connections. Especially hot, sticky, sugary or corrosive
liquids. Such contamination may compromise the safe
operation of the control system and damage the seating
system upholstery.
DANGER!
DANGER!
Make sure you always have comfortable access
to the controls while the chair is moving and make
sure that the controller is fixed securely to the chair.
2.3.2 User
2.3.1 User and Attendants
2.3.3 Attendants
2.3.4 Attendant control
2.
3.
5. Always keep your hands and body parts clear of moving
parts to help prevent injuries.
1.
DANGER!
When transferring the user in or out of the seating
system, never use the footplate as a platform.
When transferring the user in or out of the seating
system, never use the armrest as a means of support.
Do not lift this seating system by any parts that are
removable, doing so may result in damage to the
seating system or injury to the user.
Never try to stop or slow this seating system with the
wheel locks (if applicable). Wheel locks are designed to
prevent the system from moving when stopped. They
are not brakes.
4.
Wheelchairs involved in collisions should be replaced.
NOTE- The warranty is void on any wheelchair that is
involved in a collision.
WARNING!
DO NOT use any wheelchair that has been involved in a motor
vehicle accident. A sudden stop and/or collision may
structurally damage your wheelchair. There may have been a
change to the structure of the chair, and/or damaged or
broken some of the components. Wheelchairs involved in
sudden stops should be inspected for possible failures in
frame and/or components. Frame damage may be
represented by but not limited to: visual cracks, dents, metal
distortion, bends, or damage to the seating mounting. If the
chair no longer drives straight, it could be damaged. If the
wheelchair has been involved in an accident, discontinue use
immediately and contact your authorized dealer for a
thorough inspection. If damage is questionable or if there is
concern regarding the condition of the chair, Sunrise Medical
recommends replacement of the chair.
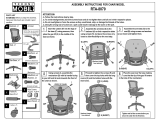
1.
2.
3.
4.
5.
6.
7.
8.
9.
10.
11.
Have someone help you practice bending, reaching and
transferring until you learn how to do them safely.
Never try a new maneuver on your own unless you are
sure it is safe.
Get to know the areas where you plan to use your
system. Look for hazards and learn how to avoid them.
Always wear a positioning belt.
Do not use a seating system if the joystick does not
spring back to the neutral position.
Do not use your seating system if the joystick boot is
ripped or damaged.
Do not try to tip this seating system without an
attendant present.
Do not allow additional riders, the system may become
unstable.
DANGER!
Every seating system is different.
Take the time to learn the feel of this system before
you begin riding.
Be aware that you must develop your own methods for
the safe use of this system that are best suited to your
level of function and ability.
1.
2.
3.
Do not stand or sit on any portion of this seating
system.
You need to work with the user, and the user’s doctor
or health care professional, to develop safe methods
best suited to your abilities and those of the user.
To manually push the system you must release the
motor brakes.
Do not engage or disengage motor brakes
unless
power to the system is
off
.
Make sure you have full control over the system
when you release the motor brakes. When you do so
the system will not have brakes.
Make sure the system is on level ground before
you release the motor brakes.
DANGER!
Make sure you heed all warnings and follow all
instructions in each section of this manual. Warnings that
apply to the user also apply to you.
1. Set the speed of the attendant control to a speed that
you can comfortably follow.
2. Always turn off the power to the controller when
leaving the user in the chair.
Check to make sure push handle grips will not rotate or
slip off.
4.
248020 Rev. C
6
SEDEO PRO
Make sure that the batteries and the ventilator are
securely fastened to the tray before use.
Familiarize yourself with the increased size of the
wheelchair before driving to prevent potential
collisions.
When activating the recline backrest make sure that
the area around the vent tray is clear.
Be aware that the vent tray assembly can cause a
finger trap (pinch point) hazard when the backrest is
reclined.
The vent tray is not designed to hold anything other
than the vent unit and its batteries, it is not designed
to hold an oxygen bottle etc. Use of these items may
cause your wheelchair to become unstable.
The vent tray must be installed and maintained by a
Sunrise Medical authorized dealer.
2.6.2 Swing away tray
DANGER!
The maximum load allowed for the tray is 5.5 lbs (2.5
kg).
Do not overload the tray, this could cause the tray to
break or could cause the chair to become unstable.
Do not leave lit cigare.ttes or other heat sources on the
tray as this could cause the tray to deform and mark.
Ensure that all extremities and clothing are clear when
positioning the tray for use.
2.6 Safety: Accessory Trays
2.6.1 Vent tray
WARNING!
Using a vent tray will affect the stability and overall
weight of your wheelchair.
2.7 Safety: Stability
DANGER!
Removing the batteries may cause the chair to
become unstable causing it to tip backwards.
Only remove the batteries while the chair is on the
ground.
Do not remove the batteries while the chair is on a
lift table or on any other elevated surface.
Wheels (turning and caster)
Powered tilt in space adjustment.
Powered seat lift option.
Powered recline adjustment.
Swing-away bracket of the controller.
Power elevating leg rest.
2.4 Safety: Moving parts
DANGER!
A wheelchair has moving and rotating parts. Contact with
moving parts may result in serious physical injury or
damage to the wheelchair. Contact with the moving
parts of the wheelchair should be avoided Fig 2.5.
Fig. 2.5
2.5 Safety: Choking hazard
DANGER!
This mobility aid uses small parts which under
certain circumstances may present a choking
hazard to young children.
248020 Rev. C
7
SEDEO PRO
3.0 General description
This wheelchair is equipped with the Sedeo Pro seating
system. The Sedeo Pro seating system provides excellent
support for the head, torso, arms, and legs. Optimal body
support ensures maximum independence for the wheelchair
user.
The wheelchair must be adjusted by a qualified specialist.
Incorrect settings may have negative consequences for the
user.
Main components(Fig 3.1)
1. Headrest
2. Joystick
3. Armrest
4. Seat cushion
5. Leg rest
6. Backrest cushion
Fig. 3.1
1
2
4
5
3
6
3.1 Maximum user weight
The overall maximum user weight shall not exceed:
SEDEO Pro
SEDEO Pro w/C-ME up to 3mph
SEDEO Pro w/C-ME up to 2.4mph
SEDEO Pro Heavy Duty with recline
- 300 lbs (136 kg)
- 250 lbs (113 kg)
- 300 lbs (136kg)
- 350 lbs (204kg)
SEDEO Pro Heavy Duty without recline - 450 lbs (204kg)
WARNING!
Exceeding these weight capacities could lead to injury and/or
permanent damage to the equipment.
NOTE - Exceeding the weight limit will void the warranty
248020 Rev. C
8
SEDEO PRO
4.0 Warnings for Components and Options
If you use parts or make changes not authorized by
Sunrise Medical it may create a safety hazard and will
void the warranty.
1.
2.
1. Standard foam cushions and other body supports are
not designed for the relief of pressure.
2. If you suffer from pressure sores, or if you are at risk
that they will occur, you may need a special seating
system or a device that will help control your posture.
Consult your healthcare professional to find out if you
need such a device for your comfort and health.
2.
3.
4.4 Footplate and footrests
1. At the lowest point, footrests should be at least
2" (51mm) off the ground. If set too LOW, they
may "hang up" on obstacles you can expect to
find in normal use. This may cause the system to
stop suddenly and tip forward.
2. To avoid a trip or fall when you transfer:
Make sure your feet do not “hang up” or get caught
in the space between the footrests.
Avoid putting weight on the footrests, as the
system
may tip
forward.
Remove or swing the footrests out of the way,
if
possible.
3.
The footrest should always be in the down position
when operating the system.
4. Never lift this system by the footrests. Footrests
detach and will not bear the weight of this system. Lift
this system only by non-detachable parts of the main
frame.
WARNING!
4.1 Armrests
DANGER!
Armrests will not bear the weight of the user.
Never
lift this system by its armrests. They may
come loose
or break.
When transferring the user in or out of the seating
system never use the armrest as a means of support.
4.2 Cushions
WARNING!
4.3 Fasteners
DANGER!
Many of the screws, bolts and nuts on this system
are special high-strength fasteners. Use of improper
fasteners may cause your system to fail.
1. Only use fasteners provided by Sunrise Medical.
DANGER!
3
.
1.
2.
3.
Make sure the
rider does not slide down in the
seating system seat. If this occurs, the rider may suffer
chest compression or suffocate due to pressure from
the belts.
The belts must be snug, but must not be so tight that
they interfere with breathing. You should be able to
slide your open hand, flat, between the belt and the
rider.
A pelvic wedge or a similar device can help keep the
rider from sliding down in the seat. Consult with the
rider’s doctor or healthcare professional to find out if
the rider needs such a device.
4. Use positioning belts only with a rider who can
cooperate. Make sure the rider or attendant can
easily remove the belts in case of emergency.
5. NEVER use positioning belts:
a. As a patient restraint. A restraint requires a
doctor’s order.
b. On a rider who is comatose or agitated.
c. As a motor vehicle restraint. In an accident or
sudden stop the rider may be thrown from the
system. Seating system positioning belts will not
prevent this, and further injury may result from the
belts or straps.
If you fail to heed these warnings, damage to your
system, a fall, tip-over or loss of control may occur
and cause severe injury to the rider or others.
4.5 Positioning belts
DANGER!
The positioning belt is predominately used to support
your posture. It can also be used to limit slipping and/or
sliding that you might experience when the system is in
motion. The positioning belt is not a transit rated safety
belt and should not be used in the place of a seat belt
while being transported in a motor vehicle. Improper
use of positioning belts may cause severe injury or
death. If you use a positioning belt, be sure to follow
the recommendations in this section:
4.6 Push handles
DANGER!
Push handles provide secure points for an
attendant to propel and control the system. This
helps to prevent a fall or tip-over.
Check to make sure push handle grips will not
rotate or slip off.
If fasteners become loose, tighten them immediately.
Do not over- or under-tightened fasteners as this can
cause damage to your system or it’s components.
Always tighten to specified torque. Specified torque
values are listed on page 38.
Do not reuse fasteners.
4.
5.
248020 Rev. C
9
SEDEO PRO
4.7 Seating systems
DANGER!
4.8 Upholstery fabric
DANGER!
4.9 Wiring and connectors
WARNING!
Never pull on cables directly. This can result in
wires breaking inside the connector or harness. To
remove a plug or connector, always grasp the plug
or connector itself.
4.10 Assignable controls
DANGER!
It is possible to assign a function to an input control
(buttons, jacks) to your seating system . If controls
have been assigned to perform a dual or alternate
function ensure you know what each control
operates. Please contact your authorized dealer if
you do not receive this information. Failure to do so
may result in damage and/or injury.
4.11 Power seating safety
1. Operation
DANGER!
2. Reduced Speed Driving (Creep)
This power system is designed to automatically
reduce the maximum driving speed to a creep
mode when certain power seating limits are
reached. Depending on the configuration of the
chair there might be multiple creep speeds.
Please discuss the multiple creep speeds with
your authorized dealer.
3. Pinch points
Pinch points may occur when operating the
powered seating options on this system. Ensure
all hands and body parts are clear of all power
seating components that may result in pinch
points before operating them.
4. Tilting Power Base with Push Handles
Do not attempt to tilt power wheelchairs by
pulling down on the push handles. Power
wheelchairs have heavy bases. As such,
attempting to tilt a power seating system to
traverse obstacles can damage components in
the seating system and/or modular actuators.
Use of a seating system not approved by Sunrise
Medical may affect or interfere with other parts
of the system.
Never change the seating system unless you
consult your authorized dealer first.
Never raise your seating system to a height of
more than 19" (482mm) (measuring from the
front of the seat pan to the floor) with all
actuators in their home position.
1. Replace worn or torn fabric of the seat sling and/or
seat back as soon as possible. If you fail to do so,
the seat may fail and cause you to fall. Worn or
torn fabrics may increase the potential for a fire
hazard.
2. Fabric will deteriorate with age and use. Look for
fraying, thin spots, or stretching of fabric at rivet
holes. Replace fabric as required.
3. Be aware that washing may reduce flame
retardation qualities of the fabric.
While driving this seating system in the reclined,
elevated, or tilted position use caution.
Do not attempt to operate any power seating
option while positioned on an incline.
Do not attempt to operate any power seating
option while this seating system is in motion.
Do not attempt to operate the recline, lift, or tilt
power seating options around children. Through
programing it is possible to reverse the direction
of all powered seating functions, ensure you
know which direction your seat is going to move
before operating. Please discuss with your
authorized dealer which direction the power
seating functions have been programed.
248020 Rev. C
10
SEDEO PRO
Only operate the wheelchair at a low and
maneuverable speed when the parallel swing-away
is in use.
When transferring to and from the wheelchair, do
not use the remote as a means of support.
Do not hang any items on or over the parallel swing
away remote assembly as this could damage the
swing-away mechanism.
DANGER!
4.12 Power recline
DANGER!
Pinch Point
Avoid putting hands or fingers near the power recline
mechanism while in operation.
Power Recline Weight Capacity
The maximum user weight capacity for the power
recline is up to 300 lbs (136 kg), 350 lbs (158 kg) for
heavy duty chair. Exceeding this weight capacity
could lead to injury and/or permanent damage to the
equipment.
4.13 Power leg rest
DANGER!
The power leg rest accessory has a maximum user
weight capacity of up to 450 lbs (204 kg) depending
on your system configuration. Never exceed this
capacity while operating the powered actuator.
Note - hanging items on / near the joystick may
cause unwanted movement and potential of serious
injury or death!
4.14 Lift, Tilt, or Combo
DANGER!
Pinch Point
Avoid putting hands, fingers, clothing items, or letting
children near the seating system when the Tilt/Lift
mechanism is in operation.
Lift, Tilt, or Combo Weight Capacity
The powered lift, tilt and/or lift/tilt modular
accessory for this system has a maximum user weight
capacity of up to 300 lbs (136 kg), 450 lbs (204 kg) for
heavy duty tilt). Never exceed this capacity while
operating the powered actuator.
4.15 C-ME
®
Lift
DANGER!
The C-ME accessory has a maximum user weight
capacity of up to 250 lbs (113 kg) with a maximum
speed of 3mph or a maximum user weight of 300 lbs
(136 kg) with a maximum speed of 2.4mph at full lift.
Never exceed this capacity while operating the lift.
WARNING!
Exceeding these weight capacities could lead to injury
and/or permanent damage to the equipment.
NOTE - Exceeding the weight limit will void the
warranty.
4.16 Swing away joystick arm
DANGER!
Before adjusting the swing away arm, switch off the
controller to avoid accidental displacement of the
joystick which would cause unwanted movement of
your wheelchair. Be aware that the width of your
chair may have increased and you may not be able to
go through certain obstacles.
5. Remain Clear During Power Accessory Operation
Please stay clear of any powered actuator while
the component is in motion. Sunrise Medical
power mechanisms move over large ranges of
travel. Users should be aware of their
surroundings while components are in motion.
6. Maximum User Weight
Do not exceed the weight capacity for your specific
system/seating system configuration. Doing so
could result in premature failure or injury.
7. Latch Mode
While operating any power seating function in
latched mode use caution. In latch mode, powered
seating will not stop until a reverse command is
performed or the end of travel is met. Please
consult with your authorized dealer to receive
training before using latch mode. Failure to do so
may result in potential serious injury.
Power seating safety (Continued)
248020 Rev. C
11
SEDEO PRO
A
B
C
HHT
Fig. 4.1
Fig. 4.4
Fig. 4.3
Fig. 4.2
Fig. 4.5
1.
2.
3.
4.
5.
6.
7.
8.
If possible and feasible, the rider should transfer to the Original Equipment
Manufacturer (OEM) vehicle seat and use the vehicle restraint.
If the seating system is used for transport, it must be used in a forward-
facing seating position during travel in a motor vehicle.
The recommended clear zones for wheelchair seated occupants restrained
by both pelvic and upper-torso belt(s) and only by a pelvic belt are shown
in the diagrams (Fig. 4.1 and 4.2) and described below. Frontal Clear Zones
(FCZ) need to be larger when upper torso belt(s) are not used. The
Rear Clear Zone of 16" (40.5 cm) is measured from the rearmost point on
an occupant’s head. The Frontal Clear Zone is measured from the front
most point of an occupant’s head and is 26" (66 cm) with pelvic and upper-
torso belt(s) and 37" (94 cm) with only a pelvic belt. The frontal clear zone
may not be achievable for wheelchair- seated drivers.
The estimated seated height (HHT) from the ground or floor to the top of
the wheelchair-seated occupant’s head ranges from approximately
47" (119 cm) for a small adult female to about 61" (155 cm) for a
tall adult male (Fig. 4.2).
The rider must not weigh more than 350 lbs (158 kg).
Attach WTORS to securement points in accordance with the
manufacturer’s instructions and SAE J2249.
Ensure hip guides are mounted and are locked in place.
Use only Wheelchair Tie-down and Occupant Restraint Systems
(WTORS) which meet the requirements of SAE J2249 Recommended
Practice– Wheelchair Tie-down and Occupant Restraint Systems For Use
in Motor Vehicles. Do not use WTORS designed to rely on the wheelchair
structure to transfer occupant restraint loads to the vehicle.
9. In order to reduce the potential of injury to vehicle occupants,
wheelchair mounted accessories, such as trays and respiratory
equipment, should be removed from the seating and wheelchair and
secured separately.
10. Postural supports and positioning devices should not be relied on for
occupant restraint.
11. Do not alter or substitute wheelchair frame parts, components or
seating.
12. Sudden stops or impacts can structurally damage your system. Chairs
involved in such incidents should be replaced.
Important Transit notes for Occupant restraints:
13.
14.
15.
16.
17.
18.
Attach occupant restraints in accordance with the manufacturer’s
instructions and SAE J2249.
Both pelvic and upper torso restraint belts must be used to restrain the
occupant to reduce the possibility of head and chest impacts with the
vehicle components and serious risk of injury to the user and other
vehicle occupants (
Fig. 4.3).
The upper torso restraint belt (A) should be mounted to the vehicle (B)
pillar - failure to do so will increase the risk of serious abdominal injuries
to the user (Fig. 4.3).
A head restraint suitable for transportation must be fitted and suitably
positioned at all times during transportation.
The pelvic restraint belt (C) must be worn low across the front of the
pelvis so that the angle of the pelvic belt is within the preferred zone of
30 to 75 degrees to the horizontal (Fig. 4.3).
A steeper (greater) angle within the preferred zone is desirable, closer to,
but not exceeding 75 degrees (Fig. 4.5).
19. The upper torso restraint belt (A) must fit over the shoulder and
across the
chest (Fig. 4.3).
20. Restraint belts must be adjusted as tightly as possible consistent with
user comfort, and should not constrict breathing (Fig. 4.4).
4.17 Transit
DANGER!
Important Transit notes for the chair:
248020 Rev. C
12
SEDEO PRO
5.0 Setting up the seating system
The average wheelchair user does not exist. This is why Sunrise
Medical wheelchairs can be pre-set according to specific needs of
the user.
Pre-settings are carried out once, the first time the wheelchair is
going to be used. They must be executed by an authorized
dealer, unless explicitly stated otherwise.
Tool and calibration marks
An M5 Allen key is supplied with the seating system. This can be
used by an authorized dealer for adjusting all of the seating
system settings. The M5 Allen key (A) can be found on the frame
at the location indicated in Fig 5.1.
CAUTION!
There are calibration marks on various parts of the seating
system. The factory settings are indicated.
5.1 Pre-set backrest frame depth (Fig 5.2 and 5.3)
1. Loosen (A and B) by one turn.
2. Adjust (C) to the desired position
3. Tighten (A and B). See page 38 for specified torque values.
Fig.
5.1
Fig.
5.2
Fig. 5.4
CAUTION!
When a bigger seat depth is required ensure that the harnesses
are lengthened before the mechanical adjustment takes place.
There are 2 sizes seat rail available: 15.75 - 20.50" (400-520mm)
and 19 - 22" (480-560mm). Choose the right seat rail to match
the adjusted seat depth.
Mount extra seat depth mounting plate for seat depth 19-22 for
more stability of the long seat rail (check with Sunrise Medical
Customer Service for COG mounting location), Fig 5.4.
A
1
2
3
C
DANGER!
We strongly recommend that you contact your Sunrise Medical
approved authorized dealer to adjust the seat depth, because
adjusting the seat depth will affect the center of gravity.
Fig.
5.3
B
248020 Rev. C
13
SEDEO PRO
5.2 Pre-set armrests
Flip back armrests / Single Post Removable armrests width
(Fig 5.5)
Fine adjustments can be done with the armrest only, for larger
adjustments also pre-set the seat plate width.
1. Loosen (A) by one turn.
2. Adjust (B) to the desired position
3. Tighten (A). See page 38 for specified torque values.
CAUTION!
Please check that the new armrest position does not
interfere with any seat positioning
Reclining flip back armrest width (Fig 5.6)
1. Loosen (A) by one turn.
2. Adjust (B) to the desired position
3. Tighten (A). See page 38 for specified torque values.
CAUTION!
Please check that the new armrest position does not
interfere with any seat positioning
Seat plate width (Fig 5.7)
Lift the seat cushion off the Velcro© strips to access the
seat plates.
1. Loosen (A) by one turn.
2. Adjust (B) to the desired position
3. Tighten (A). See page 38 for specified torque values.
The seat width is indicated by the scale that runs alongside
each slot (B).
Fig. 5.5
Fig. 5.6
Fig. 5.7
B
B
A
B
A
1
2
3
B
248020 Rev. C
14
SEDEO PRO
5.3 Pre-set backrest
Backrest angle (Fig 5.8)
Turn (A) in order to adjust (B).
Backrest height with fixed back or reclining back (Fig 5.9)
1. Loosen (A) by one turn.
2. Adjust (B) to the desired position.
3. Tighten (A). See page 38 for specified torque values.
Fig. 5.8
Fig. 5.9
1
2
3
248020 Rev. C
15
SEDEO PRO
5.4 Pre-set Flip back armrests / Single post removable
armrests
Armrest height (Fig 5.10)
1. Loosen (A) by one turn.
2. Adjust (B) to the desired position.
3. Tighten (A). See page 38 for specified torque values.
Ensure that the arms are supported well, without the
shoulders being pushed upwards.
Armrest depth (Fig 5.11)
1. Loosen (A) by one turn.
2. Adjust (B) to the desired position.
3. Tighten (A). See page 38 for specified torque values.
Position the flip back armrest further back in order to obtain more
space for sidewards transfers. Position the armrest further to the
front to obtain more support for forward transfers.
Armrest pad depth (Fig 5.12)
1. Loosen (A) by one turn.
2. Adjust (B) to the desired position.
3. Tighten (A). See page 38 for specified torque values.
A
B
Fig. 5.10
Fig. 5.11
Fig. 5.12
1
2
3
A
1
2
3
B
1
3
2
248020 Rev. C
16
SEDEO PRO
Armrest pad width
To remove: (Fig 5.13 and 5.14)
1. Loosen screws (A).
2. Remove armpad (B).
3. Loosen screws (C) by one turn.
4. Remove mounting plate (D).
To position: (Fig 5.15 and 5.16)
5. Slide slot (E or F) onto clamp nuts (G).
CAUTION!
Ensure that the slot (E or F) and clamp nuts (G) are fully
engaged.
6. Adjust the depth of (D) and tighten screws (C).
7. Reinstall the armpad (B) with screws (A).
See page 38 for specified torque values.
D
C
3
4
A
1
2
B
5
D
F
G
E
Fig. 5.13
Fig. 5.14
Fig. 5.15
D
C
6
Fig. 5.16
See page 38 for specified torque values.
To reinstall: (Fig 5.13)
6
248020 Rev. C
17
SEDEO PRO
B
A
2
3
1
Fig. 5.17
Fig. 5.18
Armrest angle (Fig 5.17)
1. Loosen (A) by one turn.
2. Adjust (B) to the desired position.
3. Tighten (A).
See page 38 for specified torque values.
Side guard height (Fig 5.18)
1. Loosen (A) by one turn.
2. Adjust (B) to the desired position.
3. Tighten (A).
See page 38 for specified torque values.
3
1
2
248020 Rev. C
18
SEDEO PRO
Fig. 5.19
Fig. 5.20
Fig. 5.21
5.5 Pre-set Reclining flip back armrests
Armrest height
Fine or gross adjustment it is a two-part
process: PART 1 (Fig 5.19)
1. Loosen (A) in order to adjust (B).
PART 2 (Fig 5.20)
2. Loosen (A) in order to adjust (B).
Armrest pad depth (Fig 5.21)
A
B
A
B
B
A
A
WARNING!
All screws should be checked periodically for
tightness. A loose arm pad could slip down when
pressed.
See maintenance schedule on page 38.
1. Loosen both screws (A) by one turn.
2. Adjust (B) to the desired position.
3. Tighten (A). See page 38 for specified torque values.
248020 Rev. C
19
SEDEO PRO
248020 Rev. B 20 SEDEO PRO
Lower leg length (Fig 5.23)
1. Remove the six securing screws (B). (Use 5mm hex key)
2. Move footplate up or down to desired height.
3. Re-install screws (B) through adjustment holes and tighten
the hardware. See page 38 for specified torque values.
Calf Pad Height Adjustment (Fig 5.24)
1. Remove the two securing screws (C). (Use 5 mm hex key)
2. Move Calf Pads to desired height.
3. Tighten screws (C) through adjustment holes. See page 38
for specified torque values.
5.6 Pre-set Fixed center mount leg rest (short and long)
Removing the assembly (5.22)
1. Remove the 3 screws (A) and lower the footrest
assembly from the seat. (Use 5mm hex key)
Fig. 5.24
Fig. 5.23
Fig. 5.22
248020 Rev. C
20
SEDEO PRO
  • Page 1 1
  • Page 2 2
  • Page 3 3
  • Page 4 4
  • Page 5 5
  • Page 6 6
  • Page 7 7
  • Page 8 8
  • Page 9 9
  • Page 10 10
  • Page 11 11
  • Page 12 12
  • Page 13 13
  • Page 14 14
  • Page 15 15
  • Page 16 16
  • Page 17 17
  • Page 18 18
  • Page 19 19
  • Page 20 20
  • Page 21 21
  • Page 22 22
  • Page 23 23
  • Page 24 24
  • Page 25 25
  • Page 26 26
  • Page 27 27
  • Page 28 28
  • Page 29 29
  • Page 30 30
  • Page 31 31
  • Page 32 32
  • Page 33 33
  • Page 34 34
  • Page 35 35
  • Page 36 36
  • Page 37 37
  • Page 38 38
  • Page 39 39
  • Page 40 40
  • Page 41 41
  • Page 42 42
  • Page 43 43
  • Page 44 44

Sunrise Medical Q500 H Owner's manual

Type
Owner's manual

Ask a question and I''ll find the answer in the document

Finding information in a document is now easier with AI