Page is loading ...

C13 Chronograph
O W N E R ’ S H A N D B O O K

Time on your side...
Your Christopher Ward watch has been designed and engineered by highly talented craftspeople to
ensure not only accurate and precise timekeeping but also to bring a real pride of ownership that
only luxury items of the highest quality can ever hope to deliver.
You have made an investment, a good one, and the aim of this handbook is to help you make the
most of that investment during what I hope will be a lifetime of ownership.
Christopher Ward

Caring for your Christopher Ward quartz watch
Your C13 Chronograph is constructed from the finest components and materials available including
one of Switzerland’s finest quartz movements.
As with all watches of this quality, with just a little care, it has the potential to become an heirloom
piece giving further joy to future generations.
Here are a few hints to help keep your watch working perfectly over the years:
• Althoughthebatteryinyourwatchmaylastlonger,werecommendyouhaveitchangedevery
2/3 years by a reputable watch repairer.
• Atthesametimeashavingthebatterychangeditmakessensetohavethewatchrepairerclean
and lubricate your watch as necessary.
• Makesurethecrownisscreweddownfullybeforeputtingthewatchintowater.Adhereto
the water resistance ratings towards the end of the handbook to prevent water getting to the
movement which could result in a very costly repair or the need for a replacement movement.
• Yourwatchisshockresistanttominorimpactsbutdroppingfromheightontoahardsurface
may damage the movement.

Should you need a replacement part - don’t worry, we keep stocks of spare parts for years, even for
discontinued models. It’s all part of the Christopher Ward service.
Finally, don’t forget our famous 60:60 Guarantee allows you to return your watch absolutely free,
for any reason, and with no quibbles, for up to 60 days after purchase and we also guarantee your
movement for up to 60 months.
After all, why shouldn’t you enjoy peace of mind as much as you enjoy your watch?


The C13 Chronograph
Features
13 jewel Swiss quartz movement
Multi-functionchronograph
Date indicator
Convex sapphire crystal with ant-reflective coating
Water resistant to 5 atm
Adjustable quick-release butterfly clasp
Screw-in crown
Screw-down case with unique serial number
Sunken chronographic dials with split
second stopwatch function
Technical Data
Dimensions: 39mm x 39mm
Height: 10.8mm
Weight: 120g - 180g
Case: 316L Stainless steel
Calibre: Ronda 5030.D

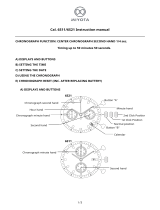
Description of the display and control buttons
Display elements
MinuteHand
Seconds
Hour hand
Minutes
Centre stop-second
Hours
Date Window
Control buttons
Push-button A
Crown
Push-button B

Setting the time
For a superior water resistance your crown is of the
screw-in type. To get to position turn the crown
anti-clockwise until it releases itself.
Pull out the crown to position (the watch
stops).
Turn the crown until you reach the correct
time e.g. 08.45 hr.
Push the crown back into position and
screw the crown in a clockwise direction in order
to maintain water resistance. The crown should
sit flush to the case.
1 2 3
1
1
3

Setting the date (quick mode)
Pull out the crown to position (the watch
continues to run).
Turn the crown clockwise until the correct
date appears.
Pull the crown to position
Push the crown back into position until flush
with the case and screw in.
Please note:
The date can not be changed during the date changing phase
between 21.00 hr and 02.00 hr as the watch gearing will already
be aligning itself to change the date.
The crown should always be screwed in after adjustment, and
it is best to do so from position 3 to avoid advancing beyond
the desired date.
1 2 3
1 3
3
2
1

Crown
Date
Setting the date/time
Example:
Date / time on the watch: 2nd / 01.25 hr
Present date / time: 29th / 21.30 hr
Pull out the crown to position (the watch
continues to run).
Turn the crown clockwise until yesterday’s date
appears ie. 28th.
1 2
1 2
2

Pull out the crown to position (the watch
stops).
Turn the crown clockwise until the correct date
ie. 29th appears (after passing through midnight).
Continue to turn the crown until the correct
time 21.30 hr appears.
Push the crown back into position until
flush with the case and screw in.
1 2 3
1 2 3
3
1

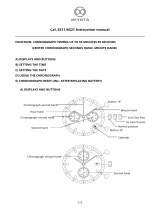
Chronograph:
The minute counter measures 30 minutes per rotation.
The centre stop-second measures 60 seconds per rotation.
The hour counter measures 12 hours per rotation.
Please note:
Before using the chronograph functions, please ensure that:
The crown is in position (screwed in).
The 3 chronograph hands are at zero position following activation of
push-button B.
Should this not be the case, the positions of the hands must be adjusted (see the chapter
entitled ‘Adjusting the chronograph hands to zero position’).
1
1
Display elements
Seconds
Minutes
Centre stop-second
Hours
Control buttons
Push-button A
(Start / Stop)
Push-button B
(Reset)

Chronograph:
Basic function
(Start / Stop / Reset)
Example:
Start: Press push-button A.
Stop: to stop the timing, press push-button A
once more and read the 3 chronograph
counters: 2 hours / 20 mins / 33 secs.
Zero positioning:
Press push-button B.
(The 3 chronograph hands will be reset to
their zero positions).
Example of use:
Timing a runner over 20km.
Push-button A
Push-button B
1
2
3
1
2
3

Chronograph:
Accumulated timing
Example:
Start: (start timing).
Stop: (e.g. 15 min 5 sec following ).
Restart: (timing is resumed).
Stop: (e.g. 13 min 5 sec following )
= 28 min 10 sec
(the accumulated measured time is shown)
Reset:
The 3 chronograph hands are returned to
their zero positions.
Repeat: as necessary.
Example of use:
Overall time to complete a journey less the coffee
breaks.
Push-button A
Push-button B
2
3
1
5
6
4
1
3
5
1
2
3
4

Chronograph:
Intermediate or interval timing
Example:
Start: (start timing).
Display interval:
e.g. 10 minutes 10 seconds (timing continues
in the background).
Making up the measured time:
(the 3 chronograph hands are quickly
advanced to the ongoing measured time).
* Stop: (final time is displayed).
Reset:
The 3 chronograph hands are returned to
their zero positions.
Please note:
* Following , further intervals or intermediates
can be displayed by pressing push-button B.
Example of use: 4 x 100m relay.
*
Push-button B
2
3
1
5
4
3
1
2
4
3
5
Push-button A

Adjusting the chronograph
hands to zero position
Example:
One or several chronograph hands are not in
their correct zero positions and have to be
adjusted (e.g. following a battery change).
Pull out the crown to position (all three
chronograph hands are in their correct or
incorrect zero position).
Keep push-buttons A and B depressed
simultaneously for at least 2 seconds
(the centre stop-second rotates by
360° corrective mode is activated).
Push-button A
Push-button B
321
3
3

Adjusting the centre stop second
Single step A 1 x short
Continuous A long
When correct press button B to set.
Corrective mode for the hour counter
is now activated.
Adjusting the hour counter hand
(position 6h)
Single step A 1 x short
Continuous A long
When correct press button B to set. Corrective
mode for the minute counter is now activated.
Adjusting the minute counter (position 9h)
Single step A 1 x short
Continuous A long
Return the crown to position (flush with the
case).
Termination of the chronograph hands
adjustment can be carried out at any time.
A
B
1 2 3
1

Fitting the bracelet
If you find the bracelet needs adjusting to your wrist we recommend you have it re-sized by a
reputablewatchrepairerorjeweller.Mostlocaljewellerswilleitherdothisforfreeorperhapsmake
a nominal charge for what is a job that should only take a few minutes. It is always best to be
present so a comfortable fit is achieved.
Establishing the length of the bracelet
Place the watch with its separated bracelet on your wrist and estimate the number of links you need
to remove. If you need to remove several links, try to keep the numbers removed from both halves
of the bracelet as equal as possible to ensure that the clasp remains roughly in the middle of your wrist.
To open your bracelet simply press either side of
the clasp to release as shown.
Press

The quick-release butterfly clasp
The strap versions of the C13 Chronograph use quick-release butterfly clasps. If you are unfamiliar
with the butterfly clasp system just follow our 8 step guide below.
Step 1 Locate the clasp Step 2 Click quick-release Step 3 Pull open clasp Step 4 Prise cover open
Step 5 Thread strap through Step 6 Snap back Step 7 Close clasp Step 8 Complete

Water resistance
Please note. these are only guidelines
but we strongly urge you to adhere
to them to retain the integrity of
your watch. If you have any queries
regarding this please contact us
direct.
NB. To safeguard watch movement
please ensure the crown is, at all times,
screwed in correctly.
1 ATM(10Metres)
Safe to wear your watch
while washing your
hands with tap water.
3 ATM(30Metres)
Washing your car and or
general hosepipe usage.
5 ATM(50Metres)
Water resistant to
most household
shower units.
10 ATM(100Metres)
Safe to use while
snorkelling in open
water, it is not advisable
to dive with your watch.
30 ATM(300Metres)
Ideal for experienced
divers and, in general,
anybody practising
scuba-diving.
50 ATM(500Metres)
Professional divers,
experienced prolonged
exposure underwater.
/