Page is loading ...

PerfectView
M5L, M7L, M7LX
WAECO
MENUEC1/C2
+
DE 8 LCD-Monitor
Montage- und Bedienungsanleitung
EN 23 LCD Monitor
Installation and Operating Manual
FR 38 Ecran LCD
Instructions de montage
et de service
ES 54 Pantalla LCD
Instrucciones de montaje y de uso
IT 70 Monitor LCD
Istruzioni di montaggio e d’uso
NL 86 LCD-monitor
Montagehandleiding en
gebruiksaanwijzing
DA 100 LCD-monitor
Monterings- og betjeningsvejledning
SV 114 LCD-monitor
Monterings- och bruksanvisning
NO 128 LCD-monitor
Monterings- og bruksanvisning
FI 142 LCD-monitori
Asennus- ja käyttöohje
PT 156 Monitor LCD
Instruções de montagem e manual
de instruções
RU 171 ЖК-монитор
Инструкция по монтажу и
эксплуатации
PL 187 Monitor LCD
Instrukcja montażu i obsługi
CS 202 Monitor LCD
Návod k montáži a obsluze
SK 216 LCD monitor
Návod na montáž a uvedenie do
prevádzky
HU 230 LCD-monitor
Szerelési és használati útmutató

PerfectView M5L, M7L, M7LX
2
1
4
8
12 13 14
911
56 7
23
10
1

PerfectView M5L, M7L, M7LX
3
2
3
4
5
6
7

PerfectView M5L, M7L, M7LX
4
8
WAECO
W
AECO
MENUEC1/C2
+
WAECO
1
2
3
9

PerfectView M5L, M7L, M7LX
5
WAECO
MENUEC1/C2
+
WAECO
1
2
3
4
5
7
6
8
9
0

PerfectView M5L, M7L, M7LX
6
WAECO
WAECO
WAECO
WAECO
AB
a
1 1
A
B
b
1 2
c

PerfectView M5L, M7L, M7LX
7
WAECO
MENUEC1/C2
+
M5L, M7L
M7LX
132
9
6
10
5
8
4
7
11
WAECO
MENUEC1/C2
+
132
9
6
5
8
4
12
7
13
10
11
d

PerfectView M5L, M7L, M7LX Explanation of symbols
EN
23
Please read this instruction manual carefully before installation and first use, and
store it in a safe place. If you pass on the product to another person, hand over this
instruction manual along with it.
Contents
1 Explanation of symbols . . . . . . . . . . . . . . . . . . . . . . . . . . . . . . . . . . . . . . . . . 23
2 Safety and installation instructions. . . . . . . . . . . . . . . . . . . . . . . . . . . . . . . . . 24
3 Scope of delivery . . . . . . . . . . . . . . . . . . . . . . . . . . . . . . . . . . . . . . . . . . . . . . 26
4 Accessories . . . . . . . . . . . . . . . . . . . . . . . . . . . . . . . . . . . . . . . . . . . . . . . . . . 27
5 Intended use. . . . . . . . . . . . . . . . . . . . . . . . . . . . . . . . . . . . . . . . . . . . . . . . . . 27
6 Technical description . . . . . . . . . . . . . . . . . . . . . . . . . . . . . . . . . . . . . . . . . . . 27
7 Mounting the LCD monitor . . . . . . . . . . . . . . . . . . . . . . . . . . . . . . . . . . . . . . . 29
8 Using the LCD monitor . . . . . . . . . . . . . . . . . . . . . . . . . . . . . . . . . . . . . . . . . . 33
9 Cleaning and caring for the LCD monitor . . . . . . . . . . . . . . . . . . . . . . . . . . . . 35
10 Guarantee . . . . . . . . . . . . . . . . . . . . . . . . . . . . . . . . . . . . . . . . . . . . . . . . . . . 36
11 Disposal . . . . . . . . . . . . . . . . . . . . . . . . . . . . . . . . . . . . . . . . . . . . . . . . . . . . . 36
12 Technical data . . . . . . . . . . . . . . . . . . . . . . . . . . . . . . . . . . . . . . . . . . . . . . . . 37
1 Explanation of symbols
!
A
I
➤ Action: This symbol indicates that action is required on your part. The required ac-
tion is described step-by-step.
✓ This symbol describes the result of an action.
Fig. 1 5, page 3: This refers to an element in an illustration. In this case, item 5 in
figure 1 on page 3.
CAUTION!
Safety instruction: Failure to observe this instruction can lead to injury.
NOTICE!
Failure to observe this instruction can cause material damage and impair the
function of the product.
NOTE
Supplementary information for operating the product.

Safety and installation instructions PerfectView M5L, M7L, M7LX
EN
24
2 Safety and installation instructions
Please observe the prescribed safety instructions and stipulations from the vehicle
manufacturer and service workshops.
The manufacturer accepts no liability for damage in the following cases:
Faulty assembly or connection
Damage to the product resulting from mechanical influences and excess voltage
Alterations to the product without express permission from the manufacturer
Use for purposes other than those described in the operating manual
A
Please observe the following instructions:
When working on the following cables, only use insulated cable lugs, plugs and tab
sleeves:
– 30 (direct supply from positive battery terminal)
– 15 (connected positive terminal, behind the battery)
– 31 (return cable from the battery, earth)
– 58 (reversing light)
Do not use plastic terminal strips.
Use a crimping tool (fig. <Waeco<Waeco>1 11, page 2) to connect the cables.
When connecting to supply cable 31 (earth), screw the cable
– To the vehicle’s earth bolt with a cable lug and a gear disc or
– To the sheet metal body work with a cable lug and a self-tapping screw
Ensure that there is a good earth connection.
When the negative terminal of the battery is disconnected, all data stored in the volatile
memories will be lost.
The following data must be set again, depending on the vehicle equipment options:
– Radio code
– Vehicle clock
–Timer
– On-board computer
– Seat position
NOTICE! Risk of damage!
To prevent short circuits, always disconnect the negative terminal of the
electrical system before working on the vehicle.
If the vehicle has an additional battery, its negative terminal should also
be disconnected.
Inadequate supply cable connections could result in short circuits which:
– Cause cable fires
– Trigger the airbag
– Damage electronic control devices
– Cause electric functions to fail (indicators, brake light, horn,
ignition, lights)

PerfectView M5L, M7L, M7LX Safety and installation instructions
EN
25
You can find instructions for making these settings in the appropriate operating
instructions.
Observe the following installation instructions:
!
Observe the following instructions when working with electrical parts:
When testing the voltage in electrical cables, only use a diode test lamp
(fig. <Waeco<Waeco>1 1, page 2) or a voltmeter (fig. <Waeco<Waeco>1 2,
page 2).
Test lamps with an illuminant (fig. <Waeco<Waeco>1 3, page 2) take up voltages
which are too high and which can damage the vehicle’s electronic system.
When making electrical connections, ensure that
– They are not kinked or twisted
– They do not rub on edges
– They are not laid in sharp edged ducts without protection
(fig. <Waeco<Waeco>3, page 3).
Insulate all connections.
Secure the cables against mechanical wear with cable binders or insulating tape, for
example to existing cables.
Observe the following instructions when handling the LCD monitor:
!
CAUTION!
Secure the monitor in such a way that it cannot become loose under any cir-
cumstances (sudden braking, accidents) and cause injuries to the occu-
pants of the vehicle.
Do not attach the monitor in the area that may be used by an airbag, as this
could cause injury if the airbags are triggered.
CAUTION!
People (including children) whose physical, sensory or mental capacities or
whose lack of experience or knowledge prevent them from using this prod-
uct safely should not use it without the supervision or instruction of a respon-
sible person.
Do not open the monitor (fig. <Waeco<Waeco>4, page 3).
Do not submerge the monitor in water (fig. <Waeco<Waeco>5, page 3); the
monitor is not waterproof.
The monitor may not impair your vision when driving
(fig. <Waeco<Waeco>8, page 4).
Do not operate the monitor with wet hands.
Do not operate the monitor if the housing has been damaged.

Scope of delivery PerfectView M5L, M7L, M7LX
EN
26
A
3 Scope of delivery
NOTICE!
Connect it to the correct voltage.
Do not use the monitor in areas which
– are subjected to direct sunlight,
– are subject to strong temperature fluctuations,
– have high levels of humidity,
– are poorly ventilated,
– are dusty or oily.
Do not press the LCD display.
Do not drop the monitor.
If you use the monitor in vehicles, the vehicle should be running during op-
eration to prevent the vehicle battery from becoming fully discharged.
The picture quality can be impaired in the vicinity of electromagnetic fields.
For this reason do not mount the monitor near loudspeakers.
No. in
fig. <Wae
co<Waec
o>9,
page 4
Quantity Designation
Item no.
M5L M7L
1 1 Monitor 9102100006 9102100007
2 1 Monitor bracket 9102200052 9102200053
3 1 Support base 9102200054
– 1 Connection cable 9102200055
– – Fastening material
No. in
fig. <Wae
co<Waec
o>9,
page 4
Quantity Designation
Item no.
M7LX
1 1 Monitor 9102100018
2 1 Monitor bracket 9102200053
3 1 Support base 9102200054
– 1 Connection cable 9102200056
– – Fastening material

PerfectView M5L, M7L, M7LX Accessories
EN
27
4 Accessories
Available as accessory (not included in scope of delivery):
5 Intended use
The LCD monitors PerfectView M5L, M7L and M7LX are monitors which are primarily in-
tended for use in vehicles. They can be used together with cameras
(e.g. a reversing video system) or other video sources.
The LCD monitors are designed for use in all vehicles.
6 Technical description
6.1 Function description
The LCD monitor is a monitor for the connection of cameras (e. g. reversing video sys-
tems) or other video sources (e. g. TV set). It is possible to switch back and forth between
video sources.
The monitor features control cables which allow the cameras to be activated automatical-
ly.
To secure it and connect the power, slide it onto the monitor bracket. The Easylink system
allows the monitor to be easily removed from the monitor bracket. It can therefore be re-
moved to protect it from theft, or for use in several trucks in a fleet (fleet solution).
The monitors M5L and M7L can operate up to two cameras.
The monitor M7LX can operate up to three cameras. Alongside the usual controls, the
three cameras can be switched consecutively in automatic mode. This monitor also fea-
tures a distance indicator in the display which is activated automatically when the reverse
gear is engaged.
A further video source can also be connected to the monitors, e.g. a reversing camera on
the trailer (trailer operation). This additional video input has signal detection: when a video
source is connected to this video input, video input C1 is automatically deactivated (e.g.
the reversing camera on the tractor) and the image from the additional video input is dis-
played instead.
The brightness of the monitor adapts automatically to the ambient light.
Designation Item no.
Monitor bracket with support for M5L 9102200049
Monitor bracket with support for M7L 9102200050

Technical description PerfectView M5L, M7L, M7LX
EN
28
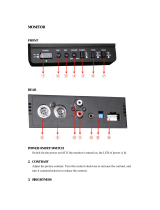
6.2 Control elements
The following control elements are located on the monitor:
No. in
fig. <Waec
o<Waeco>
0, page 5
Designation Description
1 Sensor window for the dimmer function.
The brightness of the display is automatically adapted to
the ambient light.
2 C1/C2 1. Switches from video source 1 to video source 2 (C1
and C2) and vice-versa.
2. Switches the menu off.
3. M7LX: Switches the automatic camera panning on
(the cameras are activated in preset time intervals,
e. g. for horse transporters with multi-box monitor-
ing).
3 MENU 1. Switches the menu on.
2. Calls up the parameters for setting.
The parameters are distributed over two screen
pages in the following order:
Page 1
– Brightness
– Contrast
–Colour
Page 2
– Language: “English” or “German”
– Reset (“Default”): Default setting for all param-
eters
– Camera1/Camera2: “Normal” or “Mirrored”
– M7LX: Camera3: “Normal” or “Mirrored”
– M7LX: Distance: Distance marker setting
4 – Decreases the value of the selected parameter.
5 + Increases the value of the selected parameter.
6 P Switches the monitor on and off.
7 USB charger output (5 V, 500 mA)
8 Monitor bracket
9 Loudspeaker

PerfectView M5L, M7L, M7LX Mounting the LCD monitor
EN
29
7 Mounting the LCD monitor
7.1 Tools required (fig. <Waeco<Waeco>1, page 2)
For installation and assembly you will require the following tools:
Measuring ruler (4)
Centre punch (5)
Hammer (6)
Drill bit set (7)
Drill (8)
Screwdriver (9)
To make and test the electrical connection, the following tools are required:
Diode test lamp (1) or voltmeter (2)
Insulating tape (10)
Heat shrinking sleeve
Hot air blower (11)
Crimping tool (12)
Soldering iron, if required (13)
Solder, if required (14)
Cable bushing sleeves, if necessary
To fasten the cables, you may require additional cable binders.
7.2 Installing the monitor
!
Observe the following installation instructions:
Select an installation location that provides an unobstructed view of the monitor
(fig. <Waeco<Waeco>6, page 3 and fig. <Waeco<Waeco>7, page 3).
Never install the monitor in areas where your head may impact or in the area that would
be filled by an expanding airbag. This could cause injury if the airbag opens.
The monitor may not impair your vision when driving (fig. <Waeco<Waeco>8,
page 4).
The installation location should be flat.
Check that there is sufficient room underneath the installation location to attach the
washers and nuts.
Check beforehand that there is sufficient room for the drill head to come out on the
other side (fig. <Waeco<Waeco>2, page 3).
Bear in mind the weight of the monitor. Provide reinforcement if necessary (larger
washers or plates).
Ensure that you can lay the connection cables to the monitor.
CAUTION! Risk of injury!
Select the location of the monitor so that it cannot injure anybody in the vehicle
under any circumstances (e.g. sudden braking, road traffic accidents).

Mounting the LCD monitor PerfectView M5L, M7L, M7LX
EN
30
Choosing the installation location
➤ Place the monitor and the mounting rail on the monitor bracket
(fig. <Waeco<Waeco>a A, page 6).
➤ Place the monitor bracket and the mounting rail onto the support base and secure it
using the knurled nuts (fig. <Waeco<Waeco>a B, page 6).
➤ Position the monitor and the attached monitor bracket provisionally.
➤ Mark the outlines of the corners of the support base on the dashboard.
➤ Unscrew the support base from the monitor holder.
I
Sticking the monitor bracket onto the dashboard (fig. <Waeco<Waeco>b A,
page 6)
➤ Remove the film from under the support base.
➤ Stick the support base to the position of your choice.
Screwing the monitor bracket onto the dashboard (fig. <Waeco<Waeco>b B,
page 6)
➤ Hold the support base within the outlines marked beforehand.
➤ Mark four different drilling points.
➤ Drill a hole of ∅ 2 mm at each of the points marked beforehand.
➤ Screw the support base on using 4 x 20 mm self-tapping screws.
Fastening the monitor
➤ Place the monitor and the mounting rail onto the support base and secure it using the
knurled nuts (fig. <Waeco<Waeco>a, page 6).
NOTE
You can fasten the support base using adhesive or screws.

PerfectView M5L, M7L, M7LX Mounting the LCD monitor
EN
31
7.3 Connecting the monitor electrically
The circuit diagram for the LCD monitor can be found in fig. <Waeco<Waeco>d, page 7.
A
No. in
fig. <Waeco<W
aeco>d, page 7
Designation
1 Monitor
2 20-pin socket
3 Monitor line
4 20-pin plug
5 12–24 V positive cable (red): connected to the positive pole of the
ignition (connected positive, terminal 15) or the positive pole of the
battery (terminal 30).
6 Earth cable (black): connected to the negative pole of the voltage
source.
7 Cable (green): control input for video input C1,
e. g. for connection to the reversing light.
8 Cable (white): control input for video input C2,
e. g. side camera.
9 6 pin socket C1 (connection to video source 1)
10 6 pin socket C2 (connection to video source 2)
11 6 pin socket C3 (connection to video source 3)
M5L, M7L only: with video signal recognition)
12 M7LX only: 6 pin socket C4 (connection to video source 4,
with video signal recognition).
13 M7LX only: Cable (blue): Control input for video input C3.
NOTICE!
Cables and connections that are not properly installed will cause malfunctions
or damage to components. Correct installation of cables and connections en-
sures lasting and trouble-free operation of the retrofitted components.

Mounting the LCD monitor PerfectView M5L, M7L, M7LX
EN
32
Observe the following instructions when laying the connection cable:
Feed the connection cable through existing ducts or other openings where possible,
e. g. ventilation grilles. If no suitable ducts or openings are available you will need to
drill a hole of ∅ 20 mm. Check beforehand that there is sufficient space on the other
side for the drill head to emerge (fig. <Waeco<Waeco>2, page 3).
To prevent damage to the cables, when laying them ensure that there is always a
sufficient interval to vehicle components which can become hot (lights, heaters, ven-
tilators etc.).
Wrap insulating tape around every connection on the cable (even inside the vehicle).
When laying the cables, make sure:
– they are not kinked or twisted
– they do not rub on edges
– they are not laid in sharp-edged ducts without protection
(fig. <Waeco<Waeco>3, page 3).
Connecting the monitor as a reversing video system (fig. <Waeco<Waeco>d,
page 7)
➤ Lay the connection cable for the monitor bracket on the dashboard.
➤ Insert the plug of the monitor cable (2) into the socket (4) of the connection cable (3).
A
➤ Connect the red and black cables of the connection cable to a suitable voltage sup-
ply:
– Connect the red cable (5) to terminal 15 (ignition).
– Connect the black cable (6) to terminal 31 (earth).
➤ If the monitor is to be activated when reverse gear is selected, connect the green ca-
ble (8) to the positive cable of the reversing light.
I
➤ If the monitor is to be activated e. g. when the indicator is flashing, connect the fol-
lowing control cable to a positive cable of the indicator:
– M5L, M7L: white cable (8)
– M7LX: white cable (8), blue cable (13)
I
NOTICE! Risk of damage
Make sure the polarity is correct when connecting to a voltage source.
NOTE
If voltage is present in the green cable (8), the reversing camera will be activat-
ed automatically. The reversing camera has priority.
NOTE
If voltage is present in this control cable, the following video input will be acti-
vated:
M5L, M7L: video input C2
M7LX: video input C2, video input C3

PerfectView M5L, M7L, M7LX Using the LCD monitor
EN
33
This control cable is used as a signal cable for the activation e. g. of a side camera when
an indicator is flashing.
➤ If necessary, connect the socket C1 (9) of the connection cable to the plug of the vid-
eo source 1 (e. g. camera).
➤ If necessary, connect the socket C2 (10) of the connection cable to the plug of the
video source 2 (e. g. side camera).
➤ M7LX only: If necessary, connect the socket C3 (11) of the connection cable to the
plug of the video source 3 (e. g. reversing camera).
I
Connecting an additional reversing camera (trailer operation)
➤ M5L, M7L: If necessary, connect socket C3 (11) of the connection cable to the plug
of the additional reversing camera.
➤ M7LX: If necessary, connect socket C4 (12) of the connection cable to the plug of
the additional reversing camera.
8 Using the LCD monitor
8.1 Switching on the monitor
➤ If the monitor is switched off, press the “P” button (fig. <Waeco<Waeco>0 6, page 5)
to switch the monitor on.
✓ The picture appears.
8.2 Switching off the monitor
➤ Press the “P” (fig. <Waeco<Waeco>0 6, page 5) button to switch off the monitor.
✓ The picture disappears.
8.3 Adjusting the monitor (fig. <Waeco<Waeco>0, page 5)
To set the monitor to suit your requirements, proceed as follows:
➤ Press the “MENU” button (3) to call up the required parameter.
✓ The parameters to be set appear in the following order:
Page 1:
– Brightness: 0 – 60
– Contrast: 0 – 60
– Colour: 0 – 60
NOTE
Observe the power consumption of the video system. The cameras are
equipped with heaters. A maximum current of 1.5 A can flow (three cameras in
heating mode). Use a disconnector switch for direct connection to the battery.
This allows you to disconnect the video system from the battery easily if you
are no longer using the vehicle.

Using the LCD monitor PerfectView M5L, M7L, M7LX
EN
34
Page 2:
– Language: “English” or “German”
– Reset (“Default”): Default setting for all parameters
– Camera1/Camera2: “Normal” or “Mirrored”
– M7LX: Camera3: “Normal” or “Mirrored”
– M7LX: Distance: Distance markers (“Setting distance markers (M7LX)
(fig. <Waeco<Waeco>0, page 5)” on page 35)
➤ Press the “–” button (4) or “+” button (5) to set the parameter of your choice.
➤ Press the “–” button (4) to reduce the value of the selected parameter.
➤ Press the “+” button (5) to increase the value of the selected parameter.
8.4 Setting the video source (fig. <Waeco<Waeco>0, page 5)
I
M5L, M7L
➤ If you wish to switch to a different video source (from camera 1 to camera 2), press
the “C1/C2” button (1).
✓ The monitor switches from camera 1 to camera 2 or vice-versa.
M7LX
➤ If you would like to switch to a different video source, press the “C1/C2/C3” button (1).
✓ The monitor changes the camera in the order “camera 1 – camera 2 – camera 3”.
➤ If you wish the cameras to run automatically, press and hold the “C1/C2/C3” button
(1) for at least three seconds.
✓ The monitor display the “AUTO” mode.
✓ The monitor changes the cameras in the order “camera 1 – camera 2 – camera 3”
automatically in the preset time intervals.
No sound is available in this operating mode.
➤ If you wish to set the display time (2 s to 16 s):
Press the “–” button (4) to reduce the camera display time.
Press the “+” button (5) to increase the camera display time.
➤ To end the automatic function, press the “C1/C2/C3” button (1) again.
✓ The monitor displays the “MANUAL” mode.
NOTE
If you have connected the green cable to the reversing light and voltage is pre-
sent, reversing camera V1 is activated automatically (see “Using the monitor
with two reversing cameras (trailer operation) (fig. <Waeco<Waeco>c,
page 6)” on page 35).

PerfectView M5L, M7L, M7LX Cleaning and caring for the LCD monitor
EN
35
8.5 Using the monitor with two reversing cameras
(trailer operation) (fig. <Waeco<Waeco>c, page 6)
You do not need to make any settings to the monitor during operation. The monitor auto-
matically detects whether one or two cameras are connected (e.g. to a truck-trailer com-
bination).
One camera connected (e. g. tractor or trailer): the camera connected to C1 (1) is ac-
tivated.
Two cameras connected (e. g. tractor with trailer):
– M5L, M7L only: the camera connected to C3 (2) is activated.
(C1 is inactive).
– M7LX only: the camera connected to C4 (2) is activated.
(C1 is inactive).
8.6 Setting distance markers (M7LX) (fig. <Waeco<Waeco>0,
page 5)
To set the distance markers, proceed as follows:
➤ Press the “MENU” button (3) to call up the required parameter.
✓ The parameters to be set appear.
➤ Press the “MENU” button (3) again to select the parameter “Set distance markers”.
➤ Press the “–” button (4) to display the distance markers.
➤ Press the “–” button (4) again to select the parts to be set.
✓ The parts to be set are highlighted in red.
➤ Press the “+” button (5) to set the part highlighted in red.
You can slide each distance marker to one of three positions.
The first time you press, the side marker will be activated, the second time the upper
distance marker, the third time the middle, the fourth time the lower, etc.
➤ Press the “MENU” button (3) to exit the settings.
9 Cleaning and caring for the LCD monitor
A
➤ Clean the monitor with a soft, damp cloth from time to time.
NOTICE! Risk of damage
Do not use sharp or hard objects for cleaning as these may damage the
monitor.
Remove the cable before cleaning the monitor to prevent short circuiting.
/