Page is loading ...


2/70 Device handbook APLUS with TFT display, 173 013-04, 10/2015
Legal information
Warning notices
In this document warning notices are used, which you have to observe to ensure personal safety and to prevent
damage to property. Depending on the degree of danger the following symbols are used:
If the warning notice is not followed death or severe personal injury
will result.
If the warning notice is not followed damage to property or severe
personal injury may result.
If the warning notice is not followed the device may be damaged or
may not fulfill the expected functionality.
Qualified personnel
The product described in this document may be handled by personnel only, which is qualified for the respective
task. Qualified personnel have the training and experience to identify risks and potential hazards when working
with the product. Qualified personnel are also able to understand and follow the given safety and warning
notices.
Intended use
The product described in this document may be used only for the application specified. The maximum electrical
supply data and ambient conditions specified in the technical data section must be adhered. For the perfect and
safe operation of the device proper transport and storage as well as professional assembly, installation,
handling and maintenance are required.
Disclaimer of liability
The content of this document has been reviewed to ensure correctness. Nevertheless it may contain errors or
inconsistencies and we cannot guarantee completeness and correctness. This is especially true for different
language versions of this document. This document is regularly reviewed and updated. Necessary corrections
will be included in subsequent version and are available via our webpage http://www.camillebauer.com
.
Feedback
If you detect errors in this document or if there is necessary information missing, please inform us via e-mail to:
customer-support@camillebauer.com

3/70 Device handbook APLUS with TFT display, 173 013-04, 10/2015
Contents
1. Introduction ..................................................................................................................... 5
1.1 Purpose of this document ........................................................................................................ 5
1.2 Scope of supply ....................................................................................................................... 5
1.3 Further documents .................................................................................................................. 5
2. Security notes .................................................................................................................. 6
3. Device overview............................................................................................................... 6
3.1 Brief description ....................................................................................................................... 6
3.2 Possible modes of operation ................................................................................................... 7
3.3 Monitoring and alarming .......................................................................................................... 8
3.3.1 Alarming concept ................................................................................................................................. 8
3.3.2 Logic components ..............................................................................................................................10
3.3.3 Limit values ........................................................................................................................................11
3.3.4 Sequence of evaluation .....................................................................................................................12
3.4 Free Modbus image .............................................................................................................. 13
4. Mechanical mounting .................................................................................................... 14
4.1 Panel cutout .......................................................................................................................... 14
4.2 Mounting of the device .......................................................................................................... 14
4.3 Demounting of the device ...................................................................................................... 14
5. Electrical connections .................................................................................................. 15
5.1 General safety notes ............................................................................................................. 15
5.2 Electrical connections of the I/Os .......................................................................................... 16
5.3 Possible cross sections and tightening torques ..................................................................... 16
5.4 Inputs .................................................................................................................................... 17
5.5 Rogowski current inputs ........................................................................................................ 21
5.6 Power supply ......................................................................................................................... 22
5.7 Relays ................................................................................................................................... 22
5.8 Digital inputs and outputs ...................................................................................................... 23
5.9 Analog outputs ...................................................................................................................... 25
5.10 Modbus interface RS485 X4 and / or X8 ............................................................................... 25
5.11 Profibus DP interface............................................................................................................ 26
6. Commissioning.............................................................................................................. 27
6.1 Software installation CB-Manager ......................................................................................... 27
6.2 Parametrization of the device functionality ............................................................................. 28
6.3 Installation check ................................................................................................................... 29
6.4 Installation of Ethernet devices .............................................................................................. 30
6.4.1 Connection ......................................................................................................................................30
6.4.2 Network installation using the CB-Manager software .....................................................................31
6.4.3 Network installation by means of local programming .....................................................................32
6.4.4 Time synchronization via NTP-protocol ..........................................................................................33
6.4.5 TCP ports for data transmission .....................................................................................................33
6.5 Installation of Profibus DP devices ........................................................................................ 34
6.6 Protection against device data changing ............................................................................... 35
7. Operating the device ..................................................................................................... 36
7.1 Operating elements ............................................................................................................... 36
7.2 Symbols used for display ....................................................................................................... 37
7.3 Display modes ....................................................................................................................... 38
7.4 Alarm handling ...................................................................................................................... 39
7.4.1 Alarm state display on the device ......................................................................................................39

4/70 Device handbook APLUS with TFT display, 173 013-04, 10/2015
7.4.2 Alarm text indication on the display .................................................................................................. 39
7.4.3 Reset of alarms ................................................................................................................................. 39
7.5 Resetting measurements ...................................................................................................... 40
7.6 Configuration ........................................................................................................................ 40
7.7 Data logger ........................................................................................................................... 41
7.7.1 Activation of data logger recording ................................................................................................... 41
7.7.2 SD card ............................................................................................................................................. 41
7.7.3 Logger state display .......................................................................................................................... 42
7.7.4 Access to logger data ....................................................................................................................... 42
7.7.5 Logger data analysis ......................................................................................................................... 43
8. Service, maintenance and disposal ............................................................................. 44
8.1 Protection of data integrity .................................................................................................... 44
8.2 Calibration and new adjustment ............................................................................................ 44
8.3 Cleaning................................................................................................................................ 44
8.4 Battery .................................................................................................................................. 44
8.5 Disposal ................................................................................................................................ 44
9. Technical data ................................................................................................................ 45
10. Dimensional drawings ................................................................................................... 50
Annex ................................................................................................................................... 51
A Description of measured quantities ............................................................................. 51
A1 Basic measurements............................................................................................................. 51
A2 Harmonic analysis ................................................................................................................. 54
A3 System imbalance ................................................................................................................. 55
A4 Reactive power ..................................................................................................................... 56
A5 Mean values and trend .......................................................................................................... 58
A6 Meters ................................................................................................................................... 59
B Display matrices in DEFAULT mode ............................................................................ 60
B0 Used abbreviations for the measurements ............................................................................ 60
B1 Display matrix single phase system ...................................................................................... 63
B2 Display matrix Split-phase (two-phase) systems ................................................................... 63
B3 Display matrix 3-wire system, balanced load ......................................................................... 64
B4 Display matrix 3-wire systems, unbalanced load ................................................................... 64
B5 Display matrix 3-wire systems, unbalanced load, Aron .......................................................... 65
B6 Display matrix 4-wire system, balanced load ......................................................................... 65
B7 Display matrix 4-wire systems, unbalanced load ................................................................... 66
B8 Display matrix 4-wire system, unbalanced load, Open-Y ....................................................... 66
C Declaration of conformity ............................................................................................. 67
C1 CE conformity ....................................................................................................................... 67
C2 FCC statement ...................................................................................................................... 68
INDEX ................................................................................................................................... 69

5/70 Device handbook APLUS with TFT display, 173 013-04, 10/2015
1. Introduction
1.1 Purpose of this document
This document describes the universal measurement device for heavy-current quantities APLUS. It is
intended to be used by:
• Installation personnel and commissioning engineers
• Service and maintenance personnel
• Planners
Scope
This handbook is valid for all hardware versions of the A
PLUS with TFT display. Some of the functions
described in this document are available only, if the necessary optional components are included in the
device.
Required knowledge
A general knowledge in the field of electrical engineering is required. For assembly and installation of the
device knowledge of applicable national safety regulations and installation standard is required.
1.2 Scope of supply
• Measurement device APLUS
• Safety instructions (multiple languages)
• Software and documentation CD
• Connection set basic unit: Plug-in terminals and mounting clamps
• Optional: Connection set I/O extension: Plug-in terminals
1.3 Further documents
On the CD supplied with the device the following documents about the APLUS are provided:
• Safety instructions A
PLUS
• Data sheet A
PLUS
• Modbus basics: General description of the communication protocol
• Modbus interface A
PLUS: Register description of Modbus/RTU communication via RS-485
• Modbus/TCP interface A
PLUS: Register description of Modbus/TCP communication via Ethernet

6/70 Device handbook APLUS with TFT display, 173 013-04, 10/2015
2. Security notes
Device may only be disposed in a professional manner !
The installation and commissioning should only be carried out by trained personnel.
Check the following points before commissioning:
– that the maximum values for all the connections are not exceeded, see "Technical data"
section,
– that the connection wires are not damaged, and that they are not live during wiring,
– that the power flow direction and the phase rotation are correct.
The instrument must be taken out of service if safe operation is no longer possible (e.g. visible
damage). In this case, all the connections must be switched off. The instrument must be
returned to the factory or to an authorized service dealer.
It is forbidden to open the housing and to make modifications to the instrument. The instrument
is not equipped with an integrated circuit breaker. During installation check that a labeled switch
is installed and that it can easily be reached by the operators.
Unauthorized repair or alteration of the unit invalidates the warranty.
3. Device overview
3.1 Brief description
The APLUS is a comprehensive instrument for the universal measurement, monitoring and power quality
analysis in power systems. The device can be adapted fast and easily to the measurement task by means
of the supplied CB-Manager software. The universal measurement system of the device may be used
directly for any power system, from single phase up to 4-wire unbalanced networks, without hardware
modifications. Independent of measurement task and outer influences always the same high performance
is achieved.
Using additional, optional components the opportunities of the A
PLUS may be extended. You may choose
from I/O extensions, communication interfaces, Rogowski current inputs or data logger. The nameplate on
the device gives further details about the present version.

7/70 Device handbook APLUS with TFT display, 173 013-04, 10/2015
3.2 Possible modes of operation
The APLUS can cover a wide range of possible input ranges without any hardware variance. The adaption
to the input signal is performed by means of variable amplifying levels for current and voltage inputs.
Depending on the application it makes sense to fix these levels by means of the configuration or to let
them stay variable to achieve a maximum accuracy during measurement. The differentiation, if the
amplifying remains constant or is adapted to the present value, is done during the definition of the input
configuration by means of the parameter "auto-scaling".
The disadvantage of auto-scaling is that when an amplifying level needs to be changed, a settling time of
at least one cycle of the power frequency must be allowed until the signals have stabilized again. During
this short time the measurement results remain frozen.
Continuous measurement
An absolute uninterrupted measurement of all quantities assumes that auto-scaling is deactivated for both
voltage and current inputs.
Metering
The uncertainty of the active energy meters of the A
PLUS is given with class 0.5S. To fulfill the high
requirements of the underlying meter standard EN 62053-22 also small currents have to be measured
very accurate. To do so, auto-scaling must be activated for current inputs. For metering applications the
system voltage is assumed to be quite constant, nominal value acc. standard, wherefore auto-scaling for
voltages is not required. The subsequent example shows an appropriate configuration, which also
conforms to the factory setting of the device.
Dynamic monitoring of limit values
An important criterion when monitoring the quality of the supply voltage is the possibility to detect short
sags of the system voltage. To be able to follow the progress of the voltage auto-scaling of the voltage
inputs should be deactivated. Thereby you have to consider that a possible swell of the voltage may be
detected only up to the configured overriding (20% of rated voltage in the above example), because the
switching of the measurement range is locked in both directions.
This applies analogously to all quantities of the system, whose progress should be monitored. For power
quantities the voltage amplification as well as the current amplification is influenced. However, which basic
quantities may vary how much can differ from application to application.

8/70 Device handbook APLUS with TFT display, 173 013-04, 10/2015
3.3 Monitoring and alarming
The logic module integrated in the APLUS is a powerful feature to monitor critical situations without delay
on device side. By implementing this local intelligence a safe monitoring can be realized which is
independent of the readiness of the control system.
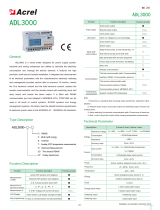
3.3.1 Alarming concept
How alarms are handled is decided during the configuration of the device. For that in the logic module you
can define if alarm states will be displayed on the TFT display and how resp. when a possibly activated
action, such as the switching of a relay, will be reset. These configuration parameters are highlighted in
yellow in the following chart.
ALARM
TFT used
for alarm
display ?
No action
N
Action
configurated
?
Perform action
Alarm state
still persists ?
Y
N
Action
resettable
?
Reset
?
Action reset
Y
N
N
Y
N
Y
• Flashing menu
• Alarm in list ON
Y
Alarm state
still persists ?
N
Y
Alarm list
displayed ?
Y
N
Alarm in list
OFF
Normal menu
► Alarm reset: This procedure affects the states of the follow-up actions
If an alarm state occurs a follow-up action (e.g. the switching of a relay) can be triggered. This follow-up
action is normally reset as soon as the alarm condition no longer exists. But the alarm handling may be
configured as well in a way that only by means of an alarm reset the subsequent operation is withdrawn.
This way an alarm remains stored until a reset is performed, even if the alarm situation no longer exists.
Possible sources for an alarm reset are the display, a digital input, another logical state of the logic
module or a command via the bus interface.
On the next page some signal flow examples are shown.

9/70 Device handbook APLUS with TFT display, 173 013-04, 10/2015
Z: Logic output determined from all involved logic
inputs
D: Corresponds to signal Z, delayed by the switch-in
resp. dropout delay
A: Output signal of the logic function
S: State of the subsequent operation (e.g. of a relay),
corresponds normally to A, but may be inverted
(subsequent operation: relay OFF)
1) Alarm reset inactive, switch-in and dropout delay 3s, follow-up action not inverted
2) Alarm reset active, switch-in and dropout delay 0s, follow-up action inverted
Reset when alarm is
inactive
Reset when alarm is
still active

10/70 Device handbook APLUS with TFT display, 173 013-04, 10/2015
3.3.2 Logic components
The logic outputs are calculated via a two level logical combination of states, which are present at the
inputs. Usable components are AND, OR and XOR gates as well as their inversions NAND, NOR and
XNOR.
The principal function of the logical gates is given in the following table, for simplicity shown for gates with
two inputs only.
function symbol
older symbols
truth table plain text
ANSI 91-1984
DIN 40700 (alt)
AND
A
B
Y
0
0
0
0
1
0
1
0
0
1
1
1
Function is true if all input
conditions are fulfilled
NAND
A
B
Y
0
0
1
0
1
1
1
0
1
1
1
0
Function is true if at least
one of the input
conditions is not fulfilled
OR
A
B
Y
0
0
0
0
1
1
1
0
1
1
1
1
Function is true if at least
one of the input
conditions is fulfilled
NOR
A
B
Y
0
0
1
0
1
0
1
0
0
1
1
0
Function is true if none of
the input conditions is
fulfilled
XOR
A
B
Y
0
0
0
0
1
1
1
0
1
1
1
0
Function is true if exactly
one of the input
conditions is fulfilled
XNOR
A
B
Y
0
0
1
0
1
0
1
0
0
1
1
1
Function is true if all of
the input conditions are
fulfilled or all conditions
are not fulfilled
The logic components of the first level may combine up to three, the components of the second level up to
four input conditions. If individual inputs are not used, their state is automatically set to a condition which
has no influence on the logic result.

11/70 Device handbook APLUS with TFT display, 173 013-04, 10/2015
3.3.3 Limit values
States of limit values are the most important input quantities of the logic module. Depending on the
application, limits either monitor the exceeding of a given value (upper limit) or the fall below a given value
(lower limit). Limits are defined by means of two parameters, the limit for the ON and the limit for the OFF
state. The hysteresis is the difference between these two values.
Upper limit: The limit for ON state (
L.On
) is higher than the limit for the OFF state (
L.OFF
)
Limit for OFF state
Limit state
0
1
Limit for ON state
► The state 1 (true) results if the limit for ON state is exceeded. It remains until the value falls below the
limit for OFF state again.
► The state 0 (false) results if the limit for ON state is not yet reached or if, following the activation of the
limit value, the value falls below the limit for OFF state again.
Lower limit: The limit for ON state (
L.On
) is smaller than the limit for OFF state (
L.OFF
)
Limit for ON state
Limit state
0
1
Limit for OFF state
► The state 1 (true) results if the value falls below the limit for ON state. It remains until the value
exceeds the limit for OFF state again.
► The state 0 (false) results if the value is higher than the limit for ON state or if, following the activation
of the limit value, the value exceeds the limit for OFF state again.
If for a limit value the limit for ON state and the limit for OFF state are configured to
the same value, it will be treated as an upper limit value with a hysteresis of 0%.
Limit values may be used to control the running of operating hour counters. As long as the limit values
are fulfilled (logical 1) the operating hour counters keep on running. Not only operating times may be
measured, but e.g. time under overload condition (additional stress) as well.

12/70 Device handbook APLUS with TFT display, 173 013-04, 10/2015
3.3.4 Sequence of evaluation
The evaluation of the logic module is performed from top to bottom and from left to right:
1. Y1, Y2, Y3, Y4
2. Z1, Z2, Z3, Z4
3. D1, D2, D3, D4
4. A1, A2, A3, A4
► The evaluation is performed once each cycle of the power frequency, e.g. every 20ms at 50Hz. But the
time between two evaluations will never be longer than 25ms.
► If the logical states Y1...Y4, Z1...Z4, D1...D4 and A1...A4 are used as inputs, their changed states will
be included in the evaluation of the next interval
► Exception: In the first evaluation level the state of previous logical functions may be used as input
without delay, e.g. the state Y1 for the logical functions with output Y2, Y3 or Y4.

13/70 Device handbook APLUS with TFT display, 173 013-04, 10/2015
3.4 Free Modbus image
Accessing measured data of a Modbus device often needs some special effort, if the interesting
measurements are stored in different, non continuous register areas. This way multiple telegrams must be
sent to the device to read all data. This needs time and it's very likely, that the measurements don't
originate from the same measurement cycle.
A free assembly of the data to read helps a lot. The A
PLUS supports, along with the still available classical
Modbus image with thousands of registers, the facility to assemble two different images, which may be
read with one telegram only. These freely assembled images are refreshed after each measurement cycle
and therefore always provide the most present values.
The free float image
Up to 60 instantaneous, mean, unbalance or THD/TDD values may be arranged in any sequence on the
register addresses 41840-41958. All of these values are floating point numbers, which allocate 2 registers
per value. Meter values are not possible because they have another format.
The free integer image
Some older control systems are not able to handle float values. To make it possible to work with the data
of the device up to 20 16-Bit integer values can be derived from the existing measurement values. These
values will then be stored in the free Modbus image (register 41800 up to 41819) as integer values with
selectable range of values.
Example: Current transformer 100/5A, measurement current phase 1, over range 20%
► The reference value is 120A (maximum measurable current)
► The integer value shall be 12'000 if the measurement is 120A
After selecting the measured quantity and entering the register value of 12'000 automatically a scaling
factor of 100.0 is calculated. The measurement I1 therefore will be multiplied by 100.0 before it is
converted into an integer value and stored in the Modbus image.
Also in the integer image instantaneous, mean, unbalance or THD/TDD values may be arranged.
For devices with Profibus interface the Modbus image is used for the assembly of the
cyclical telegram. Via Modbus the same image can be used, but it’s not possible to use it
independently.
The Modbus communication of the A
PLUS is described in a separate document. Depending on the
communication hardware selected, either the manual for Modbus/RTU or Modbus/TCP protocol should be
used. These documents may be found on the software CD or can be downloaded via our homepage
http://www.camillebauer.com
.
► W157 695: Modbus/RTU interface APLUS (communication interface RS485)
► W162 636: Modbus/TCP interface A
PLUS (communication interface Ethernet)

14/70 Device handbook APLUS with TFT display, 173 013-04, 10/2015
4. Mechanical mounting
► The version of the APLUS with TFT display is designed for panel mounting as shown below
Please ensure that the operating temperature limits are not exceeded when
determining the place of mounting (place of measurement):
-10 ... 55°C
4.1 Panel cutout
Dimensional drawing A
PLUS:
See section 10
4.2 Mounting of the device
The APLUS is suitable for panel widths up to 10mm.
a) Slide the device into the cutout from
the outside
b) From the side slide in the mounting
clamps into the intended openings and
pull them back about 2 mm
c) Tighten the fixation screws until the
device is tightly fixed with the panel
4.3 Demounting of the device
The demounting of the device may be performed only if all connected wires are out of service. Remove
all plug-in terminals and all connections of the current and voltage inputs. Pay attention to the fact, that
current transformers must be shortened before removing the current connections to the device. Then
demount the device in the opposite order of mounting (4.2).

15/70 Device handbook APLUS with TFT display, 173 013-04, 10/2015
5. Electrical connections
Ensure under all circumstances that the leads are free of potential
when connecting them !
5.1 General safety notes
Please observe that the data on the type plate must be adhered to !
The national provisions (e.g. in Germany VDE 0100 “Conditions concerning the erection of heavy
current facilities with rated voltages below 1000 V”) have to be observed in the installation and material
selection of electric lines!
Nameplate of a
device equipped
with RS485
interface and I/O
extension 1
Symbol Meaning
Device may only be disposed of in a professional manner!
Double insulation, device of protection class 2
CE conformity mark. The device fulfills the requirements of the applicable EC
directives. See declaration of conformity.
Products with this mark comply with both the Canadian (CSA) and the American (UL)
requirements.
Caution! General hazard point. Read the operating instructions.
General symbol: Input
General symbol: Output
CAT III Measurement category CAT III for current / voltage inputs and power supply
CAT II
Measurement category CAT II for relay outputs

16/70 Device handbook APLUS with TFT display, 173 013-04, 10/2015
5.2 Electrical connections of the I/Os
I/O no. Terminal No. APLUS I/O extension 1 I/O extension 2
1 X2 1, 2, 3 Relay
2 X3 1, 2 Digital input
3 X3 3, 4 Digital output
4 X5 1, 2, 3 Relay Relay
5 X6 1, 2, 3 Relay
Relay
6 X7 1, 2 Digital I/O Digital I/O
7 X7 3, 4 Digital I/O Digital I/O
8 X7 5, 6 Analog output ±20mA Digital I/O
9 X7 7, 8 Analog output ±20mA Digital I/O
10 X7 9, 10 Analog output ±20mA Digital I/O
11 X7 11, 12 Analog output ±20mA Digital I/O
I/O no. -
as used in the CB-Manager software
5.3 Possible cross sections and tightening torques
Inputs L1, L2, L3, N, I1 k-l, I2 k-l, I3 k-l
Single wire
1 x 0,5 ... 4,0mm
2
or 2 x 0,5 ... 2,5mm
2
Multiwire with end splices
1 x 0,5 ... 2,5mm
2
or 2 x 0,5 ... 1,5mm
2
Tightening torque
0,5…0,6Nm resp. 4,42…5,31 lbf in
Power supply X1, Relays X2, X5, X6
Single wire
1 x 0,5 ... 2,5mm
2
or 2 x 0,5 ... 1,0mm
2
Multiwire with end splices
1 x 0,5 ... 2,5mm
2
or 2 x 0,5 ... 1,5mm
2
Tightening torque
0,5…0,6Nm resp. 4,42…5,31 lbf in
I/O's X3, X7 and RS485 connector X4
Single wire
1 x 0,5 ... 1,5mm
2
or 2 x 0,25 ... 0,75mm
2
Multiwire with end splices
1 x 0,5 ... 1,0mm
2
or 2 x 0,25 ... 0,5mm
2
Tightening torque
0,2…0,25Nm resp. 1,77…2,21 lbf in

17/70 Device handbook APLUS with TFT display, 173 013-04, 10/2015
5.4 Inputs
All voltage measurement inputs must originate at circuit breakers or fuses rated 10 Amps or
less. This does not apply to the neutral connector. You have to provide a method for
manually removing power from the device, such as a clearly labeled circuit breaker or a
fused disconnect switch.
When using voltage transformers you have to ensure that their secondary connections
never will be short-circuited.
No fuse may be connected upstream of the current measurement inputs !
When using current transformers their secondary connectors must be short-circuited
during installation and before removing the device. Never open the secondary circuit under
load.
The connection of the inputs depends on the configured system (connection type). The required device
external fusing of the voltage inputs is not shown in the following connection diagrams.
Single-phase AC mains
1L
Direct connection
L1 L2 L3 N I1 I
2 I3
l ll l k
k
k
APLUS
L1
N
With current and voltage transformer
L1 L2 L3 N I1 I2 I3
l ll l kkk
A
PLUS
L1
N
K
k
L
l
U
u
V
v
With current transformer
L1 L2 L3 N I
1 I2 I3
l ll l kk
k
APLUS
L1
N
K
k
L
l

18/70 Device handbook APLUS with TFT display, 173 013-04, 10/2015
Three wire system, balanced load, current measurement via L1
3L.b
Direct connection
L1 L2 L3 N I1 I2 I3
l ll l kkk
A
PLUS
L1
L2
L3
With current and voltage transformer
L1 L2 L3 N I1 I2 I3
l ll l kkk
A
PLUS
L1
K
k
L
l
L2
L3
U
u
V
v
U
u
V
v
With current transformer
L1 L2 L3 N I1 I2 I3
l ll l kkk
APLUS
L1
K
k
L
l
L2
L3
In case of current measurement via L2 or L3 connect
voltages according to the following table:
Current Terminals L1 L2 L3
L2 I1-k I1-l L2 L3 L1
L3 I1-k I1-l L3 L1 L2
By rotating the voltage connections the
measurements U12, U23 and U31 will be
assigned interchanged !
Four wire system, balanced load, current measurement via L1
4L.b
Direct connection
L1 L2 L3 N I1 I2
I
3
l ll
l kk
k
A
PLUS
L1
N
L2
L3
With current and voltage transformer
L1 L2 L
3 N I1 I2 I3
l ll l
kkk
A
PLUS
L1
N
K
k
L
l
U
u
V
v
L2
L3
With current transformer
L1 L2 L3 N I
1 I2 I3
l ll l kk
k
A
PLUS
L1
N
K
k
L
l
L2
L3
In case of current measurement via L2 or L3 connect
voltages according to the following table:
Current Terminals L1 N
L2 I1-k I1-l L2 N
L3 I1-k I1-l L3 N

19/70 Device handbook APLUS with TFT display, 173 013-04, 10/2015
Three wire system, unbalanced load
3L.Ub
Direct connection
L1 L2 L3 N I1 I2 I3
l ll l kkk
A
PLUS
L1
L2
L3
With current and 3 single-pole isolated voltage
transformers
L1 L2 L3 N I1 I2 I3
l ll l kkk
A
PLUS
K
k
L
l
K
k
L
l
K
k
L
l
L1
L2
L3
X
U
X
U
X
U
x x x
u uu
With current transformers
L1 L2 L3 N I1 I2 I3
l ll l kkk
APLUS
K
k
L
l
K
k
L
l
K
k
L
l
L1
L2
L3
Three wire system, unbalanced load, Aron connection
3L.UA
Direct connection
L1 L2 L3 N I1 I2 I3
l ll l kkk
A
PLUS
L1
L2
L3
With current and 3 single-pole isolated voltage
transformers
L1 L2 L3 N I1 I2 I3
l ll l kkk
A
PLUS
K
k
L
l
K
k
L
l
L1
L2
L3
X
U
X
U
X
U
x x x
u uu
With current transformers
L1 L2 L3 N I1 I2 I3
l ll l kkk
A
PLUS
K
k
L
l
K
k
L
l
L1
L2
L3

20/70 Device handbook APLUS with TFT display, 173 013-04, 10/2015
Four wire system, unbalanced load
4L.Ub
Direct connection
L
1
L
2
L
3
N
I
1
I
2
I
3
l
l
l
l
k
k
k
A
PLUS
L
1
L
2
L
3
N
With current and 3 single-pole isolated voltage
transformers
L1 L2 L3 N I1 I2 I3
l ll l kkk
A
PLUS
K
k
L
l
K
k
L
l
K
k
L
l
L1
L2
L3
N
X
U
X
U
X
U
x x x
u uu
With current transformers
L1 L2 L3 N I1 I2 I3
l ll l kkk
A
PLUS
K
k
L
l
K
k
L
l
K
k
L
l
L1
L2
L3
N
Four wire system, unbalanced load, Open-Y
4L.UY
Direct connection
L1 L2 L3 N I1 I2 I3
l ll l kkk
A
PLUS
L1
L2
L3
N
With current and 2 single-pole isolated voltage
transformers
L1 L2 L3 N I1 I2 I3
l ll l kkk
A
PLUS
K
k
L
l
K
k
L
l
K
k
L
l
L1
L2
L3
N
X
U
X
U
x x
u u
With current transformers
L1 L2 L3 N I1 I2 I3
l ll l kkk
APLUS
K
k
L
l
K
k
L
l
K
k
L
l
L1
L2
L3
N
/