Page is loading ...

RNP8380 Really Nice Preamp
Quickstart Guide
V0.50

RNPQuickstartV050 Page 1 of 10
I
NTRODUCTION
Typically, this is where I’m supposed to congratulate you on your choice of buying our Really Nice
Preamp, but I’m not going to! I do, however, want to
THANK YOU!
We appreciate putting your trust and
hard-earned cash into one of our products (or at least giving us a shot by demoing them)! Even though
we’re very proud of our products, the point of it is to give you the opportunity to
make music
without
excessively draining your bank account nor making excuses for the sonic results!
Really Nice Preamp
What’s Cool!
Before you scurry off to work on your studio tan (although if you’re in a real hurry, see
See “Quickstart” on
page 4.
), I did want to point out to you some of the salient points about the Really Nice Preamp:
•
Lots’o’headroom —
These days, the trend is for microphones to increase their
output signal levels while reducing their output noise levels. This means either
employing a front-end pad and/or increasing the headroom of a micpre. We
decided to do the latter: at unity gain, the RNP 8380 has a clip point of +28dBu
(over 27 Volts peak-to-peak)! Even with a hefty microphone output, the RNP8380
should take what your mics have to give!
•
Fidelity —
As simple as the function of micpre is, most design engineers would
probably agree that it’s not one of the easier devices to design properly. There are
many ways to balance the sometimes conflicting design constraints. Unfortu-
nately, with the proliferation of integrated-circuit (IC) based micpres in recent
years, one of the typical casualties has been fidelity. At this point, I won’t bore you
with the geeky details, but I want to assure you that fidelity was
not
sacrificed
in
the RNP8380. Even though there are many micpres that are quieter, there are very
few that have the spurious-free (i.e., distortion-free) spectrum of the RNP8380
(Okay,
that
was a geeky detail...)! Now, more than ever, what you put into a
micpre is what you’ll get out!
•
Ugly box —
If you look beyond the RNP8380’s utiliterian ugliness, you’ll see that
we opted to throw the money we saved in cosmetics into the quality of the audio
electronics. I like having nice-looking gear as much as the next guy, but given the
choice between something that
sounds
nice versus
looks
nice, the sound wins out
every time!
•
Really Nice Compressor (RNC) inserts —
Each channel on the RNP8380 has an
unbalanced send/receive jack that allow you to connect an RNC1773 using a sin-
gle Tip-Ring-Sleeve (TRS) cable (per channel). Also, with proper cabling, you
could use this feature to balance any other unbalanced piece of gear. In addition,
with the right external configuration, the RNP can provide a separate +22dBu

RNPQuickstartV050 Page 2 of 10
FMR Audio, +1-512-280-6557 www.fmraudio.com
unbalanced output
and
a +28dBu balanced output simultaneously to allow nifty
things like separate M/S decoding while tracking the M/S signal without decod-
ing!
•
Balanced/unbalanced operation —
Both the mic inputs and micpre outputs
are electronically balanced, differential signals. Want to run to/from unbalanced
sources? No problem, the RNP “automatically” adjusts...no special cabling
required!
•
Hi-Z DI inputs —
These inputs are designed to take a source, such as a passive
bass, and not “suck the tone” away from the instrument. This input features a
high-impedance (1M
Ω
), unbalanced 1/4˝ jack.
•
Slowly-ramping 48V supply —
To reduce the chance of destroying mics con-
nected to the RNP that can’t tolerate +48V applied to them, we ramp up the
+48Volts slowly—just in case you accidently turn on the phantom supply with a
phantom-intolerant microphone attached to the RNP. In addition, this ramp helps
reduce “settling time” of the RNP’s servos (see Geek Stuff below) and reduces the
size of the output pops/clicks.
•
EMI-resistant —
By utilizing a third-order EMI filter at the front end specifically
designed to attenuate RF while giving a smooth audio performance up to 240kHz,
we’ve reduced the chances that you’ll have trouble with Radio Frequency (RF)
interfering with the RNP’s operation even at high-gain levels. When used with a
nominal 150
Ω
balanced source, this filter yields exceptional audio performance.
•
Output mutes —
During phantom engagement/disengagement and DI/mic
switching, we momentarily mute the output signals to reduce output pops &
clicks that may otherwise annoy you and others. This mute actually occurs before
the INSERT send signal so that even devices connected to the INSERT are spared
large pops & clicks.
•
Stepped gain control —
To allow precise gain-setting between multiple chan-
nels, we’re using a Grayhill 12-position switch to set the RNP’s gain.
•
Phase inversion control —
This is fairly standard stuff to allow you to accommo-
date any phase problems due to things like system cabling, etc. This control
inverts the polarity of the micpres output signal relative to the input.
•
Precision metering —
Three LEDs per channel are provided for accurate meter-
ing (signal presence, +18dBu and CLIP) of the insert “SEND” signal. In addition,

RNPQuickstartV050 Page 3 of 10
FMR Audio, +1-512-280-6557 www.fmraudio.com
the clip LED trips at 1dB below actual clip and stays on for 3 seconds to make sig-
nal-chain troubleshooting easier. The metering is digitally-calibrated and driven
by the internal microprocessor.
•
Flexible power supply requirements —
The RNP will run off of either AC or
DC as long as the voltage range is within 9-12V (and has a current capacity of at
least 1.5Amps). Polarity of the wallwart connection is unimportant so that you
don’t have to worry about that detail either! In addition, if you happen to connect
a wallwart that doesn’t have enough “OOMPH!” to power the RNP (like the
RNC’s wallwart), the RNP will tell you by periodically flashing it’s front panel
LEDs!
•
Geek stuff —
An internal microprocessor provides control and monitoring of
many RNP internal activities: power supply operation, source (mic/DI) selection,
precision metering, push button control and phantom voltage control. The
preamp itself is a unique, full Class A self-biasing-fully differential-DC servoed-
trans-impedance-100MHz GBP-instrumentation amp with an input impedance of
5k
Ω
. The RNP’s maximum level is +28dBu (differential mode) with an EIN of -
120dB. High common-mode impedances help reduce the effect of interfering
noise sources. Both phantom coupling caps and gain port voltages are indepen-
dently servoed.
What Sucks!
All right, I’m now going to violate a very important marketing/sales rule by telling you what I think sucks
about the RNP. Why? First, because any piece of studio gear is only a tool and
because nothing is perfect and
compromises always have to be made
. By giving you my perspective on the RNP’s shortcomings, at least you’ll
have some insights into the “Whys and Wherefores” about my choices. Let your ears and application
requirements be the ultimate guides:
•
The RNP uses a wallwart —
As I explain on our website for the RNC, the RNP
also uses a wallwart to: (a) reduce internal noise induction, (b) to make the
national/international regulatory compliance less costly, and, (c) to permit easy
adaptation of the RNP to countries other than the U.S. The upside is that we’ve
designed the RNP to use a range of wallwarts (see “What’s Cool!” above) instead
of the pain-in-the-ass one used on the RNC.
•
The RNP is relatively noisy when evaluated by lab measurement —
Many
micpres these days (including the cheap ones) have very low noise floors (EINs of
-127dB or better). The RNP’s EIN of -120dB is obviously not as “good” as these
others, BUT, I decided that the sonic character (or lack thereof)
and
a decent price
point were more important than the absolute noise floor. Why? First, many of the

RNPQuickstartV050 Page 4 of 10
FMR Audio, +1-512-280-6557 www.fmraudio.com
sought-after vintage micpre noise levels are much worse than the RNPs, so in
actual use, I concluded that many folks (particularly those “in-the-know”), when
a choice must be made, prefer tone to low-noise. Second, even though we have
internal versions of the RNP with a “competitive” EIN, we’d have to charge more
for the privilege of meeting lab measurements that few actual applications would
challenge. Third, the trend in microphone development has been to raise the out-
put level of microphones, thereby reducing overall gain requirements of external
micpres. Are there some applications that the RNP may be problematic? Yes. Will
most
of us encounter them? No.
•
The RNP has coarse gain steps of 6dB/step —
Under ideal circumstances,
when gain staging your signal path, you want to only use as much gain as neces-
sary to do the job. Too much gain and you possibly run out of headroom. Too
much or too little gain and you possibly get more noise than you’d like for a given
application. So, why not use a gain pot or a switch with more positions to allow
finer gain steps? First, pots are notoriously inconsistent and imprecise for gain
setting (see John Hardy’s discussion of this) without using a two stage pot...one
stage for low gains and the other for high gains. That’s OK, but I personally don’t
like to have a “gain range” switch that can cause the gain to jump 30dB or more.
This is primarily ‘cause I’ve been known to inadvertently push the button at an
inopportune time (don’t tell anyone)! Second, 16 and more positions make for a
very expensive switch! In an ideal world, I’d have a switch with an infinite num-
ber of steps to allow us to smoothly and precisely maximize the micpre’s dynamic
range...allowing us to exactly dial-in the gain we need without too much noise or
too low of a clip point. Given these situations, we’ve made the RNP go from 0dB
of gain with a clip point of almost +28dBu in twelve steps. Even though this
requires that we (the users) are more careful in setting the maximum gain before
clipping, at least it’s gain setting is a little less critical given the high clip point.
Q
UICKSTART
Even for those of you who are very experienced, there are some different operational features that you
need to be aware of. To use the RNP right away, there are two things you must do:
• Connect the RNP
• Let the RNP stabilize after power-up
In more detail:

RNPQuickstartV050 Page 5 of 10
FMR Audio, +1-512-280-6557 www.fmraudio.com
Connect The RNP:
1)
Connect the Source(s) —
The source microphone cabled to the RNP input(s) via
a standard XLR mic cable, or an unbalanced Tip-Sleeve 1/4˝ connected from your
source(s) to the front panel-mounted Direct-Inject (DI) input jack. Remember,
when the DI jacks are used, the mic input XLR is disconnected from the preamp.
2)
Connect the Output(s) —
The RNP output(s) need to be attached to your desti-
nation device. This may be done with either a standard TS 1/4˝ plug or Tip-Ring-
Sleeve (TRS) 1/4˝ depending upon whether you are feeding an unbalanced/non
differential device (TS cables) or a balanced/differential device (TRS cables). At
this point, you may use an appropriate mechanical choice for the interconnect
(e.g., TRS to XLR).
3)
Connect the Insert(s) —
If you’re not using anything on the RNP inserts, then
you may leave the insert jacks unconnected. Otherwise, hook them up at this
point via either TRS cables—the Tip delivers the SEND signal, the Ring retrieves
the RETURN signal and the Sleeve provides the reference signal—or with an
appropriately wired “Y”-cable.
4)
Connect the power supply —
Using only the provided power supply, connect it
now to the RNP power jack, then plug the power supply into a powered wall-out-
let.
You don’t have to do things in the order given above for everything to work. The above order is only a
suggestion.
Let the RNP Stabilize:
At this point, the RNP does things a little differently from other preamps that we’ve seen:
•
Blinking Phantom Power Lights —
After the front panel lights blink momen-
tarily, both channel’s both Phantom Power lights start blinking. This means that
the RNP is stabilizing its internal circuits for optimum performance.
•
SEND/Outputs muted —
While the Phantom Power lights are blinking, the
SENDs and MAIN outputs are muted to reduce pops/clicks.
•
SEND/Outputs un-muted —
After approximately 10 seconds, if everything
checks out internally, the Phantom Power lights will extinguish and the SENDs
and MAIN outputs will be un-muted. At this point, the level meters will also be
activated.

RNPQuickstartV050 Page 6 of 10
FMR Audio, +1-512-280-6557 www.fmraudio.com
We recommend—although this is not necessary for functionality—that you run the RNP for at least 5 min-
utes before using it in a critical application. This would allow all of the internal high-impedance circuit to
settle closer to their final values and also the RNP’s internal temperature to stabilize. At this point, the
RNP is ready to rock!
**IMPORTANT NOTE**
The RNP is a class-A circuit that runs at about 6 times the quiescent current of
“typical” class-A preamps. Given that this extra power consumption is squeezed
into a small box,
the RNP definitely gets warm...particularly its extruded alu-
minum base
. Make sure that there’s plenty of ambient airflow around the unit
and it’ll happily amplify all day long.

RNPQuickstartV050 Page 7 of 10
FMR Audio, +1-512-280-6557 www.fmraudio.com
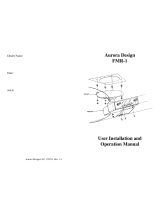
Figure 1: RNP Front Panel Connections and Controls
Control # Control Description
1
DI Input jack, 1/4¨ unbalanced,
1M
Ω
input impedance
2
Polarity inversion switch & invert
“on” LED
3
Phantom power (+48V) switch
and phantom “on” indicator
4
Preamp gain switch, 12-position
in 6dB steps
5
Send output level meter, pre-
insert SEND level
Clip+18Sig Clip+18Sig
0
54
48
42
3630
24
18
12
6
(dB)
60
66
0
54
48
42
3630
24
18
12
6
(dB)
60
66
F M R A u d i o
RNP8380
Ch A
Really
Nice
Preamp
Ch B
+48V
Invert
Level
GAIN
+48V
Invert
Level
GAIN
Hi-ZHi-Z
1 5
432

RNPQuickstartV050 Page 8 of 10
FMR Audio, +1-512-280-6557 www.fmraudio.com
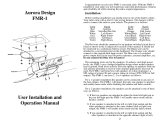
Figure 2: RNP Rear Panel Connections
Control # Control Description
1
XLR female mic inputs, pin #2
hot
2
Insert jacks, 1/4”, tip send, ring
receive
3
2.1mm coaxial power connector
4
Output jacks, 1/4”, tip hot, ring
cold
Power
9V-12V
≥1.5A
Mic A
Mic B
GUZINTAS GUZOUTAS
A B
Insert Insert
Out Out
Tip
Ring
=
=
Snd
Rcv
Tip
Ring
=
=
+
-
FMR Audio
www.fmraudio.com
!
CAUTION
RISK OF ELECTRIC
SHOCK. DO NOT OPEN!
Only use power
supply provided
with unit!
1
4
2
3

RNPQuickstartV050 Page 9 of 10
FMR Audio, +1-512-280-6557 www.fmraudio.com
S
IGNAL
F
LOW
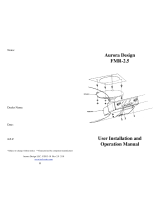
Referring to Figure 3, the signal flow for the RNP is as follows:
MIC INPUT —
The XLR female connector accepts standard mic cable from a microphone. The polarity on
this connector follows current convention of pin#1 is reference, pin#2 is hot, and pin#3 is cold. The differ-
ential-mode impedance is approximately 5k
Ω
.
PHANTOM RESISTORS —
These two 6.81k
Ω
/1W resistors provide current to an attached condenser micro-
phone from a 2W, 48V low impedance driver. When phantom is not engaged, these two resistors are dis-
connected from the 48V driver and are “seen” by the microphone as a 13.6k
Ω
differential-mode
impedance.
EMI & OVERVOLTAGE PROTECTION —
A third order, passive filter is provided between the mic input and
the preamplifier stage to reduce RFI/EMI interference (cutoff frequency is approximately 240kHz). Also
Figure 3: RNP Block Diagram
EMI &
Over-V
Protection
Ø
Over-V
Protection
±18V
+50V
Logic
EMI, Over-V
& Polarity
Protection
+48V
Driver
CPU
&
Signal
Conditioners
Channel 1 (Ch. 2 is identical)
+
-
Meter & Switches
"HiZ Input"
"Mic Input"
"Source"
"Invert""Mute"
"Output"
"Insert"
(Tip = Send, Ring = Return)
(Tip = +, Ring = -)
"+48V Engage"
Switch &
Resistors
"Gain"
"Power"
Preamp/
Servos
01/09/02 Rev. --

RNPQuickstartV050 Page 10 of 10
FMR Audio, +1-512-280-6557 www.fmraudio.com
provided at this point is over voltage protection to keep transients from unnecessarily stressing the pream-
plifier’s front end.
SOURCE SELECTION —
A relay is provided to switch between either the DI (Hi-Z) input or the mic input.
This selection is done by the microprocessor by monitoring the presence/absence of a plug inserted into
the “Hi-Z” jack. When a plug is inserted, the source relay switches to the DI input, otherwise, the mic
input is selected.
PREAMP & GAIN CONTROL —
The heart of the RNP is the Class-A, self-biasing preamp stage and its gain
control. The preamp utilizes DC servos to reduce gain control transients and a stepped attenuator (12-posi-
tion) with discrete gain setting resistors. This gain control mechanism ensures repeatable gain settings
with minimum channel-to-channel and unit-to-unit gain variability.
INSERT, MUTE & METERING —
After the preamp, a relay provides the ability to mute the preamp output
before hitting the “send” signal available on the INSERT jack (Tip = send, Ring = receive). This same point
is monitored by the microprocessor/metering circuits to display the output level of the preamp.
POLARITY INVERSION —
After the INSERT RETURN, a relay provides a polarity inversion mechanism for
the returning signal.
DIFFERENTIAL & BALANCED OUTPUT DRIVER —
This servo-balanced output driver permits either differ-
ential or single-ended operation of the RNP’s output. The 1/4” output jack is wired with Tip=in phase,
Ring =out-of-phase relative to the signal present on the INSERT RETURN jack.
OUTPUT SIGNAL OVERVOLTAGE PROTECTION —
Both DC isolation and voltage clamps are provided at
the output jack to reduce the chance of damaging the output driver in the presence large DC or transient
voltages.
/