
OWNER'S MANUAL
S _,A/RS
SEWING MACHINE !i_i!?i¸iliiillii_ii,!!i_iii!_i i_

SEARS, ROEBUCK AND CO.
Dear Customer:
You have just invested in a very fine zigzag sewing machine. Before usng your new Kenmore machne,
please pause for a moment and carefully read this booklet which contains instructions on how to operate
and care for your machine.
Specific instructions are g yen on threading, tension adjustments, cleaning, oiling, etc. This will help you
obtain the best sewing results and avoid unnecessary service expense for conditions beyond our contro.
Advice on the operation and care of your machine is always available at your nearest Sears Retail Store.
Please remember, if you have questions about your machine or need parts and service, always mention
the model number and serial number when you inquire.
Kenmore Sewing Machine
Record n space provided below the model number and serial
number of this appliance. The model number and serial number
are located on the nomenclature plate, as identified on Page 4 of
this booklet.
Model No. 385. Serial No.
Retain these numbers for future reference.
THIS MODEL ISACENTER NEEDLE, LOW BAR SEWING MACHINE.

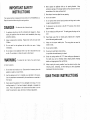
IMPORTANT SAFETY
INSTRUCTIONS
Your sewing machine is designed and constructed only for HOUSEHOLD use.
Read all instruction before using this sewing machine.
DA NGER- To reduce the risk of electric shock:
1. An appliance should never be left unattended when plugged in. Always
unplug this appliance from the electric outlet immediately after using
and before cleaning.
2. Always unplug before relamping. Replace bulb with same type rated
15 Watts.
3. Do not reach for the appliance that has fallen into water. Unplug
immediately/.
4. Do not place or store appliance where it can fall or be pulled into a tub
or sink. Do not place in or drop into water or other liquid.
WAR NING- reduce the risk of burns, fire, electric shock,
or injury to persons.
2.
3.
Do not allow to be used as a toy. Close attent_on is necessary when this
appliance is used by or near children.
Use this appliance only for its intended use as described in this manual.
Use only attachments recommended by the manufacturer as contained in
this manual.
Never operate this appliance if it has a damaged cord or plug, if it is not
working properly, if it has been dropped or damaged, or dropped into
water. Return the appliance to the nearest authorized dealer or service
center for examination, repmr, electrical or mechanical adjustment.
4. Never operate the appliance with any air opening blocked. Keep
ventilation openings of the sewing machine and foot controller free from
accumulation of lint, dust, and loose cloth.
5. Never drop or nsert any object into any opening.
6. Do not use outdoors.
7. Do not operate where aerosol (spray) products are being used or where
oxygen is being administered.
8. To disconnect, turn all controls to the off ("O") position, then remove
plug from outlet.
9. Do not unplug by pulling on cord. To unplug, grasp the plug, not the
cord.
10. Keep fingers away from all moving parts. Special care is requred
around the sewing machine needle.
11. Always use the proper needle plate. The wrong plate can cause the
needle to break.
12.
13.
14.
15.
Do not use bent needles.
Do not pull or push fabric while stitching.
It may deflect the needle causing it to break.
Switch the sewing machine off ("O") when making any adjustment in
the needle area, such as threading needle, changing needle, threading
bobbin, or changing presser foot, and the like.
Always unplug the sewing machine from the electrical outlet when
removing covers, lubricating, or when making any other adjustments
mentioned in the instruction manual.
SAVE THESE INSTRUCTIONS

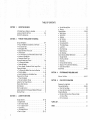
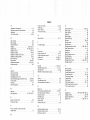
TABLE OFCONTENTS
SECTION
SECTION
SECTION
1. KNOW THE MACHINE
A Portable Case or Cabinet is Avaialble .............. 3
Locate and Identify the Parts .................. 3_4
Identify the Accessories ........................ 4
2, PREPARE THE MACHINE FOR SEWING
Set Up the Machine ......................... 5_7
.Plug in the Machine and Switch on the Power ....... 5
•Foot Control Use .......................... 5
•Setting Spool Pins .......................... 6
=Adjust the Presser Foot Lever .................. 6
•Thread Cutter ............................ 6
•Free Arm Sewing: the Removable Extension Table ...7
•Accessories Storage Box ...................... 7
•Change the Presser Foot ...................... 7
Choose the Needle and Thread ................. 7_8
•To Change the Needle ....................... 7
= Check the Needle .......................... 8
eFabric, Needle, Thread and Stitch Length Chart ...... 8
Prepare the Bobbin ........................ 9_10
• To Remove the Bobbin Case from the Machine ..... 9
= Wind the Bobbin ....................... 9_10
•Insert the Bobbin into the Bobbin Case ........... 10
Prepare the Top Thread ..................... 11_12
•Thread the Needle ........................ 11
• Pick Up the Bobbin Thread .................. 12
Adjust the Top Thread Tension ................ 13_14
Reverse Stitch Contro ........................ 14
Stitch Selector ............................. t 5
Stitch Length Control ........................ 16
Adjusting Stretch Stitch Balance (Model 12614 only) .. . 36
Starting To Sew ............................ 37
3. LEARN THE STITCHES
Straight Stitches .......................... t 8_22
o Straight Stitch ........................... 18
• Use the Seam Guides ....................... 48
• Turn a Square Corner ...................... "d8
• Topstitching ............................ 19
•Left Needle Position ....................... 19
• Sew in a Zipper ........................ 20_2!
•Use the Darning Plate ...................... 22
• Darning ............................... 22
Zigzag Stitches ........................... 23_30
•Basic Zigzag ............................. 23
•Satin Stitch ............................. 24
• Applique ............................... 25
• Bar Tacking ............................. 25
•Sew a Button ............................ 26
•Overcasting Stitch ......................... 27
• Three-Step Zigzag ......................... 28
• LaceWork .............................. 28
• Blind Hemming .......................... 29
• Shell Stitching ........................... 30
•Box Stitching ............................ 30
Stretch Stitches (Model 12614 only) ............ 31_33
• Straight Stretch .......................... 31
• Rick-Ruck Stretch ........................ 31
• Smocking .............................. 32
•Overcast Stretch Stitching ................... 32
• Serging or Pine Leaf Stretch Stitching ............ 33
• Elastic Stretch Stitch ....................... 33
Buttonholes ............................. 34_35
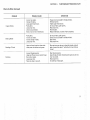
SECTION 4. PERFORMANCE PROBLEMS CHART
What to Do When ........................ 36_37
SECTION 5. CARE FOR THE MACHINE
Replacing the Light Bulb ..................... 38
Cleaning the Machine ...................... 38_39
• Clean the Feed Dogs ...................... 38
•Clean the Shuttle Race ..................... 39
Oiling the Machine .......................... 40
• Oil behind the Face Cover Plate and Under
Arm Cover Plate .......................... 40
= Oi the Underside ......................... 40
PARTS LIST ......................................... 4-I
_NDEX ............................................ 42

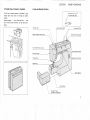
SECTION 1. KNOW THE MACHINE
APortable Case or Cabinet is Available
A full line of sewing cabinets is available at your
nearest Sears retail store or through our general
catalog.
Another option .. . buy a Carrying Case . . . then
your Kenmore goes anywhere, can be stored any-
where.
/-
\
Locate and Identify the Parts
Take-up Lever
Bobbin Winding Tension Disc
\\\
\\
Upper Thread Guide
Top Thread Tension Control
Face Cover Plate
Thread Cutter
Needle Plate
\\
\\\\Shuttle Cover
Extension Table
(Accessory storage box)
Thread spool pin (1 Pc.)
For Model 385-11607
/
/
Thread Spoo Pins
Bobbin Winding Spindle
/
/
/
Stitch Length Control
Reverse Stitch Control
\ Stitch Selector

SECTION 1. KNOWTHE MACHINE
Arm Cover Plate
Hand Wheel
\\\
Auto Clutch Knob
Light and
Power Switch
Plug Connector
Foot Control
Needle Clamp Screw
Presser Foot
Carrying Handle
Presser Foot Lever
Free Arm
_ Nomenclature Plate
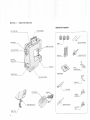
Identify the Accessories
®®®
)
Bobbin Buttonhole opener
Needle Large screw driver
Darning p_
Lint brush
Sliding
buttonhole foot
Zipperfoot
Straight
stitch foot
Small screw driver
Satin stitch
foot

SECTION 2. PREPARE THE MACHINE FOR SEWING
Set Up the Machine
• Plug in the Machine and Switch on the Power
f -.
Power
switch
\
Power supply plug
Plug
connector
Machine
plug
NOTE: Before inserting the plug into your
machine, be sure the power switch is
OFF.
1. Check your outlet to be sure it is a 110 to 120
Volt AC outlet.
2. Insert the machine plug into the three-prong
plug connector, as shown. It wil only fit one
way.
3. Insert the power supply plug into the outlet.
jSewing ight
4.
f
Power switch _
Push the light and power switch to turn
on the power and sewing light.
SAFETY FEATURE:
Your machine wil not operate unless the
light/power switch is turned on. If you are
interrupted or stop sewing, turn off the
light/power switch to prevent injury to
children.
=Foot Control Use
i
/
Foot con[ro
The foot control regulates the speed at
which you sew.
To increase speed, gently press down with
the ball of your foot.
To decrease speed, release your foot pres-
sure slightly.
NOTE: The foot control is sensitive and
will ncrease or decrease your
sewing speed immediately.
Practice on a scrap of fabric to
regulate your sewing speed to
your taste and needs.

SECTION 2. PREPARE THE MACHINE FOR SEWING
o Setting Spool Pin
f
t
Spool pin
The spool pins are used for holding the
spools of thread when feeding thread to the
machine.
To use, pull up the spool pins. Push down
for storage.
NOTE: Model 11607 has one spool pin.
Adjust the Presser Foot Lever
Normal up \
position _Hig[q.
High i'_ position
position
up
position
Presser foot
lever
The Presser Foot Lever raises and lowers your
presser foot.
You can raise it about 1/4" higher than the normal
up position for easy removal of the presser foot or
to help you place heavy fabrics under the presser
foot.
•Thread Cutter
f-
cutter
You don't need a pair of scissors to cut the
thread after you finish sewing. Just use the
handy thread cutter.
Pull the threads to lengthen several inches
before starting the next seam.
6

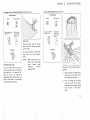
SECTION 2. PREPARE THE MACHINE FOR SEWING
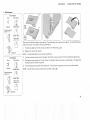
Set Up the Machine (Continued)
•Free-Arm Sewing: the Removable
Extension Table
\\\\
• Accessory Storage Box
-_ f f
To Remove the Extension Table
(for free-arm sewing)
1. Grip the table with your index finger
and thumb, as shown.
2. Pull gently to the left. The extension
table will snap out.
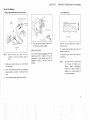
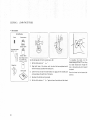
= Change the Presser Foot
To Attach the Extension Table
(for flat-bed sewing)
1. Insert the tab and the pin into their
catches.
2. With your thumb and index finger,
gently snap in.
I
The lid of the accessory storage Use the correct presser foot for
box lifts open toward you. the stitch you wish to sew,
Sewing accessories are conveni- To change the various presser
ently located in the box. feet, raise the presser bar to its
highest position by lifting the
presser foot lever.
Loosen the presser foot thumb
screw, choose the proper foot,
insert from the bottom.
Tighten the screw using the
large screw driver to make
certain the foot is secure.
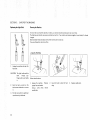
Choose the Needle and Thread
•To Change the Needle
Flat
side
away
from
you
o
Needle clamp screw
J
NOTE: Raise the needle bar to its highest
position by turning the hand wheel
toward you
1. Loosen the needle clamp screw by
turning it toward you.
2. Remove the needle by pulling it down-
ward.
3. Insert the new needle into the needle
clamp with the flat side away from you.
4. Push the needle up as far as it will go.
5. Tighten the needle clamp screw firm y
with the large screwdriver from the
accessor y box.

SECTION 2. PREPARE THE MACHINE FOR SEWING
Your choice of needle and thread depends on the fabric you are
sewing.
In the needle envelope, you will find the following color-coded
needles:
Blue (1 1) ......... for stretch fabrics.
Orange (1 1) ........ for lightweight fabrics.
Red (14) .......... for medium or medium-heavy
weight fabrics.
Purple (16) ........ for medium-heavy weight fabrics
and decorative topstitching on these
fabrics. (This needle has a larger
thread hole for thicker topstitching
thread.)
Green (1 8) ........ for heavy weight fabrics and
decorative top-stitching on these
fabrics.
Replacement Kenmore needles are available at your nearest Sears
store.
o Check the Needle
1. Look for barbed or blunt point.
2. A damaged needle can cause permanent snags or runs in
knits, fine silks and silk-like fabrics.
Always buy a good quality thread. It should resist tangling and
be strong, smooth and consistent in thickness.
8
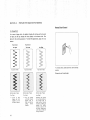
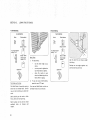
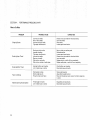
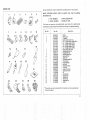
Fabric, Needle, Thread and
FABRIC
Lightweight:
Batiste, Dimity, Chiffon,
Silks, Fine Lace, Organza,
Crepe, Taffeta, Voile,
Organdy
Medium Weight:
Cotton, Cotton Blend,
Percale, Gingham,
Shantung, Pique,
Seersucker, Satin, Knit,
Suitings, Linen,
Wool Crepe, Leather
Medium Heavy Weight:
Corduroy, Denim, Wool,
Sailcloth, Wool Flannel,
Gabardine, Velvet,
Leather
Heavy Weight:
Coating, Upholstery
Cotton Duck, Heavy
Twills, Canvas
Decorative top-stitching
on all types of fabric
Stretch Fabric:
Polyester Double Knit,
Nylon Tricot, Jersey,
Stretch Terry, Spandex,
Cire Tricot
;titch Length Chart
NEEDLE
SIZE AND
COLOR
11-ORANGE
14-RED
14-RED
or
16-PURPLE
18-GREEN
16-PURPLE
18-GREEN
11-B LUE
(STRETCH
FABRIC
NEEDLE)
THREAD SIZE
Polyester Co re/Cotton
Wrap
Fine Mercerized Cotton
Silk A
50 Mercerized Cotton
Polyester Core/Cotton
Wrap
Silk A
50 Mercerized Cotton
Mercerized Heavy-Duty
Polyester Core/Cotton
Wrap
Silk A
Heavy Duty Mercerized
Cotton
Polyester Core/Cotton
Wrap
Silk A
Buttonhole Twist
(Use as top thread only)
Polyester Core/Cotton
Wrap
50 Mercerized Cotton
RECOMMENDED
STITCH LENGTH
SETTING
2
(12 stitches per
inch)
2--2.5
(10-12 stitches
per inch)
2--3
(8-10 stitches
per inch)
3
(8 stitches per
inch)
3--4
(6-8 stitches
per inch)
2--2.5
(10-12 stitches
per inch)

SECTION 2. PREPARE THE MACHINE FOR SEWING i
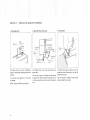
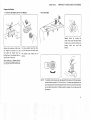
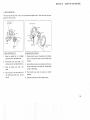
Prepare the Bobbin
oTo Remove the Bobbin Case from the Machine
f
Remove the extension table from
the machine by pulling it to the
left. Open the shuttle cover by
pulling down the embossed part on
the left side of the cover.
Raise needle to its highest position
by rotating hand wheel toward you.
To remove bobbin case from shut-
tle, pull open latch of bobbin case.
Pull bobbin case straight out of
shuttle.
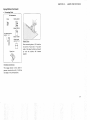
•Wind the Bobbin
)
Release clutch by turning the
clutch knob inside the hand wheel
toward you to stop the needle from
moving while you wind the
bobbin.
NOTE: The bobbin winder stopper can be adjusted for the amount of thread needed
on the bobbin (example 1/2 full or full etc.). To make the adjustment use
your large screw driver and loosen the screw one turn or less. This will allow
you to adjust the position of bobbin winder stopper. Do not take screw all
the wayout.
9

SECTION 2. PREPARE THE MACHINE FOR SEWING
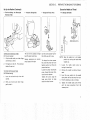
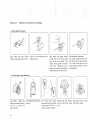
=Wind the Bobbin (Continued)
Draw thread from spool through
bobbin winding tension disc as shown.
J
Pull end of thread through hole in
bobbin as shown.
7
J
Place bobbin onto bobbin winding
spindle with end of thread coming
from the top of the bobbin. Push
bobbin winding spindle to the right
until it clicks. Holding onto end of
thread, start machine. When bobbin is
slightly filled, snip off end of thread.
Wind thread unti winder stops.
Push bobbin winding spindle to the
left and clip thread. Remove bobbin.
Turn clutch knob away from you
while holding hand wheel for normal
sewing operation.
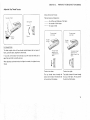
o Bnsert the Bobbin into the Bobbin Case
f f
Place bobbin in bobbin case Pull thread through slot of case
making sure thread feeds clock- as shown.
wise and is coming from
bobbin as shown.
J
Pull thread under tension
\
Holding latch open, position Case should lock into place
spring and through the opening case nto shuttle and release when latch is released.
as shown above. Pull3to4 latch.
inches of thread from bobbin.
10

Prepare the Top Thread
®Thread the Needle
\
The numbered steps above follow the numbers
on the illustrations.
Dotted lines show places where the thread
loops and then is pulled tight.
SECTION 2. PREPARE THE MACHINE FOR SEWING
Raise take-up lever to its highest position by turning hand wheel toward you.
Raise presser foot lever.
Place spool on spool pin as shown, with thread coming from the back of the spool.
1.
2.
3.
4.
5.
NOTE:
J
Draw thread into thread guide using both hands.
While holding thread near spool, draw thread down into the tension area and then around the
check spring holder.
Firmly draw thread up and through take-up lever from right to left.
Draw thread down and slip it into left side needle bar thread guide.
Thread needle from front to back.
You may want to cut the end of thread with sharp scissors for easier needle threading,
11

SECTION 2. PREPARE THE MACHINE FOR SEWING
oPick Up the Bobbin Thread
!
Raise presser foot lever. Hold top
thread loosely in left hand and rotate
handwheel toward you one complete
turn.
2. Bring bobbin thread up by pulling
top thread.
3. Pull both threads under and to the
back of the presser foot, leaving 4
to 6 inches of thread clear.
If you cannot pick up bobbin thread by following steps given above, then check:
1. Is needle threaded from front to back?
2. Is thread tangled around needle?
3. Are 3 to 4 inches of thread coming from the shuttle?
4. Is thread from shuttle tangled?
5. Is bobbin properly installed in the bobbin case?
6. Is the machine threaded according to the instructions?
12

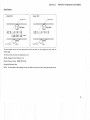
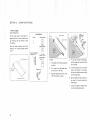
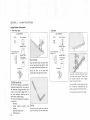
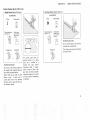
Adjust the Top Thread Tension
SECTION 2. PREPARE THE MACHINE FOR SEWING
Too side of fabric
X
TOD.
tnreaa
tnreao
Setting mark
\
Loosen \
Tighten
For Straight Stitch
The ideal straight stitch will have threads locked between the two ayers of
fabric, as shown above, magnified to show detail.
If you look at the stitch, front and back, you will notice that there are no
gaps, that each stitch is smooth and even.
When adjusting top thread tension, the higher the number, the tighter the top
th read.
Choose the Correct Tension:
The best tension will depend on;
the stiffness and thickness of the fabric
--- the number of fabric ayers
the type of stitch
The top tnreaa
is too oose,
Too side
of fabric
\\
The too $nreaa
aDDears on the
unaerside of the
fabric.
L
Tension is too loose:
The top thread shows through the
bottom of the fabric. The bottom side
of the stitch will feel bumpy.
The too thread
s too tignt
The bobbin thread
aDDears on the
uoDer surface of me
fabric.
-. J
Tension is too tight:
The bobbin thread will come through
the top of the fabric. The top side of
the stitch will feel bumpy.
13

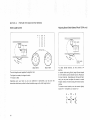
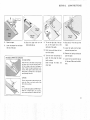
SECTION 2. PREPARE THE MACHINE FOR SEWING
For Zigzag Stitch
In a correct zigzag stitch, the bobbin threads will not show on the top side
of fabric and the top threads will show slightly on the bottom side. See
below for the correct appearance. To match this appearance, adjust the top
tension.
Too tension
Too Tight
-. J
Top side of Fabric
Top tension
Too Loose
J
Too side of Fabric
Just Right
J
Top side of Fabric
Reverse Stitch Control
\\
To reverse stitch, hold down this control during
sewi ng.
Release to sew forward again.
Bottom side of Fabric
Too Tignt:
Corner of each
ztgzag will Bull
together or tne
top side of fabrics.
14
Bottom side of Fabric
Too Loose:
The too thread
will loop through
bottom side of
fabric and will be
oulled almost
together.
Bottom side of Fabric
Just Right:
M nimize the amount
of top thread visible on
the bottom side of
fabric without causing
excessive puckering or
causing the bobbin
_hread to show on the
top side. Results vary
with fabric, thread and
sewing conditions.

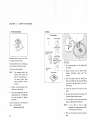
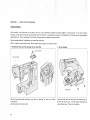
SECTION 2. PREPARE THE MACHINE FOR SEWING
Stitch Selector
Model 12614
//Setting mark
/
/
'-, r 1
Stitch Se_
Model 11607
jSetting marK
7
f
// S_tch Selector
FI [q i', >
\
/
Stitch Se_
The stitch selector control not only determines the stitch you select, but also regulates the stitch width for
regular zigzag.
The different types of stitches are designated by color.
Straight, Zigzag and Utility Stitches are red.
Stretch Stitches are brown. (Model 12614 only)
Buttonhole Settings are blue.
NOTE: To avoid needle or fabric damage, be sure your needle is up and out of fabric when adjusting this control.
15

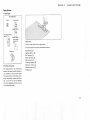
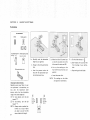
SECTION 2. PREPARE THE MACHINE FOR SEWING
Stitch Length Control Adjusting Stretch Stitch Balance (Model 12614 only)
_[_'_ t
// tit h Length
/\
\/
\,/
g
0234
I
I
I
I
(Model 12614)
jSetting mark_
(Model 116071
The stitch ength control regulates the length of stich.
The higher the number, the longer the stich.
"0" means no feed
Depending upon your fabric or your own preference in buttonholes, you may alter the
buttonhole stitch density within the blue buttonhole range on the stitch length control.
// U Stitch Length
/\
,
I i I
m II
\/
\•/
4"
Stitch Length
Control
J
To select Stretch Stitches, set this control at T
position.
In stretch stitch sewing, Stitch Length Control should
be in the detent position between S and L (Tposition)
for most materials. Depending upon the type of fabric
used, you may need to adjust this control to match
forward stitches of stretch sewing with reverse motion
stitches.
To shorten stretch stitches, turn the control slightly
toward "S". To lengthen, turn toward "L".
L - T - S
16

Starting To Sew
SECTION 2. PREPARE THE MACHINE FOR SEWING
Now that you are familiar with the controls on your machine and with the accessories provided for the machine, you are ready to start to sew with your new
Kenmore sewing machine. Below are some good habits to follow each time you sit down to sew:
1. Inspect the needle. It should be straight, properly set and sharp on the point. It should be the correct size for the fabric and thread being used. Do not be
afraid to change your needle frequently. Many of the new fabrics made of synthetic blends tend todull the needles more easily than fabrics made of natural
fibers.
2. Before placing the material on the machine, see that the ends of the threads have been drawn about 4 inches to the rear of the machine. Holdon to threads
during the sewing of the first 3 or 4 stitches of the seam.
3. Test the machine stitch on a scrap of the fabric you plan to use. The fabric should be double thickness. Adjust the machine for the length of stitch and
tension suitable to the fabric.
4. Fabric should be placed under the presser foot with the bulk of the material to the left of the needle and the right edge of the material placed on the 5/8"
seam marking on the needle plate when making a simole seam.
5. Run the machine at a slow even speed. The more pressure you put on the foot control, the faster the machine will sew.
6. Fasten each seam by back tacking sewing a few stitches in reverse.
7. Always finish sewing each seam with the needle at its highest point.
8. Guide the fabric gently with your hand in front of the needle. Never pull or hold the fabric in such a way that the normal feeding is altered.
9. When turning the hand wheel manual y, always turn it toward you.
17

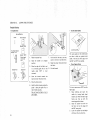
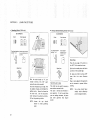
SECTION 3. LEARN THE STITCHES
Straight Stitches
=Straight Stitch
Set the Machine
Stitch
I
I
I
Top thread tension
control 2 to 6
Straight foot
Stitch selector
(Model 12614)
{Model 11607)
Stitch length
control red
zone
Zigzag foot
or
1. Raise the presser foot.
2. Raise the needle to its highest
position.
3. Place the edge of the fabric next
to a stitching guide line on the
needle plate (5/8" is most
common).
4. Draw the threads towards the
back and lower the presser foot.
5. Press the foot control.
6. Hold the fabric loosely and gently
guide it along the guide line, so
that it feeds naturally.
Do not force the fabric or try to
pull it tight.
18
J
7. At the end of the seam, you may
want to reverse to lock the stitch.
8. Raise the presser foot and remove
the fabric.
9. Cut the threads.
-Use the Seam Guides
f
Cornering Guide
The seam guides on the needle plate
are there to help you measure seam
width. The lines are 1/8" apart, with
the 5/8" and 7/8" lines marked.
=Turn a Square Corner
f
_n g
/
J
To turn a square corner 5/8" from the
fabric edge:
1. Stop stitching and lower the
needle by turning hand wheel
toward you when the fabric edge
facing you lines up with the
cornering guide, as shown.
2. Raise the presser foot and turn
the fabric to line the edge with
the 5/8" seam guide.
3. Lower the presser foot and begin
stitching in the new direction.
Page is loading ...
Page is loading ...
Page is loading ...
Page is loading ...
Page is loading ...
Page is loading ...
Page is loading ...
Page is loading ...
Page is loading ...
Page is loading ...
Page is loading ...
Page is loading ...
Page is loading ...
Page is loading ...
Page is loading ...
Page is loading ...
Page is loading ...
Page is loading ...
Page is loading ...
Page is loading ...
Page is loading ...
Page is loading ...
Page is loading ...
Page is loading ...
Page is loading ...
Page is loading ...
-
 1
1
-
 2
2
-
 3
3
-
 4
4
-
 5
5
-
 6
6
-
 7
7
-
 8
8
-
 9
9
-
 10
10
-
 11
11
-
 12
12
-
 13
13
-
 14
14
-
 15
15
-
 16
16
-
 17
17
-
 18
18
-
 19
19
-
 20
20
-
 21
21
-
 22
22
-
 23
23
-
 24
24
-
 25
25
-
 26
26
-
 27
27
-
 28
28
-
 29
29
-
 30
30
-
 31
31
-
 32
32
-
 33
33
-
 34
34
-
 35
35
-
 36
36
-
 37
37
-
 38
38
-
 39
39
-
 40
40
-
 41
41
-
 42
42
-
 43
43
-
 44
44
-
 45
45
-
 46
46


Kenmore 385. 11607 User manual
- Category
- Sewing machines
- Type
- User manual
Ask a question and I''ll find the answer in the document
Finding information in a document is now easier with AI
Related papers
-
Kenmore 19502 Owner's manual
-
Sears 385. 11607 User manual
-
-
-
-
-
-
-
-