Sears 385.128418 User manual
- Category
- Sewing machines
- Type
- User manual
This manual is also suitable for

OWNER'S MANUAL
SEA/RS
SEWING MACHINE
MODI

SEARS, ROEBUCK AND CO,
Dear Customer:
You have just invested in a very fine zigzag sewing machine. Before using your new Kenmore machine,
please pause for a moment and carefully read th_s booklet which contains instructions on how to operate
and care for your machine.
Specific mstructions are given on threading, tension adiustments, cleaning, oiling, etc. This wiff hetp you
obtain the best sewing results and avoid unnecessary servtce expense for conditions beyond our control.
AdvEce on the operation and care of your machine _salways available at your nearest Sears Retail Store.
Please remember, if you have questions about your machine or need parts and service, always mention
the model number and serial number when you inquire.
Kenmore Sewing Machine
Record in space provided below the model number and serial
number of this appliance. The model number and seria! number
are located on the nomenclature plate, as identified on Page 3 of
this booklet.
Model No. 385. Serial No.
Retain these numbers for future reference.
THIS MODEL IS A CENTER NEEDLE, LOW BAR SEWING MACHINE.

TABLE OF CONTENTS
SECTION 1.
SECTION 2.
SECTION 3.
KNOW YOUR MACHINE
A Portable Caseor Cabinet is Available .............. 2
Locate and Identify the Parts .................. 2_3
Identify the Accessories ........................ 3
PREPARE YOUR MACHINE FOR SEWING
Set Up the Machine ...................... 4_6
• Plug in the Machme and Switch on the Power ....... 4
• Foot Control Use ........................ 4
Setting Spool Pins ......................... 5
• Adjust the Presser Foot Lever .................. 5
o Free Arm Sewing: the Removable
Extension Table ........................ 5_6
Know What the Presser Feet Will Do ............ 7"--8
Choose Your Needle and Thread .............. 9_10
• Check Your Needle ...................... 9
Fabric, Needle, Thread and Stitch Length Chart ..... 10
• To Change Your Needle ..................... 10
Prepare the Bobbin ....................... 11_13
, To Remove the Bobbin Case from the Machine ..... 11
• Wind the Bobbin ..................... 11_12
• Insert the Bobbin into the Bobbin Case .......... 13
Prepare Your Top Thread ................... 14_15
, Thread Your Needle ................... 14_15
Pick Up Your Bobbin Thread ................. 15
Adjust the Top Thread Tension ........... 16_17
Stitch Selector ............................. 1B
Stitch Length Control ..................... 18
Adjusting Stretch Stitch Balance .............. 18
Reverse Stitch Control ...................... 18
Starting To Sew ....................... t9
LEARN THE STITCHES
Practical Stitch Chart ................... 20_22
Straight Stitches ................... 23_24
• Straight Stitch .......................... 23
• Use the Seam Guides ....................... 23
• Turn a Square Corner ..................... 23
• Use the Darning Plate ...................... 24
• Topstitching .......................... 24
, Left Needle Position ....................... 24
Darning ............................ 25
Straight Stretch .......................... 25
Zigzag Stitches .......................... 26_30
• Basic Zigzag ............................ 26
, Satin Stitch ......................... 27
a Applique .............................. 28
• Bar Tacking ............................. 28
° Sew a Button ........................... 29
o Overcasting Stitch ....................... 30
• Rick-R ack Stretch ........................ 30
• Three-Step Zigzag ........................ 31
• Overcasting Stretch Stitching ................. 32
• Serging or Pine Leaf Stretch Stitching ............ 32
Blind Hemming ............................ 33
Lace Work ............................ 34
Buttonholes ......................... 35_36
Sew in a Zipper ......................... 37_38
Shell Stitching ........................... 39
Smocking ............................ 39
Elastic Stretch Stitch ...................... 40
Box Stitching .......................... 40
SECTION 4. PERFORMANCE PROBLEMS CHART
What to Do When ....................... 41_42
SECTION 5. CARE FOR YOUR MACHINE
Replacing the Light Bulb ................. 43
Cleaning the Machine ............... 43_46
• Clean the Feed Dogs ...................... 43
a Clean the Shuttle Race ..................... 44
• Oil behind the Face Cover Plate ............... 45
• Oil under the Top Cover ................... 45
Oil the Underside ......................... 46
PARTS LIST ................................... 47
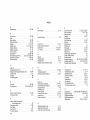
INDEX ....................................... 48

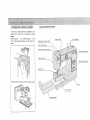
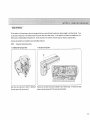
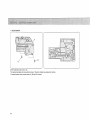
: Locate and identify theParts
A full line of sewing cabinets is available at your
nearest Sears retail store or through our general
•catalog,
Another option , , , buy a Carrying Case , , , then
your Kenmore goes anywhere, can be stored any-
where.
_obbin Winder Tension Disc
Upper Thread Gu_de
Top Thread Tension Control
Face Cover Plate
Needle Ple te
Take-up Lever
Stitch Selector
Stitch Length Control
Reverse Stitch Control
\
Extension Table
X,, Shuttle Cover

ThreadSpoolPins
ClutchKnob
Hand W heel
L_ght end
Power Switch
Plug Connector
FOOt Control
Top Cover
Thread Guide
Presser Foot Lever
Free Arm
Nomenclature Plate
Thread Gupde
Thread Guide
Needle Clamp
Accessory box
" _'_.,,,,,Lint brush
Bobbin
Buttonhole opener
(_Large screw driver
Af# 9
Straight
stitch foot
footSatmstitch /_

• Plug in the Machine and Switch on the Power
Power
switch
\
Power supply Plug
supply
NOTE:
1.
2.
3.
Machine
socket
Machine
plug
Before inserting the plug into your
machine, be sure the power switch is
OFF,
Check your outlet to be sure )t isa 110to 120
Volt AC outlet.
Insert the machine plug into the three-prong
machine socket, as shown, It will only fit one
way,
Insert the power supply plug into the outlet.
4_
Sewing {igh _/_p{ !__
Push the light and power switch to turn
on the power and sewing light.
SAFETY FEATURE:
Your machine will not operate unless the
light/power switch is turned on. If you are
interrupted or stop sewing, turn off the
light/power switch to prevent injury to
children,
Foot Control Use
/
Foot control
, J
The foot control regulates the speed at
which you sew,
To increase speed, gently press down with
the ball of your foot,
To decrease speed, release your foot pres-
sure slightly.
NOTE: The foot control is sensitwe and
wilt increase or decrease your
sewing speed immediately.
Practice on a scrap of fabric to
regulate your sewing speed to
your taste and needs.

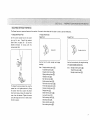
Setting Spool Pins
Spool pin tell
Spool Pins are packed in accessory box.
Screw thread spool pins in pface securely
with a screw driver,
Position spool pin felts as shown in iflustra-
tion.
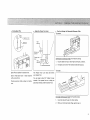
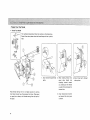
Adjust the Presser Foot Lever
High
posHion
\
..~
pOSitiOn
,/
Presser toot _--_'_;
lever Normal up
High posilion
The Presser Foot Lever raises and lowers
your presser foot.
You can raise it about 1/4" higher for easy
remova_ of the presser foot or to help you
ptace heavy fabrics under the presser foot.
= Free*Arm Sewing: the Removable Extension Table
To remove:
To Remove the Extension Table (for free-arm sewing)
1. Grip the table with your index finger and thumb, as shown.
2, Pull gently to the left. The extension table will snap out,
To Attach:
To Attach the Extension Table (for flat-bed sewing)
1. Insert the tab and the pin into their catches.
2. With your thumb and index finger, gently snap m.

¸,
_, i_Z_':i_!i_i_!_:: _i_y'_'_,i'_}_i_:_;!,:_!_.:_i_::j_:_ _<_?_'_:AI_'!_;_I!I_!_?_:;',!<_:_,_L _
* Free-Arm Sewing (Continued)
Your sewing machine can do free arm sewing.
This feature makes sewing easy for:
$
* bar tacking to reinforce pockets,
belt foops and waistline on ready-
made or homemade garments to
avoid fabric bunching around the
needle,
* stitching sleeves, waistbands, pant
legs, or any circular garment area.
* darning socks or mending knees,
elbows, or areas of wear in child*
ren's clothes,
* sewing buttons on sleeves, waista-
bands, etc,

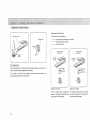
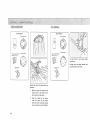
ThePresserfeetareanimportantfeatureofthismachine.Youneedtoknowwhateach foot does in order to use them effectively.
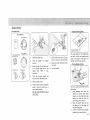
= Change the Presser Foot
Use the correct presser foot for the stitch
you wish to sew. Consult the practical
Stitch Chart on pages 20 _ 22 and the
detailed directions for sewing with the
various presser feet.
0
J
To change the various presser feet, raise the
presser bar to its highest position by lifting
the presser foot lever. Loosen the presser
foot thumb screw, choose the proper foot,
insert from the bottom, Tighten the screw
using the large screw driver to make certain
the foot is secure.
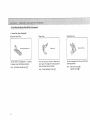
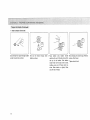
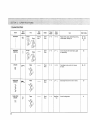
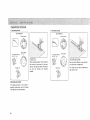
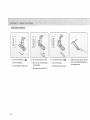
• Presser Foot Types
Zigzag Foot Straight Foot
Zigzag fooI
Use this foot for both straight and zigzag
stitching.
Uses: Straight stitching (see p.23),
Topstitching Isee p.24),
Straight stretch (see p.25),
Zigzag stitching (see p.2_66),
Appllque (see p.28),
Bar tacking (see P,2i88),
Button sewing (see p.29),
Rick-rack stretch (see p,30),
Three-step zigzag {see p.31),
Overcast stretch {see p.32),
Serging (see p.3__22),
Blind hemming (see p.3_33),
Lace work (see p.34),
Shell stitching (see p.399},
Smocking (see p.39),
Elastic stretch (see p.4__O),
Box stitching (see p.4_O).
Straight stitch loot
I
Use this foot exclusively for straight stitching
using center needle position only.
Uses: Straight stitching (see p.23),
Topstitching (see p.244),
Straight stretch (see p.255)

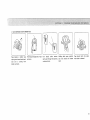
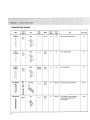
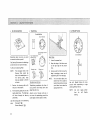
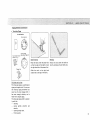
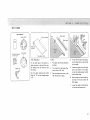
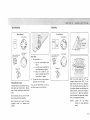
Presser Foot Types (Continued}
Buttonhole Guide Foot
r
Buttonhole guide _'oot
Use this foot for buttonholes. It is marked
to measure your buttonholes accurately,
Uses: Buttonhole making {see p.3__55)
Zipper Foot
f
Zipper foot
This foot can be set to sew on each side of
your zipper. The edges of the foot guide the
zipper and keep the seam straight.
Uses: Zipper application (see p.3Z7)
Satin Stitch Foot
Satin stitch foot
Use this transparent foot for satin stitch and
outlining appiique.
Uses: Satin stitch (see p.2Z7),
Applique (see p.2_88)

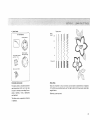
Yourchoiceofneedleandthreaddependsonthefabricyouaresewing.
tnyourneedlecase,youwillfindthefollowingcolor-codedneedles:
Blue(11)........... forstretchfabrics
Orange(11)......... forlightweightfabrics
Red(14)........... formediumormedium-heavyweightfabrics
Purple(16)....... for medium-heavyweightanddecorative
topstitchingonthesefabrics
(Thisneedlehasa largerthreadholefor
thickertopstitch_ngthread.)
Green(18) .......... forheavyweightfabricsanddecorativetop-
stitchingon these fabrics
Specialty needles are also available.
Denim Needle ....... for sewing dense fabrics such as denim or
canvas,
Topstitching Needle .... its larger eye wilt hotd heavier thread.
Leather Needle ....... punches tiny holes in leather and suede.
When buying needles other than Kenmore needles, be sure the needle fits the
length and shape of the needle shown above. A longer or shorter needle will
skip stitches or break.
= Check Your Needle
1. Look for barbed or blunt point.
2. A damaged needle can cause permanent snags or runs in knits, fine silks
and silk-like fabrics.
Always buy a good quality thread, tt should resist tangling and be strong,
smooth and consistent in thickness.

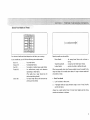
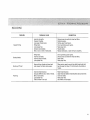
Fabric, Needle, Thread and Stitch Length Chart
NEEDLE
FABRIC SIZE AND
COLOR
Lightweight:
Batrste= Dimity, Chiffon.
Silks, Fine Lace, Organza,
Crepe, Taffeta. Voile,
Organdy
Medium Weight:
Cotton, Cotton B_ends,
Percale, Gingham,
Shantung, Pique,
Seersucker. Satm. Knits.
Vinyl Suitings. Linen,
Wool Crepe. Leather
Medium Heavy Weight:
Corduroy, Denim, Wool,
Sailcloth. Wool Flannet,
Gabardine, Velvets,
Leather
Heavy Wmght;
Coatings, Upholstery
Cotton Duck, Heavy
Twi!ls. Canvas
Oecorative top-stttchlng
On all types of fabric
Stretch Fabric:
Polyester Double Knits,
Nylon Tricot, Jersey,
Stretch Terry, Spande×,
Cite Tricot
11-ORANGE
14-RED
THREADSIZE
Polyester Core/Cotton
Wrap
Fine Mercerized Cotton
Silk A
50 Mercerized Cotton
Polyester Core/Cotton
Wrap
Silk A
R ECOi'_MENDED
STITCH LENGTH
SETTING
10
12 stitches per
_neh
10 _ 12 stitches
per inch
50 Mercerized Cotton
14-R ED Mercerized Heavy-Duty 8 _ 10 stitches
or Polyester Core/Cotton
16-PURPLE Wrap per inch
Silk A
Heavy Duty Mercerized
Cotton
8 stitches per
18-GREEN PoJyester Core/Cotton inch
Wrap
Siik A
IS*PURPLE Buttonhole Twist 6 _ 8 stitches per
18oGREEN (Use as top thread onJy} inch
11-BLUE
(STR ETCH Polyester Core/Cotton 10 _ 12 stitches
FABRIC Wrap
NEEDLE) 50 Mercerized Cotton per inch
with "Q FOOT"
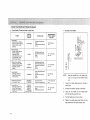
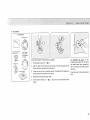
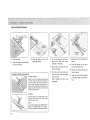
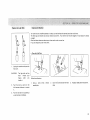
= To Change Your Needle
-'4 "g:%" ""
Fiat
s_de
away
tfore
Needle clamp screw
NOTE:
Raise the needle bar to its highest posi-
tion by turning the hand wheel toward
you.
1. Loosen the needle clamp screw by turning it
toward you.
2. Remove the needle by pulling it downward.
3. Insert the new needte into the needle clamp
with the flat side away from you.
4. Push the needle up as far as it will go.
5. Tighten the needle clamp screw firmly with the
large screwdriver from your accessory box.

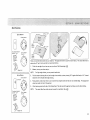
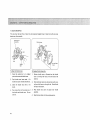
:: Prepare the Bobbin:
= To Remove the Bobbin Case from the Machine = Wind the Bobbin
Release clutch by turning clutch
knob toward you.
Remove the extension table from
the machine by pulling it to the
left, Open the shuttle cover by
pulling down the embossed part on
the left side of the cover.
Raise needle to its highest position
by rotating hand wheel toward you.
To remove bobbin case from shut-
tie, pull open latch of bobbin case.
Pull bobbin case straight out of
shuttle.
1!

,_i!P_areith_¸gob_niliCo.ti._ed_i_!
__, !_i!i;!i:_!_i:_i;i_:; _ <': _:," __i!_;i!:_i _:!i!;:_:_:i _ :_:- • i i _'!'i i_I! i: :! :: _x: ;
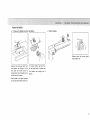
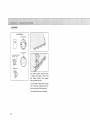
Wind the Bobbin (Continued)
7
Draw thread from spool through bobbin
winder tension disc as shown.
Pull end of thread through
bobbin asshown.
hole in Place bobbin onto bobbin winder
spindle with end of thread coming from
the top of the bobbin. Push bobbin
winder shaft to the right until it dicks.
Holding onto end of thread, start ma-
chine. When bobbin is slightly fiIled,
snip off end of thread,
Wind thread untif winder stops, Remove
bobbin. Clip thread.
Tighten clutch knob.
12

Insert the Bobbin into the Bobbin Case
Place bobbin in bobbin case
making sure thread leeds clock-
wlse and is coming from
bobbin as shown.
Pull thread through slot of case
as shown,
Pull
.......... J
thread under tension
spring and through the opening
as shown above,
" r
Holding latch open, position
case into shuttle and re|ease
latch.
Case should lock into place
when latch is released.

Thread Your Needle
@
The numbered steps below follow the numbers on the illustrations.
Dotted lines show places where the thread loops end then is pulled
tight.
J
1, Draw thread through thread
guide.
Raise thread take-up ]ever to its highest position by turning
hand wheel toward you. Raise presser foot lever, Place spool
on spool pin as shown, with thread coming from the back of
the spool
2, While holding thread near
spoo]0 draw thread into
threading channel toward
you making sure the thread
is pulled firmly between the
tenston discs,
3. Draw thread down channel
and around the spring wire
as shown,
__ J
4. Draw thread up & through
take-up lever,
14

Pick Up Your Bobbin Thread
®
5. Draw thread down and into
thread guide,
6. Pul! the thread to the left and slip
it through the thread guide,
7. Thread then is slipped into needle
bar thread guide.
8, Thread needle from front to back,
NOTE:
You may want to cut the
end of the thread with sharp
smssors for eas_er needle
threading,
Raise presser foot lever. Hold
needle thread loosely in left hand
and rotate handwheel toward you
one complete turn,
24
Bring bobbin thread up by pulling
top thread.
tf you cannot pick up bobbin thread by following steps gwen above, then check:
1, Is needle threaded from front to back?
2. Is thread tangled around needle?
3, Are 3 to 4 inches of thread coming from the shuttle?
4, Is thread from shuttle tangled?
5. Is bobbin properly installed in the bobbin case?
6. Is the machine threaded according to the Instructions?
3, Pull both threads under and to the
back of the presser foot, leaving 3
to 4 inches of thread clear,
15

Top side of fabric
thread
thread
Setting mark
koose__.%
Tighten
For Straight Stitch
The ideal straight stitch will have threads locked between the two layers of
fabric, as shown above, magnified to show detail.
If you look at the stitch, front and back, you will notice that there are no
gaps, that each stitch is smooth and even,
Choose the Correct Tension:
The best tension will depend on;
the stiffness and thickness of the fabric
the number of fabric layers
the type of stitch
The top thread
ts too loose,
The top thread
appears on the
underside of the
fabric.
®
Tension is too loose:
The top thread
_stoe t}ght
The bobbin thread
appears on the
upper surface of the
fabric,
Tension is too tight:
The top thread shows through the The bobbin thread will come through
bottom of the fabric, The bottom side the top of the fabric. The top side of
of the stitch will feel bump% the stitch will feel bumpy.
16

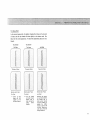
For Zigzag Stitch
In the correct zigzag stitch, the bobbin threads will not show on the top side
of fabric and the top threads will show slightly on the bottom side. See
below for the correct appearance. To match this appearance, adjust your top
tension.
Top tension Top tension
Tdo Tight Too Loose
Top sJde of Fabric Top s_de of Fabric
Just Right
Top s_de of Fabric
Bottom side of Fabric Bottom side of Fabric Bottom stde of Fabric
Too Tight: Too Loose: Just Right:
-- Corner ol each -- The top thread Minimize the amount
zigzag will pull will loop through of top thread visible on
together on the bottom s_de o_ the bottom rode of
top side of fabrics, fabric and will be labrlc without causing
pulled atmost excessive puckering or
together, causing the bobbin
thread to show on the
toP side. Resuhs vary
with _abrtc, thread and
sewing conditions.
17

Setting mark
The stitch selector control not only
determines the stitch you select, but
also regulates the stitch width for
regular zigzag and rick rack stretch
stitches.
The different types of stitches are
designated by color.
Straight, Zigzag and Utility Stitches
are orange.
Stretch Stitches are gold.
Buttonhole Settings are blue.
NOTE: To avoid needle or fabric
damage, be sure your needle
is up and out of fabric when
adjusting this control.
18
6 8 12240
I k i
I
The stitch length control regulates the
length of the stitch.
The higher the number, the shorter the
stitch.
0 means no feed.
=Adjus¼ingStretch Stitch _
in stretch stitch sewing, Stitch Length
Control should be in the detent posi-
tion between S and L ( T position) for
most materials. Depending upon the
type of fabric used, you may need to
adjust this control to match forward
stitches of stretch sewing with reverse
motion stitches. To shorten stretch
stitches, turn the control slightly to-
ward "S". To Jengthen, turn toward
,JL _, '
S. ,T.-L
Smock ing stretch
Rickrack stretch
Reverse: Stitcl_ €o'trot
f
To reverse stitch, hotd down this con-
trol during sewing,
Release to sew forward again.
Page is loading ...
Page is loading ...
Page is loading ...
Page is loading ...
Page is loading ...
Page is loading ...
Page is loading ...
Page is loading ...
Page is loading ...
Page is loading ...
Page is loading ...
Page is loading ...
Page is loading ...
Page is loading ...
Page is loading ...
Page is loading ...
Page is loading ...
Page is loading ...
Page is loading ...
Page is loading ...
Page is loading ...
Page is loading ...
Page is loading ...
Page is loading ...
Page is loading ...
Page is loading ...
Page is loading ...
Page is loading ...
Page is loading ...
Page is loading ...
Page is loading ...
Page is loading ...
-
 1
1
-
 2
2
-
 3
3
-
 4
4
-
 5
5
-
 6
6
-
 7
7
-
 8
8
-
 9
9
-
 10
10
-
 11
11
-
 12
12
-
 13
13
-
 14
14
-
 15
15
-
 16
16
-
 17
17
-
 18
18
-
 19
19
-
 20
20
-
 21
21
-
 22
22
-
 23
23
-
 24
24
-
 25
25
-
 26
26
-
 27
27
-
 28
28
-
 29
29
-
 30
30
-
 31
31
-
 32
32
-
 33
33
-
 34
34
-
 35
35
-
 36
36
-
 37
37
-
 38
38
-
 39
39
-
 40
40
-
 41
41
-
 42
42
-
 43
43
-
 44
44
-
 45
45
-
 46
46
-
 47
47
-
 48
48
-
 49
49
-
 50
50
-
 51
51
-
 52
52


Sears 385.128418 User manual
- Category
- Sewing machines
- Type
- User manual
- This manual is also suitable for
Ask a question and I''ll find the answer in the document
Finding information in a document is now easier with AI
Related papers
-
Sears SEARS 385. 17622 User manual
-
-
-
-
-
-
Sears 385.17724 User manual
-
-
-