MIMAKI UCJV300 User guide

Type
User guide

MIMAKI UCJV300: Unleash Your Creativity with Multilayer Printing and Endless Possibilities. Discover the art of printing multiple layers with UV ink, opening up a world of unique and captivating designs. Create stunning graphics that transform with the play of light, showcasing different visuals when illuminated or not. Imagine captivating storefront signs that change their appearance as the day transitions into night, adding an extra layer of intrigue and customer engagement.

MIMAKI UCJV300: Unleash Your Creativity with Multilayer Printing and Endless Possibilities. Discover the art of printing multiple layers with UV ink, opening up a world of unique and captivating designs. Create stunning graphics that transform with the play of light, showcasing different visuals when illuminated or not. Imagine captivating storefront signs that change their appearance as the day transitions into night, adding an extra layer of intrigue and customer engagement.

UCJV300
Multilayer Printing Guide
This document describes Multilayer Printing, a function to print by overlaying multiple print layers, making use
of the UV ink characteristics.
Read this document carefully before using your printer.
Note
It is strictly prohibited to write or copy a part or whole of this document without our approval.
The contents of this document may be subject to change without notice.
Due to improvement or change of this software, the description of this document could be partially different in
specification, for which your understanding is requested.
It is strictly prohibited to copy this software to other disk (excluding the case for making backup) or to load on the
memory for the purpose other than executing it.
With the exception of what is provided for in the warranty provisions of MIMAKI ENGINEERING CO., LTD., we
do not assume any liability against the damages (including but not limited to the loss of profit, indirect damage,
special damage or other monetary damages) arisen out of the use or failure to use of this product. The same
shall also apply to the case even if MIMAKI ENGINEERING CO., LTD. had been notified of the possibility of aris-
ing damages in advance. As an example, we shall not be liable for any loss of the media (works) made using this
product or indirect damages caused by the product made using this media.
Adobe, Photoshop, Illustrator and PostScript are trademarks of Adobe Systems Incorporated.
Apple, Macintosh, Mac OSX and macOS are registered trademarks of Apple Inc.
Microsoft, Windows, Windows 7, Windows 8.1 or Windows 10 All trademarks of Microsoft used in this document
are trademarks or registered trademarks of the Microsoft Corporation and its related companies in Canada, the
United States and/or other countries.
All brand names and product names are trademarks or registered trademarks of their respective companies.
- 2 -
TABLE OF CONTENTS
Note ............................................................................................................................ 1
What is Multilayer Printing? ..................................................................................... 2
4 Layers Printing ....................................................................................................... 3
4 layers printing - about Day & Night ................................................................................... 4
Functions of software (4 layers) ............................................................................................ 5
Creating and printing procedures of 4 layers data .............................................................. 6
With RasterLinkTools ............................................................................................................ 6
Without RasterLinkTools ..................................................................................................... 10
Troubleshooting (4 layers) ................................................................................................... 14
5 Layers Printing ..................................................................................................... 18
About 5 layers printing ........................................................................................................ 19
Functions of software (5 layers) .......................................................................................... 20
Creating and printing procedures of 5 layers data ............................................................ 21
With RasterLinkTools .......................................................................................................... 21
Without RasterLinkTools ..................................................................................................... 24
Troubleshooting (5 layers) ................................................................................................... 28
What is Multilayer Printing?
Utilizing the features of UV ink, it is a function to print multiple printed layers.
New printing that cannot be expressed with only one layer becomes possible.
The target is the printers including a special color machine.
- 3 -
4 Layers Printing
- 4 -
4 layers printing - about Day & Night
By overprinting a total of 4 layers of front color + white + black (light shielding) + background color, the back-
ground picture will appear on the front through when light is applied from the back.
Making use of this effect can change the impression of the picture between when the light is on and off.
4 layers printing (Day & Night) – structural description
The following describes the structure of the 4 layers printing (Day & Night).
Back (1st layer): a picture to show on the front when light is applied
Black (2nd layer): does not display the back picture when light is not applied
White (3rd layer): makes the front color shine, and hides the black layer
Front (4th layer): a picture usually shown
Front
White
Black
Back
Media
1
2
3
4
Light is off
Light is on
By lighting from the back side, the
background picture will appear on the
front through.
Side view
Media
Light is off
Light is on
12 3 4
The layer for printing a
picture shown when
light is applied from
the back.
1st layer print
Black-filled layer.
The layer to hide the
1st layer picture when
light is not applied.
Also called a
light-shielding layer.
2nd layer print
3rd layer print
White-filled layer.
The layer to hide the
2nd black layer to
make the color of the
4th layer shine.
4th layer print
The layer for printing a
picture shown when
light is not applied.
- 5 -
Functions of software (4 layers)
The following software products are used for 4 layers printing:
Illustrator
Creation of front and back layers
Use to create a front layer (a picture usually shown) and a back layer (a picture to show when light is
applied).
RasterLinkTools
Automatic creation of white and black layers
Automatically create white and black layers required for 4 layers printing.
•Preview
Display the finished image of 4 layers printing data.
(Preview function is supported for only 4 layers printing.)
RasterLink6Plus
Create a composition job of multi-layer and print it.
Print 4 layers at the same time.
- 6 -
Creating and printing procedures of 4 layers data
With RasterLinkTools
The following describes the procedure to configure settings required for 4 layers printing with RasterLinkTools.
Use the simplest procedure of "solid white and black layers" for the steps from "data creation" to "print of cre-
ated data".
Solid white and black layers
Light is off Light is on
1. [Illustrator] Creating front and back layers ( P.7)
2. [RasterLinkTools] Creating white and black layers ( P.7)
3. [RasterLinkTools] Displaying preview for confirmation ( P.8)
4. [RasterLinkTools] Saving created data ( P.8)
5. [RasterLink6Plus] Printing created data ( P.9)
- 7 -
1.
Create front and back layers. (Illustrator)
Create single layer data for each of the
front and back layers.
Merge any multiple layers for each layer.
2.
Create white and black layers automatically. (RasterLinkTools)
(1) Start RasterLinkTools.
(2) Select the [white & black layers auto-creation] icon .
You are prompted to check the number of layers of data to create.
(3) Select 4 layers and press the [OK] button.
(4) The white and black layers required for 4
layers printing are created between the front and back layers created at step (1).
4th layer (front) 1st layer (back)
Make sure to arrange the pictures in the order shown in the figure above. (Otherwise, 4 layers
printing does not function properly.)
There is no restriction on layer names.
The white layer is created with a solid fill of Yellow 100%.
However, it is recognized as white during preview or when data is saved in a hot folder of
RasterLink6Plus.
The black layer is created with a solid fill of Black 30%. Change the density of Black as necessary.
The white and black layers each have the same size as the picture on the 4th layer.
4
- 8 -
3.
The preview is displayed. (RasterLinkTools)
Select the [Multilayer Printing
function] icon .
Select and deselect the check
box of [Light is on ] in the preview
window to confirm the resultant
image when the light is applied
and not applied.
4.
Save the created data. (RasterLinkTools)
Press the [Output] button.
A file saving screen will be
displayed.
Select a hot folder of
RasterLink6Plus and save the file.
A single file for a single layer, four
files in total are saved in the hot
folder.
Note that the preview function cannot perfectly represent the actual print data.
The preview function is supported for only 4 layers printing.
File names for saving
The files are saved with the following file names.
xxxxx_YYYYY.extension
...
...
xxxxx: any file name specified by a user
YYYYY: an identifier added by RasterLinkTools automatically
*
*.Do not change the identifier.
- 9 -
5.
Print the created data. (RasterLink6Plus)
(1) After saving the created 4 layers
data files in the hot folder, a job is
composed.
(2) Select the [Execute] icon .
(3) Press the [Start] button to start print-
ing.
You can change the print setting of a composition job in 4 layers printing. However, you cannot
specify individual print setting for each layer.
1
2
3
- 10 -
Without RasterLinkTools
The following describes the procedure to configure settings required for 4 layers printing with only
RasterLink6Plus and without RasterLinkTools.
If you created data with any method other than P.6 "With RasterLinkTools", you have to configure the
settings manually because the settings required for 4 layers printing are not made automatically.
1. Loading data for 4 layers printing ( P.11)
2. Configuring print setting for the white layer( P.11)
3. Configuring print setting for the black layer( P.12)
4. Composing the created job ( P.12)
5. Setting positional correction for each layer (optional)( P.13)
6. Printing the created data ( P.13)
- 11 -
1.
Load the 4 layers printing data into RasterLink6Plus.
You can use one of the following two procedures for loading data:
(1) Loading from the hot folder
Save the created 4 layers data files
together in the hot folder.
(2) Loading from the [File] menu
From the top left menu in
RasterLink6Plus, select [File] - [Open] to load
the created 4 layers data file one by one, four
times in total.
2.
Configure the print setting for the white layer.
On RasterLink6Plus, select "Mono color replacement" or "White layer creation".
In RasterLinkTools, if you created the white layer by using the automatic creation function of
white and black layers, the white layer is created in yellow. Select Yellow into White in "Mono
color replacement " as shown in the image above to print the white layer.
If you create the white layer by using "Color replacement ", only "Mono color -> White" is
possible.
Note that "Multiple colors -> White" in "Color replacement " is impossible only for Multilayer
Printing.
Hot folder
Mono color replacement
White layer creation
- 12 -
3.
Configure the print setting for the black layer.
(1) Select the [Properties] icon .
(2) Set the job attribute to
[Light-shielding layer].
(This option is available for only jobs
with color attribute.)
4.
Compose the jobs in the created layers.
(1) Select the [composition] icon .
(2) Set the composition (print) order of the 4 layers data.
(3) Click the [Composite] button.
This procedure sets the [Color Matching] setting to
[ColorMatching OFF], located in [Print Conditions
] - [Print Quality] tab.
You cannot specify individual print setting for each layer. (ex. changing the resolution on the
white layer only is impossible)
The print settings (profile, resolution, etc.) on the top job are also used on other jobs being
composited.
1
2
4th layer
Farthest layer
from the media
1st layer
Nearest layer
from the media
1
2
3
1st
2nd
3rd
4th
- 13 -
5.
Set the positional correction of data after composition. (optional)
If any positional correction is required, select the [layer setting] icon .
The positional correction for each layer is now configurable. Make settings as necessary.
6.
Print the created data.
(1) Select the [Execute] icon .
(2) Press the [Start] button to start printing.
You can change the print setting of a composition job in 4 layers printing. However, you cannot
specify individual print setting for each layer.
1
2
- 14 -
Troubleshooting (4 layers)
The following describes additional information for creating 4 layers data.
RasterLinkTools
Preview does not appear, or the preview display is wrong.
Check the order and numbers of layers.
The order and numbers of layers are correct, but the preview display is
wrong.
For complicated pictures, the preview may not function correctly. However, a print can succeed. Try a test
print.
You want to create white and black layers without a solid fill.
The automatic creation function of white and black layers in RasterLinkTools is used to automatically create
white and black layers with a solid fill.
Create white and black layers without a solid fill manually if you need them.
Why is the density for the automatically created black layer set to Black 30%?
According to our test results, the optimal density of Black was 30%, so it is set for the automatically created black layer.
However, the optimal density may change depending on the environment. Try to change the density as necessary.
RasterLink6Plus
The 1st layer picture appears on the 4th layer through.
First, increase the density of white to the limit.* 1
Increasing the density of black prevents the picture from appearing on the front through. However, this may
give the overall picture a dark atmosphere when light is applied.
*1. The special color machine is designed to use two units of white as standard. So when you print, use the
two units of white if possible. The auto setting is configured to use the two units of white.
Is the profile exclusive for 4 layers printing necessary?
You do not have to prepare the profile exclusive for 4 layers printing.
Use the profile of WhiteOnColor or ColorOnWhite for the media to be printed.
What is the layer combination supported for 4 layers printing?
The following combination is supported for 4 layers printing.
color + light-shielding (color) + special color (white) + color
color + special color (white) + light-shielding (color) + color
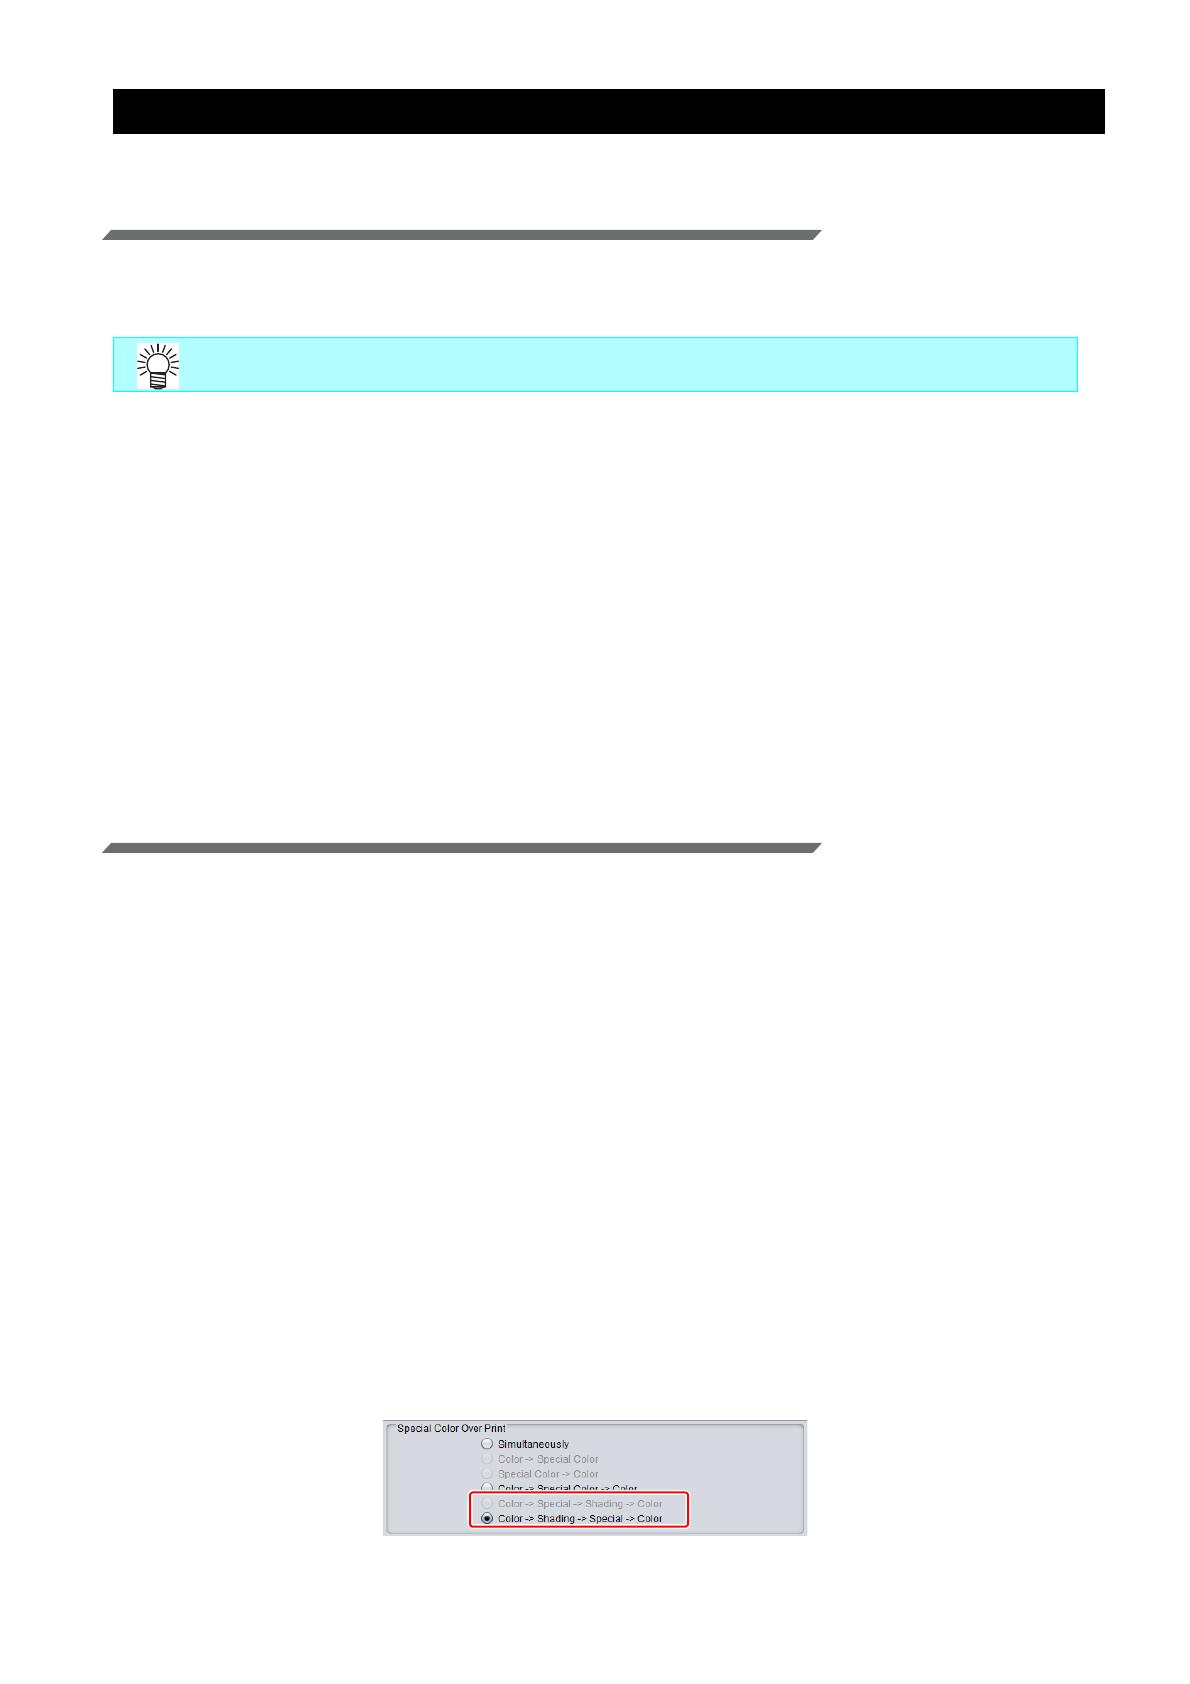
4 layers are composed, but they cannot be printed correctly.
In the layer setting window, check if either one of the last two options is selected in [Special Color Over
Print] as shown below.
Preview display is supported for only 4 layers.
- 15 -
The part of the picture you want to enhance is not highlighted when light is
applied from back.
The simplest structure is the solid black layer for 4 layers printing(Day & Night). However, different
expression is achieved than a solid fill by adding more steps on the black layer data.
The following describes an example in which a part of the black layer is cut out to show the target part vivid
and highlighted.
Example to highlight the part of the picture you want to enhance
You want to print on transparent media (mirror output).
When printing on transparent media, set the media on the position nearest to the point of view, and print on
the back side of the media. This makes the order of layers inverted from the usual one.
Printing procedure is the same as the usual one.
Light is off Light is on
The daylight landscape printed on the top layer is
shown when light is not applied.
By lighting from the back side, the different
dress color and background printed on the bot-
tom layer will appear.
In this sample, the part of
the woman and dress is cut
out on the black layer.
The light passes through
the cut out part well, so the
cut out part is shown high-
lighted compared to other
parts.
Comparison image
"With" cutout "Without" cutout
Printing on standard media Printing on transparent media (mirror output)
Side view
Side view
See the picture through the media
Media
1st layer
(back)
4th layer
(front)
Transparent media
1st layer
(front)
4th layer
(back)
- 16 -
About mirror output procedure
You can use one of the following two procedures to make the picture inverted for mirror output.
1. Inverting with RasterLinkTools
2. Inverting with RasterLink6Plus
1.
Inverting with RasterLinkTools
In the Multilayer Printing preview window, select the [Mirror] check box.
After selecting this option and saving the data, save the data to the hot folder in Raster-
Link6Plus. The picture is composed with the settings to be printed in Mirror (invert).
2.
Inverting with RasterLink6Plus
(1) Select the [composition] icon .
(2) Change the order of layers in the 4 layers data to the mirror output order (in inverse order of
usual one) manually.
(3) Select entire 4 layers data.
(4) Select the [Mirror] check box in the Composite option. The picture is inverted.
(5) Click the [Composite] button.
You do not have to change the order of the layers manually.
This function is valid only when the file is saved in RasterLinkTools and saved to the hot folder
in RasterLink6Plus.
Follow this procedure before composing jobs.
4th layer
Farthest layer
from the media
1st layer
Nearest layer
from the media
1
2, 3
5
1st
2nd
3rd
4th
4
- 17 -
What is the condition for automatically making settings required for 4 layers
printing?
Start operation
<< 4 layers data creation >>
You have used RasterLink-
Tools
<< Saving method >>
You have used the saving
function for Multilayer Printing
in RasterLinkTools
<< Loading file >>
You have saved the data you
had saved above to the hot
folder of RasterLink6Plus.
Automatically set
You have to set manually
Refer to P.10 "Without Ras-
terLinkTools".
- 18 -
5 Layers Printing
- 19 -
About 5 layers printing
By overprinting a total of 5 layers of "color (front) + white + color (light-shielding) + white + color (back)", different
pictures can be shown on the front and back on a sheet of media.
5 layers printing – structural description
The following describes the structure of the 5 layers printing.
Back (1st layer): a picture seen through the media
White 1 (2nd layer): hides the black layer and makes the back color shine
Black (3rd layer): the layer for light-shielding the front and back pictures
White 2 (4th layer): the layer to hide the black layer and make the front color shine
Front (5th layer): a picture seen from the media
Front
White 2
White 1
Black
Back
Media
1
2
3
4
5
Different pictures shown on
the front and back
Back Front
The layer for printing
a picture on the
back side.
1st layer print
White-filled layer.
The layer to hide
the 3rd black layer
to make the color
of the 1st layer
shine.
2nd layer print
Black-filled layer.
The layer to prevent
the pictures on the
1st and 5th layers
from being seen
through. Also called
a light-shielding
layer.
3rd layer print
White-filled layer.
The layer to hide
the 3rd black layer
to make the color
of the 5th layer
shine.
4th layer print
The layer for
printing a picture
on the front side.
5th layer print
- 20 -
Functions of software (5 layers)
The following software products are used for 5 layers printing for the steps from "data creation" to "print of cre-
ated data".
Illustrator
Creation of front and back layers
Use to create a front layer (a picture seen from the media) and a back layer (a picture seen through the
media).
RasterLinkTools
Automatic creation of white and black layers
Automatically create white and black layers required for 5 layers.
RasterLink6Plus
Create a composition job of Multi-layer and print it.
The target is the printers with a white color feature.
Print 5 layers at the same time.
  • Page 1 1
  • Page 2 2
  • Page 3 3
  • Page 4 4
  • Page 5 5
  • Page 6 6
  • Page 7 7
  • Page 8 8
  • Page 9 9
  • Page 10 10
  • Page 11 11
  • Page 12 12
  • Page 13 13
  • Page 14 14
  • Page 15 15
  • Page 16 16
  • Page 17 17
  • Page 18 18
  • Page 19 19
  • Page 20 20
  • Page 21 21
  • Page 22 22
  • Page 23 23
  • Page 24 24
  • Page 25 25
  • Page 26 26
  • Page 27 27
  • Page 28 28
  • Page 29 29
  • Page 30 30

MIMAKI UCJV300 User guide

Type
User guide

MIMAKI UCJV300: Unleash Your Creativity with Multilayer Printing and Endless Possibilities. Discover the art of printing multiple layers with UV ink, opening up a world of unique and captivating designs. Create stunning graphics that transform with the play of light, showcasing different visuals when illuminated or not. Imagine captivating storefront signs that change their appearance as the day transitions into night, adding an extra layer of intrigue and customer engagement.

Ask a question and I''ll find the answer in the document

Finding information in a document is now easier with AI