
HOSE HOLDER ASSEMBLY INSTRUCTIONS
© 2007 WHITEHALL PRODUCTS Visit our Web Site at: www.whitehallproducts.com Rev. 4/07 AW-397
ASSEMBLY OF HOSE HOLDER:
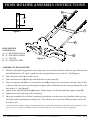
1. Hold the t-plate (C) flat against the mounting surface in the desired location. Mark the top of the keyholes
and drill pilot holes 4.5” apart. Install your mounting hardware (not provided).** (See Figure 1)
2. Place decorative face (A) front side down.
3. Place machine screws (B) through indicated holes on the t-plate (C).
4. Place one support tube (D) over one machine screw (B) and place over decorative face (A). Align A & B
so that the machine screw goes through the support tube and threads into the corresponding hole on the
back side of A. (See Figure 2)
5. Lightly screw together (do not tighten yet). Repeat steps 4-5 with the remaining support tubes (D).
6. Tighten all screws until snug with screwdriver.
7. Hang the assembled Hose Holder by placing the keyholes over the screws you installed earlier on your
mounting surface and firmly pressing down. This will lock your new Hose Holder in place and it will
be ready to use.
** For best results on exterior siding, we recommend that you locate a stud, behind the wall surface and use a #14 x 3” wood
screw or 1/4” x 3” lag bolt. For brick, masonry, or concrete walls, use a 1/4” masonry anchor or toggle bolt.
HOSE HOLDER
CONSISTS OF:
A. (1) DECORATIVE FACE
B. (3) MACHINE SCREWS
C. (1) T-PLATE
D. (3) SUPPORT TUBES
B
C
D
A
4.5”
Figure 1
Figure 2
-
 1
1

Whitehall Products 00920 Installation guide
- Category
- Mounting kits
- Type
- Installation guide
Ask a question and I''ll find the answer in the document
Finding information in a document is now easier with AI
Related papers


Other documents
-
Speakman SM-5490-ADA Installation guide
-
-
Enviro FPI User manual
-
Friedrich WallMaster PTAC User manual
-
MQ Multiquip FCG1-6HA User manual
-
Friedrich PE07R3SA Owner's manual
-
 Whitfield Advantage Optima 3 FS User manual
-
 MQ Multiquip FCG1-SERIES Operating instructions
-
Enviro EF-ΙΙ i User manual
-
 Mendota FV44i Installation & Operating Manual


