Page is loading ...

Decal Instructions
Thank you for your purchase of a Granite City Graphics LLC.
product! With proper application and care your product will
provide the lasting impression you hoped it would. Please do
not hesitate to contact us with questions or for your next
graphic or custom design needs!
How to Apply Vinyl Decals
Each decal will arrive as three layers of material. The top layer is clear transfer tape, which is used to apply the
decal. The second layer is the vinyl film, which is the actual decal itself. The bottom layer is the backing paper.
When you receive your decal, lay it flat and firmly wipe a credit card or application squeegee across the top of
the transfer tape. This helps make sure the transfer tape properly adheres to the decal. This is especially
important if the decal was shipped in a mailing tube.
Below are three sets of application instructions. The instructions for small decals are for applying small decals
for cell phones, laptops, car windows or other similar surfaces. The instructions for large decals are for larger
car window decals, storefront windows, or wall decals. The top hinge method is suitable for most applications,
and the center hinge method works better for wider decals. As always, please contact us with questions!
Small Decals:
1. Completely clean and dry the desired application surface.
2. Carefully peel the backing paper from the decal at a sharp angle.
3. Align the decal and press it onto the desired surface. Firmly run a credit card across the transfer tape to
make sure the decal adheres to the surface.
4. Slowly peel the transfer tape from the top of the decal. If any part of the decal starts to come up with the
tape, stop peeling and run over that part of the decal with a credit card and try to peel the tape again.
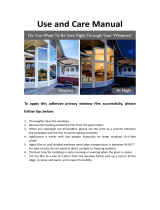
Large Decals - Top Hinge Method:
1. Completely clean and dry the desired application surface.
2. Align the decal where you would like it to be. Tape in place using masking tape along the top edge of
the transfer tape.
3. Lift the free end of the decal up and peel the backing paper away from the decal at a sharp angle.
4. Starting from the top edge of the decal near the masking tape, wipe down over the transfer tape with a
credit card or application squeegee. Firmly go over the entire decal until it is completely adhered to the
surface.
5. Slowly and carefully peel the transfer tape from the top of the decal. Don’t pull the tape away from the
surface. Peel the tape at a sharp angle so you may press on top of the decal as you peel. If any part of
the decal starts to come up with the tape, stop peeling and run over that part of the decal with a credit
card and try to peel the tape again.
Large Decals - Center Hinge Method
1. Completely clean and dry the desired application surface.
2. Align the decal where you would like it to be. Tape in place using masking tape along the top edge of
the transfer tape.
3. Place a piece of masking tape vertically down the center of the decal, from top to bottom. This will act
as a hinge so both the left and right side of the decal can swing away from the surface.
https://www.facebook.com/granitecitygraphics/

4. Remove masking tape from one side of the decal and pull the decal away from the surface. Peel the
backing off the half of the decal you are working with and cut the paper off near the center hinge.
5. Starting from the center edge of the decal near the masking tape, wipe over the transfer tape with a
credit card outward from the center. Firmly go over the entire decal surface until it is completely
adhered to the surface.
6. Once the first half of the decal has been applied, remove the masking tape and center hinge tape from
the decal. Pull this half of the decal back from the surface and peel the backing paper from the decal.
7. Starting from where the first half of the decal has already been applied, wipe over the transfer tape with
a credit card outward toward the edge. Firmly go over the entire decal until it is completely adhered to
the surface.
8. Slowly and carefully peel the transfer tape from one end of the decal. Peel the tape at a sharp angle so
you can press the decal as you peel the tape. If any part of the decal starts to come up with the tape,
stop peeling and run over that part of the decal with a credit card and try to peel the tape again.
Removing Vinyl Decals
A razor blade or scraper may be used to remove decals from glass, such as mirrors, car windows, and
storefront windows. Do not use a blade or scraping tool on any surface that could be scratched or damaged.
For removing decals from the surface of electronic devices, use your fingernail to peel up the edges of the
decal, being careful not to scratch the surface. For matte wall decals, peel the decal as you would from an
electronic device. For glossy wall decals or stubborn matte wall decals, a blow dryer may be used to heat the
decal and aid in removing it.
https://www.facebook.com/granitecitygraphics/
/