ASSEMBLY INSTRUCTIONS
E011CE(3A) WOODEN EXTENSION CHAIR
A
Right side frame Left side frame
C
Back Rest
D
Seat
B
E
Front apron
F
Back apron
G
1 3/4" Bolt
H
2 1/4" Bolt
I
1" Screw
J
Wooden cap
1pc 1pc 1pc 1pc
1pc 1pc
2pcs + 1pc reserve 6pcs + 1pc reserve
4pcs + 1pc reserve 6pcs + 1pc reserve
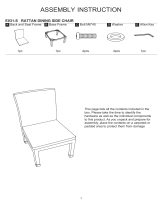
This page lists all the contents included in the
box. Please take time to indentify the hardware
as well as the individual components to this
product. As you unpack and prepare for
assembly, place the contents on a carpeted or
padded area to protect them from damage.
1

A
C
G
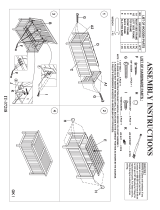
Attach the back rest(C) and aprons(E & F) into right and left side frame(A&B) to the matching holes. Secure using 1 3/4"
bolt(G) and 2 1/4" bolts(H) to left side frame(B), with screwdriver (not provided), position as shown. Don't fully tighten at
this step.
B
F
E
Washer
1
2
Upright the pre assembled, attach seat(D) and secure right frame(A), using bolt(G) and bolt(H) with screwdriver (not
provide). Note : To assembled the left side frame(B) was already shown in step 1. Don't fully tighten at this step.
D
Washer
Washer, from the furniture factory
already fitted to the frame.
Pointless is existing seats can to
join for the other seat.
H
Secure bolt with
screwdriver
(not provided).
G
H
B
E
H
B
B
F
2
A
UP
H
G
B
A
D
B

J
Secure the seat(D) and frame(A&B), using 1" screws(I), position as shown. Tighten all bolts and screws using
screwdriver (not provided).
3
Tapping the wooden caps(J) to cover bolts using rubber mallet (not provided).The chair is now ready to use.
4
J
To joining the other chair, secure using 2 1/4" bolts(H) with screwdriver (not provided) from underneath of seat.
5
Cleaning & Care
Treat surface with care. Surface is resistant to scratches but is not scratch resistant. Clean surfaces with a dry or damp soft cloth.
Do not use abrasive cleaners. Hardware may loosen over time. Periodically check that all connections are tight.
3
I
Secure screw with
screwdriver (not provided).
Secure bolt with
screwdriver
(not provided).
A
D
B
I
D
B
H
H


/