Garmin 190-00557-00 User manual

Category
Navigators
Type
User manual
GPSMAP
®
76Cx
mapping gps
owner’s manual
GPSMAP 76Cx shown with optional MapSource
®
data.
© 2007–2009 Garmin Ltd. or its subsidiaries
Garmin International, Inc.
1200 East 151
st
Street,
Olathe, Kansas 66062, USA
Tel. (913) 397.8200 or (800) 800.1020
Fax (913) 397.8282
Garmin (Europe) Ltd.
Liberty House
Hounsdown Business Park,
Southampton, Hampshire, SO40 9LR UK
Tel. +44 (0) 870.8501241 (outside the UK)
0808 2380000 (within the UK)
Fax +44 (0) 870.8501251
Garmin Corporation
No. 68, Jangshu 2
nd
Road,
Shijr, Taipei County, Taiwan
Tel. 886/2.2642.9199
Fax 886/2.2642.9099
All rights reserved. Except as expressly provided herein, no part of this manual may be reproduced, copied, transmitted,
disseminated, downloaded or stored in any storage medium, for any purpose without the express prior written consent of Garmin.
Garmin hereby grants permission to download a single copy of this manual onto a hard drive or other electronic storage medium
to be viewed and to print one copy of this manual or of any revision hereto, provided that such electronic or printed copy of this
manual must contain the complete text of this copyright notice and provided further that any unauthorized commercial distribution
of this manual or any revision hereto is strictly prohibited.
Information in this document is subject to change without notice. Garmin reserves the right to change or improve its products and
to make changes in the content without obligation to notify any person or organization of such changes or improvements. Visit the
Garmin Web site (www.garmin.com) for current updates and supplemental information concerning the use and operation of this
and other Garmin products.
Garmin
®
is a trademark of Garmin Ltd. or its subsidiaries, registered in the USA and other countries.
GPSMAP
®
, AutoLocate
®
, TracBack
®
, BlueChart
®
g2, and MapSource
®
are trademarks of Garmin Ltd. or its
subsidiaries. These trademarks may not be used without the express permission of Garmin.
microSD
is a trademark of The SD Card Association. TransFlash
is a trademark of SanDisk Corporation.
May 2009 Part Number 190-00557-00 Rev.E Printed in Taiwan
GPSMAP 76Cx Owner’s Manual i
IntroductIon
IntroductIon
Thank you for choosing the Garmin GPSMAP 76Cx.
Both use the proven performance of Garmin GPS
and full-featured mapping to create an unsurpassed
portable GPS receiver. Take a moment to compare the
contents of this package with the packing list on the
box. If any pieces are missing, contact your Garmin
dealer.
Tips and Shortcuts
To quickly return to the Main Menu from any
page, press the MENU key twice.
To extend battery life, turn off the GPS when
not using the GPSMAP 76Cx for navigation.
Decrease the level of the display’s backlight by
quickly pressing and releasing the POWER
key.
Product Registration
Help us better support you by completing our online
registration today! Connect to our Web site at
http://my.garmin.com. Keep the original sales receipt,
or a photocopy, in a safe place.
Contact Garmin
Contact Garmin if you have any questions while
using your unit. Contact Garmin Product Support by
phone: (913) 397-8200 or (800) 800-1020, Monday–
Friday, 8 AM–5 PM Central Time; or go to
www.garmin.com/support/ and click Product Support.
In Europe, contact Garmin (Europe) Ltd. at +44 (0)
870.8501242 (outside the UK) or 0808 2380000
(within the UK).
Optional �ccessories�ccessories
For a complete list of available accessories and maps
for use with the GPSMAP 76 Cx refer to
http://buy.garmin.com.
ii GPSMAP 76Cx Owner’s Manual
IntroductIon
table of contents
Introduction ........................................................i
Tips and Shortcuts ...............................................i
Product Registration ............................................i
Contact Garmin ....................................................i
Optional �ccessories ...........................................i
Operating the GPSM�P 76Cx ............................iii
Warnings .............................................................iv
Important Information ........................................iv
Getting Started ..................................................1
Unit Overview ......................................................1
Using the GPSM�P 76Cx Keypad ......................3
Turning on the GPSM�P 76Cx ...........................4
Initializing the GPS Receiver ..............................4
Basic Operation ................................................7
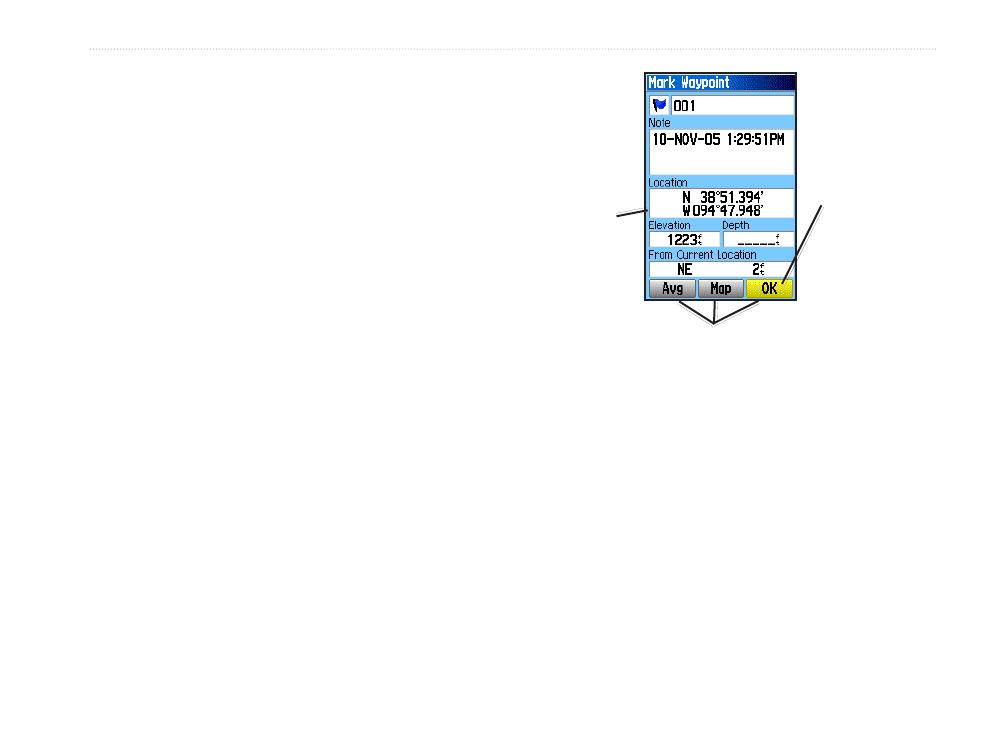
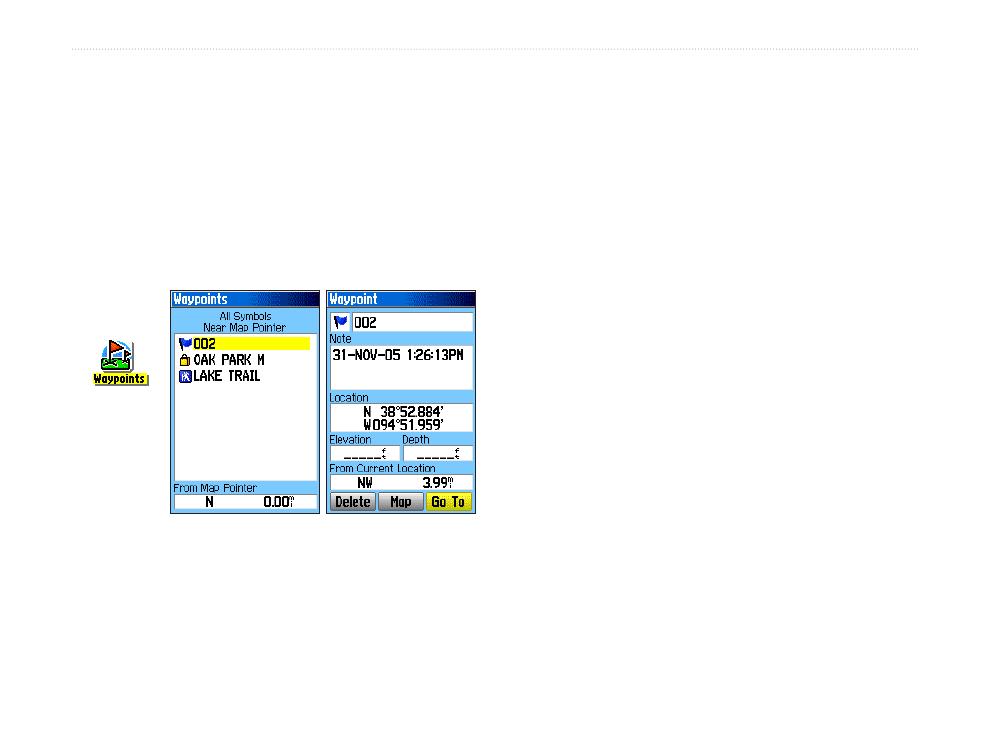
Creating and Using Waypoints ..........................7
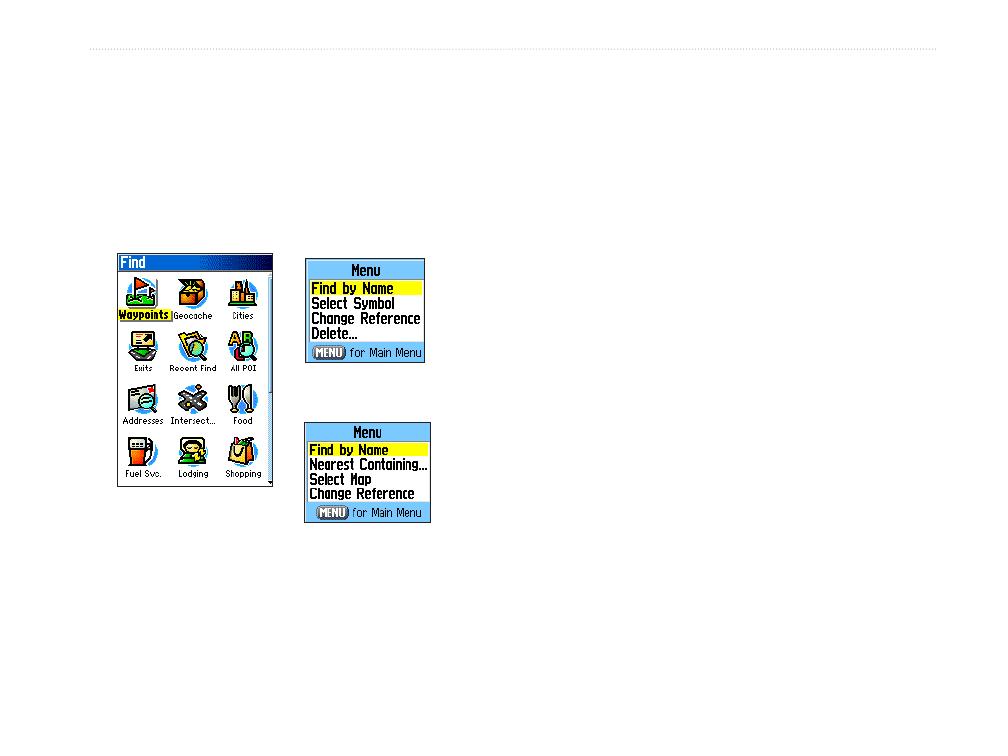
Using the Find Menu .........................................11
Using Tracks ..................................................... 18
Creating a Route ............................................... 22
Main Pages ......................................................25
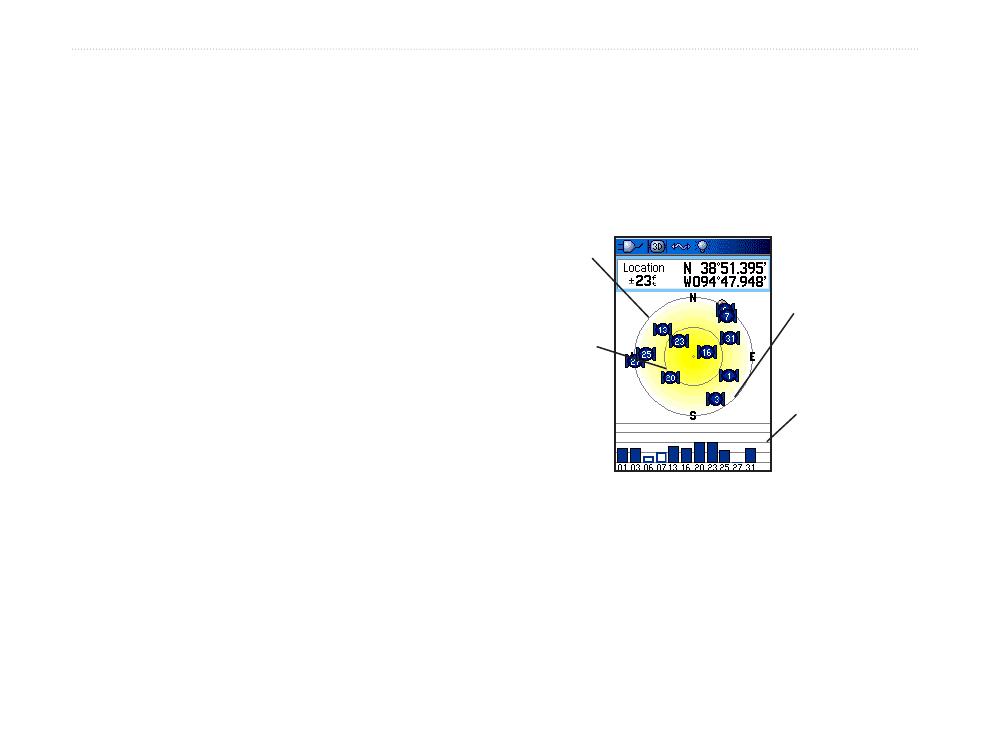
Satellite Page .................................................... 26
Map Page ........................................................... 26
Compass Page .................................................. 29
Trip Computer Page ......................................... 32
Main Menu .......................................................33
Tracks ................................................................ 33
Route Page ........................................................ 33
Highway Page ................................................... 33
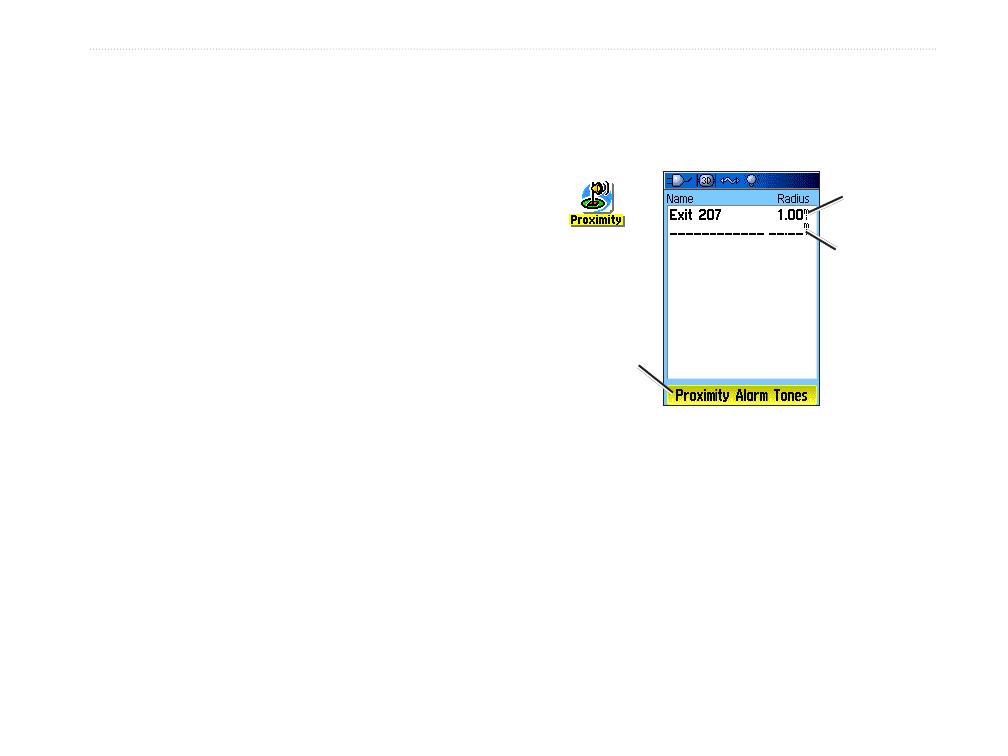
Setup Menu ....................................................... 34
Calendar ............................................................ 42
Calculator .......................................................... 42
Stopwatch ......................................................... 42
Sun and Moon ................................................... 42
Hunt & Fish ....................................................... 42
Games Menu ..................................................... 42
�ppendix .........................................................43
Specications ................................................... 43
Interfacing ......................................................... 44
Connecting Your GPSM�P 76Cx to a Computer
45
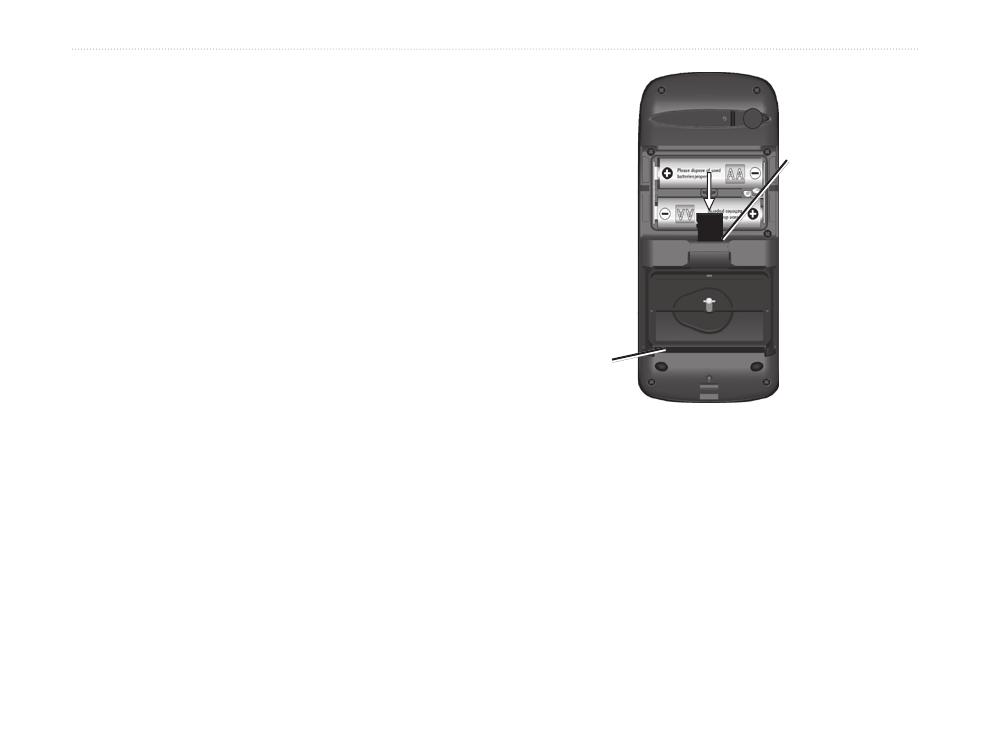
Caring for the GPSM�P 76Cx .......................... 46
FCC Compliance ............................................... 47
Limited Warranty .............................................. 48
Software License �greement .......................... 49
Index ................................................................50
GPSMAP 76Cx Owner’s Manual iii
IntroductIon
Operating the GPSM�P 76Cx
Understanding Terms
Select—move the highlighted area on the screen up,
down, left, or right with the ROCKER key to select
individual fields.
Key—when you are directed to press a key, press and
quickly release the key.
Field—the location on a page where data or an option
can be shown or entered.
On-screen button—use the ROCKER key to select a
button, and press ENTER.
Scroll bar—when viewing a list of items too long to
appear on the screen, a scroll bar appears next to the
list. To scroll through a list, press up or down on the
ROCKER, or use the In and Out keys.
Default—the factory setting saved in the unit’s
memory. You can change the settings, and revert to
the factory settings when you select Restore Defaults.
Highlighted
eld
On-screen buttons
Field
Manual Conventions
In this manual, when you are instructed to select
an item, small arrows (>) appear in the text. They
indicate that you should highlight a series of items on
the screen using the ROCKER, and press ENTER
after each item. For example, if you see “select
Service > Show Info,” you should highlight Service,
and press ENTER. Then highlight Show Info, and
press ENTER again.
iv GPSMAP 76Cx Owner’s Manual
IntroductIon
Failure to avoid the following potentially hazardous
situations could result in an accident or collision
resulting in death or serious injury.
When navigating, carefully compare information
displayed on the unit to all available navigation sources,
including information from visual sightings, and maps.
For safety, always resolve any discrepancies or questions
before continuing navigation.
Use the electronic chart in the unit only to facilitate,
not to replace, the use of authorized government charts.
Ofcial government charts and notices to mariners
contain all information needed to navigate safely.
Use this unit only as a navigational aid. Do not attempt
to use the unit for any purpose requiring precise
measurement of direction, distance, location, or
topography.
WARNING: This product, its packaging, and its components contain chemicals known to the State of California to cause cancer,
birth defects, or reproductive harm. This Notice is provided in accordance with California’s Proposition 65.
See www.garmin.com/prop65 for more information.
The California Electronic Waste Recycling Act of 2003 requires the recycling of certain electronics. For more information on
the applicability to this product, see www.erecycle.org.
Important Information
MAP DATA INFORMATION: One of the goals of Garmin is to provide customers with the most complete and accurate
cartography that is available to us at a reasonable cost. We use a combination of governmental and private data sources, which we
identify in product literature and copyright messages displayed to the consumer. Virtually all data sources contain some inaccurate
or incomplete data. In some countries, complete and accurate map information is either not available or is prohibitively expensive.
Warnings
GPSMAP 76Cx Owner’s Manual 1
GettInG started
Unit Overview
Carry lanyard
attachment slots
Battery compartment
cover
External Data/
�uxiliary Power Port
Internal
antenna
Interface keys
�uxiliary GPS
�ntenna Connector
Battery compartment
locking D-ring
USB connector port
GettInG Started
2 GPSMAP 76Cx Owner’s Manual
GettInG Started
Batteries, microSD Card, and Lanyard
The GPSMAP 76Cx operates on two AA batteries
(not included), which are located in the back of
the unit. You can use Alkaline, NiMH, or Lithium
batteries. See page 34 for information on setting the
battery type.
To install the batteries:
1. Remove the battery cover
by turning the D-ring 1/4
turn counter-clockwise and
pulling the cover loose.
2. Insert the batteries,
observing the proper
polarity.
3. Reinstall the battery cover.
Remove the batteries from your
unit when you do not expect to
use the unit for several months.
Stored data is not lost when
batteries are removed.
To install the microSD card:
1. Remove the battery cover by turning the D-ring
1/4 turn counter-clockwise and pulling the cover
loose.
2. Locate the microSD card in the slot below the
batteries and press down on the top edge of the
card until you feel it click. Then gently allow the
card to release.
3. Press down again to install
the card, making certain
the card is fully in place
to prevent damage when
reinstalling the battery
cover.
To install the lanyard:
1. Place the loop of the
lanyard throught the slot at
the base of the unit.
2. Route the strap through
the loop, and pull tight.
MICRO
SD
CARD
microSD card slot
(with microSD card in
position for insertion)
Install the carry lanyard
in the slot at the bottom
of the unit
GPSMAP 76Cx Owner’s Manual 3
GettInG Started
Using the GPSM�P 76Cx Keypad
QUIT Key
Press to cancel data entry or exit a
page.
ENTER/MARK Key
Press and release to enter highlighted
options, data or conrm on-screen
messages.
Press and hold at any time to mark your
current location as a waypoint.
IN/OUT Zoom Keys
Press to zoom in or out on the Map
page.
Press to scroll up or down a list on
any other page.
FIND/MOB Key
Press at any time to view the Find
Menu.
Press and hold for MOB.
POWER Key
Press and hold to turn the unit on
or off.
Press and Release to adjust the
backlighting.
ROCKER Key
Press up, down, left, or right to highlight
options and to enter data, or move the map
panning arrow.
PAGE Key
Press to cycle through the main pages.
MENU Key
Press to view page options.
Press twice to view the Main Menu.
4 GPSMAP 76Cx Owner’s Manual
GettInG Started
Turning on the GPSM�P 76Cx
To turn the GPSM�P 76Cx on and off:
Press and hold the POWER.
Adjusting the Backlight
To adjust the backlight level:
1. Press and quickly release the POWER key.
2. Press up on the ROCKER to increase the
brightness, or press down to decrease.
3. Press ENTER or QUIT to close.
See page 34 for information on changing the screen
colors and backlight time out and brightness levels.
Initializing the GPS Receiver
The rst time you turn on your unit, the GPS receiver
must collect satellite data and establish its current
location. To receive satellite signals, you should be
outdoors and have a clear view of the sky.
To initialize your GPSM�P 76Cx:
Hold the unit in front of you facing the sky and
observe the Satellite page. While the GPS receiver
is searching for the satellite signals, a “Locating
Satellites” message is replaced by an “Acquiring
Satellites” message until a location x is made.
The Strength of
each satellite
signal.
The outer
circle
represents
the horizon.
The inner
circle is 45
degrees from
the horizon.
Heading bug
indicates your
direction
Initialization Options
If the unit cannot get a satellite x, an options
menu with a list of solutions appears. Highlight the
appropriate solution and press ENTER.
GPSMAP 76Cx Owner’s Manual 5
GettInG Started
Using the Status Bar
At the top of each page, the status bar provides status
information for several unit features.
Status Bar
The Battery Power icon ( ) shows the remaining
battery power. The Auxiliary Power icon ( ) or
Cable Connection icon ( ) appears when the unit
is plugged in to an external or USB power source.
Satellite signal status is shown when searching for or
acquiring satellites ( ), when a 2D x ( ) is
attained and when a 3D x ( ) is attained.
The Backlight icon ( ) appears when the backlight
is on. The Backlight is off when you turn the unit on.
The Backlight uses a signicant amount of battery
power.
On-Screen Messages
When a signicant event in the operation of the unit
occurs, an on-screen message appears to advise you of
the occurrence. In each case the condition is described
and often a remedy provided. Press ENTER to
acknowledge the message and close the window.
On-Screen Messages
6 GPSMAP 76Cx Owner’s Manual
GettInG Started
Using the Databases
Optional MapSource CD-ROMs enhance the
versatility of your GPSMAP 76Cx. This data is
loaded to the microSD Card already installed in the
unit. With optional MapSource City Navigator data,
you can view listings of nearby restaurants, lodging,
shopping centers, attractions and entertainment, and
even retrieve addresses and phone numbers for any
listed location.
The included USB Interface Cable or an optional PC
interface cable (with a serial connector) can be used
to transfer MapSource CD-ROM data to the microSD
card. Higher capacity and pre-loaded microSD map
data cards are also available.
Map data transfer requires the USB Interface Cable
provided with the unit to transfer MapSource data
from a PC to the microSD card when installed in the
GPSMAP 76Cx. Use the USB Mass Storage feature
to transfer other les to the microSD as explained on
page 35.
See http://www.garmin.com/cartography/ for
compatible MapSource products.
MICRO
SD
CARD
microSD card slot
located in battery
compartment
USB interface
cable connection
under opened
battery cover
GPSMAP 76Cx Owner’s Manual 7
BaSIc operatIon
basIc operatIon
This section explains some of the more common
operations you can perform with your GPSMAP 76Cx
including using the Find Menu, creating and using
waypoints, tracks, and routes.
Creating and Using Waypoints
Waypoints are locations or landmarks you record
and store in your GPS. You can add waypoints to
routes and even create a Go To directly to the selected
waypoint.
You can create waypoints using three methods. Press
the ENTER/MARK key while at a location, create a
waypoint on the Map page, or enter coordinates for a
waypoint manually.
Marking Your Current Location
Use the ENTER/MARK key to quickly capture your
current location creating a new waypoint. You must
have a valid position (2D or 3D) x to mark your
current location.
To mark your current location:
1. Press and hold the ENTER/M�RK key until the
Mark Waypoint page appears. A default three-
digit name and symbol are assigned to the new
waypoint.
Mark Waypoint Page
Waypoint
name
Waypoint
symbol
2. To accept the waypoint with the default
information, highlight OK.
OR
To change any information, select the
appropriate eld, and press ENTER to open
the on-screen keypad. After entering and
conrming your changes, select OK.
8 GPSMAP 76Cx Owner’s Manual
BaSIc operatIon
Creating Waypoints Using the Map
To create a waypoint using the Map page:
1. On the Map page, use the ROCKER to move
the pointer to the map item you want to mark.
2. Press and quickly release ENTER/M�RK
to capture the pointer location and open the
information page for the map item.
3. Select Save. If there is no information for that
point, a “No map information at this point. Do
you want to create a user waypoint here?”
prompt appears. Select Yes.
Editing Waypoints
You can edit waypoints to change the symbol, name,
note, location, elevation, and depth.
To edit a waypoint:
1. Press FIND..
2. Select Waypoints..
3. Select the waypoint you want to edit, and press
ENTER.
4. Make changes by highlighting each eld
and use the waypoint symbol chart, and
alphanumeric keypad to enter new data.
To delete a waypoint:
From the Waypoints page, select the waypoint
you want to delete > Delete.
NOTE: When you delete a waypoint, you cannot
recover it from the unit.
To move a waypoint on the Map page:
1. Press FIND > Waypoints.
2. Select the waypoint you want to move, and
press ENTER.
3. Select Map to show the waypoint on the map.
4. Press ENTER again to place a MOVE marker
next to the waypoint.
5. Use the ROCKER to move the waypoint to a
new location, and press ENTER.
Averaging a Waypoint’s Location
You can average a new waypoint location over time to
produce a more accurate location.
NOTE: You must have a GPS Satellite x before
you can average a waypoint’s location.
GPSMAP 76Cx Owner’s Manual 9
BaSIc operatIon
To calculate a location by averaging:
1. Find a location you want to calculate an
average for, press M�RK > vg to begin
averaging.
2. Press Save.
Projecting a Waypoint
Create a new waypoint by projecting the distance and
bearing from one location to a new location.
To project a waypoint:
1. Press FIND > Waypoints.
2. Select the waypoint you want to project. The
Waypoint page opens.
4. Press MENU to open the Options menu.
5. Select Project Waypoint, and press ENTER to
open the Project Waypoint page.
6. Enter the distance and bearing to the projected
waypoint in the appropriate elds at the bottom
of the page, and press QUIT when nished.
Proximity Waypoints
Use the Proximity Waypoints page to dene an alarm
circle around a waypoint.
Proximity
icon
Empty line
Proximity
Alarm Tones
button
Radius
eld
To add a proximity waypoint
1. Press MENU twice > Proximity.
2. Select an empty line, and press ENTER.
3. Select a waypoint from the Waypoints List or
from any other group of Find items to open the
information page for the item.
4. Select Use to add the point to the list on the
Proximity Waypoints page.
10 GPSMAP 76Cx Owner’s Manual
BaSIc operatIon
5. Using the ROCKER to select the Radius eld
and enter a value.
To clear one or all proximity waypoints
from the list:
To remove or review a single entry, press
ENTER. To remove all waypoints from the list,
press MENU > Remove �ll.
To turn proximity alarms on or off:
1. Press MENU twice to open the Main Menu.
2. Highlight the Proximity icon and press ENTER
to open the Proximity Waypoints page.
3. Highlight the Proximity �larm Tones button,
and press ENTER to open the Alarm Tones
page. Place a check in the Proximity Alarms
box to activate alarms. As you approach a
proximity waypoint, a tone sounds and a “Near
Proximity Point” message appears. When
you move outside the set radius, a “Leaving
Proximity Point” message is shown. Use this
page to select tones for each alarm.
Man OverBoard (MOB)
Another method for creating a waypoint is the Man
Overboard (MOB) feature. Use this application for
marking a location on water where you cannot stop
quickly and must return to a point where there are no
landmarks for reference.
To create a waypoint using the MOB
feature:
1. Press and hold FIND/MOB to mark the MOB
waypoint.
2. Press ENTER to open the Map page showing
the path from your current location to the MOB
point. Use the Compass page for additional
guidance to the MOB point.
GPSMAP 76Cx Owner’s Manual 11
BaSIc operatIon
Using the Find Menu
Use the Find Menu to search for waypoints,
geocaches, cities, and exits included in the GPSMAP
76Cx basemap. Additional icons appear depending on
the optional BlueChart g2 or MapSource data loaded
to the unit. Press FIND to open the Find Menu.
Waypoint Options
Menu
Cities Options Menu
Find Menu with optional
MapSource data
When you access a Find list, it contains items near
your current location or the pointer.
The options menu for each category contains a
submenu of search options. Select a category.
Find By Name
Use Find By Name if you know the name of the
location you want to nd.
To nd a location using Find By Name:
1. Press FIND to open the Find Menu.
2. Select the icon for the type of item for which
you want to search for, or search the entire
database by selecting �ll Points of Interest.
3. Press MENU > Find By Name.
4. Use the ROCKER to operate the on-screen
keypad and enter the name of the location
you want to nd. When the Find list contains a
match, highlight OK.
5. Select the location item from the Find list,
and press ENTER. The item’s information
page opens, allowing you to save the item
as a waypoint, show the item on the map, or
automatically create a route to the item (Go To).
12 GPSMAP 76Cx Owner’s Manual
BaSIc operatIon
Recent Finds
The Recent Finds page shows a list of the last 50
items you have searched for or gone to recently.
To go to a recently found item:
1. Press FIND.
2. Select Recent Finds.
List of
recently
found items
Recent
Finds icon
3. Use the ROCKER to select the item you want
to go to, and press ENTER.
4. Select Go To to begin navigation.
Using the Find Information Page
When you select an item from the Find List and
press ENTER, an information page shows detailed
information about the item. Each information page
contains three on-screen buttons. Different buttons
appear depending on whether you are selecting an
item to navigate to or adding an item.
Find Information Page Options
To use the Options Menu:
1. With an information page open for a Find item,
press MENU to open the Options Menu.
2. Use the ROCKER to select an option:
Average Location—sample a new waypoint
location over time and average the result for a
more accurate location reference. See page 9.
Project Waypoint—create a new waypoint by
entering bearing and distance from a referenced
location. See page 9.
Find Near Here—return to the Find Menu to
search for map items near the item.
GPSMAP 76Cx Owner’s Manual 13
BaSIc operatIon
Change Reference—point to a new location on
the Map page using the pointer.
Set Proximity—program an alarm to sound
when you are within a specied radius of an
item. See page 9.
Add To Route—include this item on a
new route or add it to an existing route. See
“Creating and Using Routes” on page 22.
View Sun and Moon—view Sun and Moon
tables for this item location. See page 42.
View Hunt and Fish—view Hunt and Fish
tables for this item location. See page 42.
Map Information—show the map from which
the map item originated. See the Appendix for
information about downloading detailed maps.
To nd an item near another item:
1. Press FIND.
2. Select an icon on the Find Menu.
3. Select an item in the Find list.
4. Press MENU, select Find Near Here. The
Find Menu opens again with each category
containing items near the item selected.
5. Select a category icon and press ENTER to
open a Find list of items near the item.
To nd an item from another location on
the map:
1. Press FIND.
2. Select an icon on the Find Menu.
3. Press MENU, select Change Reference. The
Map page appears.
4. Use the ROCKER to pan the arrow (pointer) to
the map location you want. The Find list shows
a list of items near the new map location.
14 GPSMAP 76Cx Owner’s Manual
BaSIc operatIon
Finding a Waypoint
The Waypoints page contains a list of all saved
waypoints. Waypoints are stored in alphanumeric
order and are identied by an assigned symbol.
To nd a waypoint:
1. Press FIND.
2. Select Waypoints and choose a waypoint.
Waypoints
icon
Finding a Geocache
Select Geocache to view the list of geocache
locations created by you or downloaded from your
computer. A geocache location is a waypoint with a
special geocache symbol to separate it from others.
For more information about geocaching log on to
http://my.garmin.com and click “Go Geocaching.”
To nd a geocache:
1. Press FIND.
2. Highlight Geocache. You can view found
geocaches or those that have not been found.
3. Use the ROCKER to highlight a geocache on
the list.
4. Select Go To to navigate to the geocache
location. When you navigate to a geocache,
the Compass page changes to Geocache
Navigation mode and any additional information
about downloaded cache location is shown in
the comment eld.
When a geocache is found, the unit marks the cache
as found, logs an entry into the calendar, and provides
an option that shows the nearest cache.
  • Page 1 1
  • Page 2 2
  • Page 3 3
  • Page 4 4
  • Page 5 5
  • Page 6 6
  • Page 7 7
  • Page 8 8
  • Page 9 9
  • Page 10 10
  • Page 11 11
  • Page 12 12
  • Page 13 13
  • Page 14 14
  • Page 15 15
  • Page 16 16
  • Page 17 17
  • Page 18 18
  • Page 19 19
  • Page 20 20
  • Page 21 21
  • Page 22 22
  • Page 23 23
  • Page 24 24
  • Page 25 25
  • Page 26 26
  • Page 27 27
  • Page 28 28
  • Page 29 29
  • Page 30 30
  • Page 31 31
  • Page 32 32
  • Page 33 33
  • Page 34 34
  • Page 35 35
  • Page 36 36
  • Page 37 37
  • Page 38 38
  • Page 39 39
  • Page 40 40
  • Page 41 41
  • Page 42 42
  • Page 43 43
  • Page 44 44
  • Page 45 45
  • Page 46 46
  • Page 47 47
  • Page 48 48
  • Page 49 49
  • Page 50 50
  • Page 51 51
  • Page 52 52
  • Page 53 53
  • Page 54 54
  • Page 55 55
  • Page 56 56
  • Page 57 57
  • Page 58 58

Garmin 190-00557-00 User manual

Category
Navigators
Type
User manual

Ask a question and I''ll find the answer in the document

Finding information in a document is now easier with AI