HP iPAQ 500 Series Owner's manual
- Category
- Mobile phones
- Type
- Owner's manual
This manual is also suitable for

HP iPAQ
Product Guide

© Copyright 2007 Hewlett-Packard
Development Company, L.P.
Microsoft, Windows, the Windows logo,
Outlook, and ActiveSync are trademarks of
Microsoft Corporation in the U.S. and other
countries.
HP iPAQ Products are Powered by Microsoft
Windows Mobile 6.0 Standard.
SD Logo is a trademark of its
proprietor.
Bluetooth® is a trademark owned by its
proprietor and used by Hewlett-Packard
Development Company, L.P. under license.
All other product names mentioned herein
may be trademarks of their respective
companies.
HP encourages customers to recycle used
electronic hardware, HP original print
cartridges, and rechargeable batteries. For
more information about recycling programs,
go to
http://www.hp.com/recycle.
Perchlorate Material - special handling may
apply. See
http://www.dtsc.ca.gov/
hazardouswaste/perchlorate. This product's
real time clock battery or coin cell battery
may contain perchlorate and may require
special handling when recycled or disposed
of in California.
The information contained herein is subject
to change without notice. The only
warranties for HP products and services are
set forth in the express warranty statements
accompanying such products and services.
Nothing herein should be construed as
constituting an additional warranty. HP shall
not be liable for technical or editorial errors
or omissions contained herein.
This document contains proprietary
information that is protected by copyright. No
part of this can document may be
photocopied, reproduced, or translated to
another language without the prior written
consent of Hewlett-Packard Development
Company, L.P.
Second Edition May 2007
Document Part Number: 446232-002

Table of contents
1 Registering the iPAQ
Registering your HP iPAQ .................................................................................................................... 1
2 Box Contents
Box Contents ........................................................................................................................................ 2
3 Components
Front Panel Components ..................................................................................................................... 3
Bottom Panel Components .................................................................................................................. 4
Left and Right Side Components ......................................................................................................... 4
Back Panel Components ...................................................................................................................... 5
4 Setting Up Your HP iPAQ
Step 1: Remove the battery cover and insert the SIM card .................................................................. 6
Step 2: Install the battery and replace the battery cover ...................................................................... 7
Step 3: Charge the battery ................................................................................................................... 7
Step 4: Turn on your HP iPAQ ............................................................................................................. 8
Protecting Your HP iPAQ with a Password .......................................................................................... 8
Finding the Serial and Model Number .................................................................................................. 8
Status Icons .......................................................................................................................................... 8
5 Learning the Basics
Home Screen ..................................................................................................................................... 10
Battery Saving Tips ............................................................................................................................ 10
Locking and Unlocking Your HP iPAQ ............................................................................................... 10
Entering Text ...................................................................................................................................... 11
Changing Input Modes ....................................................................................................... 11
Entering Text in the Multipress Mode ................................................................................ 11
Entering Text in the T9 Mode ............................................................................................ 12
Entering the Owner Information ......................................................................................................... 12
Viewing the Operating System Information ........................................................................................ 12
Changing the Regional Settings ......................................................................................................... 12
Adjusting the Volume ......................................................................................................................... 13
Setting the Ringtone .......................................................................................................... 13
Adjusting Speaker Volume ................................................................................................ 13
Changing the Power Management Settings ....................................................................................... 13
Dimming or Adjusting the Brightness of the Backlight ........................................................................ 13
Installing and Removing Programs .................................................................................................... 14
Opening and Closing Programs ......................................................................................................... 14
Customizing the HP iPAQ .................................................................................................................. 14
Setting Alarms .................................................................................................................................... 15
Creating and Assigning a Category .................................................................................................... 15
Synchronization .................................................................................................................................. 15
iii

Changing the Type of ActiveSync Connection ................................................................................... 16
Troubleshooting Help for Synchronization Issues .............................................................................. 17
6 Using Your Smartphone
Using the Home Key .......................................................................................................................... 19
Using the Back key ............................................................................................................................. 19
Using the 4-Way Navigation Key ........................................................................................................ 19
Calling Features ................................................................................................................................. 19
Making a Call ..................................................................................................................... 19
Answering a Call ................................................................................................................ 19
Using Call Waiting ............................................................................................................. 19
Redialing a Number ........................................................................................................... 20
Calling a Contact ............................................................................................................... 20
Making a Call Using Voice Commander ............................................................................ 21
Making Emergency Calls ................................................................................................... 21
Making Calls Using Speed Dials ........................................................................................ 21
Using Voice mail ................................................................................................................ 22
Using the Handsfree Function ........................................................................................... 22
Monitoring Phone Usage ................................................................................................... 22
Making Data Calls .............................................................................................................. 22
Muting a Call ...................................................................................................................... 22
Putting a Call on Hold ........................................................................................................ 22
Making a Conference Call ................................................................................................. 23
Making a Call From a Hyperlinked Phone Number ........................................................... 23
Dialing International Numbers ........................................................................................... 23
Checking Your Connection and Signal Strength ................................................................................ 23
Changing the SIM Personal Identification Number ............................................................................ 23
Managing Calls Using Call History ..................................................................................................... 24
Using Wireless Manager .................................................................................................................... 24
Quick Launch ..................................................................................................................................... 24
Changing the Ring Tone and Ring Type ............................................................................................ 25
Changing Network Settings ................................................................................................................ 25
Profiles ............................................................................................................................................... 25
Using profiles ..................................................................................................................... 25
Editing profiles ................................................................................................................... 25
Automatic Frequency Band Selection ................................................................................................ 26
Copying a Contact From a SIM to a Device ....................................................................................... 26
ActiveSync – Synchronizing Contacts, Tasks, Calendar and E-mail with Exchange/Outlook ............ 26
Setting up E-mail ................................................................................................................................ 26
Setting up E-mail using Exchange Server .......................................................................................... 27
Voice Notes ........................................................................................................................................ 27
7 Connections
Connecting to Intranet URLs .............................................................................................................. 28
Changing or Deleting an Intranet URL ............................................................................................... 28
Setting Up Proxy Settings .................................................................................................................. 28
Setting Up GPRS using HP iPAQ DataConnect ................................................................................ 29
Configuring Advanced Proxy Settings ................................................................................................ 29
Setting Up a VPN Connection ............................................................................................................ 29
Wi-Fi ................................................................................................................................................... 30
iv

Wi-Fi Terms ....................................................................................................................... 30
Automatically Connecting to a Wi-Fi Network .................................................................... 30
Manually Connecting to a Wi-Fi Network ........................................................................... 31
Finding an IP Address ....................................................................................................... 31
Deleting a Wireless Network Connection .......................................................................... 31
Configuring 802.1x Authentication Settings ....................................................................... 32
Configuring IP PBX using HP iPAQ Setup Assistant ......................................................................... 32
Bluetooth ............................................................................................................................................ 32
Bluetooth Terms ................................................................................................................ 33
Changing Bluetooth Settings ............................................................................................. 33
Bluetooth Device Profiles ................................................................................................... 33
Creating, Accepting, and Ending a Bluetooth Partnership ................................................. 34
Making a Device Discoverable .......................................................................................... 34
Setting Up an Incoming or Outgoing COM Port ................................................................. 35
Ending a Connection ......................................................................................................... 35
GPRS/EDGE ...................................................................................................................................... 35
Changing GPRS Network Settings .................................................................................... 35
Editing Network Parameters .............................................................................................. 35
Connecting to a Laptop ...................................................................................................................... 36
To Connect to a Laptop using a USB Data Connection .................................................... 36
To Connect to a Laptop using Bluetooth data connection ................................................. 36
ActiveSync over USB cable, GPRS and Bluetooth ............................................................................ 37
8 Camera
Using the Digital Camera ................................................................................................................... 38
Capturing Photos ............................................................................................................... 38
Viewing Photos .................................................................................................................. 38
Changing Camera Settings ................................................................................................................ 38
Changing Brightness Settings ........................................................................................... 38
Changing Resolution Settings ........................................................................................... 39
Changing Mode Settings ................................................................................................... 39
Changing Zoom Settings ................................................................................................... 39
Changing White Balance Settings ..................................................................................... 39
Configuring File Settings .................................................................................................... 40
Using the Camcorder ......................................................................................................................... 41
Recording Videos .............................................................................................................. 41
Configuring Video Format .................................................................................................. 41
Transfer Images ................................................................................................................................. 41
Using GPRS ...................................................................................................................... 41
Using Bluetooth ................................................................................................................. 42
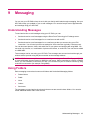
9 Messaging
Understanding Messages ................................................................................................................... 43
Using Folders ..................................................................................................................................... 43
Synchronizing E-mail .......................................................................................................................... 44
Composing E-mail using Voice Commander ...................................................................................... 44
Setting up Messaging Accounts ......................................................................................................... 45
Text Messaging ................................................................................................................. 45
MMS Messaging ................................................................................................................ 45
Setting up E-mail using Exchange Server ......................................................................... 45
v

Setting up E-mail using POP3 or IMAP4 account .............................................................. 45
Receiving E-mail Attachments ........................................................................................... 46
Receiving Meeting Requests ............................................................................................. 46
Creating or Changing a Signature ..................................................................................... 47
Using Messaging ................................................................................................................................ 47
Composing and Sending Messages .................................................................................. 47
Replying or Forwarding a Message ................................................................................... 48
Adding an Attachment to a Message ................................................................................. 48
Downloading Messages ..................................................................................................... 48
Downloading Messages from a Server .............................................................................. 48
Windows Live Messenger .................................................................................................................. 48
Signing In and Out of Messenger ...................................................................................... 49
Sending Instant Messages ................................................................................................ 49
Changing Your Status ........................................................................................................ 50
10 Calendar
Keeping Track of Appointments ......................................................................................................... 51
Creating an Appointment .................................................................................................................... 51
Updating an Appointment ................................................................................................................... 51
Canceling an Appointment ................................................................................................................. 51
Changing the Display of the Work Week ............................................................................................ 52
11 Contacts
Adding a Contact ................................................................................................................................ 53
Deleting a Contact .............................................................................................................................. 53
Changing Contact Information ............................................................................................................ 53
Copying a Contact .............................................................................................................................. 53
Adding a Photo ................................................................................................................................... 54
Sending an E-mail Message to a Contact .......................................................................................... 54
Sending a Text Message to a Contact ............................................................................................... 54
Adding and Removing a Picture ......................................................................................................... 54
Working with the Contact List ............................................................................................................. 55
12 Applications
Using HP Applications ........................................................................................................................ 56
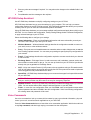
Using HP Voice Reply ....................................................................................................... 56
HP iPAQ Setup Assistant .................................................................................................. 57
Voice Commands .............................................................................................................. 57
HP iPAQ Shortcuts ............................................................................................................ 58
Task Manager .................................................................................................................... 59
HP iPAQ DataConnect ...................................................................................................... 59
HP iPAQ Tips ..................................................................................................................... 59
HP iPAQ QuickStart Tour .................................................................................................. 59
Using Windows Media MP3 Player .................................................................................................... 59
Using Voice Recorder ........................................................................................................................ 60
Using MS Office Applications ............................................................................................................. 61
File Management ................................................................................................................................ 61
Playing Games ................................................................................................................................... 62
Playing Bubble Breaker ..................................................................................................... 62
vi

Playing Solitaire ................................................................................................................. 62
Internet Explorer ................................................................................................................................. 63
13 Storage Cards
Using Storage Cards .......................................................................................................................... 64
Inserting a Storage Card .................................................................................................................... 64
Removing a Storage Card .................................................................................................................. 64
Viewing Content of a Storage Card .................................................................................................... 64
14 Synchronizing
Copying (or Transferring) Files ........................................................................................................... 66
Migrating Data from Palm Desktop to Microsoft Windows Mobile 6.0 Standard ................................ 66
Wireless Synchronization Cost Saving Tips ....................................................................................... 67
15 Tasks
Setting the Start and Due Dates for a Task ........................................................................................ 68
Showing Start and Due Dates in the Task List ................................................................................... 68
Marking a Task as Completed ............................................................................................................ 68
16 Product Specifications
System Specifications ........................................................................................................................ 69
Physical Specifications ....................................................................................................................... 69
Operating Environment ...................................................................................................................... 70
17 Regulatory Notices
Federal Communications Commission Notice ................................................................................... 71
Modifications ...................................................................................................................... 71
Cables ................................................................................................................................ 71
Declaration of Conformity for Products Marked with the FCC Logo (United States Only) . 72
Canadian Notice ................................................................................................................................. 72
Avis Canadien .................................................................................................................................... 72
European Union Notice ...................................................................................................................... 72
Products with 2.4-GHz Wireless LAN Devices .................................................................. 74
Battery Warning .................................................................................................................................. 74
Battery Recycling ............................................................................................................................... 74
Battery Disposal ................................................................................................................................. 74
Equipment Warning ............................................................................................................................ 75
Airline Travel Notice ........................................................................................................................... 75
Medical Electronic Equipment ............................................................................................................ 75
SAR Notice ......................................................................................................................................... 75
Wireless Notices ................................................................................................................................. 76
U.S. Regulatory Wireless Notice ....................................................................................... 76
Canadian Regulatory Wireless Notice ............................................................................... 76
Brazilian Notice .................................................................................................................. 76
Singaporean Wireless Notice ............................................................................................ 76
Japanese Notice ................................................................................................................................. 77
Wireless LAN 802.11b Devices ......................................................................................... 77
Wireless LAN 802.11g Devices ......................................................................................... 77
vii

Bluetooth Devices .............................................................................................................. 77
Taiwan DGT Notice ............................................................................................................................ 78
Korean Notice ..................................................................................................................................... 78
Acoustics Warning .............................................................................................................................. 78
18 Frequently Asked Questions
I am having trouble turning on my HP iPAQ. What should I do? ........................................................ 79
I am unable to make or receive calls. How do I fix this? .................................................................... 79
I have trouble connecting to the Internet. What should I do? ............................................................. 79
I am unable to hear voices clearly. How do I resolve this? ................................................................ 79
I cannot use certain call functions. What should I do? ....................................................................... 79
Why do I hear disturbing noises during a phone call? ........................................................................ 80
Why are the standby and talk time shorter at times? ......................................................................... 80
Why does the HP iPAQ operate slowly at times? .............................................................................. 80
Why do I see the Home screen layout error message on my HP iPAQ display screen? ................... 80
I have trouble charging my battery. What should I do? ...................................................................... 80
I am unable to use the ActiveSync feature. What should I do? .......................................................... 80
19 Care and Maintenance
Guidelines for using your HP iPAQ .................................................................................................... 81
Guidelines for cleaning your HP iPAQ ............................................................................................... 81
Guidelines for carrying or storing your HP iPAQ ................................................................................ 81
Guidelines for using accessories ........................................................................................................ 81
Guidelines for using your HP iPAQ in public places ........................................................................... 81
viii

1 Registering the iPAQ
Registering your HP iPAQ
You need to register your HP iPAQ with Hewlett-Packard to be able to:
●
Access support and services, and get the most out of your HP products
●
Manage your profile
●
Sign up for free support alerts, driver notices, and personalized newsletters
In some countries, when you register your HP iPAQ with Hewlett-Packard, you receive e-mail regarding
special offers and promotions. Take time now to register your HP iPAQ online at
http://www.register.hp.com.
NOTE: Registration is not supported in all countries.
If your mail or e-mail address needs to be updated after registration, visit http://www.register.hp.com
and enter your user ID and registration password to edit your online profile.
Registering your HP iPAQ 1

2 Box Contents
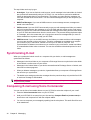
Box Contents
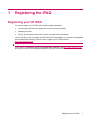
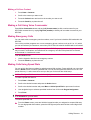
This illustration depicts the items that come in the box with your HP iPAQ.
NOTE: Box contents vary by model.
(1) HP iPAQ Voice Messenger
(2) 1100 mAh Li-Ion removable/rechargeable battery
(3) Getting Started CD with special software
(4) HP iPAQ documentation
(5) Wired stereo headset
NOTE: Listening to personal stereo equipment at full volume for long periods can damage hearing. To reduce the
risk of hearing loss, do not spend much time listening to personal stereo equipment at full volume. HP recommends
use of the headset manufactured by Merry, part number EMC220-X00, that is included with your HP iPAQ.
(6) AC adapter with interchangeable plug
NOTE: The AC adapter is provided with more than one interchangeable plug, which may not be attached. Attach
the correct plug for your region. Plug the AC adapter into an AC outlet that is easily accessible at all times.
(7) Mini-USB synchronization cable
2 Chapter 2 Box Contents

3 Components
NOTE: Not all models or features are available in all regions.
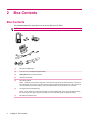
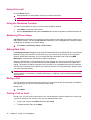
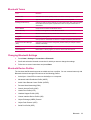
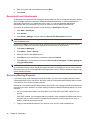
Front Panel Components
Component Function
(1) Display Screen Use to view the contents on the screen.
(2) Right Softkey Press to launch HP iPAQ Shortcuts from the Home screen.
(3) Power Button or
End Key
Press to end a phone call. Press and hold to switch your HP iPAQ on or off.
(4) Back Key Press to go back to the previous screen.
(5) Keypad Use keys on the keypad to enter text, dial numbers, or navigate menus.
(6) 4-Way
Navigation Key
Use to select items, navigate menus, change feature settings, and play games. Scroll up, down,
left, or right by pressing down on the button in the direction you want to scroll. Release the button
to stop the scrolling action.
(7) Home Key Press to go to the Home screen.
(8) Send Key Press to answer a call, lock your HP iPAQ, or start the speakerphone.
(9) Action Button Press to open an item or a program.
(10) Left Softkey Press to access programs from the Start menu.
(11) Earpiece Use to listen to phone calls, sounds, and notifications.
Front Panel Components 3

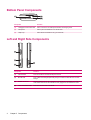
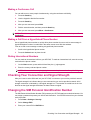
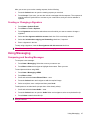
Bottom Panel Components
Component Function
(1) Charging/Communications Port Use to connect the mini-USB synchronization and charging cable.
(2) Microphone Use for phone conversations or to record notes.
(3) Strap Loop Use to attach accessories to carry your HP iPAQ.
Left and Right Side Components
Component Function
(1) Volume Button Press to increase or decrease the earpiece volume.
(2) MicroSD Slot Insert a Micro Secure Digital (MicroSD) storage card with the label side down for data
storage.
(3) Headset Connector Plug the headphones into this connector for a private phone conversation or to listen to
music. Make sure that the wired headset is firmly plugged into the headset connector.
(4) Voice Commander Button Press to launch the Voice Commander.
4 Chapter 3 Components

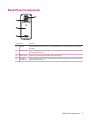
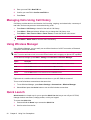
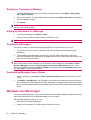
Back Panel Components
Component Function
(1) Speaker Use the speakers to listen to music or as a speakerphone to converse when driving or otherwise
occupied.
(2) Release Button Press the release button on the battery cover and slide the cover down and away from the HP iPAQ
to remove the back cover.
(3) Battery Cover Remove to insert or remove the battery and/or the SIM card.
(4) HP Digital
Camera Lens
With the camera turned on, frame the subject in the camera lens and view it on your HP iPAQ screen
before capturing the photo.
Back Panel Components 5

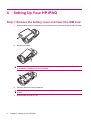
4 Setting Up Your HP iPAQ
Step 1: Remove the battery cover and insert the SIM card
1. Press the release button on the battery cover and slide the cover down and away from the HP iPAQ.
2. Remove the battery.
NOTE: If the battery is already installed, remove it before inserting the SIM card. The SIM card
is provided by a mobile phone service provider.
3. Place the SIM card in the provided slot.
NOTE: Make sure that the metal contacts are facing down and the notched corner is in the correct
position.
4. Slide the SIM card into the slot.
6 Chapter 4 Setting Up Your HP iPAQ

Step 2: Install the battery and replace the battery cover
1. Align the battery connectors on the battery with the housing pins in the battery compartment, and
insert the battery.
2. Place the battery cover down and slide up until it clicks into place.
Step 3: Charge the battery
CAUTION: To avoid damaging your HP iPAQ or the AC adapter, Make sure all connectors are properly
aligned before connecting.
The battery provides power for your HP iPAQ to operate. Your HP iPAQ comes with a mini-USB
synchronization cable, which must be used to charge the device.
It takes approximately 2–4 hours to fully charge the battery for the first time. Subsequent charges may
take longer.
1. Insert the USB end of the mini-USB synchronization cable into the port on the AC adapter.
2. Connect the AC adapter to an electrical outlet.
3. Connect the mini-USB synchronization cable to the charging/communications port on your
HP iPAQ. The cable connector only fits one way. If the connector does not insert easily, turn it over.
Step 2: Install the battery and replace the battery cover 7

TIP: You can also charge the battery by connecting your HP iPAQ to a USB port on your computer
using the mini-USB synchronization cable.
NOTE: Whenever a replacement battery is inserted into your HP iPAQ, press the End key for at
least two seconds. In case the device does not switch on, attach an AC adapter to switch on your
HP iPAQ.
Step 4: Turn on your HP iPAQ
Press the Power button or End key to turn on your HP iPAQ. Next, follow the instructions on the screen
to complete the setup. Use the keypad to enter information.
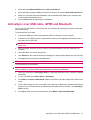
Protecting Your HP iPAQ with a Password
You can secure the data on your HP iPAQ by setting a password. Each time you turn on your HP iPAQ,
you will be prompted to enter the password.
To set a password:
1. Press Start > Settings > Security > Device Lock.
2. Select the Prompt if device unused for check box, and select the time that your HP iPAQ must
be unused before you are prompted for a password.
3. In the Password type box, select the type of password you would like to use. Enter the password
and then confirm the password.
4. Press Done.
The next time your HP iPAQ is unused for the specified period of time, you are prompted to enter your
password.
TIP: Use the same steps as above to change or reset your password.
Finding the Serial and Model Number
Locate the serial and model number of your HP iPAQ before contacting HP Customer Support,
particularly if you are calling for in-warranty support.
View the serial and model ID by pressing Start > More > HP Help and Support > Serial and Model
Number.
You can also find this information below the battery of your HP iPAQ:
To locate the serial and model number:
1. Remove the battery cover.
2. Remove the battery from the unit.
3. Locate the label containing the product ID and serial number underneath the battery.
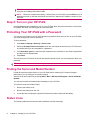
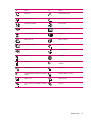
Status Icons
The following table lists the common status indicators and their meanings.
8 Chapter 4 Setting Up Your HP iPAQ

Icon Status Icon Status
Missed call Call forwarding active
Voice call active Call on hold
No SIM card installed SIM card fault
New Voice mail New e-mail or SMS
Instant message received Battery level
Battery level low Battery charging
No battery or battery fault Sync error
Ringer off Speaker phone on
Wi-Fi on Bluetooth
Roaming General Packet Radio Service (GPRS)
available
GPRS available in roaming GPRS in use
Enhanced Data for GSM Evolution (EDGE)
available
EDGE available in roaming
EDGE in use Signal strength
Phone connection unavailable or network
error
Radio off
Status Icons 9

5 Learning the Basics
Get started with your HP iPAQ by learning basic functions such as entering text, knowing the Home
screen, synchronization, and troubleshooting.
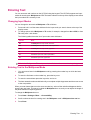
Home Screen
The Home screen displays the date and time and provides a quick status of the remaining battery
capacity, upcoming appointments, your current profile, and the number of unread text messages. From
the Home screen, scroll and select the cellular carrier and Wi-Fi connection status display module to
open the Wireless Manager. Next, press All to turn all wireless connections on/off. At the top of the
Home screen are the connectivity icons, the volume indicator, and the clock. The top of the Home screen
also displays the icons of the last ten programs you used so that you can quickly recall them.
Use the Home screen to do the following:
●
Access all applications and settings by pressing Start.
●
Access your shortcuts by selecting Shortcuts.
Battery Saving Tips
You can adjust the settings on your HP iPAQ to fit your individual needs and to help your battery last
as long as possible between charges. Here are some recommendations to conserve battery life:
●
Sounds — Every time you are notified of an event, battery power is consumed. Press Start >
Settings > Sounds and turn off any notifications that are unnecessary.
●
Auto Turn Off the Backlight — Press Start > Settings > More… > Power Management. Specify
a short amount of time to wait before turning off the backlight. Set Backlight time out on
battery to 5 to 10 seconds and Display time out to 30 seconds.
●
Turn off Bluetooth and Wi-Fi — Always turn off Bluetooth and Wi-Fi when not in use.
HP also offers a variety of accessories to keep your HP iPAQ charged when you are out of the office
for extended time periods. These include the mini-USB synchronization cable and travel adapter. Use
original HP batteries and chargers to charge your HP iPAQ.
To check the battery power, press Start > Settings > Power Management.
Locking and Unlocking Your HP iPAQ
You can lock your HP iPAQ to prevent accidental key presses and unintentional phone calls while you
carry your device.
NOTE: When your device is locked, you can still receive phone call notifications and see appointment
reminders.
To lock your HP iPAQ, press and hold the Send key.
To unlock your HP iPAQ, press Unlock and *. Your HP iPAQ is unlocked and ready for use.
10 Chapter 5 Learning the Basics

Entering Text
You can enter text and numbers on the HP iPAQ using the keypad. The HP iPAQ supports two input
modes for entering text: Multipress and T9. The status indicator on the top of the display screen shows
the input mode that is currently in use.
Changing Input Modes
You can change the text mode to Multipress or T9 as follows:
1. Press and hold * until the status indicator for the input mode you want is shown at the top of the
display screen.
2. To change options in the Multipress or T9 modes, for example, changes from abc to ABC, or from
T9 to t9, press * and release.
The following table shows the list of input mode status indicators:
Indicator Mode
abc The Multipress text input mode, lowercase
Abc The Multipress text input mode, initial capital letters
ABC The Multipress text input mode, uppercase
t9 The T9 text input mode, lowercase
T9 The T9 text input mode, initial capital letters
T9 The T9 text input mode, uppercase
TIP: In the Multipress or T9 text input mode, the first letter of a sentence is always in uppercase.
Entering Text in the Multipress Mode
1. You can enter a letter in the Multipress mode by pressing the number key on which the letter
appears.
2. To enter the first letter on the number key, press the key once.
3. To enter the second letter press the key twice, and so on.
4. The letter entered remains underlined until you complete multiple keypresses and the cursor moves
to the next position.
When you enter letters that are on the same number key, wait until the underline disappears before
entering the next letter. This pause is called the Multipress time out, and you can adjust the length of
the pause between multiple keypresses.
To change the Multipress time out:
1. Press Start > Settings > More… > Accessibility.
2. Scroll to select the time for entering text in the Multipress mode in Multipress time out box.
3. Press Done.
Entering Text 11

Entering Text in the T9 Mode
T9 is a predictive text entry mode that lets you enter a word using a single keypress per letter.
Entering Common Words
To enter common words embedded in the T9 software:
1. Press a key indicating the first letter of the word you want to enter. A list of alternative words and
letter combinations will be displayed on the screen.
2. If the word you want is not displayed, continue by entering the second letter. The word choices are
updated with each keypress.
Entering New Words
You can add new words that are not recognized by T9.
1. To enter the first letter of a word, press the required key once.
2. Use the keypad to enter the rest of the word.
3. If the word you want to type is not present in the dictionary, press ADD WORD?.
4. Enter the word in the Add My Word box and press Done.
NOTE: Your HP iPAQ stores the unrecognized word and includes it in the list of alternative word
choices. When memory space for unrecognized words is filled, your HP iPAQ deletes oldest words
as it adds new words.
TIP: You can also enter numbers and symbols in messages.
Entering the Owner Information
Enter your information so that the HP iPAQ can be returned to you if it is lost.
1. Press Start > Settings > More… > Owner Information.
2. Enter your personal information and press Done.
Viewing the Operating System Information
▲
Press Start > Settings > More… > About.
TIP: You can also press Start > More > Accessories > Resource Manager to view System
Information.
Changing the Regional Settings
The style in which language, locale, numbers, date, time, and currency display are displayed is specified
in regional settings.
To change the regional settings:
1. Press Start > Settings > More… > Regional Settings.
2. Select your region. The region you select determines the available options.
12 Chapter 5 Learning the Basics
Page is loading ...
Page is loading ...
Page is loading ...
Page is loading ...
Page is loading ...
Page is loading ...
Page is loading ...
Page is loading ...
Page is loading ...
Page is loading ...
Page is loading ...
Page is loading ...
Page is loading ...
Page is loading ...
Page is loading ...
Page is loading ...
Page is loading ...
Page is loading ...
Page is loading ...
Page is loading ...
Page is loading ...
Page is loading ...
Page is loading ...
Page is loading ...
Page is loading ...
Page is loading ...
Page is loading ...
Page is loading ...
Page is loading ...
Page is loading ...
Page is loading ...
Page is loading ...
Page is loading ...
Page is loading ...
Page is loading ...
Page is loading ...
Page is loading ...
Page is loading ...
Page is loading ...
Page is loading ...
Page is loading ...
Page is loading ...
Page is loading ...
Page is loading ...
Page is loading ...
Page is loading ...
Page is loading ...
Page is loading ...
Page is loading ...
Page is loading ...
Page is loading ...
Page is loading ...
Page is loading ...
Page is loading ...
Page is loading ...
Page is loading ...
Page is loading ...
Page is loading ...
Page is loading ...
Page is loading ...
Page is loading ...
Page is loading ...
Page is loading ...
Page is loading ...
Page is loading ...
Page is loading ...
Page is loading ...
Page is loading ...
Page is loading ...
-
 1
1
-
 2
2
-
 3
3
-
 4
4
-
 5
5
-
 6
6
-
 7
7
-
 8
8
-
 9
9
-
 10
10
-
 11
11
-
 12
12
-
 13
13
-
 14
14
-
 15
15
-
 16
16
-
 17
17
-
 18
18
-
 19
19
-
 20
20
-
 21
21
-
 22
22
-
 23
23
-
 24
24
-
 25
25
-
 26
26
-
 27
27
-
 28
28
-
 29
29
-
 30
30
-
 31
31
-
 32
32
-
 33
33
-
 34
34
-
 35
35
-
 36
36
-
 37
37
-
 38
38
-
 39
39
-
 40
40
-
 41
41
-
 42
42
-
 43
43
-
 44
44
-
 45
45
-
 46
46
-
 47
47
-
 48
48
-
 49
49
-
 50
50
-
 51
51
-
 52
52
-
 53
53
-
 54
54
-
 55
55
-
 56
56
-
 57
57
-
 58
58
-
 59
59
-
 60
60
-
 61
61
-
 62
62
-
 63
63
-
 64
64
-
 65
65
-
 66
66
-
 67
67
-
 68
68
-
 69
69
-
 70
70
-
 71
71
-
 72
72
-
 73
73
-
 74
74
-
 75
75
-
 76
76
-
 77
77
-
 78
78
-
 79
79
-
 80
80
-
 81
81
-
 82
82
-
 83
83
-
 84
84
-
 85
85
-
 86
86
-
 87
87
-
 88
88
-
 89
89


HP iPAQ 500 Series Owner's manual
- Category
- Mobile phones
- Type
- Owner's manual
- This manual is also suitable for
Ask a question and I''ll find the answer in the document
Finding information in a document is now easier with AI
Related papers
-
HP iPAQ Voice Messenger User guide
-
HP B94HHF20C85 User manual
-
HP iPAQ Data Messenger User guide
-
HP 914c - iPAQ Business Messenger Smartphone Owner's manual
-
-
-
-
-
HP iPAQ Glisten User manual
-
Other documents
-
T-Mobile SDA User manual
-
 Cingular 2125 User manual
-
Mio Digi Walker 8870 User manual
-
Samsung SGH-I300X User manual
-
HP (Hewlett-Packard) h6300 User manual
-
Zoom 4310B User manual
-
 HIMS Co BookSense Quick start guide
-
Pantech PC-8200N User manual
-
Microsoft Smartphone 2002 User manual
-
UTStarcom PN-820 User manual

