Page is loading ...

NOTE: Due to evaporation, water may be lost from the tank if brewer
is left on for long periods of time without making coffee. When this
occurs, pour in enough water to rell the heating tank before brewing.
1
Wilbur Curtis Company, inC.
MODELS INCLUDED
•CAFE1DB
•CAFE2DB
•CAFE3DB
•CAFEAP
•CAFE0PP
ISO 9001 REGISTERED
C
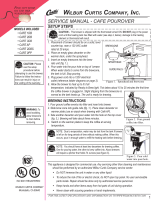
CAUTION: Please
use this setup
procedure before
attempting to use this brewer.
Failure to follow the instruc-
tions can result in injury or
the voiding of the warranty.
CAUTION:Allow
brewcone to
drain before
removing.
SETUP STEPS
1. Placethebreweronasolid,levelcountertop,
neara120VACoutletratedat20amps.
2. Placeanemptyglassdecanteronthewarmer
deck,underthesprayhead.
3.Insertanemptybrewconeintothebrewrails
unit(g.1.).
4. Slowlyllthetankwithroomtemperaturewater
throughtheopeningonthetopcoveruntilwater
startsrunninginasteadystreamfromthebrewcone
(3potsor192ounces).Thetankisfull.
5. Plugpowercordintoa120Velectricaloutlet.
6. Allowthebrewertoheatuptofulltemperature,
indicatedbythegreenReadytoBrewlight.This
takesabout15to25minutesthersttimethe
coffeebrewerispluggedin.Slightdrippingfromthebrewconeisnormalasthetankheatsup.
BREWING INSTRUCTIONS
1.Pourgroundcoffeeevenlyintothelterandplaceitintothebrew
cone.
2.Slidebrewconeintoguiderails(g.1.).Placeacleanempty
decanteronwarmerplate(useanairpotwiththeCaféAP).
3.WhenthegreenReadytoBrewlightcomeson,add64ouncesor
onedecanterofroomtemperaturewaterintoopeningonthetop
cover(g.3.).Brewingwilltakeaboutthreeminutes.
4. Switchonthewarmerplatestokeepthecoffeeatserving
temperature.
NOTE: You should have at least two decanters for brewing coffee.
One for pouring water, the other to brew coffee into. Airpot brewers
will require a pitcher that holds 74 ounces (see gure 3).
Thisapplianceisdesignedforcommercialuse.Anyservicingotherthancleaningandmaintenance
shouldbeperformedbyanauthorizedWilburCurtisCompanyservicecenter.
• DoNOTimmersetheunitinwateroranyotherliquid
• Toreducetheriskofreorelectricshock,doNOTopentoppanel.Nouserserviceable
partsinside.Repairshouldbedoneonlybyauthorizedservicepersonnel.
• Keephandsandotheritemsawayfromhotpartsofunitduringoperation.
• Nevercleanwithscouringpowdersorharshimplements.
CAUTION - This brewer is shipped with the thermostat turned ON. DO NOT plug in unit before
pouring 3 pots or 192 oz. of water into the opening (see step 4, below); damage to the heating
element or thermostat will result.
WILBUR CURTIS COMPANY
Montebello, CA 90640
SERVICEMANUAL-CAFEPOUROVER

PARTS
DIAGRAMS
1
2
3
4
5
5A
6
7
8
8A
9
26
21
22
23
Item Nº Part Nº Description
1 WC-68101 TOPWARMERASSY,120V(CAFÉ2DB)
1A WC-68103 TOPWARMERASSY,220V(CAFÉ2DB)
2 WC-37135 WARMERASSY100W120Vw/PLATE
2B WC-975 WARMERASSY,COMPLETE100W220V
3** WC-54118 TRAYASSYPOUROVER
4** WC-54121 PAN,POURCAFE’
5 WC-517 THERMOSTAT(EXPORTMODELS)
5A** WC-735 THERMOSTAT,TEMPCONTROL120V
6 WC-2962* FITTING,SPRAYHEAD
7 WC-4213 NUT,5/8-18JAMBRASS
8** WC-2958* SPRAYHEAD,BROWN
8A** WC-29025 SPRAYHEAD,PURPLEASF
9 WC-3502 LEG,SCREWBUMPER
10 WC-38099* LABEL,SWPANELCAFÉ2DB(OLDERUNITS)
10A WC-38113* LABEL,SWPANELCAFÉ1DB(OLDERUNITS)
10B WC-38114* LABEL,SWPANELCAFÉ3DB(OLDERUNITS)
10C WC-38127* LABEL,SWPANELCAFÉAP(OLDERUNITS)
10D WC-39373 LABEL,SWPANELCAFÉ2DB(ON/OFFSW)
10E WC-39372 LABEL,SWPANELCAFÉ1DB(ON/OFFSW)
10F WC-39374 LABEL,SWPANELCAFÉ3DB(ON/OFFSW)
10G WC-39371 LABEL,SWPANELCAFÉAP(ON/OFFSW)
11** WC-165 SWITCH,WARMERRED115V
11A WC-166 SWITCH,WARMER(RED)250V
11B WC-137* SWITCH,WARMERRED220V(OLDERUNITS)
12 WC-207 LIGHT,BREW115VGREEN
12A WC-208 LIGHT,BREW250VGREEN
13 WC-3621-101 BREWCONE,7⅛”BLKPLASTIC
14** WC-5310 TUBE,5/16IDX1/8WSILICONE
15 WC-29042 HOSE,VENTILATIONHEATINGTANK
16 WC-2627 GROMMET,COVERHEATINGTANK
17 WC-2628 BUSHING,CONICAL.47IDx.95ODx.99L8mm
18 WC-54125-101 COVER,TOPHEATINGTANK
18A WC-54125* COVER,TOPHEATINGTANK(OLDERUNITS)
19 WC-43062 GASKET,TANKLID
20 WC-54117 TANK,COMPLETE1450W120V
20A WC-54145 TANK,COMPLETE3500W240V
21 WC-917-04 ELEMNT,HEAT1.45KW120VW/NUTS&WSHRS
21A WC-906-04 ELEMENT,HEATING2KW220VW/NUT&WSHR
22** WC-1438-101 SENSOR,TEMPERATURETANK
23** WC-523* THERMOSTAT,MANUALRESET
23A WC-521 THERMOSTAT,THERMOSTAT,AUTORESET
24** WC-29054 TUBE,CAFÉSPRAYHEAD/SYPHON
25 WC-3645 SPRING,DELIMINGCAFESERIES
26 WC-73106 COVER,BOTTOM
27 WC-68102 COVERASSY,TOP(CAFÉ1DB,3DB,AP
27
2
14
15
16
17
18
19
20
10
11
12
13
24
25
NOTE: Items, called out in this illustration, are
specic to Cafe 1DB, Cafe 3DB & Café AP.
All other parts are common.
10A
10D
10B
10E
10C
10F
DELIMING SPRING This spring
is for cleaning lime deposits from
within the siphon tube. Remove the
sprayhead. Insert spring into the
siphon tube.
Twist the spring clockwise as you
push inward. Once past the bend in
the tubing, you can slide it back an
forth to remove hard lime deposits.
* ComponentUsedonOlderUnits
** SuggestedPartstoStock

THERMOSAT ADJUSTMENT
TheCafecoffeebrewerisfactorysetto200ºF.The
brewercanbeadjustedonthethermostatforatank
temperatureofeither200ºFor190ºF.
Toadjust:
1. Unplugtheunitatthepowercord.
2. Removethebackcover,heldbyfourscrews.
3. Locatethethermostat,attachedtoabracketbelow
thetopwrap.Therewillbeapairofcontactscovered
withablackplug(seephoto,right,200ºF).Thisis
wherethetanktemperatureselectionismade.Re-
movingtheblackplugchangesthesettingto190ºF.
Coveringthecontactswillreturnthesettingto200ºF.
Toavoidlosingthesmallblackcover,slipthecover
overoneofthecontactsasshowninphotoatright.
4. Returncovertothebackoftheunitandplugelectrical
cordintothepoweroutlet.
3
CLEANING
RegularcleaningofyourCurtisCafecoffeebrewerwillmaintainthehighestqualitycoffeeyourequipmentiscapableofproducing.Proper
cleaningisessentialinmaintainingthefreshandappealingappearanceofyourcoffeeservice.
1. Firstturnoffthebrewer,unpluggingthecordatthepoweroutlet.
2. Avoidtouchinghotsurfaces.Allowthewarmerplatestocool.
CAUTION-Donotusecleansers,liquidbleach,powdersoranyothersubstancethatcontainschlorine.Theseproductspromotecor-
rosionandwillpitthestainlesssteel.THEUSEOFTHESEPRODUCTSWILLVOIDYOURWARRANTY.
3. Wipeallexteriorsurfaceswithadampcloth,removingspillsanddebris.
4. Slidethebrewconeoutandcleanit.Thoroughlywipesprayheadareawithadampcloth.
5. Washthebrewconeandwirebrewbasket,ifapplicable.Useasoftbristledbrushforhardtocleanareas.Washbothpartswithadetergent
solutionorputthesepartsthroughadishwasher.
6. Washglassdecanterswithdishsoap.Toremovemineraldeposits,soakwithvinegar.
7. Dryallexteriorsurfacesoftheunitwithacleansoftclothtokeepwaterfromspottingthecabinet.
NOTE-Polishtheoutsidestainlesssteelsurfaceswithstainlesssteelpolishafterdrying.Thiswillpreventsurfacescratchesandresultina
cleanerappearance.
De-liming
Everysixmonths,moreofteninareaswithextremelyhardwater,theinsideoftheheatingtankshouldbede-limed.
CAUTION - The de-liming procedure must be performed by a qualied service technician.

D
C
B
2
WHT
1
BRN
RED STP
2
BLK
3
1
BLK
2
1
3
100W, 120VAC
1
WARMER ELEMENT
2
RED
1 2
WHT
WHT
WHT
WHT
WARMER SW
120V NEON
BLK
2
1
3
WHT
WARMER ELEMENT
100W, 120VAC
WARMER ELEMENT
100W, 120VAC
120V NEON
WARMER SW
120V NEON
WARMER SW
BLK
A
WHT #14
YEL
BLU #14
1
2
WHT #14
BLK
HI-LIMIT (220°F)
120/240VAC 25A
SEE TABLE FOR RATING
120V (GREEN) NEON
HEATING TANK
TEMPERATURE
SENSOR
THERMOSTAT,
TEMPERATURE
120/220VAC
HEATING TANK
BREW LIGHT
WHT #14
BLK #14
BLK #14
L1
WHT #14
N
NO
NC
COM
WC-735
WHT/YEL
WHT/YEL
BLK #14
200°F SET POINT
REAR
WARMER
TOP/FRONT
WARMER
BOTTOM
WARMER
4
ELECTRICAL LADDER DIAGRAM – 120V
Brewer Model Café 1DB, 2DB, 2DBS, 3DB & AP (All 120VAC Units)
Table1.MODEL&ELECTRICAL(All120VACUnits)
MODEL CIRCUIT VOLTS WATTS
A
MPS HERTZ WIRE PHASE
CAFE0AP10 WC-917 A 120VAC 1450W 12.1A 50/60HZ 2W + G 1-PHASE
CAFE1DB10 WC- 917 A + B 120VAC 1550W 12.9A 50/60HZ 2W + G 1-PHASE
CAFE2DB10 WC- 917 A + B + C 120VAC 1650W 13.8A 50/60HZ 2W + G 1-PHASE
CAFE2DBS10 WC- 917 A + B + C 120VAC 1650W 13.8A 50/60HZ 2W + G 1-PHASE
CAFE3DB10
CAFE0PP10
WC- 917
WC- 917
A + B + C + D
A
120VAC
120VAC
1750W
1450W
14.6A
12.1A
50/60HZ
50/60HZ
2W + G
2W + G
1-PHASE
1-PHASE
CAFE1DB20 WC- 933 A + B 120VAC 1250W 10.4A 50/60HZ 2W + G 1-PHASE
CAFE2DB20 WC- 933 A + B + C 120VAC 1350W 11.3A 50/60HZ 2W + G 1-PHASE
CAFE3DB20 WC- 933 A + B + C + D 120VAC 1450W 12.1A 50/60HZ 2W + G 1-PHASE
HEATING
ELEMENT
LD-CAFE-10 rev Q

Brewer Model Café 1DB,
2DB, 3DB & AP (All 208-
240VAC Units)
Table2.MODEL&ELECTRICAL(All208-240VACUnits)“ExportOnly”
MODEL
HEATING
ELEMENT CIRCUIT VOLTS WATTS AMPS
CAFE0AP30 WC- 906 A 240VAC 2000W 8.3A
CAFE1DB30 WC- 906 A + B 240VAC 2100W 8.8A
CAFE2DB30 WC- 906 A + B + C 240VAC 2200W 9.2A
CAFE3DB30 WC- 906 A + B + C + D 240VAC 2300W 9.6A
MODEL AND ELECTRICAL TABLE
5
ELECTRICAL LADDER DIAGRAM – 220V

Printed in U.S.A. 10/09 F-3215-S Rev P
FOR THE LATEST SPECIFICATIONS AND INFORMATION GO TO WWW.WILBURCURTIS.COM
WILBUR CURTIS CO., INC.
6913AccoSt.,Montebello,CA90640-5403USA
Phone:800/421-6150Fax:323-837-2410
TechnicalSupportPhone:800/995-0417(M-F5:30A-4:00PPST) E-Mail:[email protected]
WebSite:www.wilburcurtis.com
Product Warranty Information
The Wilbur Curtis Company certies that its products are free from defects in material and workmanship under normal use. The following limited
warranties and conditions apply:
3 Years, Parts and Labor, from Original Date of Purchase on digital control boards.
2 Years, Parts, from Original Date of Purchase on all other electrical components, ttings and tubing.
1 Year, Labor, from Original Date of Purchase on all electrical components, ttings and tubing.
Additionally, the Wilbur Curtis Company warrants its Grinding Burrs for Forty (40) months from date of purchase or 40,000 pounds of coffee,
whichever comes rst. Stainless Steel components are warranted for two (2) years from date of purchase against leaking or pitting and replace-
ment parts are warranted for ninety (90) days from date of purchase or for the remainder of the limited warranty period of the equipment in which
the component is installed.
All in-warranty service calls must have prior authorization. For Authorization, call the Technical Support Department at 1-800-995-0417. Effective
date of this policy is April 1, 2003.
Additional conditions may apply. Go to www.wilburcurtis.com to view the full product warranty information.
CONDITIONS&EXCEPTIONS
The warranty covers original equipment at time of purchase only. The Wilbur Curtis Company, Inc., assumes no responsibility for substitute replace-
ment parts installed on Curtis equipment that have not been purchased from the
Wilbur Curtis Company, Inc. The Wilbur Curtis Company will not accept any responsibility if the following conditions are not met. The warranty
does not cover and is void under the following circumstances:
1) Improper operation of equipment: Theequipmentmustbeusedforitsdesignedandintendedpurposeandfunction.
2) Improper installation of equipment:Thisequipmentmustbeinstalledbyaprofessionaltechnicianandmustcomplywithalllocalelectrical,
mechanicalandplumbingcodes.
3) Improper voltage:Equipmentmustbeinstalledatthevoltagestatedontheserialplatesuppliedwiththisequipment.
4) Improper water supply:Thisincludes,butisnotlimitedto,excessiveorlowwaterpressure,andinadequateoructuatingwaterowrate.
5) Adjustments and cleaning:Theresettingofsafetythermostatsandcircuitbreakers,programmingandtemperatureadjustmentsarethe
responsibilityoftheequipmentowner.Theownerisresponsibleforpropercleaningandregularmaintenanceofthisequipment.
6) Damaged in transit:Equipmentdamagedintransitistheresponsibilityofthefreightcompanyandaclaimshouldbemadewiththecarrier.
7) Abuse or neglect (including failure to periodically clean or remove lime accumulations):Manufacturerisnotresponsibleforvariation
inequipmentoperationduetoexcessivelimeorlocalwaterconditions.Theequipmentmustbemaintainedaccordingtothemanufacturer’s
recommendations.
8) Replacement of items subject to normal use and wear:Thisshallinclude,butisnotlimitedto,lightbulbs,sheardisks,“0”rings,gaskets,
siliconetube,canisterassemblies,whipperchambersandplates,mixingbowls,agitationassembliesandwhipperpropellers.
9) Repairs and/or Replacementsaresubjecttoourdecisionthattheworkmanshiporpartswerefaultyandthedefectsshowedupundernormal
use.Alllaborshallbeperformedduringregularworkinghours.Overtimechargesaretheresponsibilityoftheowner.Chargesincurredby
delays,waitingtime,oroperatingrestrictionsthathindertheservicetechnician’sabilitytoperformserviceistheresponsibilityoftheowner
oftheequipment.Thisincludesinstitutionalandcorrectionalfacilities.TheWilburCurtisCompanywillallowupto100miles,roundtrip,per
in-warrantyservicecall.
RETURN MERCHANDISE AUTHORIZATION: All claims under this warranty must be submitted to the Wilbur Curtis Company Technical Sup-
port Department prior to performing any repair work or return of this equipment to the factory. All returned equipment must be repackaged
properly in the original carton. No units will be accepted if they are damaged in transit due to improper packaging. NO UNITS OR PARTS WILL
BE ACCEPTED WITHOUT A RETURN MERCHANDISE AUTHORIZATION (RMA). RMA NUMBER MUST BE MARKED ON THE CARTON
OR SHIPPING LABEL. All in-warranty service calls must be performed by an authorized service agent. Call the Wilbur Curtis Technical Sup-
port Department to nd an agent near you.
ECN 10648 . 10/21/9 @ 14.9 . EAR 7522
/


