Page is loading ...

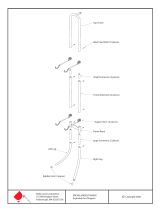
Threaded hole
Attach to wall
SEE OVER
Stand shelving unit upright and lean against unobstructed wall so that shelves are level.
5
6
©
Copyright 2010
3 SHELF UNIT WS1003
ASSEMBLY DIAGRAM
Delta Cycle Corporation
125 Washington Street
Foxborough, MA 02035 USA
IMPORTANT: READ ENTIRE INSTRUCTION BEFORE ASSEMBLY
Maximum load per shelf (spread evenly) 165lbs (75Kgs)
Failure to follow instructions can reduce the strength of this rack and the load capacity.
SAFTEY WARNING: Do not use as a step ladder. Never allow children to climb on rack.
In order to avoid accidental toppling of the rack, a wall stabilizing strap is supplied. This should be attached
to the rack at one end with the bolt provided. The other end of the strap should be secured to the wall using
a screw that is suitable for the type of wall construction. If in doubt, consult your hardware merchant for the
correct method of xing based on the wall construction.

While frame assembly is face down on ground,
determine shelf positions and attach shelves
using bolts.
Insert leg tubes (rubber feet on bottom) into frame
as shown, line up holes and screw in bolts.
Insert extension tubes into top tubes,
line up holes and screw in bolts.
Hook each one of the shelves to the corosponding
support hole in the strap.
1
2
3
4
©
Copyright 2010
3 SHELF LEANING UNIT DWS1003
ASSEMBLY DIAGRAM
Delta Cycle Corporation
125 Washington Street
Foxborough, MA 02035 USA
SEE OVER
IMPORTANT: READ ENTIRE INSTRUCTION BEFORE ASSEMBLY
PARTS LIST
LEG TUBE with Foot X 2
EXTENSION TUBE X 2
TOP TUBE with STRAP X 1
BOLT X 10
SHELF X 3
ANCHOR KIT X 1
Note: Front lip of shelf should face down.
/