VersaTube VS3406014420GW User manual

Category
Garage Door Opener
Type
User manual
UNIVERSAL ASSEMBLY INSTRUCTIONS
FOR VERSATUBE BUILDINGS
CONTRACTOR SERIES
2” X 4” FRAMES
PAGE 1
Our unique assembly process quickly transforms the individual pieces into a finished
structure that will give you years of service. Great care has been taken to ensure
complete satisfaction with your purchase. In the unlikely event that there are any missing
or damaged parts or if you simply need technical assistance, please call our Toll Free Hot-
line at 1-800-900-7222 and your questions will be addressed promptly. Thank you for
choosing the Versatube Building System.
© MSMP INC. 2/12/11
ZINST-CS
PAGE 2
SAFETY AND HAZARD INSTRUCTIONS
IMPORTANT
Read the following safety warnings and all instructions in their entirety prior to installation. If you have questions or are
missing any parts, contact VersaTube Building Systems Customer Service at 1-800-900-7222 before proceeding.
WARNING:
This structure and its manufactured components are engineered per the instructions and engineering plans provided by
VersaTube Building Systems. The use of any framing components or materials in the erection of this structure that are not
produced or provided by VersaTube could negatively affect the structural integrity and will negate any warranty provisions.
VersaTube Building Systems and its authorized dealers are not responsible for any structural collapse or failure to perform
resulting from additions, add-ons, or manipulation of non-VersaTube components and/or failure to follow approved
instructions.
WARNING:
Metal parts may get hot when exposed to high heat or direct sunlight. Avoid contact with skin and wear protective gloves and
clothing to prevent the possibility of burns.
WARNING:
Avoid installation on windy days as wind may create hazards during the installation process. Wind may blow material or
cause partially installed components to collapse prior to being secured or fully installed. The weight of the components or
structure may cause serious injury if it should collapse.
WARNING:
Metal conducts electricity and electrical shock hazards exist since the structure is made of metal. During installation or
storage, keep the structure and all components away from electrical sources. Make sure that your selected location is away
from power lines, underground cables, and any other source of electrical power. Serious injury or even death may occur if
contact is made with electrical current.
WARNING:
If the structure is moved once it has been installed, be certain to inspect all components and conditions and follow each and
every step of these instructions to make certain that the structure is securely anchored, properly installed, and aligned.
Failure to follow these steps could lead to collapse of the structure and may result in serious risk of injury.
WARNING:
In the event that your structure is enclosed, be sure to provide proper and adequate ventilation and egress and ingress.
Hazardous, poisonous or noxious substances should not be stored in the structure absent proper ventilation and all warnings
and instructions of the manufacturer of the substance. Also, proper ingress and egress should be provided to prevent adults
or children from becoming trapped inside the structure.
WARNING:
If metal panels are selected to cover all or a portion of your structure, be careful of the sharp edges which may cause cuts or
lacerations. Wear protective work gloves and suitable clothing for protection and always take care when handling metal
parts. Always wear safety goggles or glasses when cutting metal or driving/drilling screws.
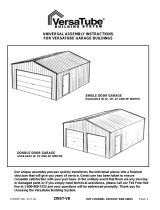
ABOUT THE CONTRACTOR SERIES BUILDINGS:
Contractor series buildings are buildings with 2” x 4” frame sections. The roof pitch is 3/12. They can be built
using base rails or base plates. The end walls are typically 2” x 3” posts on 4’ centers. The typical frames are on
4’ or 5’ centers, however, some buildings can be built on 6’ centers with low live loads. The 2” x 4” frame allows
us to construct buildings up to 16’ at the eave and up to 52’ wide. Most of our buildings are sheeted vertically
using hat channel for the roof purlins and side girts. We use 1 1/2” square tubes flush mounted for the end wall
girts. Hat channel can be used for end wall girts. This requires that you frame along the gable rafters and frame
out with 1 1/2” square tubes around doors and windows. The buildings can be built using horizontal side panels
and vertical roof panels. We recommend 26ga. panels or diagonal wind bracing if side metal is applied
horizontally. For purposes of these instruction we will be describing the frame layout and construction for
vertically sheeted buildings with flush mounted end wall girts.
Our buildings are typically places on a concrete slab with footings. Buildings can be constructed using strip
footings or concrete piers at each post in place of the slab with footings.
Because the building frames are 2” x 4” 14ga. tubing and the buildings are typically taller at the eave the
assembled trusses are too heavy to be lifted by hand. You will need a small crane or a boom attachment to a
skid loader or tractor to lift and set the trusses in place.
ATTENTION:
IT IS IMPORTANT THAT YOU READ THE FOLLOWING NOTE
BEFORE STARTING THE ASSEMBLY OF YOUR BUILDING
NOTE:
If during the installation process you have difficulty fitting frame components together, use an
adjustable wrench to open end of receiving tube as shown below, left. Close wrench down around bent
portion of tube and bend wall outward.
It may also be helpful to hit the center of the swaged at the end of the tube to create more of a lead
.
What you’ll need:
Work Gloves
Hammer
PAGE 3
Chalk Line and
Mason Line or
Nylon String
STRIKE WITH HAMMER
Pencil/Marker and
Felt Marker
Cordless (14 or 18 volt)
Or Electric Screw Gun
With 5/16" Socket Drive
and Extension
Torque Setting
One must be able to comfortably reach
the peak of the building 10’ to 22' high
Depending on building width and height.
An Extension ladder can also be helpful
when installing sheet metal.
2 Step Ladders
Level
Utility Knife
Wrench, 3/4” & 1/2”
Motor Cycle or
Ratchet Straps
(May be required to pull
frame plumb.)
Vise grip or other
quick clamp
Adjustable wrench
Tin Snips
Aviation Snips
Hammer
Drill
Masonry
Drill Bit
1/2” x 8”
Drill depth
Tape Measure
Safety Goggles
Or glasses
Hack Saw or
Circular saw with
Abrasive disk
Because of the size of most of the contractor series buildings you will need a small crane or skid loader with
a boom attachment to lift the trusses into place. You may also want to rent a scissor lift to create a movable
work platform. You will also need additional hat channel or 2x4s to use as bracing to plumb the frame.
BASIC PARTS LIST: SIZES AND QUANTITIES WILL VARY BY BUILDING WIDTH AND LENGTH
SEE THE PACKING SLIP WITH YOU BUILDING FOR PART NUMBERS AND QUANTITIES.
8’ or 10’ STARTER BASE RAIL
Used on buildings with 4’ or 5’
on center post spacing
6’ STARTER BASE RAIL
Used on buildings with 4’ on
center post spacing
4’,5’ or 6’ BASE EXTENSION
RAIL
6’ on center post spacing
8’ or 10’ BASE EXTENSION
RAIL Used on buildings with
4’ or 5’ on center post spacing
PEAK
SIDE POST IS A CUT 2X4 TUBE (6’ LONG)
RAFTER IS A CUT 2X4 TUBE
END WALL HEIGHT
EXTENSION
COLLAR TIE BRACKET
LEFT AND RIGHT
ANGLE BRACKET
FLAT BRACKET
SINGLE PURLIN BRACKET
DOUBLE PURLIN
BRACKET
TRUSS BRACE END TIE 2” X 2”
BUTYL SEALING TAPE
INSIDE CLOSURE
OUTSIDE CLOSURE
END WALL GIRTS 1 1/2 SQUARE
#12 X 3/4” SELF-DRILLING SCREW
#10 PAN HEAD, SELF–
DRILLING SCREW
1” SELF-DRILLING SCREW
WITH WASHER, PAINTED
PARTS NOT SHOWN ARE 2X3 OR 2X4 STRAIGHT LENGTH
PARTS. SHEET METAL AND TRIM ARE SHOWN IN THAT
SECTION.
PAGE 4
HAT CHANNEL (ROOF AND SIDES)
4’, 5’, 8’, 10’ or 20’ LENGTH.
CONCRETE
WEDGE ANCHOR
TRUSS BRACE CENTER TIE 2” X 2”
SWAGED BOTH ENDS
EAVE CORNER
700-BK10 BRACKET
HEIGHT EXTENSION
FOUNDATION NOTES
 You should check with your local building official or Code Enforcement Office for the foundation
requirements in your County. You will need to know the frost depth, the wind load and the snow load to
determine the size and depth of the footings.
 If you order an engineering drawing package it will include a foundation drawing. The typical VersaTube
foundation is a 4” thick slab with 12” wide x 12” below grade footing. The footing has two runs of #4 rebar
running the length of the footing, one 3” from the bottom and one 5” above that rebar. The rebar is
centered in the footing. We also recommend a welded wire fabric reinforcement 6/6/10/10 at mid-depth in
the slab. You could also use #3 rebar in a square grid pattern 24” on center.
 The ground should be compacted to a minimum of 1000 PSI bearing pressure.
 If you have a frost depth deeper than 12” you will need to extend the footing depth down to or below the
frost line.
 We recommend the use of a 1 1/2” x 1 1/2” sheeting ledge around the top edge of the slab. This will close
off the bottom of the side metal panels and prevent water from running onto the building floor.
 If you do not require a concrete slab, you can pour concrete strip footings without a slab.
PIERS: You can use concrete piers in place of the slab and footing or strip footing. The piers must be sized to
support the dead load of the building plus the roof snow load. The piers must be deep enough to resist the
wind uplift on the building and be at least as deep as the frost line. Our typical pier is 12” in diameter. Larger
buildings and buildings with a heavy snow load will require a wider pier. Piers are typically located at every
post.
CONCRETE: We typically speck 2500 psi concrete, however some Counties require a denser concrete.
Please check with the building department for a recommendation. If your building in located in a high wind
area you may need to increase the concrete density to get better pull out ratings on you anchors.
ANCHORS: We recommend concrete wedge anchors be used to anchor your VersaTube building. On the
sides of the building we use 5/8” x 5” anchors with the base plates and 5/8” x 7” anchors with base rails.
On the end walls we use 1/2” x 4 1/2” anchors for base plates and 1/2” x 7” anchors for base rails.
1 1/2”
SHEETING LEDGE
SLAB
PAGE 5
PAGE 6
STEP 1 IF YOU ARE USING BASE RAILS: BASE RAIL ASSEMBLY
If you are using the base plates proceed to the next page
Place the starter base rails in the front corners of the building 1 1/2” in from the sheeting ledge on the sides of the slab.
(See FRONT DETAIL below) The outside dimension of the base rails should be your building width (24’ to 52’) The starter
base rails are ether 6’-2”, 8’-2” or 10’-2” long with 2 or 3 welded vertical pins. The 6’-2” rails are for 6’ on center buildings,
the 8’-2” rails are for 4’ on center buildings and the 10’-2” rails are for 5’ on center buildings.
Now, insert 8’ or 10’ length extension base rails into the starter base rails as shown until you get to the desired building
length. NOTE: the last base rails that you insert to get to your building length may be 4’ or 5’ base extensions.
The vertical pins should be on 4’, 5’ or 6’ centers. As you insert base extensions measure the distance from pin to pin and
adjust the joint so that all the pins are on 4’, 5’ or 6’ centers. (46”, 58” or 70” between pins)
HINT: IT may be helpful to cut a spacer board 46”, 58” ore 70” to use as a guide for pin spacing. When you are sure that
you have all the base rails in the proper location, fasten each joint with two #12 self-drilling screws on the top of the base
rail.
SIDE GARAGE DOORS: If you will be installing garage doors in the side of a building you will be removing 2 side posts.
Typically you will remove two 6’, one 8’ or 10’ base extension rail and start the base rail run again with a starter 4’,5’, 6’, 8’
or 10’ starter base rail. The distance between pins at the opening will be 142” for 4’ or 6’ on center buildings and 178” for 5
on center frames.
ANCHORING THE BASE RAILS:
Check with your local building official to see if concrete expansion
bolts are acceptable in your area. Some regions may
require adhesive anchors. We recommend 5/8” x 7” expansion
anchors with a 5/8” flat washer.
INSTALLATION:
Use a 5/8” concrete bit in a hammer drill to drill a 5” deep hole in
the slab. Use the anchor hole in the tube as a guide. Place the
washer and nut on the top of the bolt with about 2 threads
showing. Tap the bolt into the hole with a hammer and tighten the
nut until it is good and snug. Do not crush the base rail tube.
Note: Before you drill holes in concrete be sure that you have se-
cured the joint between base rails with (2) # 12 x 3/4” self-drilling
screws. This will keep the base rails from vibrating apart.
PIN
4’ OR 5’
4’ OR 5’
STARTER BASE RAIL
8’-2” OR 10’-2” (3) PINS
EXTENSION BASE RAIL
8’-2” OR 10’-2” (2) PINS.
(AS MANY AS NEEDED TO
GET TO YOUR BUILDING
LENGTH
EXTENSION BASE RAIL
4’ OR 5’
ACTUAL SIZES:
52 3/4”, (1) SWAGE, (1)
PIN OR
64 3/4”, (1) SWAGE, (1)
PIN.
SOME BUILDINGS WILL
NOT HAVE A 4’ OR 5’
EXTENSION AT THE
END
1 1/2”
1 1/2”
1 1/2”
FRONT VIEW
1 1/2”
1 1/2”
SIDE VIEW
#12 SELF-
DRILLING SCREW
2 PER JOINT
JOINT DETAIL
7”
PLACE THE END OF THE
STARTER RAIL WITH 2 ANCHOR
HOLES IN THE CORNER OF THE
BUILDING
LAYOUT FOR 6’ ON CENTER BASE RAILS
6’ STARTER RAIL 6’ BASE EXTENSION
STEP 1 IF YOU ARE USING BASE PLATES: SIDE POST LAYOUT
STEP 1: MARKING THE SIDE POST LOCATIONS
Using a pencil or other marking devise, on the top of the slab mark the location of the leading edge of each side post. The
space between marks will be 4’, 5’ or 6’. Make these marks down the full length of the building on both sides of the
building. If you use a speed square to mark the line on the slab and make the line about 6” long you will be able to see
the line from both sides of the post when you install the posts.
4’, 5, or 6’
HEIGHT EXTENSION
SIDE POST
#12 X 3/4” SELF-DRILLING SCREWS
SWAGE JOINT
PAGE 7
SIDE POSTS AND HEIGHT EXTENSIONS
If your building is 10’ at the eave, you will not be installing a height extension. The base plate is welded to the bottom of
each side post. The side post for a 10’ building is a 2” x 4” x 6’ tube with a anchor or base plate welded to one end. If your
building is 12’ at the eave you will assemble a 6’ side post (no plate) to a 2’ height extension. The height extensions have
a base plate welded to the bottom. A height extension has one end swaged or reduced to fit into the side post. The
swage is 6” long. If your building is 14’ at the eave you will use a 4’ height extension. A 16’ building uses a 6’ height ex-
tension.
ASSEMBLY OF SIDE POST TO HEIGHT EXTENSION: The side post is a cut piece of tubing 2” x 4” x 6’. Insert the top of
the height extension into the side post and attach with (4) #12 x 3/4” self-drilling screws.
STEP 2: POSITIONING AND ANCHORING THE SIDE POST/ HEIGHT EXTENSIONS ON THE
SLAB
The outside of each post should be set 1 1/2” from the edge of the sheeting ledge. This is the space provided for the 1 1/2”
high hat channel girts. The corner post should be flush with the sheeting ledge. (If you are using hat channel for the end
wall girts the corner post will be 1 1/2” from the sheeting ledge.) The anchor portion of the base plate is turned toward the
inside of the building as shown. All of the additional side posts will face the same direction unless it is necessary to turn
them the other direction at a door opening. The corner post at the other end of the building will be turned back to the inside
of the building.
The base plates will be attached to the slab with 5/8” x 5” concrete wedge anchors. Position the side post assembly, mark
the location for the anchor bolt, remove the side post assembly. Using a 5/8” concrete drill bit in a hammer drill, drill a hole
in the slab 5 1/2” deep. Place the flat washer on the anchor bolt and thread the hex nut on to the bolt until about 2 threads
show above the nut. Place the side post assembly back in place, insert the anchor bolt into the hole an tap it in with a ham-
mer. Tighten the nut. You must then plumb the post side to side and front to back and brace the post in place with a diago-
nal brace to a stake in the ground on the outside of the building. A wood 2x4 or additional pieces of hat channel can be
used as braces.
1 1/2”
EDGE OF
SHEETING LEDGE
CORNER SIDE POST
BASE PLATE EXTENDS 1/4”
OVER SHEETING LEDGE EDGE
CORNER POST
46”, 58” or 70”
BETWEEN POSTS
INSTALLING ADDITIONAL SIDE POSTS
Position and anchor all additional side
posts as you did the corner post on 4’, 5’
or 6’ centers using the post locating marks
you put on the slab. Install at least two
runs of hat channel girts down the wall.
This will line up and hold the posts plumb
and properly spaced at 4’, 5’ or 6’ centers.
Hint: You may want to cut a spacer board
to set the space between post as you in-
stall hat channel girts. The first or lower
run of hat channel is 2” from the slab. You
can use 2x3 or 2x4 tubes laid on their side
as a spacer under the lower edge of the
hat channel. The ends of the hat channel
should fall in the center of a side post.
Attach the hat channel with #12 x 3/4”
self-drilling screws. Add additional diago-
nal braces as needed down the length of
the building.
All bottom runs of hat channel are 2” from
the slab. The on center spacing of hat
channel runs on different eave height
buildings will be different.
On 10’ buildings: 38” on center.
On 12’ buildings: 46” on center.
On 14’ buildings: 40 1/2” on center.
On 16’ buildings: 46 1/2” on center.
PAGE 8
1”
END OF HAT
CHANNEL
CENTERED IN
FRAME
BUTT ENDS OF HAT
CHANNEL TOGETHER
CENTERED IN FRAME
INSTALLING A SIDE GARAGE DOOR FRAME
The following assembly instructions are for a typical side door 10’ wide x 2’ shorter than the eave height. Side doors are
typically 10’ wide because we don’t like to remove more than two side posts. There are exceptions to this rule. Please see
your building drawings for details on the side door in your building as well as door location.
If you have a side garage door in your building you will have to skip or remove two of the side posts. In place of the two
side posts you will install a side door assembly. A side door assembly has two double jamb posts (the height of the door
opening) and a double header with insert tubes welded on the top. The door jamb assembly is two 2x4x door opening
height posts welded together and a base plate welded to the bottom for anchoring to the slab. The door header is two 2x4
tubes long enough to span the opening ( on 4’ and 6’ on center buildings the header is 142” long. On 5’ on center buildings
the header is118” long.) On top of the header we weld 1 3/4” x 2 3/4” x 4” insert tubes. These tubes will fit inside the eave
corners of the truss. They are on 4’, 5’ or 6’ centers. Attach the door header to the double jamb posts with BK-10 angle
brackets.
Also attach BK-10 angle brackets to the top and bottom of the header flush with the ends. These will attach to the truss
eave corners when they are installed.
Locate the assembly on the slab between the side posts per your drawing and anchor the plates to the concrete slab and
brace the assembly to be plumb and square.
PAGE 9
DOUBLE DOOR
JAMBS
WELDED ON BASE
PLATE
BK-10 ANGLE
BRACKETS
DOUBLE HEADER
WELDED WITH
INSERT TUBES ON
TOP
SIDE DOOR
FRAME ASSEMBLY
DOOR FRAME CAN BE HELD IN
PLACE WITH ANGLE BRACING
AND HAT CHANNEL GIRTS.
ANCHOR THE BASE PLATES
LIKE THE SIDE POSTS.
THESE SIDE POSTS WERE REMOVED
WIDTH OF
DOOR
If you have base rails, the dou-
ble door jambs will have a
swaged pin (like the base rail
pins) welded flat at the bottom.
The pin will have an anchor
hole punched in it. These pins
will slide into the base rails at
both sides of the door opening.
Base rail pin
welded here
STEP 3: ASSEMBLING THE TRUSS
Note: The two end trusses
will have no collar tie or bracing. The basic interior truss has a collar tie and the W web
Assembly. Many of the buildings will require the use of knee braces in the corners. All trusses have the corner brackets.
When one or both ends of a truss are located over a side garage door the eave corner may be cut down to fit (see your
drawing package) In locations that have a heavy snow load or a high wind load the truss/knee brace design may have to be
changed (see your drawing package). Some buildings 24’ wide and under may have a truss brace with out the web. A type 2
or standard truss brace will have one center vertical 1 1/2” square with BK-30 brackets at both ends.
A typical truss frame has 13 basic parts: 1 peak, 2 rafters, 2 eave corners, 2 corner brackets, 1 collar tie center tube,
2 collar tie end tubes, 2 collar tie brackets (1 left & 1 right), 2 inside web braces. 2 outside web braces and 6 brace brackets
with hardware. The knee braces (two) are not required on all buildings. The length of rafters and braces will depend on the
width of the building. (Note, your building may have a different truss. See your drawings for truss brace layout)
ASSEMBLY: Use #12 x 3/4” self-drilling screws and screw gun with 5/16” socket with extension in all assembly operations.
1. Install a rafter on both ends of the peak. Use 4 screws in each joint
2. Install a eave corner at the other end of each rafter. Before you install screws, measure from the outside of one eave
corner to the other and set the dimension at the building width. (Example 30’, 40’ or 50’) Keep the joint spaces equal on
both sides of the assembly. This will keep the peak centered in the building. Use 4 screws in each joint.
3. Attach eave corner brackets (shipped unbent) to the eave corner by bending the bracket around the eave corner. Use a
straight edge to ensure that the bracket is flush against the eave corner. Install 2 screws on each side of the truss at
both ends of the bracket. This will require turning the truss over.
4. Join the 3 collar tie pieces. (1 collar tie center tube and 2 collar tie end tubes) Use a straight edge to make sure the
assembly is straight and install 8 screws in each swage joint.
5. Attach a right collar tie bracket on one end of the assembly and a left collar tie bracket on the other end. Fill all of the
screw holes.
6. Center the collar tie assembly in the frame (approximately 18” from outside of truss) and attach the brackets to the eave
corners. Fill all of the screw holes.
7. The web braces are 1” square tubes with flattened ends and 1 hole. The length of a web brace is from the center of one
hole to the center of the other hole. Braces are attached to the brackets with 3/8” x 1 1/4” hex bolts, lock washers and
nuts. The brackets are attached to the frame with 3 self-drilling screws . Two braces can be bolted to the same bracket.
Install the first 2 brackets on the under side of the peak about 7 3/4” from the center line of the building.
Attach one end of the inside (longer) brace to the bracket. Do not tighten at this time. (x2)
Attach the other end of the inside brace to another brace bracket on the same side as the other bracket. (x2)
Attach a outside (shorter) brace to the opposite side of the same bracket. Do not tighten at this time. (x2)
Attach the other end of the outside brace to another brace bracket on the same side as the other bracket. (x2)
Make sure that the collar tie is straight and attach the brackets with the 2 braces connected to the collar tie. (x2)
Attach final brackets to the rafter and then tighten all bolts and nuts.
8. Knee Braces: Knee braces are the same as web braces. The typical knee brace is 30” long for contractor series build-
ings. You should check with our engineering department to see if nee braces are required on your building. If you are
installing knee braces attach a brace bracket to the under side of the eave corner about 1” from the end of the collar tie.
Attach a Knee brace to the bracket and a bracket to the lower end of the knee brace. Attach the lower bracket to the
lower portion of the eave corner. Repeat on the other opposite end of the truss. Tighten all nuts and bolts securely.
PEAK
RAFTER
CENTER COLLAR
TIE TUBE
END COLLAR
TIE TUBE
INSIDE WEB BRACE
OUTSIDE WEB BRACE
COLLAR TIE BRACKET
CORNER
BRACKET
KNEE BRACE
IF REQUIRED
BRACE
BRACKET
BRACE
BRACKET
SEE THE NEXT PAGE FOR MORE DETAIL ON BRACKETS AND ASSEMBLY
PAGE 10
EAVE
CORNER
#12 SELF-DRILLING SCREW
WEB BRACE AND BRACE BRACKET
The illustration below is a web brace to brace bracket joint. This illustration shows two braces to a bracket.
WEB BRACE LENGTH
PAGE 11
WEB BRACE
BRACE BRACKET
3/8” X 1 1/4” HEX BOLT
LOCK WASHER
NUT
#12 SELF-DRILLING SCREW
3 PLACES
7 3/4”
18”
INSIDE WEB BRACE
OUTSIDE WEB BRACE
KNEE BRACE
IF REQUIRED.
KNEE BRACES
COULD BE
LONGER.
CHECK YOUR DRAWINGS FOR THE BRACE LENGTHS FOR YOUR BUILDING
BRACE BRACKET
COLLAR TIE BRACKET
CORNER
BRACKET
4 SCREWS IN ALL
FRAME JOINTS
8 SCREWS IN COLLAR
TIE JOINTS
TYPICAL TRUSS
RAFTER
EAVE
CORNER
PEAK
CENTER COLLAR
TIE TUBE
END COLLAR
TIE TUBE
DOUBLE FINK TRUSS BRACE FOR HEAVY
LOADS OR WIDER BUILDINGS.
USED WITH DOUBLE COLLAR TIE BRACK-
ETS AND LONGER KNEE BRACES
STEP 4: INSTALLING THE END WALL TRUSS
You will need a crane or boom attachment to a skid loader to lift and install the trusses to the side posts. You should also
have three people for this operation. One person to operate the crane and one on both sides of the building to guide the
swaged ends of the eave corners into the top of the side posts. The end wall trusses have no collar tie and bracing. Try to
lift the end wall truss from two points equally spaced from the center. This will prevent the truss frame from bending.
At this time you can install the center vertical or verticals in the end wall to support the center section of the end wall truss.
See your drawings for the location and parts for your building. If you are using base plates, you will be installing a PP-60
pin plate. If you are using base rails, you will be installing a starter base rail (see your drawings).
Do not attach with screws until all of the trusses are installed and checked for alignment with the other trusses.
Reference information: A 40’ wide end wall truss weighs 202 lbs. A 40’ wide interior web truss weighs 301 lbs.
CRANE OR BOOM ATTACHMENT END WALL TRUSS
SIDE POST
STEP 5: INSTALLING THE BACK WALL CENTER BRACE OR BRACES
Please check your drawings to see the layout of the back verticals on your building. You may or may not have a vertical in
the center of the back wall. Installing the center verticals will support the truss and remove the sag that will occur in an
unsupported truss.
The studs on the ends of the building are 2” x 3” tubes. If you building is over 10’ at the eave you will be using height exten-
sions (the height extension has one end swaged or reduced) with a longer vertical. The back vertical tubes will fit onto the
swaged end of a base rail pin or the swaged end of a pin on a base plate.
If you are using base plates or base rails you must see your drawings for the measured layout of the pin plates or base rails.
The pin plate that you will be using is VersaTube part no. PP-60. The base plate will be placed to the side of the vertical pin.
The base plate can be turned to the left or right as needed. You will want to turn the plate away from walk door openings.
PP-60
PIN PLATE
STARTER
BASE RAIL
BASE
EXTENSION
PAGE 12
The illustration below is a typical end wall installation for 40’ wide buildings. Please see your drawings to determine the
parts and layout of the end wall on your building. Illustration A is for pin plates
and illustration B is for base rails. If you
have pin plates you will anchor the pin plates to the slab with 1/2” x 4 1/2” concrete wedge anchor. Base rails are anchored
with 1/2” x 7” concrete wedge anchors. At this time you can install all the verticals or just the center vertical to support the
truss. Attach the verticals to the peak and rafters with two 700-bk10 brackets on the inside of the building.
(See next page for details). If your end wall has one or two garage doors install the verticals on both sides of the garage
doors to support the truss. Repeat this assembly at the other end of the building.
See your drawing package for layout.
PP-60 PIN PLATE
HEIGHT EXTENSION
FOR BUILDINGS
OVER 10’ EAVE
END WALL
VERTICAL
4’ TYPICAL
ILLUSTRATION (A)
With Base Plates
ILLUSTRATION (B)
With Base Rails
STARTER
BASE RAIL
8’ BASE EXTENSION 4’ BASE EXTENSION
HEIGHT EXTENSION
CUT TO FIT
PAGE 13
HEIGHT EXTENSION
FOR BUILDINGS
OVER 10’ EAVE
END WALL
VERTICAL
4’ TYPICAL, 8 PLA.
43”
The illustration below shows a typical assembly of an end wall vertical.
USE 2 SCREWS IN
EACH VERTICAL
JOINT
PP-60 PIN PLATE
HEIGHT EXTENSION
FOR BUILDINGS
OVER 10’ EAVE
END WALL
VERTICAL
700-BK10 BRACKETS
VIEW FROM INSIDE OF
BUILDING
VIEW FROM
OUTSIDE OF
BUILDING
700-BK10 BRACKETS
FLUSH
PAGE 14
INSTALLING GIRTS IN THE END WALL
End wall girts are 1 1/2” square tubes that are flush mounted to the verticals with BK-30 single brackets and BK-31 double
brackets. The girts are typically cut 1/4” shorter than the opening between verticals. Attach the single brackets with # 12 x
3/4” self-drilling screws to the girt and with #10 x 7/8” pan head, self drilling, square drive
screws to the frame. Attach the
double brackets to the girts and frame with #12 x 3/4” self-drilling screws (one per flange.)
1 1/2” SQUARE
SINGLE BRACKET
DOUBLE BRACKET
#12 X 3/4” SELF-
DRILLING SCREW.
TOP & BOTTOM
#10 X 7/8” PAN SDS
STEP 5: INSTALLING INTERIOR TRUSS SECTIONS
Using the crane or boom attachment lift a full truss assembly (truss with web braces) and insert the eave corner ends into
the next side posts as shown. Repeat this for all the remaining truss sections. If you have garage doors in the side of the
building the truss over those doors will be different. Over the side door the truss may have a special shorter eave corner.
Do not attach the eave corners to the side post at this time with screws. (See next page)
INTERIOR TRUSS WITH WEB
TRUSS WITH SHORT EAVE
CORNER AT ONE END TO
ATTACH OVER SIDE DOOR
HEADER
SHORT EAVE CORNER
OVER SIDE GARAGE DOOR
PAGE 15
#12 SELF-DRILLING SCREW
PAGE 16
CLAMP
MOTOR CYCLE
STRAP
STRING
SIDE POST
STEP 6: CHECKING THE EAVES FOR HEIGHT AND PLUMBING THE SIDE POSTS
When all of the eave corners have been installed you must check the height of all of the eaves to make sure that they are
at the same height. Run a string line down the length of the building at the eave corner. This will show you if any of the
eaves are not the right height or the side posts are not plumb. Make adjustments to the truss height and the frame and
install (4) #12 x 3/4” self-drilling screws in each swage joint.
4 SCREWS IN EACH
JOINT
A SCREW DRIVEN INTO THE CORNER OF THE CORNER
BRACKET CAN PROVIDE AN ANCHOR FOR YOUR STRING LINE.
You can use motor cycle straps and clamps to pull the frames into
plumb. When the hat channel purlins are installed at the roof eave
corner and the hat channel girt on the side at the eave the frames
will be held in place.
STEP 7: INSTALLING ROOF PURLIN HAT CHANNEL AND REMAINING SIDE GIRT HAT
CHANNEL
Install the first run of roof purlin hat channel at the eave corner. Place the lower edge of the channel flush with the corner
of the eave corner bracket. Attach the channel to the eave corner with #12 x 3/4” self drilling screws as you did the side hat
channel. Check the on center spacing of the frames as you go. Complete the first run of roof hat channel down the length
of the building. Repeat this on the other side of the building. Butt hat channels together at the ends, centered on a frame.
HAT CHANNEL PURLIN
FLUSH WITH EDGE OF
EAVE CORNER BRACKET
START THE END OF
THE HAT CHANNEL IN
THE CENTER OF THE
BRACKET OR 1” FROM
THE OUTSIDE EDGE.
CHECK THE SPACE
BETWEEN FRAMES
46” FOR 4’ ON CENTER,
58” FOR 5’ ON CENTER,
70” FOR 6’ ON CENTER.
HAT CHANNEL AT THE PEAK OF
THE BUILDING
After the eave hat channel purlins
have been installed on both sides of
the building install two runs of hat
channel at the peak of the building.
Locate the top edge of the hat
channel 9” from the center of the
peak frame member and 1” from the
end of the building frame as shown
at right. Be sure to measure and set
the frames on 4’, 5’, or 6’ centers as
you go depending on your building.
9”
1”
PAGE 17
END OF HAT CHANNEL
CENTERED IN FRAME
BUTT ENDS OF HAT
CHANNEL TOGETHER
CENTERED IN FRAME
INSTALLING THE REMAINING SIDE HAT CHANNEL GIRTS
See your drawing package side elevation to see the layout a side girts on your building. You should have at least two more
runs of side girts to install.
INSTALL ADDITIONAL
HAT CHANNEL PURLINS
AND GIRTS. SEE YOUR
DRAWING PACKAGE FOR
ON CENTER SPACING.
STEP 8: INSTALL THE ENCLOSURES AT BOTH ENDS OF YOUR BUILDING.
See your building drawings for parts and layout for the end walls of the building. Note that end walls are 2” x 3” tubes.
See pages 14, 15 and 16.
PAGE 18
INSTALLING A WALK DOOR FRAME IN SIDE OF BUILDING WITH BASE PLATES
A walk door frame is typically a door header tube 2” x 4” cut to fit the space between side posts. (46”, 58” or 70” long)
The door vertical is a 2” x 4” tube with a base plate welded to the bottom. This tube will be 81 3/4” for a 3068 door.
Measure the pre-hung door that you will be installing to get a rough opening size about 5/8” larger in width and 1/4” larger
in height than the insert portion of the pre-hung door. Measure a mark the location of the vertical jamb post on the slab.
(Note that the base plates extend 1/4” from each post. The measurement given is from post to post not base plate to base
plate.) You may have to cut down the door jamb post to fit your walk door frame. Pre-assemble the door jamb post to the
door header with BK-10 angle brackets and #12 x 3/4” self-drilling screws as shown below.
PRE-HUNG DOOR
FRAME PLUS 5/8”
BK-10 ANGLE
BRACKET
VERTICAL DOOR JAMB
POST CUT 1/4” LONGER
THAN PRE-HUNG DOOR
FRAME
BASE PLATE
WELDED TO POST
Now, Place the pre-assembled walk door frame in the opening
between two side posts. Flush the assembly to the side posts
and set the header level. Attach the brackets to the side posts.
Plumb the side post and anchor the base plate to the slab with
a 5/8” x 5” concrete wedge anchor.
You will now frame around the door opening with 1 1/2”
square nailer tubes. Your kit will have (1) 42” long tube with 2
holes and (2) 81 3/4” long tubes with 5 holes. Attach 42” nailer
tube flush with the bottom of the door header with #13 x 2”
concealor screws (black). Allow the nailer to extend 2” past the
door opening on both sides of the door. Now attach the 81 3/4”
vertical nailers flush with the inside of the door frame using the
same screws, 5 per nailer. The vertical nailers may have to be
trimmed to fit.
5/8” x 5” CONCRETE
WEDGE ANCHOR
SIDE POST
SIDE POST
WITH BASE
PLATE
TURNED AWAY
FROM DOOR
PAGE 19
DOOR HEADER
42” NAILER TUBE
#12 SELF-DRILLING SCREW
INSTALLING A WALK DOOR FRAME IN SIDE OF BUILDING WITH BASE RAILS
We recommend that you cut out the base rail where walk doors will be located. Cut out a section of base rail wide enough
to fit your pre-hung door frame into the opening (frame width + 3/8”). Measure the height of your pre-hung door frame and
cut a vertical door jamb post 2” shorter than the door frame height. This post will be mounted on top of the base rail and to
the bottom of the door header. (You should have a 2” x 4” x 81 3/4” from which to cut this door jamb post) In your kit you
will have a door header 2” x 4” x 46”, 58” or 70” depending on the on center spacing of your side posts.
Pre assemble these components as shown below and place them in the chosen space between to side posts. The door
frame assembly should be flush with the building frame. The header will be attached to the side posts with BK-10 angle
brackets and the bottom of the vertical door jamb post will be attached to the inside of the base rail with a BK-20 flat
bracket. Make sure the door jamb post is flush and plumb. Use #12 x 3/4” self-drilling screws.
VERTICAL DOOR JAMB
POST CUT 2” SHORTER
THAN PRE-HUNG DOOR
FRAME
PRE-HUNG DOOR
FRAME PLUS 3/8”
Remove hat channel girts
that cross the door open-
ing. You will re-measure
and cut them to fit after the
door nailers have been
installed. This will include
the base hat channel.
THE OPENING BETWEEN THE DOOR
JAMB POST AND THE SIDE POST IS THE
PRE-HUNG DOOR FRAME PLUS 3/8”
1/4” EXTENSION
WITH WELD
PAGE 20
2” OVERHANG
CUT OUT BASE RAIL
BK-20 FLAT BRACKET
BK-10 ANGLE
BRACKET, 3 PLACES
Height with and
without base rail
BK-10 ANGLE
BRACKET
#12 SELF-DRILLING SCREW
  • Page 1 1
  • Page 2 2
  • Page 3 3
  • Page 4 4
  • Page 5 5
  • Page 6 6
  • Page 7 7
  • Page 8 8
  • Page 9 9
  • Page 10 10
  • Page 11 11
  • Page 12 12
  • Page 13 13
  • Page 14 14
  • Page 15 15
  • Page 16 16
  • Page 17 17
  • Page 18 18
  • Page 19 19
  • Page 20 20
  • Page 21 21
  • Page 22 22
  • Page 23 23
  • Page 24 24
  • Page 25 25
  • Page 26 26
  • Page 27 27
  • Page 28 28
  • Page 29 29
  • Page 30 30
  • Page 31 31
  • Page 32 32
  • Page 33 33
  • Page 34 34
  • Page 35 35
  • Page 36 36
  • Page 37 37
  • Page 38 38
  • Page 39 39
  • Page 40 40
  • Page 41 41
  • Page 42 42
  • Page 43 43
  • Page 44 44
  • Page 45 45
  • Page 46 46

VersaTube VS3406014420GW User manual

Category
Garage Door Opener
Type
User manual

Ask a question and I''ll find the answer in the document

Finding information in a document is now easier with AI