Page is loading ...

SP-555_e.book 1 ページ 2007年6月25日 月曜日 午前9時9分

2
Main Features
Quick, Easy, and Unique Sampling!
Sample easily to the pads, or use LOOP CAPTURE for creative sound-on-sound sampling.
Sample Almost Anything!
Sample through its Line, or Mic Input with Phantom power. Also sample via USB audio
streaming.
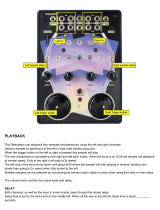
Perform with Killer Realtime Effects!
37 powerful effects such as Voice Transformer, Delay, and the unique Super Filter and DJFX
Looper, now with Effect Memory for instant recall of your effect settings.
Audio I/F and SONAR LE
SP-555 is also an audio interface for the bundled Cakewalk SONAR LE, or any other audio
application on your computer. The perfect computer interface for live use!
* The SONAR LE is only for Windows.
Large Sample Memory via CompactFlash!
Supports up to 2 GB CompactFlash, for over 12 hours of recording in Standard Mode. Use the
bundled Wave Converter software to import and export WAV/AIFF files.
D Beam and V-LINK!
Tweak the filter, trigger samples, or play synth solos with the invisible infrared D Beam controller.
Connect a V-LINK compatible video equipment and sync the music to the visuals.
SP-555_e.book 2 ページ 2007年6月25日 月曜日 午前9時9分

3
Thank you, and congratulations on your choice of the Roland
SP-555
.
Copyright © 2007 ROLAND CORPORATION
All rights reserved. No part of this publication may be reproduced in any form without the written
permission of ROLAND CORPORATION.
Before using this unit, carefully read the sections entitled: “USING THE UNIT SAFELY” and “IMPORTANT
NOTES” (p. 4; p. 6). These sections provide important information concerning the proper operation of the
unit. Additionally, in order to feel assured that you have gained a good grasp of every feature provided by
your new unit, Owner’s manual should be read in its entirety. The manual should be saved and kept on hand
as a convenient reference.
SP-555_e.book 3 ページ 2007年6月25日 月曜日 午前9時9分

4
USING THE UNIT SAFELY
USING THE UNIT SAFELY
• Before using this unit, make sure to read the instructions
below, and the Owner’s Manual.
....................................................................................................
• Do not open (or modify in any way) the unit or its AC
adaptor.
....................................................................................................
• Do not attempt to repair the unit, or replace parts within it
(except when this manual provides specific instructions
directing you to do so). Refer all servicing to your retailer, the
nearest Roland Service Center, or an authorized Roland
distributor, as listed on the “Information” page.
....................................................................................................
• Never use or store the unit in places that are:
• Subject to temperature extremes (e.g., direct sunlight in
an enclosed vehicle, near a heating duct, on top of heat-
generating equipment); or are
• Damp (e.g., baths, washrooms, on wet floors); or are
• Humid; or are
• Exposed to rain; or are
• Dusty; or are
• Subject to high levels of vibration.
....................................................................................................
• This unit should be used only with a stand that is recom-
mended by Roland.
....................................................................................................
• When using the unit a stand recommended by Roland, the
stand must be carefully placed so it is level and sure to
remain stable. If not using a stand, you still need to make sure
that any location you choose for placing the unit provides a
level surface that will properly support the unit, and keep it
from wobbling.
....................................................................................................
• Be sure to use only the AC adaptor supplied with the unit.
Also, make sure the line voltage at the installation matches
the input voltage specified on the AC adaptor’s body. Other
AC adaptors may use a different polarity, or be designed for
a different voltage, so their use could result in damage,
malfunction, or electric shock.
....................................................................................................
• Use only the attached power-supply cord. Also, the supplied
power cord must not be used with any other device.
....................................................................................................
• Do not excessively twist or bend the power cord, nor place
heavy objects on it. Doing so can damage the cord,
producing severed elements and short circuits. Damaged
cords are fire and shock hazards!
....................................................................................................
• This unit, either alone or in combination with an amplifier and
headphones or speakers, may be capable of producing
sound levels that could cause permanent hearing loss. Do not
operate for a long period of time at a high volume level, or at
a level that is uncomfortable. If you experience any hearing
loss or ringing in the ears, you should immediately stop using
the unit, and consult an audiologist.
....................................................................................................
Used for instructions intended to alert the
user to the risk of injury or material
damage should the unit be used
improperly.
* Material damage refers to damage or
other adverse effects caused with
respect to the home and all its
furnishings, as well to domestic animals
or pets.
Used for instructions intended to
alert the user to the risk of death or
severe injury should the unit be used
improperly.
The ● symbol alerts the user to things that must be
carried out. The specific thing that must be done is
indicated by the design contained within the circle. In
the case of the symbol at left, it means that the power-
cord plug must be unplugged from the outlet.
The symbol alerts the user to items that must never
be carried out (are forbidden). The specific thing that
must not be done is indicated by the design contained
within the circle. In the case of the symbol at left, it
means that the unit must never be disassembled.
The symbol alerts the user to important instructions or
warnings.The specific meaning of the symbol is
determined by the design contained within the triangle.
In the case of the symbol at left, it is used for general
cautions, warnings, or alerts to danger.
SP-555_e.book 4 ページ 2007年6月25日 月曜日 午前9時9分

5
USING THE UNIT SAFELY
• Do not allow any objects (e.g., flammable material, coins,
pins); or liquids of any kind (water, soft drinks, etc.) to
penetrate the unit.
....................................................................................................
• In households with small children, an adult should provide
supervision until the child is capable of following all the rules
essential for the safe operation of the unit.
....................................................................................................
• Protect the unit from strong impact.
(Do not drop it!)
....................................................................................................
• Do not force the unit’s power-supply cord to share an outlet
with an unreasonable number of other devices. Be especially
careful when using extension cords—the total power used by
all devices you have connected to the extension cord’s outlet
must never exceed the power rating (watts/amperes) for the
extension cord. Excessive loads can cause the insulation on
the cord to heat up and eventually melt through.
....................................................................................................
• Before using the unit in a foreign country, consult with your
retailer, the nearest Roland Service Center, or an authorized
Roland distributor, as listed on the “Information” page.
....................................................................................................
• DO NOT play a CD-ROM disc on a conventional audio CD
player. The resulting sound may be of a level that could cause
permanent hearing loss. Damage to speakers or other system
components may result.
• The unit and the AC adaptor should be located so their
location or position does not interfere with their proper venti-
lation.
....................................................................................................
• This (SP-555) for use only with Roland stand PDS-10. Use
with other stands is capable of resulting in instability causing
possible injury.
....................................................................................................
• This stand for use only with specific Roland musical instru-
ments. See apparatus instructions. Use with other models is
capable of resulting in instability causing possible injury.
....................................................................................................
• Always grasp only the plug on the AC adaptor cord when
plugging into, or unplugging from, an outlet or this unit.
....................................................................................................
• At regular intervals, you should unplug the AC adaptor and
clean it by using a dry cloth to wipe all dust and other
accumulations away from its prongs. Also, disconnect the
power plug from the power outlet whenever the unit is to
remain unused for an extended period of time. Any accumu-
lation of dust between the power plug and the power outlet
can result in poor insulation and lead to fire.
....................................................................................................
• Try to prevent cords and cables from becoming entangled.
Also, all cords and cables should be placed so they are out
of the reach of children.
....................................................................................................
• Never climb on top of, nor place heavy objects on the unit.
....................................................................................................
• Never handle the AC adaptor or its plugs with wet hands
when plugging into, or unplugging from, an outlet or this unit.
....................................................................................................
• Before moving the unit, disconnect the AC adaptor and all
cords coming from external devices.
....................................................................................................
• Before cleaning the unit, turn off the power and unplug the
AC adaptor from the outlet (Quick Start Guide).
....................................................................................................
• Whenever you suspect the possibility of lightning in your
area, disconnect the AC adaptor from the outlet.
....................................................................................................
• Should you remove screws for CARD LOCK, keep them in a
safe place out of children’s reach, so there is no chance of
them being swallowed accidentally.
....................................................................................................
• Always turn the phantom power off when connecting any
device other than condenser microphones that require
phantom power. You risk causing damage if you mistakenly
supply phantom power to dynamic microphones, audio
playback devices, or other devices that don’t require such
power. Be sure to check the specifications of any microphone
you intend to use by referring to the manual that came with it.
(This instrument’s phantom power: 48 V DC, 10 mA Max)
....................................................................................................
SP-555_e.book 5 ページ 2007年6月25日 月曜日 午前9時9分

6
IMPORTANT NOTES
In addition to the items listed under “USING THE UNIT SAFELY” on p. 4, please read and observe the following:
Power Supply
• Do not connect this unit to same electrical outlet that is being used by
an electrical appliance that is controlled by an inverter (such as a
refrigerator, washing machine, microwave oven, or air conditioner),
or that contains a motor. Depending on the way in which the
electrical appliance is used, power supply noise may cause this unit to
malfunction or may produce audible noise. If it is not practical to use
a separate electrical outlet, connect a power supply noise filter
between this unit and the electrical outlet.
• The AC adaptor will begin to generate heat after long hours of
consecutive use. This is normal, and is not a cause for concern.
• Before connecting this unit to other devices, turn off the power to all
units. This will help prevent malfunctions and/or damage to speakers
or other devices.
Placement
• Using the unit near power amplifiers (or other equipment containing
large power transformers) may induce hum. To alleviate the problem,
change the orientation of this unit; or move it farther away from the
source of interference.
• This device may interfere with radio and television reception. Do not
use this device in the vicinity of such receivers.
• Noise may be produced if wireless communications devices, such as
cell phones, are operated in the vicinity of this unit. Such noise could
occur when receiving or initiating a call, or while conversing. Should
you experience such problems, you should relocate such wireless
devices so they are at a greater distance from this unit, or switch them
off.
• Do not expose the unit to direct sunlight, place it near devices that
radiate heat, leave it inside an enclosed vehicle, or otherwise subject
it to temperature extremes. Excessive heat can deform or discolor the
unit.
• When moved from one location to another where the temperature
and/or humidity is very different, water droplets (condensation) may
form inside the unit. Damage or malfunction may result if you attempt
to use the unit in this condition. Therefore, before using the unit, you
must allow it to stand for several hours, until the condensation has
completely evaporated.
• Depending on the material and temperature of the surface on which
you place the unit, its rubber feet may discolor or mar the surface.
You can place a piece of felt or cloth under the rubber feet to prevent
this from happening. If you do so, please make sure that the unit will
not slip or move accidentally.
Maintenance
• For everyday cleaning wipe the unit with a soft, dry cloth or one that
has been slightly dampened with water. To remove stubborn dirt, use
a cloth impregnated with a mild, non-abrasive detergent. Afterwards,
be sure to wipe the unit thoroughly with a soft, dry cloth.
• Never use benzine, thinners, alcohol or solvents of any kind, to avoid
the possibility of discoloration and/or deformation.
Repairs and Data
• Please be aware that all data contained in the unit’s memory may be
lost when the unit is sent for repairs. Important data should always be
backed up on a CompactFlash card, or written down on paper (when
possible). During repairs, due care is taken to avoid the loss of data.
However, in certain cases (such as when circuitry related to memory
itself is out of order), we regret that it may not be possible to restore
the data, and Roland assumes no liability concerning such loss of
data.
Additional Precautions
• Please be aware that the contents of memory can be irretrievably lost
as a result of a malfunction, or the improper operation of the unit. To
protect yourself against the risk of loosing important data, we
recommend that you periodically save a backup copy of important
data you have stored in the unit’s memory on a CompactFlash card.
• Unfortunately, it may be impossible to restore the contents of data that
was stored in the unit’s memory or CompactFlash card once it has
been lost. Roland Corporation assumes no liability concerning such
loss of data.
• Use a reasonable amount of care when using the unit’s buttons,
sliders, or other controls; and when using its jacks and connectors.
Rough handling can lead to malfunctions.
• When connecting / disconnecting all cables, grasp the connector
itself—never pull on the cable. This way you will avoid causing shorts,
or damage to the cable’s internal elements.
• To avoid disturbing your neighbors, try to keep the unit’s volume at
reasonable levels. You may prefer to use headphones, so you do not
need to be concerned about those around you (especially when it is
late at night).
• When you need to transport the unit, package it in the box (including
padding) that it came in, if possible. Otherwise, you will need to use
equivalent packaging materials.
• Some connection cables contain resistors. Do not use cables that
incorporate resistors for connecting to this unit. The use of such cables
can cause the sound level to be extremely low, or impossible to hear.
For information on cable specifications, contact the manufacturer of
the cable.
• The sensitivity of the D Beam controller will change depending on the
amount of light in the vicinity of the unit. If it does not function as you
expect, adjust the sensitivity as appropriate for the brightness of your
location.
• The explanations in this manual include illustrations that depict what
should typically be shown by the display. Note, however, that your
unit may incorporate a newer, enhanced version of the system (e.g.,
includes newer sounds), so what you actually see in the display may
not always match what appears in the manual.
SP-555_e.book 6 ページ 2007年6月25日 月曜日 午前9時9分

7
IMPORTANT NOTES
Before Using Cards
• Carefully insert the CompactFlash card all the way in—until it is firmly
in place.
• Never touch the terminals of the CompactFlash card. Also, avoid
getting the terminals dirty.
• This unit’s memory card slot accepts CompactFlash memory cards.
Microdrive storage media are not compatible.
• CompactFlash cards are constructed using precision components;
handle the cards carefully, paying particular note to the following.
• To prevent damage to the cards from static electricity, be sure to
discharge any static electricity from your own body before
handling the cards.
• Do not touch or allow metal to come into contact with the contact
portion of the cards.
• Do not bend, drop, or subject cards to strong shock or vibration.
• Do not keep cards in direct sunlight, in closed vehicles, or other
such locations (storage temperature: -25 to 85˚ C).
• Do not allow cards to become wet.
• Do not disassemble or modify the cards.
Handling CD-ROMs
• Avoid touching or scratching the shiny underside (encoded surface) of
the disc. Damaged or dirty CD-ROM discs may not be read properly.
Keep your discs clean using a commercially available CD cleaner.
Copyright
• Recording, duplication, distribution, sale, lease, performance, or
broadcast of copyrighted material (musical works, visual works,
broadcasts, live performances, etc.) belonging to a third party in part
or in whole without the permission of the copyright owner is forbidden
by law.
• Do not use this unit for purposes that could infringe on a copyright
held by a third party. We assume no responsibility whatsoever with
regard to any infringements of third-party copyrights arising through
your use of this unit.
•
The sounds, phrases and patterns contained in this product are sound
recordings protected by copyright. Roland hereby grants to purchasers of
this product the permission to utilize the sound recordings contained in this
product for the creation and recording of original musical works; provided
however, the sound recordings contained in this product may not be
sampled, downloaded or otherwise re-recorded, in whole or in part, for
any other purpose, including but not limited to the transmission of all or any
part of the sound recordings via the internet or other digital or analog
means of transmission, and/or the manufacture, for sale or otherwise, of
any collection of sampled sounds, phrases or patterns, on CD-ROM or
equivalent means.
The sound recordings contained in this product are the original works
of Roland Corporation. Roland is not responsible for the use of the
sound recordings contained in this product, and assumes no liability
for any infringement of any copyright of any third party arising out of
use of the sounds, phrases and patterns in this product.
SAMPLE PAD BANK A PAD13–16: Created by Tim Hüfken
* Microsoft and Windows are registered trademarks of Microsoft
Corporation.
* Windows Vista is a trademark of Microsoft Corporation.
* Windows
®
is known officially as: “Microsoft
®
Windows
®
operating system.”
* The screen shots in this document are used in compliance with the
guidelines of the Microsoft Corporation.
* Mac OS is a trademark of Apple Computer, Inc.
* Pentium is a registered trademark of Intel Corporation.
* All product names mentioned in this document are trademarks or
registered trademarks of their respective owners.
* VST is a trademark of Steinberg Media Technologies AG.
* CompactFlash and are trademarks of SanDisk
Corporation and licensed by CompactFlash association.
* Roland Corporation is an authorized licensee of the
CompactFlash
™
and CF logo ( ) trademarks.
* Fugue © 1999–2007 Kyoto Software Research, Inc. All rights
reserved.
SP-555_e.book 7 ページ 2007年6月25日 月曜日 午前9時9分

8
Contents
Main Features.................................................. 2
USING THE UNIT SAFELY..................................4
IMPORTANT NOTES.........................................6
Contents..........................................................8
Introducing the SP-555...................................10
Panel Descriptions .............................10
Signal flow (block diagram) ................14
Playing samples ............................................15
Using effects..................................................18
Applying an effect to a sample............18
Applying an effect to the
mic/line input ...................................18
Storing effect settings
(EFFECT MEMORY)............................18
Effect knob control .............................19
Tips for using effects...........................19
Sampling (recording)......................................21
About the available sampling times......21
Standby mode...................................22
Sampling..........................................22
Starting sampling automatically
(Auto Sampling) ...............................22
Sampling with a specified tempo.........23
Using a count-in ................................23
Deleting a sample..............................23
Deleting all samples...........................24
Resampling.......................................24
Loop Capture.................................................25
Using Loop Capture to record from an
external device..................................25
Deleting the phrase recorded by Loop
Capture............................................26
Adjusting the playback level
of the phrase.....................................26
Recording with a specified tempo ........26
Layering sound onto a previously
recorded phrase (Overdubbing) ..........26
Saving a recorded phrase to a pad .....27
Editing a sample ........................................... 28
Setting a sample’s volume .................. 28
Adjusting the playback region of
a sample.......................................... 28
Exchanging samples between two pads30
Copying a sample to another pad....... 31
Converting to a sample that has
a modified playback region................ 31
Changing a sample’s BPM ................. 32
Changing the length of
a sample without changing
the pitch (Time Modify) ...................... 32
Playing samples and recording your performance
(Pattern Sequencer) ....................................... 33
How patterns are organized............... 33
Specifying the pattern tempo .............. 33
Playing and stopping a pattern ........... 33
Switching patterns during playback ..... 33
Recording a pattern........................... 34
Deleting a pattern.............................. 36
Deleting all patterns........................... 36
Exchanging the patterns of
two pads.......................................... 37
Copying a pattern to another pad ....... 37
D Beam controller.......................................... 38
Monophonic synthesizer (SYNTH) ....... 38
Filter ................................................ 39
Trigger............................................. 39
Connecting the SP-555 to your computer........ 40
Installing the driver and software......... 40
Changing the signal flow
when using USB audio....................... 42
About SONAR LE (Windows only)....... 43
About SP-555 Wave Converter........... 43
SP-555_e.book 8 ページ 2007年6月25日 月曜日 午前9時9分

9
Contents
About CompactFlash...................................... 44
Recommended types of CompactFlash..44
CompactFlash theft prevention.............44
Inserting and removing
CompactFlash cards...........................45
Formatting a CompactFlash card
(initializing).......................................45
Importing audio files ..........................46
Exporting audio files ..........................47
Saving backup data (backup save) ......48
Loading backup data (backup load).....48
Deleting backup data (backup delete) ..49
Other settings ................................................50
Restoring the factory settings ...............50
Clearing the data (initialization) ..........50
Protecting the memory........................51
Adjusting the blinking speed
of the display illumination ...................51
Checking the version number ..............51
Setting the SP-555’s
internal processing level .....................51
About V-LINK ................................................ 52
What is V-LINK? ................................52
Appendix...................................................... 54
Effect list........................................... 54
Quick reference of operations............. 59
Parameters that can change
the start-up state ................................ 63
Error message list .............................. 64
Troubleshooting ................................ 65
About the pedal ................................ 68
Attaching the stand (sold separately).... 68
Using the SP-555 with other MIDI equipment.. 69
About MIDI....................................... 69
Synchronizing the SP-555
with another MIDI device ................... 69
Synchronizing the pattern
tempo and playback start/stop
with an external MIDI sequencer ......... 70
Transmitting MIDI clock at
the pattern tempo .............................. 70
MIDI channel (Pad Base Ch.)
and note numbers ............................. 71
MIDI Thru setting ............................... 71
MIDI Implementation ..................................... 72
Specifications ................................................ 75
Index............................................................ 76
SP-555_e.book 9 ページ 2007年6月25日 月曜日 午前9時9分

10
Introducing the SP-555
1.
Internal Mic
This is the SP-555’s built-in mic. If you connect your own
mic (sold separately) to the MIC jack of the top panel, this
internal mic will not function.
2.
External Input
MIC Jack
This is a microphone jack for analog audio signals. It
supports both XLR and 1/4” phone type plugs. The XLR
type jack can provide 48 V phantom power, allowing you
to connect phantom-powered condenser microphones. In
this case, turn the
input select switch
to the
PHANTOM
ON
position.
* Turn the MIC button OFF before you operate the input select
switch.
* In order to protect the circuitry, there will be no sound for a short
time after you operate the input select switch.
The phone type jack also accommodates high-impedance
inputs, allowing you to directly connect a guitar or bass.
In this case, set the
input select switch
to the
Hi-Z
position.
* This instrument is equipped with balanced (XLR/TRS) type jacks.
Wiring diagrams for these jacks are shown below. Make
connections after first checking the wiring diagrams of other
equipment you intend to connect.
MIC LEVEL Knob, MIC Button
This adjusts the volume of the SP-555’s internal mic or a
mic connected to the MIC jack. If you’re inputting audio
from a mic, turn the
MIC button
on.
* Even if you turn the MIC LEVEL knob all the way down, the
sound will not be muted completely. If you’re not using the mic,
turn the MIC button off.
LINE IN LEVEL Knob, LINE IN Button
This adjusts the volume of the device connected to the rear
panel LINE IN jacks. Turn on the
LINE IN button
if you’re
sampling audio from the LINE IN jacks.
1:GND
2:HOT
3:COLD
GND(SLEEVE)
HOT(TIP)
COLD(RING)
23456 7
8
9
10
1
11
12
13
14
15
16
17
18
Panel Descriptions
Top panel
SP-555_e.book 10 ページ 2007年6月25日 月曜日 午前9時9分

11
Introducing the SP-555
PEAK Indicator
This indicator helps you adjust the MIC or LINE IN level.
Adjust the level so that this indicator lights occasionally.
3.
VOLUME Knob
This adjusts the volume of the LINE OUT and PHONES
output.
4.
METRONOME Button
When you press this button so it’s lit, the metronome will
sound at the BPM of the pattern sequencer. To adjust the
volume of the metronome, hold down this button and turn
the CTRL 3 knob.
You can’t sound the metronome while sampling.
5.
Display Illumination
This will blink according to the audio signal level while
sampling, or in sync with the pattern tempo while using the
pattern sequencer.
➜
“Adjusting the blinking speed of the display
illumination”
(p. 51)
Display
This shows the BPM (tempo) of the sample or pattern, the
values of various settings, and error messages. You can
also view the remaining sampling time here (
➜
p. 21).
TAP TEMPO Button
By pressing this button several times at the desired tempo,
you can set the tempo to the corresponding interval.
6.
D BEAM (D Beam controller)
You can apply a variety of effects to the sound by moving
your hand over this (
➜
p. 38). The following buttons will
blink when the D Beam controller responds.
SYNTH Button
Use the D Beam controller to play internal synthesizer
sounds.
FILTER Button
Use the D Beam controller to control the cutoff frequency
of the internal filter.
TRIGGER Button
Use the D Beam controller to trigger the desired pad.
If you hold down the TRIGGER button and press a pad, the
D Beam controller will trigger that pad.
7.
PATTERN SEQUENCER (
➜
p. 33)
PATTERN SELECT Button
Press this when you want to play or record a pattern.
While this button is lit, you can select a pattern by pressing
a pad.
LENGTH Button
When recording a pattern, this specifies the length of the
pattern.
QUANTIZE Button
This specifies automatic timing adjustments (quantization)
when recording a pattern.
8.
EFFECTS Knobs (CTRL 1–3)
These control the parameters that are assigned to each
knob by the selected effect. You will also use these knobs
for the following purposes.
➜
“Using effects”
(p. 18)
➜
“Effect list”
(p. 54)
CTRL 1 Knob
Use this to adjust the starting location of a sample, or to
change the playback time of a sample.
CTRL 2 Knob
Use this to adjust the BPM (tempo) of the pattern, or to
change the ending location of a sample.
MFX/CTRL 3 Knob
Use this to select the type of MFX, or to adjust the sampling
level or the volume of the sample.
9.
Effect Buttons
Use these to select the effect you want to use. A button is
lit when on, and extinguished when off.
* You can’t turn on more than one effect at the same time.
* By holding down the
EFFECT ASSIGN button
and pressing
one or more pads, you can turn on the effect for one or more
pads.
10.
LOOP CAPTURE
Here you can record the currently playing sample or
pattern, or a phrase from an external input source (up to
approximately 15 seconds).
➜
“Loop Capture”
(p. 25)
MEASURE Button
This specifies the number of measures to be recorded. If
you specify FREE, you’ll be able to record up to
approximately 15 seconds.
AUTO START Button
If you turn this button on, recording will begin
automatically when sound is input.
SOURCE SELECT Button
This selects what will be recorded.
EXT ONLY
will record
only the signal from the mic, line input, or built-in
sequencer controlled by the D Beam.
EXT & PADS
will
record this sound mixed with the currently playing
sample/pattern.
REC Button
Pressed to start recording. During recording, press this
button to stop recording. You can also use this to layer an
additional sample during LOOP CAPTURE playback.
SP-555_e.book 11 ページ 2007年6月25日 月曜日 午前9時9分

12
Introducing the SP-555
PLAY Button
This plays the recorded phrase.
SAVE TO PAD Button
This saves a phrase recorded using LOOP CAPTURE to a
pad.
11.
CANCEL Button
By pressing this button you can cancel an operation such
as sampling or sample deletion. This button will also stop
pattern playback or recording.
By rapidly pressing this button four times, you can stop all
currently playing sounds.
REMAIN Button
When you press this button, the display will indicate the
remaining time available for sampling. By holding down
this button and pressing a pad, you can select the pad to
which the effect will apply, or the pad whose settings you
want to edit (i.e., the current pad).
12.
DEL Button
Use this to delete a sample or pattern.
13.
SAMPLE
SAMPLING Button
Use this to start/stop sampling, or to record a pattern (
➜
p. 21).
RESAMPLE Button
Use this to resample the sound of a sample processed by
an effect.
START/END/LEVEL Button
Use this to change the playback start/end point of a
sample, or to change its volume.
TIME/BPM Button
Use this to specify the playback time or BPM (tempo) of a
sample.
MARK Button
Use this when you want only a portion of the sampled
sound to be heard. While this button is lit, only the
specified portion will be heard.
LO-FI Button (
➜
p. 22)
This switches the grade (standard/lo-fi) at which sampling
is performed. Lo-fi sampling will occur if this button is lit,
and standard sampling will occur if this button is
extinguished.
STEREO Button (
➜
p. 22)
This specifies whether you will be sampling in monaural or
in stereo. Stereo sampling will occur if this button is lit, and
monaural sampling will occur if this button is extinguished.
GATE Button (
➜
p. 16)
This switches you between “gate playback,” in which the
sample will sound only while you continue holding down
the pad, and “trigger playback,” in which the sound will
alternately start or stop playing each time you press the
pad. Gate playback will occur if this button is lit, and
trigger playback will occur if this button is extinguished.
LOOP Button (
➜
p. 17)
This switches you between “loop playback” in which the
sample will play repeatedly when you press the pad, and
“one-shot playback” in which the sound will play only
once. Loop playback will occur if this button is lit, and one-
shot playback will occur if this button is extinguished.
REVERSE Button (
➜
p. 15)
This selects “reverse playback” in which the sample will
play backward. Reverse playback will occur if this button
is lit, and normal playback will occur if it is extinguished.
14.
BANK Buttons (A, B, C/G, D/H, E/I, F/J)
When [PATTERN SELECT] is extinguished or when you are
recording a pattern, these buttons select the sample bank.
When [PATTERN SELECT] is lit, these buttons select the
pattern bank. Internal memory bank A or B will be
selected if you press BANK [A] or [B] so one of the buttons
is lit. CompactFlash banks C–F will be selected if you press
BANK [C/G]–[F/J] and light one of the buttons, and
CompactFlash banks G–J will be selected if you press
BANK [C/G]–[F/J] and get a button to start blinking.
15.
V-LINK Button
V-LINK ( ) is a function that lets you
perform music and video in synchronization.
By using MIDI to connect two or more V-LINK compatible
devices, you can easily enjoy a wide range of visual
effects that are linked to the expressive elements of a
musical performance.
➜
“About V-LINK”
(p. 52)
16.
EFFECT MEMORY Button
This lets you store effect settings (effect type, CTRL 1/2/3
knob values) and call them up instantly by operating a
pad.
➜
“Storing effect settings (EFFECT MEMORY)”
17.
FIXED VELOCITY Button (
➜
p. 15)
If this is off, samples will play at a fixed volume regardless
of how strongly you strike the pads.
ROLL Button (
➜
p. 15)
Use this when you want to play sounds as a “drum roll.”
HOLD (
➜
p. 15)
If you press a pad while holding down the HOLD pad, the
sample will continue sounding even after you release your
finger.
SUB PAD (
➜
p. 15)
You can use the SUB PAD to play the sample of the pad
you pressed most recently.
SP-555_e.book 12 ページ 2007年6月25日 月曜日 午前9時9分

13
Introducing the SP-555
18.
Pads 1–16
When you press a pad that is lit red, the sample assigned
to that pad will sound. The pad will blink while the sample
is playing.
When [PATTERN SELECT] is lit, you can use the pads to
select the pattern that will be played or recorded.
1.
PHONES Jack
You can connect stereo headphones here to listen to the
same sound as from LINE OUT.
2.
MEMORY CARD Slot
You can insert a separately sold CompactFlash card here.
By using banks C–J of the CompactFlash you can sample
for a longer time than is possible using the SP-555’s
internal memory.
When the SP-555 is shipped from the factory, a card
cover is attached to the MEMORY CARD slot. To detach
the cover, pinch the left and right edges of the cover
toward the middle, and pull it toward yourself.
➜
“About CompactFlash”
(p. 44)
1.
Cord Hook
Wrap the AC adaptor cord around this to prevent the AC
adaptor’s plug from being accidentally unplugged.
2.
Grounding Terminal
* Depending on the circumstances of a particular setup, you may
experience a discomforting sensation, or perceive that the
surface feels gritty to the touch when you touch this device,
microphones connected to it, or the metal portions of other
objects, such as guitars. This is due to an infinitesimal electrical
charge, which is absolutely harmless. However, if you are
concerned about this, connect the ground terminal (see figure)
with an external ground. When the unit is grounded, a slight
hum may occur, depending on the particulars of your
installation. If you are unsure of the connection method, contact
the nearest Roland Service Center, or an authorized Roland
distributor, as listed on the “Information” page.
Unsuitable places for connection
•Water pipes (may result in shock or electrocution)
•Gas pipes (may result in fire or explosion)
•Telephone-line ground or lightning rod (may be dangerous
in the event of lightning)
3.
DC IN Jack
Connect the included AC adaptor here.
4.
POWER Switch
This turns the power on/off.
5.
USB Connector
If you use a USB cable (sold separately) to connect the SP-
555 to your computer, the SP-555 will function as a USB
audio interface. You can also record the SP-555’s sound
to your computer, or sample sounds from your computer
to the SP-555.
➜
“Connecting the SP-555 to your computer”
(p. 40)
6.
MIDI OUT Connector
You can connect this connector to a MIDI device.
➜
“Using the SP-555 with other MIDI equipment”
(p.
69)
7.
MIDI IN Connector
You can connect a MIDI device to this connector.
➜
“Using the SP-555 with other MIDI equipment”
(p.
69)
Front panel
21
Rear panel
1 3 4 5 6 7 8 9 10 112
SP-555_e.book 13 ページ 2007年6月25日 月曜日 午前9時9分

14
Introducing the SP-555
8.
PEDAL Jack
You can connect a pedal switch (DP series; sold
separately) here and use it to perform loop capture or
pattern play/stop operations (p. 68).
9.
LINE IN Jacks (L/R)
Connect these jacks to the audio source device from which
you want to sample, such as a CD player or portable
audio player.
10.
LINE OUT Jacks (L/R)
Connect these jacks to your audio system, amp, or mixer.
11.
Security Slot ( )
http://www.kensington.com/
Signal flow (block diagram)
D BEAM SYNTH
EFFECT
USB AUDIO
from PC
(*1)
LINE IN / MIC
METRONOME
D BEAM
FILTER
LINE OUT /
PHONE
USB AUDIO
to PC
(*3)
(*2)
(*4)
(*5)
LOOP CAPTURE
SAMPLING / RESAMPLE
SAMPLER
SAVE TO PAD
*1: USB Audio Input. To mute this, hold down [CANCEL], press [MIC], and operate the CTRL 3 knob.
*2: D Beam Synth send to Effect. To turn this on, hold down [EFFECT ASSIGN] and press [SYNTH].
*3: USB Audio send to Effect. To turn this off, hold down [EFFECT ASSIGN] and [CANCEL], and press [MIC]/[LINE IN].
*4: Mic/Line In send to Effect. To turn this off, hold down [EFFECT ASSIGN] and press [MIC]/[LINE IN].
*5: USB Audio output source SW. To change this setting, hold down [CANCEL], press [LINE IN], and operate the CTRL 3 knob.
SP-555_e.book 14 ページ 2007年6月25日 月曜日 午前9時9分

15
Playing samples
The SP-555 provides sixteen velocity-sensitive pads, which let you vary the volume according to the force with which you strike the
pads. Striking a pad strongly will produce a louder sound, and striking it softly will produce a softer sound.
The SP-555 has ten sample banks: A–J.
Banks A and B use the SP-555’s internal memory. With the
factory settings, bank A contains preloaded samples. If
you’re using the SP-555’s internal memory, you can record
a maximum of 32 samples with a total maximum of
approximately five minutes.
Banks C–J are located on the memory card (CompactFlash).
You can record up to 128 samples on a memory card.
The SP-555 can play up to twelve samples simultaneously.
However, the polyphony is reduced as shown in the table
below if you’re using stereo samples or if you’re resampling.
BANK A–BANK J
Banks A/B are in internal memory, and the remaining banks are on
the CompactFlash card. Press a button to switch to the corresponding
bank. Sixteen samples can be assigned to each bank. Select banks
C--F by pressing a bank C--J button, causing it to light; select banks
G--J by pressing a button twice so it's blinking.
GATE
If this is unlit, the sample will play to the end when you
press a pad once. If you press this button so it's lit after
pressing the desired pad, the sound will continue playing
only while you continue pressing the pad.
LOOP
If this is unlit, the sample will play to the end and then
stop. If you press this button so it's lit after pressing the
desired pad, the sound will play repeatedly as a loop.
REVERSE
If you press this button so it's lit after pressing the desired
pad, the sample will play backward.
FIXED VELOCITY
If you press this button so it's lit, the sample will play at
the same volume regardless of how strongly you strike
the pad.
ROLL
If you hold down this button and press a pad, the sample
will play as a "roll" as long as you continue holding
down the pad. This produces a "drum roll" effect. By
holding down this button and pressing HOLD, you can
maintain the state of the pad being held down.
HOLD
If you press this button while holding down a pad, the
playback will continue even if you release the pad.
(This is valid only for pads for which GATE is turned on.)
The sound will stop when you press the pad once again.
SUB PAD
When you press this pad, the sample assigned to the
previously struck pad will be heard. You can use this to
play repeated strikes using both hands.
CANCEL
By pressing this four times
in rapid succession, you
can stop playback of all
samples.
PAD 1–PAD 16
Press a pad to play the sample assigned to that pad.
Lit red: A sample is assigned.
Unlit: No sample is assigned.
Blinking: Currently playing.
About the banks
About the polyphony
Monaural samples
Stereo samples
Normally
12 6
While resampling 4 2
BANK A–BANK J
Banks A/B are in internal memory, and the remaining banks are on
the CompactFlash card. Press a button to switch to the corresponding
bank. Sixteen samples can be assigned to each bank. Select banks
C--F by pressing a bank C--J button, causing it to light; select banks
G--J by pressing a button twice so it's blinking.
GATE
If this is unlit, the sample will play to the end when you
press a pad once. If you press this button so it's lit after
pressing the desired pad, the sound will continue playing
only while you continue pressing the pad.
LOOP
If this is unlit, the sample will play to the end and then
stop. If you press this button so it's lit after pressing the
desired pad, the sound will play repeatedly as a loop.
REVERSE
If you press this button so it's lit after pressing the desired
pad, the sample will play backward.
FIXED VELOCITY
If you press this button so it's lit, the sample will play at
the same volume regardless of how strongly you strike
the pad.
ROLL
If you hold down this button and press a pad, the sample
will play as a "roll" as long as you continue holding
down the pad. This produces a "drum roll" effect. By
holding down this button and pressing HOLD, you can
maintain the state of the pad being held down.
HOLD
If you press this button while holding down a pad, the
playback will continue even if you release the pad.
(This is valid only for pads for which GATE is turned on.)
The sound will stop when you press the pad once again.
SUB PAD
When you press this pad, the sample assigned to the
previously struck pad will be heard. You can use this to
play repeated strikes using both hands.
CANCEL
By pressing this four times
in rapid succession, you
can stop playback of all
samples.
PAD 1–PAD 16
Press a pad to play the sample assigned to that pad.
Lit red: A sample is assigned.
Unlit: No sample is assigned.
Blinking: Currently playing.
SP-555_e.book 15 ページ 2007年6月25日 月曜日 午前9時9分

16
Playing samples
You can adjust the relationship between the force used when
striking pads and the volume of sample playback.
1.
Hold down [CANCEL] and press [FIXED VELOCITY].
2.
While viewing the display, use the CTRL 3 knob to
adjust the sensitivity.
“-L-”: A loud volume will be produced even if you strike
the pads softly.
“-M-”: Medium sensitivity.
“-H-”: There will be no sound unless you strike the pads
strongly.
3.
Press [SAMPLING] to save the setting.
4.
When you’ve finished making the adjustment, press
[CANCEL] to return to normal operation.
If you turn [FIXED VELOCITY] on, the samples will play at a
fixed volume regardless of how strongly you strike the pads.
Here’s how to specify the volume that will be produced when
[FIXED VELOCITY] is on.
1.
Hold down [FIXED VELOCITY] and use the CTRL 3 knob
to adjust the fixed velocity.
Any value from 16 through 127 can be specified.
2.
While still holding down [FIXED VELOCITY], press
[SAMPLING] to save the setting.
By holding down [ROLL] and turning the CTRL 3 knob you
can adjust the speed of the roll. While viewing the display,
hold down [ROLL] and press [SAMPLING] to save the setting
as follows.
4: Quarter notes
4.3: Quarter note triplets
8: Eighth note
8.3: Eighth note triplets
16: Sixteenth notes
16.3: Sixteenth note triplets
32: Thirty-second notes
32.3: Thirty-second note triplets
Pads for which GATE is turned on will start playing when you
press the pad, and will stop playing when you release the
pad (Gate playback).
In contrast, pads for which GATE is turned off will start
playing when you press the pad, and will continue playing
even when you release the pad (Trigger playback). Playback
will stop when you reach the end (End Point) of the sample
(only if Loop is turned off).
If you want a long phrase to continue playing, you should use
Trigger playback + Loop playback. If you are playing drum-
type samples, you should use Trigger playback + One-shot
playback. The sample will play to its end even if you press the
pad for only an instant.
After sampling, the following settings are made automatically.
If the length resulting from automatic BPM calculation(p. 32) is
less than one measure: Trigger Playback
If the length resulting from automatic BPM calculation (p. 32) is
one measure or greater: Gate Playback
If you have specified Trigger playback + One-shot playback
for a long sample, the sound may continue playing for longer
than you would like. In this case, you can stop the playback by
pressing [CANCEL] four times in rapid succession.
Gate on/off can be specified independently for each pad.
1.
Make sure that [PATTERN SELECT] is extinguished.
If it is lit, press [PATTERN SELECT] so its light is turned
off.
2.
Press the pad whose Gate on/off setting you want to
change, making it the current pad.
The sample will play, and the pad will blink.
If you press [REMAIN], the current pad will blink, allowing you
to check which pad is the current pad.
Pad sensitivity
Playing samples at a fixed loudness
Adjusting the roll speed (ROLL)
Gate playback (GATE) and trigger
playback
Sound starts Sound stops
Press the pad
Release the pad
Sound starts Sound starts
Press and
release the pad
Sound stops at end
of the sample
Press and
release the pad
SP-555_e.book 16 ページ 2007年6月25日 月曜日 午前9時9分

17
Playing samples
You can also change the current pad by holding down
[REMAIN] and pressing a pad.
3.
Press [GATE] to switch on or off the button’s light.
[GATE] lit: Gate playback
[GATE] unlit: Trigger playback
4.
Make sure that [LOOP] is extinguished.
If it is lit, press [LOOP] so its light is turned off.
You can use Loop playback if you want a sampled phrase of
several measures to play repeatedly.
1.
Make sure that [PATTERN SELECT] is extinguished.
If it is lit, press [PATTERN SELECT] so its light is turned
off.
2.
Press the pad for which you want to specify Loop
playback, making it the current pad.
The sample will play, and the pad will blink.
If you press [REMAIN], the current pad will blink, allowing you
to check which pad is the current pad.
You can also change the current pad by holding down
[REMAIN] and pressing a pad.
3.
Press [LOOP] so the button is lit.
If you turn HOLD on, the sample will continue playing even
after you release your finger from the pad. This function is
convenient when you want to temporarily turn Gate off for a
pad whose Gate is on.
1.
Make sure that [PATTERN SELECT] is extinguished.
If it is lit, press [PATTERN SELECT] so its light is turned
off.
2.
While pressing a pad to play the sample, press
[HOLD].
[HOLD] will light, and the sound will be held. In this
state, the sample will continue playing even after you
take your finger off of the pad.
3.
When you press [HOLD] once again, the sound will
stop.
Hold is valid only for a pad whose Gate is turned on. You
cannot turn Hold on for pads whose Gate is off
Loop playback
Combining LOOP and GATE
You can make Gate playback/Trigger playback
settings even if Loop playback is on.
When both LOOP and GATE are on
When LOOP is on and GATE is off
Sound starts Sound stops
Press the pad
Release the pad
Sound starts Sound stops
Press and
release the pad
Press and
release the pad
Making the sample continue playing
even after you release your finger from
the pad (HOLD)
SP-555_e.book 17 ページ 2007年6月25日 月曜日 午前9時9分

18
Using effects
The SP-555 contains 37 types of effects. However, you can
use only one type of effect at a time. You can’t use a multiple
number of effects at the same time.
By default, the effect will be applied only to the pad you
pressed most recently (the “current pad”).
You can directly select the five effects
SUPER FILTER
,
VOICE TRANS
(voice transformer),
DELAY
,
ISOLATOR
,
and
DJFX LOOPER
by pressing a button. To choose one of
the other effects, press the MFX button, then press a bank (A
or B), and finally press a pad 1–16 to select the desired
effect.
The SP-555 has an effect memory function, which lets you
use [EFFECT MEMORY] to store and instantly switch among
up to sixteen effect settings.
1.
Press the pads to find the sample to which you want to
apply an effect. The effect will be applied to the pad
you pressed last (the “current pad”).
2.
Press the appropriate button for the effect you want to
apply.
To select SUPER FILTER, VOICE TRANS, DELAY,
ISOLATOR, or DJFX LOOPER, simply press the
corresponding button. For MFX, hold down [MFX] and
turn the CTRL 3 knob to select an effect while viewing
the display.
3.
Turn the CTRL 1–CTRL 3 knobs to adjust the effect.
The parameters that are controlled by the CTRL 1–CTRL
3 knobs will depend on the effect type. Refer to
“Effect
list”
(p. 54).
If you want to apply an effect to the mic/line input as well,
hold down [EFFECT ASSIGN] and press [MIC] or [LINE IN].
* The effect will be applied to both the line input and mic. You
can’t apply the effect to just one or the other.
You can use [EFFECT MEMORY] to store and instantly call
up EFFECT settings (effect type and CTRL 1/2/3 knob
values).
1.
Make the necessary settings for the effect, so it’s in the
state you want to store.
2.
Press [EFFECT MEMORY].
3.
Press [SAMPLING]. Pads 1–16 will blink.
4.
Press the pad to which you want to store the effect
settings. The pad you pressed will light, and
[SAMPLING] will blink.
5.
Press [SAMPLING] to store the current effect settings.
1.
Press [EFFECT MEMORY] so the button is lit.
2.
Press a pad 1–16 to call up the stored settings.
The effect type and the values for the CTRL 1/2/3 knobs
will be called up.
Since the values for the CTRL 1/2/3 knobs that existed at the
time you stored the effect are given priority, the current
physical position of the CTRL 1/2/3 knobs will not match the
effect that is applied.
1.
Press [EFFECT MEMORY] so the button is lit.
2.
Hold down [REMAIN], and press the pad that you want
to check.
While you hold down [REMAIN], the LED for the effect
type stored at that pad will blink (if the effect is one of
the five types that can be selected directly by a button),
or the 7-segment LED will indicate the bank and number
(A.1–B.16).
Applying an effect to a sample
Applying an effect to the
mic/line input
Storing effect settings
(EFFECT MEMORY)
Storing settings
Calling up settings
Checking the settings
SP-555_e.book 18 ページ 2007年6月25日 月曜日 午前9時9分

19
Using effects
The SP-555 lets you choose either of the following two
methods of operation to specify what will happen to the knob
settings when you switch from one type of effect to another.
1.
While holding down [CANCEL], press [SUPER FILTER].
Each time you press [SUPER FILTER], the display’s
indication will alternate between “C.nL” and “C.JP.”
“C.JP” (Jump):
The setting of the parameter will match the knob
position the instant you turn the knob.
“C.nL” (Null):
When you start turning the knob, the setting will not
actually change until the knob position passes
through the current value of the setting.
When you turn on the power, this is always set to
“C.JP” (Jump).
Applying the same effect to more than
one pad (EFFECT ASSIGN)
To apply the same effect to one or more pads in addition to
the current pad, hold down [EFFECT ASSIGN] and press the
desired pad.
The same effect is applied to each pad that lights when you
press [EFFECT ASSIGN].
If you hold down [EFFECT ASSIGN] while together pressing
both [PAD 1] and [PAD 16], you can simultaneously turn the
effect on/off for all pads in that bank.
By default, if you select as the current pad a pad to which
the effect is not applied, and then turn the effect on/off or
change the effect settings, the effect assign settings will be
cancelled, so that the effect is applied only to the current
pad.
Effect assign mode
If you hold down [EFFECT ASSIGN] and press [REMAIN],
the [EFFECT ASSIGN] button will light. In this state, the
EFFECT ASSIGN setting for each pad will not be cancelled
even if you change the current pad.
If you once again hold down [EFFECT ASSIGN] and press
[REMAIN], the [EFFECT ASSIGN] button will go out, and the
EFFECT ASSIGN setting will change when you change the
current pad.
You can also change the power-on default state. (
➜
“Effect
Assign Mode”
(p. 63) in
“Parameters whose power-on
default setting can be changed.”
)
Effect knob control
In the “C.nL” (Null) state, the display will indicate the
relation between the knob position and the value of the
setting. This will help you match the knob position with
the value.
When the value is lower than the knob position
When the knob position is lower than the value
Tips for using effects
Effect
Pad lit
on
Pad unlit off
Current pad: blinking, lit longer on
Current pad: blinking, lit briefly off
SP-555_e.book 19 ページ 2007年6月25日 月曜日 午前9時9分

20
Using effects
Applying an effect to all pads
Here’s how to apply the effect to all pads of banks A–J.
1.
Make sure that [PATTERN SELECT] is extinguished. If it
is lit, press [PATTERN SELECT] to turn it off.
2.
While holding down [EFFECT ASSIGN], press [SUB
PAD]. All bank buttons and all pads will light (the
current pad will blink).
If you want to return to the state in which the effect is
applied only to the current pad, once again hold down
[EFFECT ASSIGN] and press [SUB PAD] so that only the
current pad blinks.
Turning on the effect only while you
hold down the button (EFFECT GRAB)
Normally, the effect will turn on when you press the button,
and turn off when you press the button again.
If you hold down [EFFECT ASSIGN] and press an effect
button (or [MFX]), the effect will be on only while you
continue pressing it, and turn off when you release it. This is
convenient when you want to rapidly turn an effect on and
off.
About the effect tempo
Effect tempo mode
The parameters of some effects, such as the delay time of a
delay-type effect or BPM LOOPER, will synchronize to the
BPM of the sample.
By default, these are set to synchronize with the BPM of the
current pad. However, if you hold down [EFFECT ASSIGN]
and press [PATTERN SELECT], the effect will synchronize to
the tempo of the pattern sequencer, regardless of the BPM of
the current pad.
You can also change the power-on default state. (
➜
“Effect
Tempo Mode”
(p. 63) in
“Parameters whose power-on
default setting can be changed.”
)
If you hold down [EFFECT ASSIGN] and press [TAP TEMPO],
the effect will temporarily synchronize to the tempo of the
pattern sequencer, and the pattern of effects that have a
pattern (*1) will be reset.
*1 SLICER+FLG (A-13), STEP FILTER (B-13), STEP RING MOD
(B-14), BPM LOOPER (B-15)
About the lit, extinguished, and
blinking effect buttons
• When the effect of the current pad is on, the button of
the effect being used will light. (In the case of MFX, the
[MFX] button will light.)
• If the current pad’s effect is off, and the effect is turned
on for a source other than the current pad (i.e., for
another pad, EXT SOURCE, USB AUDIO, D BEAM),
the effect button will blink.
• If the effect is turned on for all sources, the effect
buttons will be extinguished.
Checking the previously used effect
If you press [EFFECT ASSIGN], the button of the previously
used effect will blink.
Presetting the parameters of the effect
you’ll be using next
While holding down [REMAIN], turn the CTRL 1–CTRL 3
knobs to adjust the parameters. Next, press an effect button,
and the effect will be applied with the parameter values you
set in advance.
Effect Limit mode
By using Effect Limit mode, you can prevent unintentionally
loud sounds from being produced by an effect that uses
feedback or resonance. Hold down [CANCEL] and press
[MFX]. Limit mode is on if the display indicates “L.on,” and
off if the Display indicates “L.oF.”
Some effects do not have a limit mode.
This will be off when you turn on the power.
SP-555_e.book 20 ページ 2007年6月25日 月曜日 午前9時9分
/