
SPEED BREW OWNER’S MANUAL
For models: BT, CSB, GR & SB

2
Since 1957, restaurants and cafés have chosen BUNN
®
as their trusted coffeemaker. For over 60 years, we’ve
built our business with a very simple mission: to create the best coffee experience possible by building the best
coffeemakers possible. What we started then we continue today, by ensuring quality in the cup for every cup.
We’re proud to be a company based on honesty and hard work, and a passion for great coffee wherever it is
served — your home included!
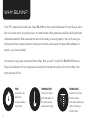
You’re about to enjoy years and years of better coffee. How, you ask? It’s called The BUNN Difference: a
nely-tuned calibration of time, temperature and turbulence that extracts maximum avor from coffee in the
optimal amount of time.
WHY BUNN?
TURBULENCE
Created in the brew
funnel as water
uniformly showers over
coffee, resulting in
smooth avor.
TEMPERATURE
Internal hot water
tank heats water to
the optimal brew
temperature range.
TIME
Quick 4-minute
brew time
ensures coffee is
never bitter.

3
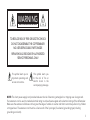
This symbol alerts you to
important operating and
service instructions.
This symbol alerts you
to the risk of re or
electric shock in the
accompanying message.
TO REDUCE RISK OF FIRE OR ELECTRIC SHOCK
DO NOT DISASSEMBLE THE COFFEEMAKER
NO USER-SERVICEABLE PARTS INSIDE
REPAIR SHOULD BE DONE BY AUTHORIZED
SERVICE PERSONNEL ONLY
WARNING
RISK OF FIRE OR ELECTRICAL SHOCK
NOTE: The short power-supply cord provided reduces the risk of becoming entangled in or tripping over a longer cord.
If an extension cord is used, its marked electrical rating must be at least as great as the electrical rating of the coffeemaker.
Make sure the extension cord does not hang over the edge of a table or counter and that it cannot be pulled on by children
or tripped over. The extension cord must be a 3-wire cord of the 3-pronged, 3-socketed, grounding type (including
grounding conductor).

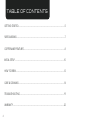
4
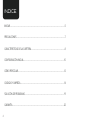
GETTING STARTED ...........................................................................................................5
SAFEGUARDING ...............................................................................................................7
COFFEEMAKER FEATURES ..............................................................................................8
INITIAL SETUP .................................................................................................................10
HOW TO BREW ...............................................................................................................12
CARE & CLEANING ........................................................................................................14
TROUBLESHOOTING .....................................................................................................19
WARRANTY .....................................................................................................................22
TABLE OF CONTENTS

5
GETTING STARTED
Record the model and date code before using.
The model and date code are located on the
bottom of your coffeemaker.
MODEL: __________________________
DATE CODE: ______________________
Questions?
Go to bunn.com/home-products/service-form
or call customer service USA 1-800-352-2866,
Canada 1-800-263-2256
Please have your model and date code ready
when calling for service.
BT, CSB, GR, or SB
53883.0001A 7/17 © 2017 BUNN-O-MATIC CORPORATION

6
PLEASE READ ALL INSTRUCTIONS BEFORE STARTING.
SPECIFICATIONS
BREW CAPACITY: 4 to 10 (5) oz. cups per batch
ELECTRICAL: UL and C-UL Listed FOR HOUSEHOLD USE ONLY. Coffeemaker has an attached, 3-prong
grounded cord set and requires 2-wire service with ground.
ELECTRICAL RATED:
BT: 120 volts AC, 7 amps, single phase, 60 Hz, 850-watts
CSB: 120 volts AC, 7.5 amps, single phase, 60 Hz, 900-watts
GR: 120 volts AC, 7.5 amps, single phase, 60 Hz, 900-watts
SB: 120 volts AC, 7 amps, single phase, 60 Hz, 900-watts
Not designed for High Altitude locations above 4,000 feet. High Altitude units are available.
See Bunn.com for details.

7
SAFEGUARDING
FOR HOUSEHOLD USE ONLY
SAVE THESE INSTRUCTIONS
IMPORTANT
Follow basic safety precautions when using electrical
appliances to reduce the risk of re, electric shock and
personal injury.
• READ ALL THE INSTRUCTIONS IN THIS MANUAL.
• Use caution. This coffeemaker produces hot liquids: hot
liquids can burn you
• Place and use coffeemaker on a level surface.
• Do not touch hot surfaces. Use handles.
• Do not tip the coffeemaker.
• To protect against electric shock, do not place cord,
plugs or coffeemaker in water or other liquids.
• Do not open lid during brewing.
• Close supervision is necessary when coffeemaker is used
around children.
• Internal hot water tank contains hot water. Before
cleaning, removing or replacing parts, press power switch
off, unplug coffeemaker and let it cool (up to 2 hours.)
• Do not operate coffeemaker with a damaged
cord or plug, or any other malfunction or damage.
Return appliance to an authorized service facility for
examination, repair or adjustment.
• Using an accessory not evaluated for use with this
coffeemaker may cause injury.
• Use coffeemaker indoors only.
• Do not let cord hang over edge of table or counter.
• Do not place coffeemaker in or near a hot gas or electric
burner, in a heated oven, or in any other heated area.
• Do not use carafe on a range top or in a microwave.
• Do not use coffeemaker for any purpose other than its
intended use.
• Do not remove brew funnel or carafe while brewing.
• Do not set a hot carafe on a cold surface.
• Do not use a cracked carafe or a carafe with a loose or
weakened handle.
• Do not pour any liquid into the internal hot water tank
other than water or vinegar for cleaning, as specied in
this manual.
• Do not clean carafe with cleansers, steel wool pads, or
other abrasive materials.
• When coffeemaker is not in use, keep lid in the closed
position.
• To disconnect, turn any control to the OFF position, then
unplug from wall outlet.

8
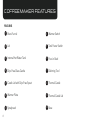
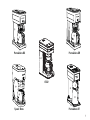
FEATURES
Brew Funnel
Lid
Internal Hot Water Tank
Drip-Free Glass Carafe
Carafe Lid with Drip-Free Spout
Warmer Plate
Sprayhead
Warmer Switch
Tank Power Switch
Pour-In Bowl
Deliming Tool
Thermal Carafe
Thermal Carafe Lid
Base
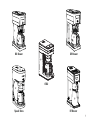
COFFEEMAKER FEATURES
3
2
1
4
5
6
7
8
9
10
11
12
13
14

9
BX Brewer
10
9
8
7
6
5
4
3
2
1
GR Brewer
WARMER/RECHAUD
I
O
10
9
8
7
6
5
4
3
2
1
BT Brewer
12
13
14
9
7
3
2
1
Speed Brew
2
10
9
8
7
6
5
4
3
1
CSB2
8
7
6
5
4
3
2
1

10
INITIAL SETUP
DO NOT PLUG IN THE COFFEEMAKER UNTIL STEP 5, OR
YOU RISK PERMANENTLY DAMAGING THE MACHINE.
It takes 2 full carafes of cold water to ll the internal hot water tank and prepare your
coffeemaker for brewing. Follow the steps on the next page for proper set up.

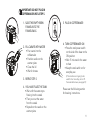
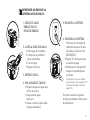
11
1. SLIDE THE EMPTY BREW
FUNNEL INTO THE
FUNNEL RAILS
2. FILL CARAFE WITH WATER
• Pour water into the
coffeemaker
• Position carafe on the
warmer plate
• Close the lid
• Wait 4 minutes
3. REPEAT STEP 2
4. YOU HAVE FILLED THE TANK
• Wait until the water stops
owing into the carafe
• Then pour out the water
from the carafe
• Reposition the carafe on the
warmer plate
5. PLUG IN COFFEEMAKER
6. TURN COFFEEMAKER ON
• Press the tank power switch
on the side of the base to the
ON position
• Wait 15 minutes for the water
to heat
• Keep the tank switch on for
everyday use
(If the machine is not going to be
used for 4 or more days, turn it off.
For extended nonuse, see page 18.)
Please see the following section
for brewing instructions.
IMPORTANT: DO NOT PLUG IN
COFFEEMAKER UNTIL STEP 5.

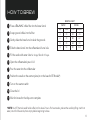
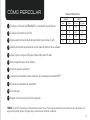
HOW TO BREW

13
Place a BUNN
®
coffee lter into the brew funnel
Scoop ground coffee into the lter
Gently shake the brew funnel to level the grounds
Slide the brew funnel into the coffeemaker’s funnel rails
Fill the carafe with water: 20oz for 4 cups, 50oz for 10 cups.
Open the coffeemaker’s pour-in lid
Pour the water into the coffeemaker
Position the carafe on the warmer plate (or on the base for BT Models*)
Turn on the warmer switch
Close the lid
Wait 4 minutes for the drip-out to complete
*NOTE: Your BT thermal carafe holds coffee hot for about 2 hours. For best results, preheat the carafe by lling it with hot
water, let sit for 30 seconds, then empty before beginning to brew.
HOW TO BREW
3
2
1
4
5
6
7
8
9
10
11
BREWING CHART
WATER COFFEE
Cups Ounces Grams Tablespoons
4 20 32.5 4-5
6 30 48.7 6-7
8 40 64.9 8-9
10 50 81.1 10-11

14
CARE & CLEANING

15
FOR BT MODEL:
Important: Do not use an abrasive cleaning device to clean the
carafe, because it will scratch the stainless steel. Occasionally,
remove the brew through valve on the Thermal Carafe Lid and
clean with mild, non abrasive detergent. To remove the valve, lift
at the edge and pull up. Be sure to clean the passage where the
valve is located.
• To remove coffee stains from inside the thermal carafe, place
a paper lter in the brew funnel and pour 2 teaspoons of
powder dishwasher detergent into the brew funnel.
• Pour one carafe of water into the coffeemaker.
• Position the carafe on the base and close the lid.
• When the brewing cycle stops, remove the brew funnel and
discard the lter.
• Rinse the funnel.
• Allow the carafe to sit for about 15 minutes.
• Use a soft bristled brush to clean the inside and outer rim of
the carafe.
• Scrub the carafe pour lip and lid with a soft cloth, warm water
and mild detergent.
• When nished, pour out the solution in the carafe.
• Rinse the carafe and the lid.
BASIC CLEANING
FOR SPEED BREW MODELS: (Excluding BT)
• Wash the brew funnel and glass carafe after each use.
• Both are top rack dishwasher safe.
Important: Separate the carafe lid from the carafe
when washing in the dishwasher, and use the top shelf
only for both the glass and the lid. If washing by hand,
use a mild, non-abrasive dish soap.
• Wipe the outside of the coffeemaker occasionally,
including the area above the brew funnel.
NOTE: After wipe down, ensure that the warmer switch
is in the OFF position.

16
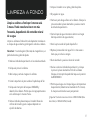
CLEANING THE SPRAYHEAD TUBE
Cleaning the sprayhead tube removes deposits formed by
natural mineral content in your water. The more mineral
content in your water, the more you should clean.
A good rule of thumb is to do it every 3 months. If
you have very hard water then twice a month may be
necessary.
You’ll need: the deliming tool provided with your
machine, a toothpick, dish soap, and a soft cloth.
• Press the tank power switch to the OFF position,
unplug the coffeemaker and allow it to cool for at least
2 hours.
• Remove the funnel and unscrew the sprayhead,
loosening with your ngertips.
• Insert all but 2 inches of the deliming tool into the
sprayhead tube.
• Slide the deliming tool in and out of the sprayhead
tube 5 or 6 times to loosen any deposits.
• Remove the deliming tool and reinsert the brew funnel.
• Pour a carafe of fresh water into the coffeemaker.
• Place the empty carafe on the warmer plate and close the
lid. Water will ow into the carafe.
• Check the sprayhead holes and clear any deposits with
the toothpick.
• Clean the sprayhead with a cloth and dish soap. Rinse it
with water.
• Empty the water from the carafe and place the empty
carafe on the warmer plate.
• Remove the brew funnel and reinstall the sprayhead.
Reinsert the brew funnel.
• Plug in the coffeemaker. Press the tank power switch to
the ON position.
• Wait 15 minutes for the water in the tank to reach brew
temperature.
• Your machine is again ready for brewing.
*NOTE: For a replacement sprayhead or deliming tool call customer
service at 1-800-352-2866 (USA) or 1-800-263-2256 (Canada).

17
DEEP CLEANING
Deep cleaning your coffeemaker removes mineral
deposits in your internal hot water tank and will prolong
the life of your coffeemaker.
You’ll need: 1 quart (32oz) of white vinegar, a toothpick
and dish soap.
• Slide the brew funnel into the funnel rails.
• Place the carafe on the coffeemaker.
• Open the lid and pour the vinegar into the
coffeemaker.
• Close the lid. Empty the carafe when liquid stops
owing.
• Flip the tank switch to the OFF position and unplug
the coffeemaker. Allow the vinegar to sit in the
coffeemaker for at least 2 hours.
Deep clean your coffeemaker at least every
3 months. More frequency may be needed,
depending on the mineral content in your water.
• Remove the brew funnel and unscrew the sprayhead.
Check the sprayhead holes and clear any deposits
with the toothpick.
• Clean the sprayhead with a cloth and dish soap.
• Rinse with water.
• Pour a carafe of fresh water into the coffeemaker. Place
the carafe on the warmer plate and reinsert the brew
funnel.
• Close the lid (the water will begin to ush out the
vinegar from the internal hot water tank).
• Empty the carafe when the liquid has stopped owing.
• Repeat the process of cycling fresh cold water 3 or
more times or until you no longer smell vinegar.
• Remove the brew funnel and reattach the sprayhead.
• Replace the brew funnel and place the carafe on the
warmer plate. Plug in the coffeemaker. Flip the tank
switch to the ON position.
• Allow the water in the tank to reach brewing
temperature (which should take about 15 minutes).
Your coffeemaker is again ready for brewing.
Questions? Contact customer service at 1-800-352-2866 (USA)
or 1-800-263-2256 (Canada).

18
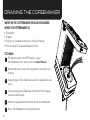
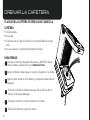
WATER IN THE COFFEEMAKER SHOULD BE DRAINED
WHEN THE COFFEEMAKER IS:
• Transported
• Shipped
• Stored in an unheated location with a chance of freezing
• Not to be used for an extended period of time
TO DRAIN:
Flip the tank switch to the OFF position, unplug
the coffeemaker and it allow to cool for at least 2 hours.
Remove the brew funnel and the sprayhead, loosening with your
ngertips.
Grasp the back of the coffeemaker and turn it upside down over
a sink.
Continue tipping the coffeemaker until the ow from the spray-
head tube and lid stops.
Attach the sprayhead and insert brew funnel into coffeemaker.
Return the coffeemaker to the upright position.
DRAINING THE COFEEMAKER
3
2
1
4
55
6

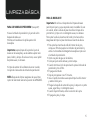
19
TROUBLESHOOTING

20
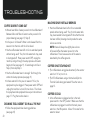
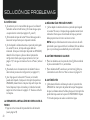
COFFEE DOESN’T COME OUT
• Were at least 20oz of water poured into the coffeemaker?
Between 20oz and 50oz of water must be poured in for
proper brewing (see page 13, Step 5).
• Is the pour-in lid closed? Water is not released from the
reservoir into the tank until the lid is closed.
• Has the coffeemaker been left on for an extended period
without being used? If so, then the water tank may need
to be topped off. Press power switch OFF, unplug the
machine, and go through the setup process until water
begins to ow (see page 11). If water begins to ow in
Step 2, then skip Step 3.
• Has the coffeemaker been in storage? Go through the
entire initial setup process (see page 11).
• Is there water still in the pour-in reservoir? If so, the
sprayhead may be clogged. Press power switch OFF and
unplug the machine. Let cool for two hours. Then clean
the sprayhead and sprayhead tube as per instructions on
page 17. Plug the machine back in.
DELIMING TOOL DOESN’T GO IN ALL THE WAY
• Follow the sprayhead tube cleaning guidelines.
(see page 18)
MACHINE ONLY PARTIALLY BREWED
• Has the coffeemaker been left on for an extended
period without being used? If so, then the water tank
may have needed to be topped off. Now that the tank
has been relled, brewing should provide the same
volume as normal.
NOTE: there will always be slightly less volume
of brewed coffee than water poured in to the
coffeemaker. This is because some of the water is
absorbed by the coffee grounds.
COFFEE IS NOT STAYING HOT
• [For coffeemakers using glass decanters] Is the warmer
switch on? If not, turn it on.
• [For BT coffeemakers using a thermal carafe] Is the
Thermal Carafe being pre-heated? See the note on
page 13.
COFFEE IS COLD
• Is the coffeemaker unplugged and/or is the tank
power switch in the OFF position? Make sure that the
coffeemaker is plugged in and that the tank power
switch is in the ON position. Allow 15 minutes for the
water to reheat.
TROUBLESHOOTING
Page is loading ...
Page is loading ...
Page is loading ...
Page is loading ...
Page is loading ...
Page is loading ...
Page is loading ...
Page is loading ...
Page is loading ...
Page is loading ...
Page is loading ...
Page is loading ...
Page is loading ...
Page is loading ...
Page is loading ...
Page is loading ...
Page is loading ...
Page is loading ...
Page is loading ...
Page is loading ...
Page is loading ...
Page is loading ...
Page is loading ...
Page is loading ...
Page is loading ...
Page is loading ...
Page is loading ...
Page is loading ...
-
 1
1
-
 2
2
-
 3
3
-
 4
4
-
 5
5
-
 6
6
-
 7
7
-
 8
8
-
 9
9
-
 10
10
-
 11
11
-
 12
12
-
 13
13
-
 14
14
-
 15
15
-
 16
16
-
 17
17
-
 18
18
-
 19
19
-
 20
20
-
 21
21
-
 22
22
-
 23
23
-
 24
24
-
 25
25
-
 26
26
-
 27
27
-
 28
28
-
 29
29
-
 30
30
-
 31
31
-
 32
32
-
 33
33
-
 34
34
-
 35
35
-
 36
36
-
 37
37
-
 38
38
-
 39
39
-
 40
40
-
 41
41
-
 42
42
-
 43
43
-
 44
44
-
 45
45
-
 46
46
-
 47
47
-
 48
48


Ask a question and I''ll find the answer in the document
Finding information in a document is now easier with AI
in other languages
- español: Bunn SB Manual de usuario
Related papers
Other documents
-
Newco Enterprises, Inc. BR-4B Datasheet
-
Bunn-O-Matic Thermal Carafe Datasheet
-
-
-
 Courant CCM-815K User manual
-
Bunn-O-Matic STX Datasheet
-
-
-
Cuisinart SS-GB1 Owner's manual
-
 Continental Electric CE23619 User manual

