Sony XBR-75Z9D User manual

Type
User manual

This manual is also suitable for

Television
léviseur
Reference Guide
US
Manuel de référence
FR
Sony Customer Support
U.S.A.:
http://www.sony.com/tvsupport
Canada:
http://www.sony.ca/support
United States Canada
1.800.222.SONY 1.877.899.SONY
Please Do Not Return the Product to
the Store
Service à la clientèle Sony
Canada :
http://support.sony.ca/fr
États-Unis :
http://www.sony.com/tvsupport
Canada États-Unis
1.877.899.SONY 1.800.222.SONY
Ne retournez pas le produit au magasin
XBR-75Z9D / 65Z9D
2
US
Table of Contents
IMPORTANT NOTICE . . . . . . . . . . . . . . . . 2
Safety Information . . . . . . . . . . . . . . . . . 3
Precautions . . . . . . . . . . . . . . . . . . . . . . . 5
Parts and Controls . . . . . . . . . . . . . . . .7
Controls and Indicators . . . . . . . . . . . . . 7
Using Remote Control . . . . . . . . . . . . .8
Remote Control Parts Description. . . . . 8
Connection Diagram . . . . . . . . . . . . .10
Installing the TV to the Wall . . . . . . . 12
Detaching the Table-Top Stand from
the TV. . . . . . . . . . . . . . . . . . . . . . . . . . . 12
Installing the TV against a wall or
enclosed area. . . . . . . . . . . . . . . . . . . 13
Troubleshooting. . . . . . . . . . . . . . . . .14
Troubles and Solutions. . . . . . . . . . . . . 14
Specifications . . . . . . . . . . . . . . . . . . . 15
Introduction
Thank you for choosing this Sony product.
Before operating the TV, please read this manual
thoroughly and retain it for future reference.
Note
Images and illustrations used in Setup Guide and this
manual are for reference only and may differ from the
actual product.
Location of the Setup Guide
Setup Guide is placed on top of the cushion inside the TV
carton.
Help/Help Guide
Help feature offers a lot of information about your TV. To
use the Help feature, press HELP on the remote control. You
can find how to and troubleshooting's from the list or by
voice or text keyword search. Select [Help Guide] on Help
Menu to view the manual. If you connect your TV to the
internet, the Help feature and information will be updated.
Location of the identification label
Labels for the TV Model No. and Power Supply rating are
located on the rear of the TV. They can be found by
removing the center cover.
CAUTION
To prevent electric shock and blade exposure, do not use
this AC plug with an extension cord, receptacle or other
outlet unless the blades can be fully inserted.
Operate the TV only on 110 V - 240 V AC (U.S.A./Canada
120 V AC)
(3D compatible models only)
Some people may experience discomfort (such as eye
strain, fatigue, or nausea) while watching 3D video
images or playing stereoscopic 3D games. Sony
recommends that all viewers take regular breaks while
watching 3D video images or playing stereoscopic 3D
games. The length and frequency of necessary breaks will
vary from person to person. You must decide what works
best. If you experience any discomfort, you should stop
watching the 3D video images or playing stereoscopic 3D
games until the discomfort ends; consult a doctor if you
believe necessary. You should also review (i) the
instruction manual of any other device or media used
with this television and (ii) our website
(http://www.sony.com/tvsupport) for the latest
information. The vision of young children (especially
those under six years old) is still under development.
Consult your doctor (such as a pediatrician or eye doctor)
before allowing young children to watch 3D video images
or play stereoscopic 3D games. Adults should supervise
The 75” class has a 74.5 inch (189.3 cm)
viewable image size and the 65” class has a
64.5 inch (163.9 cm) viewable image size
(measured diagonally).
IMPORTANT NOTICE
Owner’s Record
The model and serial numbers are located at the side
and rear of the TV. Record these numbers in the spaces
provided below. Refer to them whenever you call upon
your Sony dealer regarding this TV.
Model Name
Serial No.
3
US
US
young children to ensure they follow the
recommendations listed above.
Do not use, store, or leave the 3D Glasses or battery near
a fire, or in places with a high temperature, e.g., in direct
sunlight, or in sun-heated cars.
Note
This television includes a QAM demodulator which should
allow you to receive unscrambled digital cable television
programming via subscription service to a cable service
provider. Availability of digital cable television
programming in your area depends on the type of
programming and signal provided by your cable service
provider.
FCC Related Information
This equipment has been tested and found to comply with
the limits for a Class B digital device, pursuant to Part 15 of
the FCC Rules. These limits are designed to provide
reasonable protection against harmful interference in a
residential installation. This equipment generates, uses and
can radiate radio frequency energy and, if not installed and
used in accordance with the instructions, may cause
harmful interference to radio communications. However,
there is no guarantee that interference will not occur in a
particular installation. If this equipment does cause harmful
interference to radio or television reception, which can be
determined by turning the equipment off and on, the user
is encouraged to try to correct the interference by one or
more of the following measures:
Reorient or relocate the receiving antenna.
Increase the separation between the equipment and
receiver.
Connect the equipment into an outlet on a circuit
different from that to which the receiver is connected.
Consult the dealer or an experienced radio/TV technician
for help.
Safety and Regulatory
This device complies with Industry Canada’s licence-
exempt RSSs. Operation is subject to the following two
conditions:
(1) This device may not cause interference; and
(2) This device must accept any interference, including
interference that may cause undesired operation of the
device.
To prevent radio interference to the licensed service, this
device is intended to be operated indoors and away from
windows to provide maximum shielding. Equipment (or its
transmit antenna) that is installed outdoors is subject to
licensing.
Only use Wireless LAN indoors when using it with IEEE
802.11a (5 GHz).
This equipment complies with FCC/IC radiation exposure
limits set forth for an uncontrolled environment and meets
the FCC radio frequency (RF) Exposure Guidelines and RSS-
102 of the IC radio frequency (RF) Exposure rules. This
equipment should be installed and operated keeping the
radiator at least 20 cm or more away from person’s body
(excluding extremities: hands, wrists, feet and ankles).
This device and its antenna(s) must not be co-located or
operating with any other antenna or transmitter except
Grant condition.
WARNING
Never place a television set in an unstable location. A
television set may fall, causing serious personal injury or
death. Many injuries, particularly to children, can be
avoided by taking simple precautions such as:
Using cabinets or stands recommended by the
manufacturer of the television set.
Only using furniture that can safely support the television
set.
Ensuring the television set is not overhanging the edge
of the supporting furniture.
Not placing the television set on tall furniture (for
example, cupboards or bookcases) without anchoring
both the furniture and the television set to a suitable
support.
Not placing the television set on cloth or other materials
that may be located between the television set and
supporting furniture.
Educating children about the dangers of climbing on
furniture to reach the television set or its controls.
If your existing television set is being retained and
relocated, the same considerations as above should be
applied.
Before setting up your TV
Some TV models are packaged with a detached Table-Top
Stand so you can mount your TV to a wall right away. See
page 12 (Installing the TV to the Wall) if you want to mount
the TV to a wall. If you are not mounting the TV to a wall,
you will need to attach the Table-Top Stand. You will need a
Phillips screwdriver (not supplied) and the supplied screws
to complete the task. Look for the Setup Guide.
Be sure to consider the following while setting up your TV:
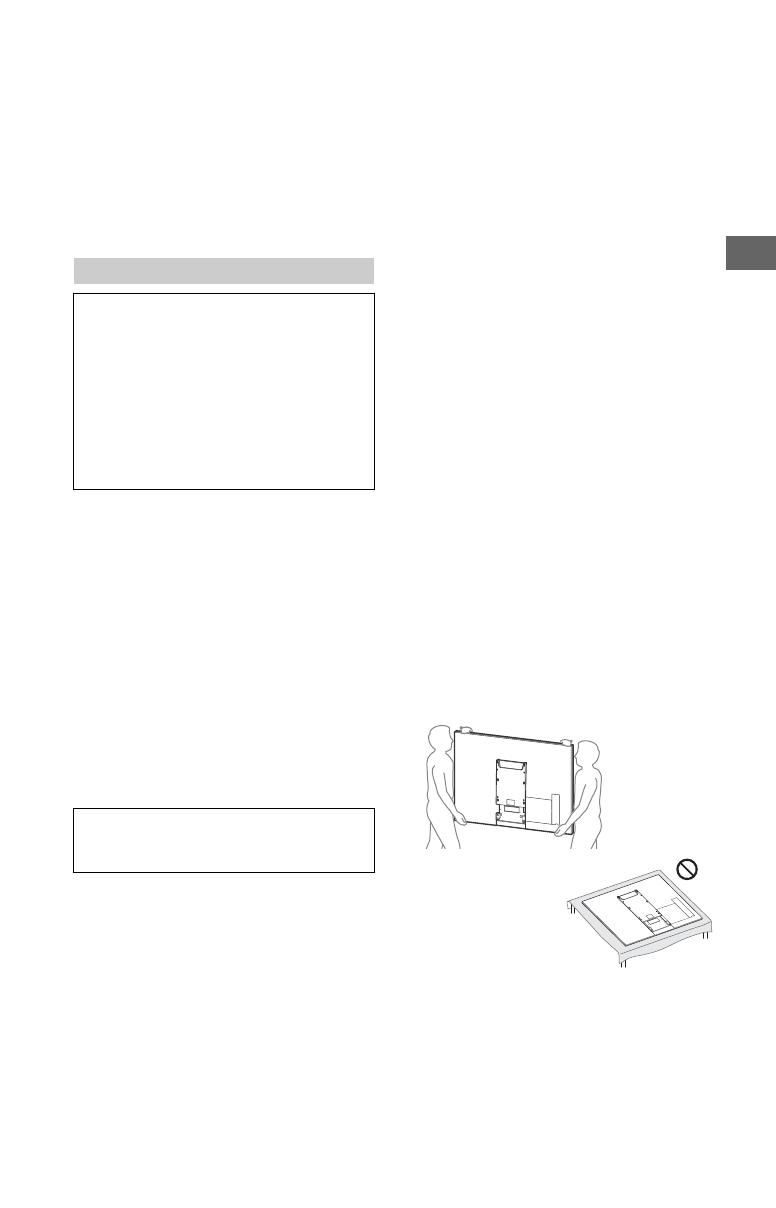
• Disconnect all cables when carrying the TV.
• Carry the TV with the adequate number of people; larger
size TVs require two or more people.
• Correct hand placement while carrying the TV is very
important for safety and to avoid damage.
• When handling or
mounting the TV set, do
not lay down the TV.
• Ensure your TV has adequate ventilation, see page 13.
For best picture quality, do not expose the screen to direct
illumination or sunlight.
• Avoid installing the TV in a room with reflective wall and
floor materials.
• Avoid moving the TV from a cold area to a warm area.
Sudden room temperature changes may cause moisture
condensation. This may cause the TV to show poor
picture and/or poor color. Should this occur, allow
moisture to evaporate completely before powering the TV
on.
Safety Information
Declaration of Conformity
Trade Name: SONY
Model: XBR-75Z9D/XBR-65Z9D
Responsible Party: Sony Electronics Inc.
Address: 16535 Via Esprillo,
San Diego, CA 92127 U.S.A.
Telephone Number: 858-942-2230
This device complies with part 15 of the FCC rules.
Operation is subject to the following two conditions:
(1) This device may not cause harmful interference, and
(2) this device must accept any interference received,
including interference that may cause undesired
operation.
Pursuant to FCC regulations, you are cautioned that any
changes or modifications not expressly approved in this
manual could void your authority to operate this
equipment.
4
US
Securing the TV
Sony strongly recommends taking
measures to prevent the TV from
toppling over.
Unsecured TVs may topple and result
in property damage, serious bodily
injury or even death.
Preventing the TV from Toppling
Secure the TV to a wall and/or stand.
Do not allow children to play or climb on furniture and TV
sets.
Avoid placing or hanging items on the TV.
Never install the TV on:
slippery, unstable and/or uneven surfaces.
furniture that can easily be used as steps, such as a
chest of drawers.
Install the TV where it cannot be pulled, pushed, or
knocked over.
Route all AC power cords and connecting cables so that
they are not accessible to curious children.
Recommended Measures to Secure the
TV
Consider the following measures when securing your TV to
a Stand (not supplied).
1 Secure the Stand for the TV.
Make sure the Stand can adequately support the weight
of the TV. Use two angle braces (not supplied) to secure
the stand. For each angle brace use the appropriate
hardware to:
Attach one side of the angle brace to the wall stud.
Attach the other side to the Stand.
2 Remove the center cover.
3 Secure the TV to the Stand.
Use the optional hardware listed as follows (not
supplied):
• M6 eye bolt (screwed into the TV’s rear cover).
• A screw or similar (attach it to the Stand)
• Rope or chain (strong enough to support the weight of
the TV). Make sure that there is no excess slack in the
rope or chain.
The length of the M6 eye bolt differs depending on the
rope or chain diameter. Please see below illustration.
Angle braces
(not supplied)
Stand
Screw hole on the rear cover
M6 eye bolt
(not supplied)
Rope or chain
(not supplied)
Screw
(not supplied)
10-12 mm
18 mm or more
5
US
US
4 Anchor the TV to the wall by using bolts, wall anchor and
chain (or rope).
Please see below illustration for M6 eye bolt length.
Note
Your TV is shipped with screws attached to the rear of the
TV depending on the TV model. (They are fastened in the
screw holes for wall mounting.) Be sure to remove the
upper two screws prior to anchoring the TV to a wall.
Securing the TV to the stand without securing the TV and
the stand to the wall provides minimum protection
against the TV toppling over. For further protection, be
sure to follow the three measures recommended.
How to care for your BRAVIA TV
Safety is very important. Please read and follow the safety
documentation (Safety Booklet) separately provided.
Unplug the TV and other
connected equipment from
the wall outlet before you
begin cleaning your TV.
Wipe the LCD screen gently
with a soft cloth.
• Stubborn stains may be
removed with a cloth
slightly moistened with a
solution of mild soap and
warm water.
• If using a chemically
pretreated cloth, please follow the instruction provided
on the package.
• Never spray water or detergent directly on the TV set. It
may drip to the bottom of the screen or exterior parts and
enter the TV set, and may cause damage to the TV set.
• Never use strong solvents such as a thinner, alcohol or
benzine for cleaning.
• Do not plug in the TV into the wall outlet until the
moisture from cleaning has evaporated.
• Do not touch the TV if your hand is covered in any
chemical substance such as hand cream or sunblock.
The TV should also be placed on a stable surface to prevent
it from toppling over (see page 4). If you have young
children or pets at home, check regularly to ensure the TV is
securely fastened.
Recommendation for an F type plug
Projection of the inner wire from the connection part must
be less than 1.5 mm.
(Reference drawing for an F type plug)
22
M6 eye bolts (not supplied)
Wall-mount holes
Rope or
chain (not
supplied)
Wall-anchor
(not supplied)
10-12 mm
18 mm or more
Precautions
7 mm max.
1.5 mm max.
6
US
The following chart shows the high-definition (HD) and standard-definition (SD) video formats supported by your BRAVIA TV
inputs.
*1 For details of supported formats, refer to the “Specifications” in this manual.
*2 For supported PC formats refer to the Help Guide.
The BRAVIA® 4K TV Experience
Thank you for choosing Sony! Your new BRAVIA® TV
opens the door to the “4K TV Experience.” This
document will help you get the most out of your TV.
Please take a moment to register your TV at:
U.S.A.: http://productregistration.sony.com
Canada: http://www.sony.ca/registration
Four Steps to a 4K TV Experience
Set, Source, Sound, and Setup.
1 Set
Now that you have made the best selection in LED
backlit LCD TV technology, be sure to remove all of the
accessories from the packaging before setting up your
TV.
2 Source
To experience the stunning detail of your BRAVIA TV,
you need access to HD programming.
Upgrade your signal or content source to high-
definition (4K) by contacting your HD service provider.
Bring the astonishing resolution of your Sony 4K Ultra
HD TV to life with Sony 4K Ultra HD Media Player. (The
availability depends on region)
Receive over-the-air HD broadcasts with an HD-
quality antenna connected directly to the back of your
TV.
Visit http://www.antennaweb.org for more
information on antenna selection and setup.
Discover the wealth of entertainment now available
on super-high resolution Blu-ray Disc™ player and
other Sony HD equipment.
3 Sound
Complete the high-definition experience with a BRAVIA
Sync™ surround sound system or A/V receiver from
Sony.
4 Setup
Install your TV and connect your sources. See page 10
for sample connection diagrams. To help assure the
highest quality for your 4K experience, use Sony HDMI
(High-Definition Multimedia Interface) cables.
To learn more about 4K TV, visit:
U.S.A.: http://www.sony.com/HDTV
Canada: http://www.sony.ca/hdtv
This TV displays all video input signals in a resolution of 3,840 dots × 2,160 lines.
INPUT VIDEO AUDIO
SUPPORTED FORMATS
4K*
1
1080/
24p/30p
1080p*
1
1080i
720/
24p/30p
720p*
1
480p 480i PC*
2
4K/
HD
HDMI
COMPONENT
Audio L/R
SD
VIDEO
Composite
video
connection
Audio L/R
7
US
US
Parts and Controls
Remote Control sensor*
1
/ Light
sensor*
1
/ Illumination LED / 3D
Sync Transmitter*
1
*
2
The illumination LED lights up or blinks
according to the status of the TV.
•White
When turning on the TV/picture off
mode/software update, etc.
•Cyan
When connecting with a mobile
device wirelessly.
•Amber
Timer is set.
 (Power) / + / –
When the TV is off,
Press to power on.
When the TV is on,
Long press to power off.
Press repeatedly to change the
function, then press + or - button to:
Adjust the volume
Select the channel
Select the input source of TV
*1 Do not place anything near the sensor.
*2 Only on limited region/country/TV model.
Controls and Indicators
1
2
8
US
Using Remote Control
The remote control shape, location, availability and function of remote control button may
vary depending on your region/country/TV model.
INPUT
Display and select the input source.
(Microphone)
Use Voice Function. (e.g., Search various
content by voice.)
POWER
Turn on or turn off the TV (standby
mode).
SYNC MENU
Display the BRAVIA Sync Menu.
Number buttons
Use with the 0-9 buttons to select
digital channels.
DISPLAY
Display information about the channel/
program/input you are viewing.
Remote Control Parts Description
Ȫ
ȩ
ȫ
Ȭ
ȭ
Ȯ
MIC
9
US
US
Google Play
Access the “Google Play” online service.
NETFLIX (Only on limited region/
country/TV model)
Access the “NETFLIX” online service.
Color buttons
Execute corresponding function at that
time.
ACTION MENU
Display a list of contextual functions.
TV
Switch to a TV channel or input from
other applications.
Turn on the TV to display TV channel
or input.
GUIDE
Display the digital program guide.
BACK
Return to previous screen.
HOME
Display the TV Home Menu.
DISCOVER
Bring up the Content Bar to search for
content.
//// (Item select/Enter)
VOL +/– (Volume)
Adjust the volume.
JUMP
Jump back and forth between two
channels or inputs. The TV alternates
between the current channel or input
and the last channel or input that was
selected.
MUTING
Mute the sound. Press again to restore
the sound.
CH +/– (Channel)
Select the channel.
AUDIO
Change the language for the program
currently being viewed.
//////
Operate media contents on TV and
connected BRAVIA Sync-compatible
device.
SUBTITLE/CC
Turn subtitles on or off (when the
feature is available).
HELP
Display Help Menu. Help Guide can be
accessed from here.
WIDE
Change the screen format.
PIC OFF
Turn the picture off, while sound
remains on.
Guidelines for IR Remote Control
Point your remote control directly at
the IR sensor located on your TV.
Make sure that no objects are blocking
the path between the remote control
and the IR sensor on your TV.
Fluorescent lamps can interfere with
your remote control; try turning off the
fluorescent lamps.
If you are having problems with the
remote control, reinsert or replace your
batteries and make sure that they are
correctly inserted.
10
US
Connection Diagram
For more information on connections, refer to the Help Guide (page 2).
Note
When connecting the cable to the Cable/Antenna, input finger tighten only, over tightening the
connection can damage the TV.
*5
*4
*1
*2 *6
*6
*1
*1
*1
*3
11
US
US
AUDIO OUT*
5
/
To listen to the TV's sound through
the connected equipment, press
HOME. Select [Settings] [Sound]
[Headphone/Audio out] and then
select the desired item.
USB 1/2, USB 3
Connecting a large USB device may
interfere with other connected
devices beside it.
When connecting a large USB device,
connect to the USB 1 port.
HDMI IN 1/2/3/4
If connecting a digital audio system
that is compatible with Audio Return
Channel (ARC) technology, use HDMI
IN 3. If not, an additional connection
with DIGITAL AUDIO OUT (OPTICAL) is
necessary.
REMOTE RS-232C
This jack is for receiving the external
control signal. Enables extended
control of the TV using RS-232C via
the RS-232C jack.
RS-232C: connect to the RS-232C
terminal of the home controller.
Take care to not connect to
headphones or an external audio
system.
If [RS232C control] is set to [On],
[BRAVIA Sync settings] is not
available.
/ VIDEO IN 1
For a composite connection, use the
supplied Analog Extension Cable*
6
.
*1
*2
*3
*4 When connecting mono equipment, connect
to the L (MONO) audio jack (socket).
*5 Supports 3-pole stereo mini jack only.
*6 Only on limited region/country/TV model.
< 21 mm
< 12 mm
3.5 mm
1234
1: L
2: Video
3: Ground
4: R
< 14 mm
12
US
Installing the TV to the Wall
This TV’s instruction manual only shows the steps on preparing the installation of the TV
before installing to the wall.
Your TV can be mounted on a wall using a Wall-Mount Bracket (not supplied) out of the box
as packaged. If the Table-Top Stand is attached to the TV, the TV may require detaching the
Table-Top Stand; see page 12 (Detaching the Table-Top Stand from the TV).
Prepare the TV for the Wall-Mount Bracket before making cable connections.
For product protection and safety reasons, Sony strongly recommends that installation of
your TV on the wall be performed by qualified professionals. Do not attempt to install it
yourself.
Follow the instruction guide provided with the Wall-Mount Bracket for your model.
Sufficient expertise is required in installing this TV, especially to determine the
strength of the wall for withstanding the TV’s weight.
The length of the screw for Wall-Mount Bracket differs depending on the Wall-Mount
Bracket thickness. Please see below illustration.
Be sure to store the unused screws and Table-Top Stand in a safe place until you are
ready to attach the Table-Top Stand. Keep the screws away from small children.
Note
Read the supplied Safety Booklet for additional safety information.
To detach the Table-Top Stand from the TV, remove the screws .
Note
Do not remove the Table-Top Stand for any reason other than to install corresponding accessories on the
TV.
Be sure the TV is vertical before turning on. To avoid uneven picture uniformity do not power on the TV
with the LCD panel facing down.
When attaching the Table-Top Stand again, be sure to fasten the screws (previously removed) to the
original holes on the rear of the TV.
Detaching the Table-Top Stand from the TV
Wall-Mount Bracket
Screw (M6)
10 mm - 12 mm
TV’s rear cover
13
US
US
Installing the TV against a wall or enclosed area
Make sure that your TV has adequate ventilation. Allow enough space around the TV as
shown in the illustration.
Note
Inadequate ventilation can lead to overheating of the TV and may cause damage to your TV or cause a
fire.
Leave at least this much space around the set.
Installed with stand
4 inches
11
7
/
8
inches
(30 cm)
4 inches
2
3
/
8
inches
(10 cm) (10 cm)
(6 cm)
Leave at least this much space around the set.
Installed on the wall
4 inches
4 inches (10 cm)
4 inches
11
7
/
8
inches
(30 cm)
(10 cm) (10 cm)
Never install the TV set as follows:
Air circulation is blocked. Air circulation is blocked.
Wall Wall
14
US
Troubleshooting
In order to keep your TV software up-to-
date, it is necessary to download the latest
software information via the digital
broadcasting system or internet and to
update the software. Select [Update Now]
to start a software update. The illumination
LED flashes white while the software is
updating.
The following screen with [Updating…] will
appear while software is updating.
Do not unplug the AC power cord during
the software update. If you do, the software
update may not finish completely, and it
may cause a software malfunction.
Software updates can take up to 30
minutes. If you do not wish to update the
software automatically, press HOME and
select [Help] [System software update]
[Automatic software download] [Off].
When you plug in TV, the TV may not be
able to turn on for a while even if you press
the power button on the remote control or
the TV, because it takes time to initialize the
system. Wait for about one minute, then
operate it again. When you turn on by
pressing the power button on the remote
control or the TV, it takes some time to turn
on the illumination LED and for the remote
control to be functional.
When the illumination LED is flashing red,
count how many times it flashes (interval
time is three seconds).
If the illumination LED flashes red, reset the
TV by disconnecting the AC power cord for
two minutes, then turn on the TV.
If the problem persists, contact Sony
Customer Support (information provided
on the front cover) with the number of
times the illumination LED flashes red
(interval time is three seconds). Disconnect
the AC power cord, and contact Sony
Customer Support.
When the illumination LED is not
flashing, check the items as follows.
You can also refer to troubleshooting in the
Help Guide or perform self-diagnosis by
selecting [Help] [Self diagnostics]. If the
problem persists, contact Sony Customer
Support (information provided on the front
cover).
Troubles and Solutions
There is no picture (screen is dark) and no
sound.
Check the cable/antenna connection.
Connect the TV to AC power, and press the
button on the TV or POWER button on the
remote control.
Some programs cannot be tuned.
Check the cable/antenna connection.
The remote control does not function.
Replace the batteries.
The [Parental lock (Broadcast)] password
has been forgotten.
Enter 4357 for the PIN code. Update PIN code
by selecting [Settings] [Parental lock
(Broadcast)] [Change password].
The TV and its surroundings become
warm.
When the TV is used for an extended period
of time, the TV and its surroundings may
become warm to the touch. This is not a
malfunction of the TV.
How to reset the TV to factory settings
Turn on the TV. You can reset the TV to
factory settings by pressing HOME, then
select [Settings]
[Storage & reset]
[Factory data reset].
WARNING: The reset will clear all of your
customized settings including the [Parental
lock (Broadcast)] setting.
For security purposes, be sure to remove all
personal and account information before
discarding, selling or passing your TV to
someone else by: unlinking/unregistering,
signing out of and deactivating all network
services as well as factory reset the TV.
Frozen audio or video, a blank screen, or
the TV does not respond to TV or remote
control buttons.
Perform a simple reset of the TV by
unplugging the AC power cord for two
minutes, then plug it in again.
Updating...
15
US
US
The , +, and – buttons cannot be located
on the TV.
See below illustration for location of the
buttons on the TV.
The illumination LED is turned on.
If you do not wish to light up the illumination
LED, you can turn it off.
Press HOME, then select [Settings]
[Illumination LED] [Off].
Cannot connect to a wireless router by
WPS (Wi-Fi Protected Setup).
If you use WEP security, select [Easy]
[Wi-Fi] [Connect by scan list]. Then, select
the network name (SSID) you want to
connect.
Cannot find the required network name
in network setup.
Select [[Manual entry]] and press to enter
network name.
Specifications
System
Television system
NTSC: American TV standard
ATSC (8VSB terrestrial): ATSC compliant 8VSB
QAM on cable: ANSI/SCTE 07 2000 (Does not
include CableCARD functionality)
Channel coverage
Analog terrestrial: 2 - 69 / Digital terrestrial:
2 - 69
Analog Cable: 1 - 135 / Digital Cable: 1 - 135
Panel system
LCD (Liquid Crystal Display) Panel, LED
Backlight (Direct LED)
Speaker output
10 W + 10 W
Wireless technology
Protocol IEEE802.11ac/a/b/g/n
Bluetooth Version 4.1
Input/Output jacks
CABLE/ANTENNA
75-ohm external terminal for RF inputs
VIDEO IN 1
Video / Audio input (mini jack)
COMPONENT IN
YPBPR (Component Video): 1080p (60 Hz),
1080i (60 Hz), 720p (60 Hz), 480p, 480i
Audio input (phono pin jack)
VIDEO IN 2
Video input (common phono pin with Y
input)
HDMI IN 1/2/3/4 (Support 4K resolution,
HDCP 2.2-compatible)
Video (2D):
4096 × 2160p (60 Hz)*
1,
*
2
, 4096 × 2160p
(24 Hz)*
1
, 3840 × 2160p (60 Hz)*
2
,
3840 × 2160p (24, 30 Hz), 1080p (30,
60 Hz), 1080/24p, 1080i (60 Hz), 720p (30,
60 Hz), 720/24p, 480p, 480i, PC Formats
*
1
3840 × 2160p is displayed when
4096 × 2160p is input
*
2
HDMI IN 2 / 3 only.
Video (3D) (3D compatible models only):
Frame Packing: 1080p (30 Hz), 1080/24p,
1080i (60 Hz), 720p (30, 60 Hz), 720/24p
Side-by-Side: 1080p (60 Hz), 1080/24p,
1080i (60 Hz), 720p (60 Hz)
Over-Under: 1080p (30, 60 Hz), 1080/24p,
1080i (60 Hz), 720p (60 Hz)
Audio: 5.1 channel linear PCM: 32, 44.1, 48,
88.2, 96, 176.4 and 192 kHz, 16, 20 and 24
bits, Dolby Digital, Dolby Digital Plus and DTS
Rear of TV
16
US
ARC (Audio Return Channel) (HDMI IN 3 only)
(Two channel linear PCM, Dolby Digital,
Dolby Digital Plus, DTS)
DIGITAL AUDIO OUT (OPTICAL)
Digital optical jack (Two channel linear PCM,
Dolby Digital, DTS)
AUDIO OUT / (Stereo mini jack)
Headphone, Audio output, Subwoofer
1, 2, 3
USB port 1 and 2 support High Speed USB
(USB2.0).
USB port 3 supports Super Speed USB
(USB3.0).
LAN
10BASE-T/100BASE-TX connector
(Connection speed may differ depending on
the network environment. 10BASE-T/
100BASE-TX communication rate and
communication quality are not guaranteed
for this TV.)
Home Network
Refer to the Help Guide for supported
formats.
REMOTE
RS-232C, mini jack
This jack is for receiving the external control
signal.
IR BLASTER *
1
IR Blaster Cable input (mini jack)
Others
Optional accessories
Wireless Subwoofer: SWF-BR100
Active 3D Glasses: TDG-BT500A
Operating temperature
32 ºF – 104 ºF (0 ºC – 40 ºC)
Power and others
Power requirement
110 V - 240 V AC, 50/60 Hz (U.S.A./Canada
120 V AC, 60 Hz)
Power consumption
in use
XBR-75Z9D: 428 W
XBR-65Z9D: 322 W
in standby*
2
Less than 0.50 W with 120 V AC and less than
0.50 W with 240 V AC
Screen size (inches measured diagonally)
(Approx.)
XBR-75Z9D: 74.5 inches (75” class)
XBR-65Z9D: 64.5 inches (65” class)
Display resolution
3,840 dots (horizontal) × 2,160 lines (vertical)
Output Rating
USB 1
5 V, , 500 mA MAX
USB 2
5 V, , 500 mA MAX
USB 3
5 V, , 900 mA MAX
Dimensions (Approx.)
with stand
XBR-75Z9D: 1,684 × 1,047 × 278 mm /
66
3
/
8
× 41
1
/
4
× 11 inches
XBR-65Z9D: 1,462 × 920 × 268 mm /
57
5
/
8
× 36
1
/
4
× 10
5
/
8
inches
without stand
XBR-75Z9D: 1,684 × 973 × 78 mm /
66
3
/
8
× 38
3
/
8
× 3
1
/
8
inches
XBR-65Z9D: 1,462 × 847 × 78 mm /
57
5
/
8
× 33
3
/
8
× 3
1
/
8
inches
wall-mount hole pattern
XBR-75Z9D: 400 × 300 mm
XBR-65Z9D: 400 × 300 mm
wall-mount screw size (mm)
M6 (length: see diagram on page 12.)
Mass (Approx.)
with stand
XBR-75Z9D: 45.1 kg / 99.4 lb.
XBR-65Z9D: 35.7 kg / 78.7 lb.
without stand
XBR-75Z9D: 41.3 kg / 91.0 lb.
XBR-65Z9D: 32.0 kg / 70.5 lb.
*
1
Only on limited region/country/TV model.
*
2
Standby power consumption will increase
when your TV is connected to the network.
Note
Optional accessories availability depends on
countries/region/TV model/stock.
Design and specifications are subject to change
without notice.
17
US
US
Licensing Information
The terms HDMI and HDMI High-
Definition Multimedia Interface, and
the HDMI Logo are trademarks or
registered trademarks of HDMI
Licensing LLC in the United States and
other countries.
Manufactured under license from
Dolby Laboratories.
Dolby, Dolby Audio, and the double-D
symbol are trademarks of Dolby
Laboratories.
•“BRAVIA and , S-Force,
Motionflow, BRAVIA Sync, and are
trademarks or registered marks of
Sony Corporation.
Gracenote, Gracenote eyeQ, Gracenote
VideoID, Gracenote Video Explore, the
Gracenote logo and logotype, and the
“Powered by Gracenote” logo are
either registered trademarks or
trademarks of Gracenote in the United
States and/or other countries.
•Opera® Devices SDK from Opera
Software ASA. Copyright 1995-2015
Opera Software ASA. All rights
reserved.
Wi-Fi, Wi-Fi Direct, Miracast, Wi-Fi
Protected Setup and Wi-Fi CERTIFIED
Logo are trademarks or registered
trademarks of Wi-Fi Alliance.
For DTS patents, see
http://patents.dts.com. Manufactured
under license from DTS, Inc.
DTS, the Symbol, & DTS and the
Symbol together are registered
trademarks, and DTS Digital Surround
is a trademark of DTS, Inc. © DTS, Inc.
All Rights Reserved.
QuickSet and the QuickSet logo are
trademarks of Universal Electronics Inc.
Portions © UEI 2000-2015
The Bluetooth® word mark and logos
are registered trademarks owned by
Bluetooth SIG, Inc. and any use of such
marks by Sony Corporation is under
license. Other trademarks and trade
names are those of their respective
owners.
TUXERA is a registered trademark of
Tuxera Inc. in the US and other
countries.
USB-IF SuperSpeed USB Trident logo is
a registered trademark of USB
Implementers Forum, Inc.
18
US
2
FR
Table des matières
AVIS IMPORTANT. . . . . . . . . . . . . . . . . . . 2
Consignes de sécurité . . . . . . . . . . . . . . 3
Précautions . . . . . . . . . . . . . . . . . . . . . . . 6
Pièces et commandes . . . . . . . . . . . . .8
Commandes et indicateurs . . . . . . . . . . 8
Utilisation de la télécommande . . . . .9
Description des pièces de la
télécommande . . . . . . . . . . . . . . . . . . . . 9
Schéma de connexion . . . . . . . . . . . . 12
Fixer le téléviseur au mur . . . . . . . . .14
Démonter le support de table du
téléviseur. . . . . . . . . . . . . . . . . . . . . . . . 15
Installation du téléviseur contre un
mur ou dans un endroit fermé . . . . . 16
Dépannage. . . . . . . . . . . . . . . . . . . . . 17
Problèmes et solutions . . . . . . . . . . . . 17
Spécifications . . . . . . . . . . . . . . . . . . . 19
Introduction
Merci d’avoir choisi ce produit Sony.
Avant de faire fonctionner le téléviseur, lisez attentivement
ce manuel et conservez-le pour toute référence ultérieure.
Remarque
Les images et illustrations utilisées dans le Manuel de
configuration et ce manuel sont fournies uniquement à
titre de référence et peuvent différer de l’aspect réel du
produit.
Emplacement du Manuel de
configuration
Le Manuel de configuration est posé sur le rembourrage à
l’intérieur du carton du téléviseur.
Aide/Manuel d’aide
La fonction d’Aide offre une grande quantité d’informations
au sujet de votre téléviseur. Pour utiliser la fonction d’Aide,
appuyez sur la touche HELP de la télécommande. Vous
trouverez des renseignements pratiques et des
informations de dépannage dans la liste ou à l’aide de la
recherche de mot-clé vocale ou textuelle. Sélectionnez
[Manuel d’aide] dans le Menu d’aide pour consulter le
manuel. Si vous connectez votre téléviseur à Internet, la
fonction d’Aide et les informations seront mises à jour.
Emplacement de l’étiquette
d’identification
Les étiquettes indiquant le numéro de modèle et les
caractéristiques nominales de l’alimentation du téléviseur
se trouvent à l’arrière du téléviseur. Vous pouvez les trouver
en retirant le couvercle central.
La taille d’image visualisable de la classe 75”
est de 74,5 pouces (189,3 cm) et la taille
d’image visualisable de la classe 65” est de
64,5 pouces (163,9 cm) (mesurée en
diagonale).
AVIS IMPORTANT
Fiche d’identification
Les numéros de modèle et de série sont indiqués à
l’arrière et sur le côté du téléviseur. Inscrivez ces
numéros dans les espaces ci-dessous. Faites-y référence
chaque fois que vous appelez votre détaillant Sony au
sujet de ce téléviseur.
N° de modèle
N° de série
  • Page 1 1
  • Page 2 2
  • Page 3 3
  • Page 4 4
  • Page 5 5
  • Page 6 6
  • Page 7 7
  • Page 8 8
  • Page 9 9
  • Page 10 10
  • Page 11 11
  • Page 12 12
  • Page 13 13
  • Page 14 14
  • Page 15 15
  • Page 16 16
  • Page 17 17
  • Page 18 18
  • Page 19 19
  • Page 20 20
  • Page 21 21
  • Page 22 22
  • Page 23 23
  • Page 24 24
  • Page 25 25
  • Page 26 26
  • Page 27 27
  • Page 28 28
  • Page 29 29
  • Page 30 30
  • Page 31 31
  • Page 32 32
  • Page 33 33
  • Page 34 34
  • Page 35 35
  • Page 36 36
  • Page 37 37
  • Page 38 38
  • Page 39 39
  • Page 40 40
  • Page 41 41
  • Page 42 42
  • Page 43 43
  • Page 44 44

Sony XBR-75Z9D User manual

Type
User manual
This manual is also suitable for

Ask a question and I''ll find the answer in the document

Finding information in a document is now easier with AI

in other languages