Page is loading ...

IMPORTANT: If you have questions on the use, care, or suitability of this equipment for your application,
contact DBI-SALA.
IMPORTANT: Record the product identication information from the ID label in the inspection and maintenance
log in section 7.0 of this manual.
IMPORTANT: All electrical wiring required for the installation of this equipment must be completed by a licensed
electrician.
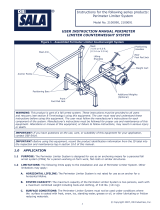
1.0 APPLICATION
1.1 The Power Tagline is designed to lower the connecting hook of one or more self retracting lifelines (SRL)
from an overhead beam to the user. Use this system when conventional tagline systems cannot be used
because of travelling overhead crane systems or related equipment. The Power Tagline may be installed on
beam anges or plates 1 1/2 in. to 18 in. (3.8 cm to 45.7 cm) wide and from 1/8 in. to 3/4 in. (.3 cm to
1.9cm) thick.
2.0 SYSTEM REQUIREMENTS
2.1 ANCHORAGE STRENGTH: When the Power Tagline is attached to the same beam as the SRL, the beam
must be capable of supporting the loads required by the SRL. When the Power Tagline is attached to a beam
or plate other than that of the SRL, the beam or plate must support a minimum of 500 lbs (227 kg).
2.2 PERSONAL FALL ARREST SYSTEM: The Power Tagline must be used with a complete personal fall arrest
system that includes a full body harness. See personal fall arrest system manufacturer’s instructions for
more information.
2.3 Refer to national Standards including ANSI Z359 (.0, .1, .2, .3, and .4) family of standards on fall protection,
ANSI A10.32, and applicable local, state and federal (OSHA) requirements governing occupational safety for
more information about work positioning systems.
WARNING: Do not alter or intentionally misuse this equipment. Consult DBI-SALA when using this equipment
in combination with components or subsystems other than those described in this manual. Some subsystem
and component combinations may interfere with the operation of this equipment. Use caution when using this
equipment around moving machinery and electrical hazards. Do not loop the lanyard around small structural
members.
User Instruction Manual
Power Tagline for SRL
Model No. 8102100
This manual is intended to meet the
Manufacturer’s Instructions as required by OSHA.
© Copyright 2009, DB Industries, Inc.
Wireless Remote Control System
Corded Remote Control System
Form: 5900019 Rev:C

2
2.4 ANCHORAGE STRENGTH: The anchorage strength required is dependent on the application type. The
following are the requirements of ANSI 359.1 for these application types:
A. FALL ARREST: Anchorages selected for fall arrest systems shall have a strength capable of sustaining
static loads applied in the directions permitted by the system of at least:
1. 5,000 lbs. (22.2 kN) for non-certified anchorages, or
2. Two times the maximum arresting force for certified anchorages. When more than one fall arrest
system is attached to an anchorage, the strengths set forth in (1) and (2) above shall be multiplied by
the number of systems attached to the anchorage.
3.0 INSTALLATION AND USE
3.1 BEFORE EACH USE of this equipment, carefully inspect it
according to section 4.0 of this manual.
3.2 PLAN your system before beginning installation. Consider
all factors affecting your safety when installing and using
this equipment. Locate the Power Tagline system over a safe
access area (for connecting/disconnecting) your fall arrest
system.
3.3 INSTALLATION: The Power Tagline may be installed on
a bar or pipe (see Figure 2), or on beam anges or plates
1 1/2 in. to 18 in. (3.8 cm to 45.7 cm) wide and from 1/8 in.
to 3/4 in. (.3 cm to 1.9cm) thick. The beam must meet the
fall clearance and strength requirements specied for your
personal fall arrest system. Electrical wiring performed at
the job site must meet all applicable local, state, and federal
codes.
A. INSTALLING POwER TAGLINE ONTO A
BEAM: See Figure 3.
Remove the Pipe Mount Bracket
by removing the Bracket Bolt and
replacing the bolt after the bracket is
removed.
Loosen the nut on the top of
each clamp to allow the clamp jaw to
open to the maximum width.
Position the mounting bracket
beneath the beam at the appropriate
location with the clamp jaw open.
Slide the clamp onto the beam
ange and tighten lightly. Secure the
other clamp to the other side of the beam
ange.
Adjust the position of the bracket
so it is centered beneath the beam, then
tighten the clamp jaws. Torque the nuts
to 8 ft-lbs.
Position the motor and mounting
plate against the mounting bracket and
insert the supplied bolts through the plate
holes and bracket slots. Make sure the
motor is mounted to the inside of the
bracket, with the bent bracket leg over
the motor.
Mounting
Bracket
Open the clamp
jaw and position
the mounting
bracket
Slide the clamp
onto the beam
flange.
After adjusting
the position of
the bracket and
clamps, tighten
each nut to
secure the
clamp.
Bracket Bolt

3
B. ATTACH THE dROPPEd OBjECTS PROTECTION CHAIN: Regardless of the type of installation (pipe,
beam, or plate) a dropped objects protection chain must be installed.
Wrap the chain over the pipe or beam and fasten it using the screw shut carabiner. See
Figure 5.
Loosen the bolt at the top of the motor and back it out enough to slip the carabiner onto it.
Replace the bolt and nut and tighten with a wrench. Remove any excess chain or secure it
out of the working area.
C. INSTALLING A wIRELESS REMOTE CONTROL:
Push the electrical cord plug into the connector on the side of the motor and tighten the
threaded retainer.
Connect the strain relief clip on the cord into the ring on the side of the motor. See Figure 6.
Position the wireless control box in a location away from the trolley travel path or other
equipment. Secure the wireless control box to the structure
with user supplied hardware.
Route the power cord to an outlet. Secure the cord
as required for safe operation.
d. INSTALLING A CORdEd REMOTE CONTROL:
Push the electrical cord plug into the connector on
the side of the motor and tighten the threaded retainer.
Connect the strain relief clip on the cord into the
ring on the side of the motor. See Figure 6.
Route the power cord to an outlet and secure the
cord as required for safe operation. Position the remote
control in a location away from trolley travel and other
equipment.
To install the
weight to the tagline, insert
a cotter pin into one end of
the bar. See Figure 4. Feed
the cable loop through
the slot in the top plate
of the weight and put the
bar through the mounting
holes and cable loop. Then
place the other cotter pin
through the other end of
the bar. Secure each cotter
pin by bending back the
long leg of the pin.

4
IMPORTANT: If modifying this installation, all wiring
must be completed by
a licensed electrician and must meet
local codes and regulations.
3.4 USING THE POwER TAGLINE:
• For the wireless remote control (see Figure 7), twist the red button in a
clockwise rotation to verify that power is on.
• Lower the line until the SRL hook is accessible. Disconnect the SRL
hook from the tagline weight and attach the SRL to the connection
point on your full body harness.
• Raise tagline weight all the way up. An automatic stop on the motor
will prevent the tagline from raising too far.
• When use of the fall arrest system is completed, lower the tagline to
access the tagline weight. Disconnect the hook from your full body
harness and connect it to the weight. Raise tagline all the way up.
• For the wireless remote control, push in the red button to turn the
power off when not in use.
• Use the SRL and trolley according to manufacturer’s instructions.
IMPORTANT: Maximum lowering distance for the Power Tagline is 100 ft.
(30 m) Lowering the tagline more than 100 ft (30 m) will cause the cable
to start to reverse direction, then turn off because of a safety switch on the
motor.
4.0 INSPECTION
4.1 INSPECTION STEPS:
Inspect each SRL according to the manufacturer’s instructions.
Inspect each trolley according to the manufacturer’s
instructions.
Inspect operation of the Power Tagline system. The weight
should pull the SRL hook down to the user.
Inspect the wire rope tagline for damage.
Inspect the mounting bracket, making sure all fasteners are
present and secure.
Inspect all electrical connections. Make sure they are in good
condition with no loose connections or exposed wire.
Make sure the Lock-out Key is securely in place See Figure 7. The
Wireless Remote will not power-up without it.
5.0 MAINTENANCE
The Power Tagline system may be wiped clean with water and mild detergent.
Clean the outside of the system only. Do not allow water to contact the
electrical system. Wipe dry with a clean cloth.
For electrical motor maintenance lock-out the power switch to prevent
unintentional activation. Proceed according to the motor manufacturer’s
instructions provided with this equipment.
The batteries in the wireless remote control may be changed by loosening
the captive screw at the bottom-front of the unit and slide out the battery
compartment. Remove the old batteries, and replace them with batteries
of the same size (four AA cells). Refer to the polarity marking inside the
compartment for correct orientation. Replace the compartment and secure it
with the captive screw.
Red Button
(Emergency Stop)
Raise Tagline
Lower Tagline
Lock-Out Key
Raise Tagline
Lower Tagline
Captive
Screw
Battery
Compartment

5
6.0 SPECIFICATIONS
Maximum Cable Pay-out: 100 feet (30 m)
Electrical System Requirements:
Model 8102101: 110-120 V, Single Phase, 50-60 Hz, 1200 watts, 12 amps.
Model 8102102: 200-240 V, Single Phase, 50-60 Hz, 1200 watts, 9 amps.
Winch Speed: 75 ft/min (23 m/min.)
22 lbs. (10 kg)
52 lbs. (24 kg)
(winch, tagline weight, brackets): 73 lbs. (33 kg)
13 in. tall x 9 1/4 in. wide x 8 1/2 in. deep (33 cm x 23.5 cm x 21.6 cm).
Channel Frequency (MHZ) VOLTAGE
A01 410.010 110V
A05 411.029 110V
A21 415.105 110V
A29 417.143 110V
A37 419.181 110V
A43 420.709 110V
A47 421.729 110V
A51 422.748 110V
A67 426.824 220V
A71 427.843 220V
The range of the wireless remote is based on the battery condition and the obstructions in the area of operation.
7.0 LABELING
This label must be present and fully legible:

6
9.0 INSPECTION AND MAINTENANCE LOG
SERIAL NUMBER:
MOdEL NUMBER:
dATE PURCHASEd: dATE OF FIRST USE:
INSPECTION dATE INSPECTION ITEMS
NOTEd
CORRECTIVE ACTION MAINTENANCE
PERFORMEd
Approved By:
Approved By:
Approved By:
Approved By:
Approved By:
Approved By:
Approved By:
Approved By:
Approved By:
Approved By:
Approved By:
Approved By:
Approved By:
Approved By:
Approved By:
Approved By:
Approved By:
Approved By:

7
9.0 INSPECTION AND MAINTENANCE LOG
SERIAL NUMBER:
MOdEL NUMBER:
dATE PURCHASEd: dATE OF FIRST USE:
INSPECTION dATE INSPECTION ITEMS
NOTEd
CORRECTIVE ACTION MAINTENANCE
PERFORMEd
Approved By:
Approved By:
Approved By:
Approved By:
Approved By:
Approved By:
Approved By:
Approved By:
Approved By:
Approved By:
Approved By:
Approved By:
Approved By:
Approved By:
Approved By:
Approved By:
Approved By:
Approved By:

A CAPITAL SAFETY COMPANY
CSG USA
3833 Sala Way
Red Wing, MN 55066-5005
Toll Free: 800.328.6146
Phone: 651.388.8282
Fax: 651.388.5065
solutions@capitalsafety.com
260 Export Boulevard
Mississauga, Ontario L5S 1Y9
Toll Free: 800.387.7484
Phone: 905.795.9333
Fax: 905.795.8777
sales.ca@capitalsafety.com
Certificate No. FM 39709
ISO
9001
/