Page is loading ...

Ofcial Licensed Product of UEFA CHAMPIONS LEAGUE™. Ofcial Licensed Product of UEFA EUROPA LEAGUE™. All names, logos and trophies of UEFA are
the property, registered trademarks and/or logos of UEFA and are used herein with the permission of UEFA. No reproduction is allowed without the prior
written approval of UEFA. adidas, the 3-Bars logo, the 3-Stripe trade mark and Predator are registered trade marks of the adidas Group, used with permission.
adiPURE, adiZERO and F50 are trade marks of the adidas Group, used with permission. All other copyrights or trademarks are the property of their respective
owners and are used under license. ©2010 Konami Digital Entertainment KONAMI is a registered trademark of KONAMI CORPORATION.
Windows, el botón Start de Windows, Xbox, Xbox 360, Xbox LIVE y los logotipos de Xbox son marcas
registradas del grupo de empresas Microsoft. “Games for Windows” y el logotipo del botón Start de Windows
se usan bajo licencia de Microsoft.
Windows, o botão Iniciar do Windows, Xbox, Xbox 360, Xbox LIVE e os logotipos do Xbox são marcas
comerciais registradas do grupo de empresas da Microsoft, e “Games for Windows” e o logotipo do botão
Iniciar do Windows são usados sob licença da Microsoft.
Windows, the Windows Start button, Xbox, Xbox 360, Xbox LIVE, and the Xbox logos are trademarks of the
Microsoft group of companies, and “Games for Windows” and the Windows Start button logo are used under
license from Microsoft.

Family Settings
Windows Parental Controls (Vista and Windows 7) enable parents and guardians to restrict access to mature-rated
games and set time limits on how long they can play. For more information, go to www.gamesforwindows.com/
isyourfamilyset.
PRO EVOLUTION SOCCER 2011
CONTENTS
01
System Requirements I
Getting Started 02
Game Controls 02
Dribbling & Trapping 03
Passing 03
Crossing 04
Shooting 04
Tricks & Skills 04
Defense, General Controls 06
Set-Pieces & Dead-Ball Situations 06
Match Screens 07
Game Plan 08
Game Modes 09
Edit Mode 10
Gallery 11
System Settings 11
UEFA Champions League 11
Master League 11
Become a Legend 12
Online 13
Legal 15
Warranty / Customer Support 17
E
VIDEO
GAME
VIDEO
GAME

Minimum System Requirements:
Microsoft Windows XP SP3, Vista SP2, 7
Intel Pentium IV 2.4GHZ or equivalent processor
1GB RAM
8GB free hard disk space
4x DVD-ROM drive
DirectX 9.0c compatible video card. 128MB Pixel Shader 3.0.
(NVIDIA GeForce 6600 or AMD/ATI Radeon x1300 video card)
DirectX 9.0c compatible sound card
DirectX 9.0c or higher (included on Disc)
Multiplayer: TCP/IP 192 kbps or higher
Windows compatible keyboard
800 x 600 monitor resolution
Recommended System Requirements:
Windows XP SP3, Vista SP2, 7
Intel Core™2 Duo 2.0GHz or equivalent processor
2GB RAM
8GB free hard disk space
8x DVD-ROM Drive
DirectX 9.0c compatible video card. 512MB Pixel Shader 3.0
(NVIDIA GeForce 7900 or AMD/ATI Radeon HD2400 or better)
DirectX 9.0c compatible sound card
DirectX 9.0c or higher (included on Disc)
Multiplayer: TCP/IP Broadband Internet connection
Windows compatible USB Gamepad
1280 x 720 monitor resolution
SUPPORTED CHIPSETS:
NVIDIA - GeForce GTX285, 9800, 8800, 8600, 7950, 7900, 7800, 7300, 6800, 6600
AMD/ATI - Radeon HD5850, HD5770, HD4870, HD4650, HD3870, HD2600, HD2400, X1900, X1650, X1600, X1300
Installing the Game
In order to play PES® 2011, you must first install the program on your computer’s hard drive. The PES 2011 DVD contains
an Autorun Menu that automatically guides you through the installation process.
To initiate the installation process:
1. Insert DVD into your computer’s DVD-ROM drive.
2. Once the Autorun Menu appears, click INSTALL.
3. Follow the on-screen installation instructions.
4. If your computer does not have DirectX 9.0c, make sure to install it from the Autorun Menu before starting the game.
If the Autorun screen does not appear:
1. Double-click on the MY COMPUTER icon on your computer’s desktop.
2. Double-click on the DVD-ROM drive showing the PES 2011 icon.
3. Double-click Autorun.exe.
Once you have successfully installed the game, you’re ready to play!
To install PES 2011, you first need to enter a registration code during the install process. Please refer to
the code printed on the back of this manual and, once prompted on-screen, enter the code. You will also
need this code when you register for online play (see “Online Mode”). Once a code has been registered
for online play, it is linked to the person who registered it. If you find a registration code does not work
when entered for online play, it may be because it has already been registered by another person (i.e. if
you purchase a pre-owned game). In this case, you will not be able to play PES 2011 online. You will need
to purchase a copy of the game that has an unregistered code for online play.
Up (cursor key up)
Down (cursor key down)
Left (cursor key left)
Right (cursor key right)
W - Y
X - A
A - X
D - B
Q - y
E - z
Z - w
C - ^
F1 - BACK
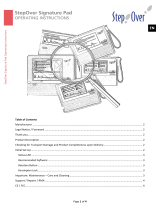
PC Game Pads: Please see the Pad Picture on the Controls pages
Note: The following buttons are fixed:
To select: Cursor Keys
Confirm: Enter
Cancel: Escape
Autorun Menu
The Autorun Menu will appear any time the PES 2011 DVD is inserted into the DVD-ROM drive. The menu has several
options:
• Play - Only available after you have installed the game. Click to start playing PES 2011.
• Settings - Change several settings like display and button settings. You can also convert your PES 2010 Options File
for use on PES 2011.
• Install - Only available if you don’t have PES 2011 installed on your system. Click to install the game.
• Uninstall - Only available after you have installed the game. Click to remove the game from your hard drive.
• DirectX Setup - Install Microsoft DirectX 9.0c to your system.
• Read Me - Click to open the readme file.
• Exit - Close the Autorun Menu.
Starting PES 2011
To begin playing PES 2011, insert the game DVD into the DVD-ROM drive and select Play. Alternatively, click on the
PES 2011 icon found within the Konami PES 2011 program folder.
(Start bar - Programs - KONAMI - PES 2011.)
Uninstalling PES 2011
If you need to uninstall PES 2011, you may do any of the following:
• Insert the PES 2011 DVD and select Uninstall from the Autorun Menu.
• Click on the > button, choose Programs, KONAMI, PES 2011, and click on Uninstall.
• Click on the > button, choose Settings, Control Panel, Add/Remove Programs, and click onPES 2011 to uninstall
the game.
PC Keyboard Controls
This game supports the keyboard as well as game pads that are direct input compatible and have more than three
buttons. The button configuration in the game and in the manual are displayed on a Xbox 360™ Controller for
Windows. Please change the button configurations to your choice in “Button Configs” or in “Settings” on the Auto
Run menu. The following table gives you an overview of the basic controls performed on the keyboard and how they
are displayed within the manual and within the game. Please note that the display might be different from game
pads you are using.
PRO EVOLUTION SOCCER 2011
SYSTEM REQUIREMENTS
II
PRO EVOLUTION SOCCER 2011
SYSTEM REQUIREMENTS
I

w
Left Trigger
y
Left Bumper
z
Right Bumper
L
Left Stick
<
Back
^
Right Trigger
R
Right Stick
>
Start
l
D-pad
Y
X
B
A
Getting Started
If this is your first time playing, press any button on the Title Screen to move to the Default Settings Screen.
If you have previously saved game data, you will advance to the Top Menu.
Default Settings
Before playing a game for the first time, you can select between five different levels of difficulty. You can also change
the difficulty after you begin your game. System data, where all game information is saved, will then be created
automatically. After confirming this step has been completed, proceed to the Top Menu.
Top Menu Screen
The Top Menu select screen provides access to PES 2011 competitions, options and features. Use the left stick or
D-pad to highlight the required option, and then press the A button to make your selection.
Using the Help Function
PES 2011 is a massive, feature-packed game, but every effort has been made to make it as accessible as possible.
When the Help icon appears at the bottom of the screen, you can press the corresponding button to call up the
Help Menu to view helpful advice at any time. Please select your preferred language from the language selection
screen displayed when booting up the game.
Family Settings
Windows Parental Controls (Vista and Windows 7) enable parents and guardians to restrict access to mature-rated
games and set time limits on how long they can play. For more information, go to www.gamesforwindows.com/
isyourfamilyset.
Default Controls
Use your controller to navigate menu screens. Use the left stick or D-pad to move through menus, A button to
confirm a selection, and Y button to cancel or move back through screens.
For the basic controls used during a match, refer to the table below. Read pages 3-7 for more advanced controls.
You can change the assignments for each button by going to “Controller Settings” in “System Settings.” (See System
Settings, page 11.)
For this game, the left stick and D-pad control the same actions. When this manual refers to “left stick,” you may also
use the D-pad in the same manner.
BASIC OFFENSE CONTROLS
y button: Switch between players
z button: Dash
Left stick: Player movement, dribbling
D-pad: Player movement, dribbling
Y button: Through ball
B button: Cross/long pass
A button: Short pass
X button: Shoot
Right stick: Manual pass
BASIC DEFENSE CONTROLS
y button: Switch between players
z button: Dash
Left stick: Player movement
D-pad: Player movement
Y button (hold down): Goalkeeper
B button: Sliding tackle
A button (hold down): Tackle/apply pressure with player you are controlling
X button (hold down): Clearance/apply pressure with player you are not controlling
(hold down button)
PRO EVOLUTION SOCCER 2011
GAME CONTROLS / CONTROLS
03
PRO EVOLUTION SOCCER 2011
GETTING STARTED / FAMILY SETTINGS / GAME CONTROLS
02
Dribbling & Trapping
Dribbling: Push the left stick to move when the ball is at your player’s feet.
Sideways Dribble: Hold the ^ button and push the left stick at 90° to the direction of movement. Just a small
number of players can perform this dribble.
Dash Dribble: Press the z button while dribbling to sprint.
Extend Time between Ball Touches: While holding the z button to sprint with the ball at your player’s feet, rapidly
push the left stick two or three times between touches to knock the ball further ahead. You can also achieve the same
effect by repeatedly tapping the z button.
Greater Distance between Ball Touches: While running with the ball with the z button depressed, hold the ^
button and push the left stick 45° to either side of the current direction of movement.
Slow Dribble: Keep the ^ button depressed while dribbling to perform a “slow dribble.” The ball will hardly leave your
player’s feet as you perform this technique, and it can be followed by a quick change of direction or one of many feints.
Stop the Ball 1: Release the left stick and press the z button to stop the ball’s movement while dribbling.
Stop the Ball 2: Release the left stick and press the ^ button to instruct your player to stop and face your
opponent’s goal.
Jump: When an opponent executes a sliding tackle, press the ^ button to attempt to jump over it.
Control Ball: When receiving a pass, push the left stick to control the ball.
Turn without Touching the ball: To instruct a player to turn and run onto an incoming pass without making an
initial touch, hold the z button and push the left stick in the direction that the ball is moving.
Passing
Note: Push the left stick to specify the direction a pass should be played in.
Short Pass/Head Ball: Press the A button to make a short pass along the ground or head the ball. Hold the A button
for longer to pass to a more distant player.
Backheel: Quickly push the left stick away from the player’s current direction of movement and then
press the A button.
First-Time Pass: Press the A button before your player traps the ball.
Players only go and pressure opposition players if you press the A button + the left stick.
Otherwise, players try to hold up the opposition by positioning themselves right in front of them and
tracking their moves.

Long Pass: Press the B button. The distance of the pass depends on the length of time that the B button is held.
First-Time Long Pass: Press the B button before your player traps the ball.
Through Ball: Press the Y button. Holding the Y button down for longer will direct the pass to a more distant
player.
First-Time Through Ball: Press the Y button before your player traps the ball.
Chipped Through Ball: Hold the Y button and press the Y button.
One-Two Pass: Hold down the Y button and press the A button to make a short pass, then press the Y button
before your teammate receives the ball to execute a return pass.
One-Two Pass with Chipped Return Ball: Hold down the Y button and press the A or Y button to make a short
pass, then press the y + Y buttons before your teammate receives the ball to execute a chipped return pass.
Pass and Move: Press the ^ button immediately after passing the ball to instruct the player to make a forward run.
Manual Pass: While holding the w button, push the right stick in the desired direction and press the A or Y button
to execute the pass.
Manual Long Pass: While holding the w button, push the right stick in the desired direction to execute the pass.
Crossing
Note: Push the left stick to specify the direction of a cross.
High Cross: From deep in your opponent’s half, press the B button.
Low Cross: From deep inside your opponent’s half, press the B button twice.
Cross along the Ground: From deep inside your opponent’s half, press the B button three times to send in a low
cross along the ground.
Lofted Ball: Press the ^ button while delivering a cross to loft the ball high into the air.
Early Cross: Hold the Y button and press the B button to cross the ball from any position in your opponent’s half.
Shooting
Notes on shooting: Press the X button to build up the power gauge. Release the X button when the power gauge
reaches the desired level, and your player will send a shot towards the goal. The length of the power gauge determines
the power and height of your shot. Push the left stick to specify the required direction as the shot is made.
Shoot: Press the X button.
First-Time Shot/Head Ball: Press the X button just before the ball reaches your player to make a rst-time shot
or header on goal.
Controlled Shot: Press the ^ button when the power gauge reaches the desired level to make a shot that trades
power for precision.
Chip Shot: Hold the Y button and press the X button.
Chip Shot Type 2: For a lob with a lower trajectory, press the X button and then press the z button when the
power gauge appears.
Tricks & Skills
Note: All moves are assuming that the player is facing forward.
Shoulder Feint Skills
Upper body Feint: From a stationary position, push the right stick to the side.
Matthews Feint: From a stationary position, push and hold the right stick to the left, then push the left stick
diagonally right. (Or hold the right stick to the right, then push the left stick diagonally left).
Matthews Feint into Side-Slip: From a stationary position, push and hold the right stick to the left, then push the
left stick to the right. (Or hold the right stick to the right, then push the left stick to the left).
Scissors Feint Skills
Step over Dummy: Rotate the right stick from forward to 90° left or right. If executed from a stationary position, the
player will step over the ball on the spot.
Reverse Step over Dummy: Rotate the right stick from 90° left or right back to forward. If executed from a stationary
position, the player will step over the ball on the spot.
Step Over Fake: Rotate the right stick from 90° left or right back to forward. Then while holding the right stick, push
the left stick to back left or back right. (Depending on the direction you initially pressed the right stick).
PRO EVOLUTION SOCCER 2011
CONTROLS
05
PRO EVOLUTION SOCCER 2011
CONTROLS
04
Step On Skills
Step On & Drag: From a stationary position, press the w button and back on the right stick.
Step On & Slide: From a stationary position, press the w button and left or right on the right stick depending on
which direction you want to take the ball.
L Feint (If Right Footed): From a stationary position, press the w button and back on the right stick. Then, while
holding the right stick, push the left stick to the right. (For a left footed player, you must push the left stick to the left.)
Backheel Feint: From a stationary position, push and hold the w button, then rotate the right stick from back to 90°
left. Then while holding the right stick, push the left stick to the right or left.
Drag Back into Right Take / Left Take: From a stationary position, press and hold the w button, then push the right
stick to the back. Then, while holding the right stick, push the left stick diagonally left or right. (If the player is left
footed, you must reverse the directions.)
Inside Bounce: From a stationary position, press the w button and back on the right stick. Then, while holding the
right stick, push the left stick forward.
Running Inside Bounce into Diagonal Take: While Dribbling, press the w button and back on the right stick. Then,
while holding the right stick, push the left stick diagonally left or right.
Flip Flap Skills
Flip Flap: While Dribbling, press the w button and the right stick diagonally right. Then, while holding the right stick,
push the left stick diagonally left. (If the player is left footed, you must reverse the directions.)
Reverse Flip Flap: While Dribbling, press the w button and the right stick diagonally left. Then, while holding the
right stick, push the left stick diagonally right. (If the player is left footed, you must reverse the directions.)
Roulette Skills
Roulette: Press the w button, then rotate the right stick a full 360°. The direction in which the player spins depends
on which way you rotate the right stick. Certain players may have dierent Roulette motions.
Turn Skills
Cross Over Turn: While Dribbling, press the w button and the right stick to the side, followed by the left stick.
(Towards the same side you pushed the right stick).
Flicking Skills
Front Flick: Press and hold the w and click the right stick. Then, push the left stick diagonally left or right. (Can also
be executed while dribbling).
Rainbow Flick: Press and hold the w button , then click the right stick twice. (Can also be executed while dribbling.)
Sideway Dribble Skills
Sideway Dribble: While dribbling, press and hold the w button. Then, push the right stick forward or to either side.
Sideway Scissors: During Sideway Dribble (to the left), Press and hold the w button, then rotate the right stick 180°
from the left all the way to the right. Finally, push the left stick to the left. (You must reverse the directions if you were
initially moving towards the right.)
Sideward Stepover: During Sideway Dribble (to the left): Press and hold the w button, then rotate the right stick
90° from left back to forward. Finally, push the left stick to the left while holding the right stick. (You must reverse the
directions if you were initially moving towards the right.)
Link Feints
A feature new to PES 2011, Link Feints allow you to pull a trick combination consisting of up to 4 moves by simply
pressing
y and C / Z / V / X on the right stick. These Link Feints can be customized and congured in Game Plan,
so why not create your very own set of tricks and give yourself the edge over your rivals by showcasing your trickery?
The Default Link Feints are as follows:
Running Upper
Body Feint (R)
Upper Body
Feint (L)
Running Upper
Body Feint (R)
Running Stepover
Dummy (L)
Matthews Feint (R)
Step On & Slide (R)
Reverse Stepover
Dummy (R)
Stepover Fake (R)
Step On & Slide (L)
Roulette (L)
V Feint (R)
Command 1
st
Move 2
nd
Move 3
rd
Move 4
th
Move
y / z X
y / z Z
y / z V
y / z C

PRO EVOLUTION SOCCER 2011
CONTROLS / MATCH SCREENS
07
PRO EVOLUTION SOCCER 2011
CONTROLS
06
Free Kicks: General Controls
Quick Restart: This only works with the correct timing when a player is positioning the ball for a quick free kick using
his hands. When this happens, specify a direction holding the left stick and press the A or Y button to quickly restart
the game with a simple pass.
Changing the Number of Kickers: Press the y and z buttons simultaneously to cycle through the following free
kick congurations: one kicker (default), two kickers (second kicker: right side), two kickers (second kicker: left side).
Using the Second Kicker: Execute the free kick while holding the Y button to make the second kicker make the
shot or cross pass.
Second Kicker Rolls Ball Forward: Hold down the Y button and then press the A button to make the second kicker
roll the ball forward. You can then make a shot or pass from open play with the second kicker.
Free Kicks: Wall Control
When the opposing team has a free kick, press and hold the following buttons to control the players in the defensive wall:
Increase/decrease number of players in the wall: Hold down the ^ button and press up on the left stick to add up to
two more players to the wall. To remove these players hold down the ^ or w button and press down on the left stick.
Only players that have been added can be later removed.
All Players Jump: Press the X button.
Players Hold Position: Press the A button.
Players Charge Forward + Jump: Press the B button.
Players Charge Forward: Press the B and A button together.
Random: No buttons pressed.
Throw-ins
Short/ Long Throw-in: Press the A button to throw the ball. Distance depends on length of gauge.
Penalty Kicks
Kicker: The height and the direction of the shot depends on how long the player presses the left stick towards goal
and to either side respectively when running up to take the penalty. (Player automatically runs up to take the shot).
Goalkeeper: Hold the left stick and X button for a length of time that’s proportional to how high or wide you want
to jump in order to save the shot. You must match the timing of the kicker. If you don’t input a direction, your keeper
stay still and cover the goal center.
Unique controls for when the cursor is set to Fixed
Calling for the Ball: When a teammate has the ball, press the ^ button twice to call for a pass. The more frequently
you press the button, the more strident your appeal for the ball will be.
Defense
Tackle/Apply Pressure: Press the A button and hold the left stick towards the opposition player with the ball.
Delay 1 (Hold up the opposition): Press the A button. The player holds up an opposition attacker by taking up a
position to block his path to goal. The defending player will remain stationary.
Delay 2 (Hold up the opposition): Press the A button and the left stick (pull towards the defending player’s goal).
This makes the player backtrack towards his goal while still facing his opponent and holding him up.
Close Down: Hold the X button when the opposing team is in possession to have the player closest to the ball (not
counting the player you are controlling) close down the player on the ball.
Sliding Tackle: Press the B button.
Clearance: When the ball is deep inside your half, press the X button to clear the ball.
Rush Keeper from Goal: Press the Y button while defending to make the goalkeeper sprint towards the ball.
Goal Kick: Press the B button or the X button to kick the ball upeld. Push the left stick to aim.
Throw Ball: When your goalkeeper is holding the ball, press the A button to throw the ball to a teammate.
Drop Ball: When your goalkeeper is holding the ball (with no left stick pushed), press the z button to instruct him
to drop the ball at his feet.
Goalkeeper: Push the right stick + y buttons to switch control between an outeld player and the keeper.
General Controls
Change Player: Press the y button to switch control to the player closest to the ball.
Control Player when Ball is Airborne: When the ball is in the air, hold the ^ button and push the left stick to
position the player to meet it.
Super Cancel: When a player is automatically running after the ball, press the z and ^ buttons simultaneously to
bring the player to a halt, or to regain full control.
Activate/Cancel Strategies (Manual Mode): Hold down the < button and then press the B button, the A button,
the Y button or the X button to activate or cancel strategies assigned to those buttons.
Attack/Defense Level: Press the < and z button together to increase the Attack/Defense gauge level, thus
instructing your players to push forward. Press the w and ^ button together to reduce it.
Dive: Click the left and right sticks together.
Kick/Pass Feint: Press the A, X, or B button and then press the A button after the power gauge appears.
Set-Pieces & Dead-Ball Situations
Note: For free kicks and corners, hold the relevant button down to increase the power gauge to the required level.
Corners
Regular: Press the B button.
High Cross: Hold down the ^ button + B button.
Low Cross: Push the left stick up + B button.
Along the Ground: Push the left stick down + B button.
Apply Curl: Push the left stick left or right while the power gauge is onscreen.
Short Corner: Press the A button to send a short pass to your nearest teammate.
Free Kicks: Passing
Short Pass: Choose a direction with the left stick and then press the A button.
Regular Long Pass: Press the B button.
High Ball: Hold down the ^ button + B button.
Low Ball: Up on the left stick + B button.
Along the Ground: Down on the left stick + B button.
Curl: Left or right on the left stick while the power gauge is displayed.
Through Ball: Press the Y button when taking a free kick to send a ball through the defense. Push the left stick to
aim the pass.
Free kicks: Shooting
Regular Shot: Press the X button.
Hard Shot: Up on the left stick + X button.
Weak Shot: Down on the left stick + X button.
Moderately Hard Shot: Press the X button, and just as the player makes contact, press the Y button.
Moderately Weak Shot: Press the X button and then, just as the player makes contact, press the A button.
Apply Curl: Hold the left stick left or right when the power gauge is displayed.
Match Screens
This section explains the various features and functions of screens you will encounter during a match.
Match Display
Attack/Defense Mindedness: This gauge indicates your team’s current mentality. The redder the bar is, the more
oensive the team will be; conversely, a blue bar indicates that a team is pulling back to defend.
Strategy Mark: Button symbols representing Manual Strategies appear in this area when active.
Stamina Gauge: Displays a player’s current stamina. The gauge will turn red when stamina is dangerously low,
indicating a drop in that player’s performance.
Elapsed Time
Name
Active Player
(Cursor)/
Stamina Gauge
Active Player (Cursor)
(indicating player under control)
•Yellow name/number above
cursor: Player got booked
•Yellow/red checkered ag:
Your controlled player is in an
oside position
Radar
Power Gauge
Strategy Mark
Score
Attack/Defence Mindedness

Player Abilities
To look at the player’s abilities, move the cursor on to a player of your choice and press the Y button. Once the stats
are on screen, press y or z to see what Skill Cards or Playing Style Cards the player has.
Note: If you need details on player abilities, please refer to the Edit Mode of PES 2011, where you can nd detailed
descriptions for them.
Set Formation
Move the cursor onto a player on the pitch, then press the A button to grab him. The player can then be freely moved
around the pitch until you release him at the desired position by pressing A again. To substitute players, drag the
player onto the icon representing the player you want to replace him with. Also, you can press the X button when
an on-pitch Player icon is highlighted to choose:
1) The player’s Role
2) Whether to appoint the player as Captain
3) Mark Settings
Card System
Through the Card System you can take advantage of a player’s unique abilities. This offers you endless possibilities
and strategic options never seen before.
The Card System offers two different categories:
1) P = Playstyle Cards represent individual playstyles such as “Pinpoint Pass.”
2) S = Skill Cards identify skills (e.g. “Penalty Saver”) that players own, and can’t be changed or deactivated.
Note: The available Playstyle Cards may differ depending on the player’s role and attack level.
If you are using a Playstyle Card that goes against your current tactics, the tactics will be given priority.
Other Settings
Make use of various options by choosing the icons shown at the bottom of the screen to fine tune your
Game Plan such as:
Link Feints
Congure up to 4 custom-made chain of tricks and skills which can be executed by pressing the w button + right
stick (C, V, Z and X). First, choose a controller you want to assign the Link Feints to. Then, select “Create New”
to design a new set then proceed to the edit screen. Or alternatively, you can choose “PRESET” to edit existing Link
Feints. Link Feints can be saved and loaded in “Data Management” and can be congured to each unique controller.
However, if you share your Game Plan Data with friends (for example in a multi-player game), then choose to load
Link Feints in “Data Management”, your data will be overwritten by that of “The Leader”.
Note: “The Leader” refers to the player who has control of the Game Plan in a multi-player game. (Usually, the one
with the smallest number on each side).
UEFA Champions League (page 11)
Pit your club against the elite of European soccer in the exclusive UEFA Champions League mode.
Copa Santander Libertadores
Take on the very best of Latin American Football in the also Exclusive Copa Santander Libertadores mode.
Exhibition
First, if you want to quickly start a match, choose whether you will compete against a friend (VS. PLAYER) or the
computer (VS. COM). This is the quickest way to get the ball rolling, whereas a custom match (CUSTOM) gives you
more options from the start. Besides very obvious selections for the team, uniform, or stadium, you will find the
following pre-match options depending on the selected mode:
Game Options
For each controller you have connected, decide whether the corresponding players will compete against one
another or play on the same team. Also, choose whether you or the computer will control the players during the
match. By pressing the X button, you can adjust “Cursor Settings”. (See “Cursor Settings” page 11.)
Home/Away: Push left or right on the left stick to switch between the home and away sides.
Coach Mode: Issue tactical commands while the computer controls the players on the pitch. Switch to Coach Mode
Active Player:
The active player under control will be highlighted by a bar (or “Cursor”) above his head. Each user will be
displayed be a dierent color, which you’ll see when selecting sides (see also page 11).
Power Gauge:
The Power Gauge is shown underneath the player once you initiate a pass or shot. The longer you keep
the respective button pressed, the more the gauge will be lled and the more powerful a pass or shot
will be.
PRO EVOLUTION SOCCER 2011
GAME PLAN / GAME MODES
09
PRO EVOLUTION SOCCER 2011
MATCH SCREENS / GAME PLAN
08
Event Icons: The following symbols will appear in the top left-hand corner of the screen during matches.
Blue - Returning to the Match (No Injury):
A player is returning to the pitch with a clean bill of health.
Yellow - Returning to the Match (Slight Injury):
A player is returning to the pitch, but is carrying an injury that will have an impact on his performance.
Red - Not Returning to the Match (Due to Injury):
An injured player cannot return to the pitch, and must be substituted (if possible).
Gray - Indirect Free Kick:
An indirect free kick has been awarded.
Gray - Stoppage Time:
This indicates the game minutes of stoppage time that will be played.
Injuries:
1 Returning to Full Fitness 2 Severe Injury 3 Slight Injury 4 Injury Status Unclear
Unavailable:
5 On International Duty 6 Suspended due to Cumulative Yellow Cards 7 Suspended due to a Red Card
Assisted Settings
Move the sliders to adjust Lineup, Formation, Tactics and Set Piece Settings. Once you’ve chosen the settings to
change, use left and right on the left stick to move the sliders. The settings will automatically change to match the
slider’s position.
Lineup
The circular icons shown on the pitch diagram represent players and their positions. Make use of “Edit Position” and
“Substitutions” to form your game plan.
Game Plan
Before starting a match, you can set your team’s formation, line-up, captain, and set piece takers, along with various
other settings on the Game Plan. Make sure you are well prepared for the match.
Information Windows
When you rst select Game plan, you will be presented with 3 options as ways to set up your team. These are “Leave
to Manager”, “Simple Settings” and “Choose Manually”. If you want to have your formation and lineup chosen for
you automatically, choose “Leave to Manager”.
Simple Settings
Allows you to choose the formation and the team’s attack pattern. The rest of the game plan will be
formed automatically.
Management Edit
Choose a strategy t for certain time periods or situations during the match. Strategies will then be automatically
implemented if the conditions are met. Choose Auto Trigger Setting to choose whether you want certain strategies
such as Oside traps to be triggered automatically.
Choose Manually
Choose all Game Plan settings manually
Press the y or z button while the pitch diagram is shown to switch between Player form/Stamina (Arrows indicate
Form and the green gauge indicates stamina), Position/Overall Rating and Player Icon.
7654321
Green
Cross
Red
Cross
Yellow
Cross
Purple
Dash
Globe Yellow
Cards
Red
Cards

PRO EVOLUTION SOCCER 2011
EDIT MODE / GALLERY / SYSTEM SETTINGS /
UEFA CHAMPIONS LEAGUE / MASTER LEAGUE
11
PRO EVOLUTION SOCCER 2011
GAME MODES / EDIT MODE
10
by pushing left on the left stick when the controller icon is on the home side, or by pushing right on the left stick
when the controller icon is on the away side.
Watch Match: Watch two computer controlled teams play each other.
General Settings
Choose settings for Difficulty Level, Match Duration, Injuries, Team Conditions, and more. Then select “Confirm.”
Please note that some options such as “Rule Settings” and “Player Development” are unique to particular
game modes.
Master League (page 11)
Compete in league play, developing your players and looking to strengthen your team in the transfer market.
Become a Legend (page 12)
This challenging mode recreates the career of one specific player of your choice.
If you put in good performances your reputation will grow, which will result in transfer offers to join different clubs.
Can you write your name in the history books?
League & Cup
Enjoy various league and cup competitions. A good table standing in the league will enable you to enter the UEFA
Europa League or even the UEFA Champions League the following season.
Community
“Community” is a mode that supports the matches you have with your closest friends. By registering your
friends in a community, you can compete together using various competition formats. An eight player option is
available in Online Community, which you can access directly.
Online (page 13)
Go online and enjoy matches against players from many different countries playing the same version of PES 2011. Up
to eight players can join in an Online Match.
Training
Move your players freely as you practice the game’s controls. By adjusting the settings, you can focus on specific
areas such as free kicks and corners. Please note that you cannot choose “Watch Match Mode” in Player Settings.
Edit
This option enables you to customize many things like teams and players as well as stadium and cup names featured
in PES 2011. You can create your own original club. Activate the Help menu (look for the prompt at the bottom of the
screen) to view more detailed instructions on how to use this mode’s various options and features.
Note: Edited team and strip (uniform) data will be reected in all modes including online.
Stadium Edit
You can freely edit designs of the pitch and the stands to create your very own Home Stadium
Adding Your Own Images
You can add images for player faces, uniform logos, and emblems by using existing image data, a USB camera, or
similar equipment. Wherever the camera symbol appears, just follow the on-screen instructions.
Note: Data for up to 600 faces, 600 logos, 46 emblems and 20 league emblems can be stored on the hard disk drive.
Registering a Created Player with a Team
To register a player you made in “Create Player” with a team, go to “Team” from the Edit Menu and select “Register
Player.” Then choose the team you would like the player to join. Next, after a list of that team’s players appears, either
select “Add Player” or choose an existing player to switch with the created player. Finally, select “Other” and choose
the player you just made.
Using the Edit Data of a Prequel Title
Choose the “Load” option to load and then implement the Edit Data from a Prequel PES title.
Note: Please note that data from the various game modes cannot be used. If you choose to use Prequel Edit data
when you have already created Edit data for this title, it will be overwritten.
Extra Content
Use GP you can earn by playing matches to buy extra items such as Balls and Stadium Parts as well as Expansion kits
for the various modes.
Note: To obtain the latest uploads via the internet, choose “Data Pack”.
Gallery
The gallery combines a lot of fun and informative features.
Track Record: View a history of what you have played in the game.
Replay Playback: Watch replays that you have saved.
Credits: View sta credits.
System Settings
Adjust settings for controls and saving data.
Playlist Editor: Listen to the game’s background music.
Controller Settings: Change how the controls are used. You can also adjust other settings, deciding, for example,
how the player cursor is displayed and how it is switched. (See Cursor Name below).
On-Screen Display: Select the on-screen information and position shown during matches.
Sound Settings: Adjust various items related to sound, such as Commentary Volume and Sound Eect Volume.
Screen Adjustments: Change screen position and color settings.
Language: Change the language that is used in the game.
Port Settings: Set ports for your Internet connection if necessary.
Auto-Sign-In: Toggle automatic network login on/o.
Cursor Settings
Go to “Cursor Settings” in “Controller Settings” to change how the player cursor is displayed and how it is switched.
Among the items available, “Change Cursor,” in particular has a great eect on the game’s controls. Be sure to choose
a “Change Cursor” option that makes it easy for you to control the action.
Change Cursor
Assisted: Cursor switches automatically. You can also switch manually between players when pressing the y button.
Semi-assisted: When on oense, the cursor will switch automatically to the player receiving the ball. On defense,
the cursor is switched manually by pressing the y button.
Unassisted: The cursor only switches when you press the y button.
Fixed Player: With this being switched on, you can set the cursor permanently on one player (except the goalkeeper).
Note: You can also access the settings for “Change Cursor” through “Player Settings” before and during a match.
Cursor Name
User Number: Cursor displays that user’s number (1-7).
Player Name: Displays the name of the player.
No: Does not show any numbers or names.
UEFA Champions League
Pit your club against the elite of European soccer with the all new and exclusive UEFA Champions League mode.
Is your team strong enough to negotiate the group stages? Will you rise to the challenge of knock-out games? Can
you become one of the few to lift the cup every player, manager, and fan dreams of?
Master League
In this mode, you must choose a team and then lead it to success in league and cup competitions over an unlimited
number of seasons. As well as generating revenue through success on the field and keeping your squad at peak
fitness, you’ll need to make astute forays into the transfer market and carefully nurture up-and-coming talent to
transform your club into a dominant force in world soccer.
Note: The Master League in PES 2011 offers a myriad of new features and improvements, some of which are featured
below. And of course you can now qualify and participate for the world’s most prestigious events in club soccer: the
UEFA Europa League and UEFA Champions League.

Focus Point Settings
On starting the game, you will be asked to choose the type of player you want to be. At this point, you will also allocate
Focus points (14 in total across the key abilities). The more points are allocated to one skill, the quicker it develops.
Interacting with your Team Mates
To call for the ball, press the x button twice. If you’re in a good position your teammate will pass you the ball. To
get a teammate to close down opposition players, you need to press the X button. Your player must be o the ball.
Vertical Wide Camera
By pressing the w button when using the Vertical Wide Camera (your player must be o the ball too), you can get
the camera to retreat giving you a much wider view of the pitch.
Online
Go online and compete in matches against online rivals from faraway places. The results will be reflected in your
online ranking.
About Online Mode
To learn more about services related to PES 2011’s Online Mode, please visit the following website.
www.konami.com
Online Preparations
After selecting “Online” from the Top Menu, follow the steps below to set up your game.
1 View Pertinent Information
Crucial information, such as that related to server shutdown, will be displayed at the outset.
2 Obtain Password
In order to play in Online Mode, you need to enter a “Registration Code” and obtain a password. Choose from the
following menus that will appear at this point.
Log in
Log in to the game if you have already obtained a password.
Registration Code
Enter a registration code and obtain a password.
Change Registered Information
Make changes to information entered when you obtained a password.
IMPORTANT: What is a Registration Code?
A registration code is a 20-digit ID found on the back of the manual of this game. It is made up of letters and numbers
(for example: ABCD-1234-JKLM-7890-UVWX). You will need it to log in to Online Mode, so be sure to keep it in a
safe place.
3 Log in
Enter your registration code and password, then select “Connect”.
Registration Code Entry Field
Password Entry Field
Connect
Check Box
You can place a check mark by selecting this box. Doing so allows your registration code and password to be
automatically entered from the next time you play.
4 Create User Data/Check Details
You will be taken to the “Create User Data” screen if there is no user data available. Please beware that user data
created cannot be deleted until a certain time period has passed.
5 Division
Players will be placed in 1 of 5 divisions (Divisions 1 to 5).
Competitions
By rule, Competitions have a Qualifying Round and a Knockout Stage. Users must rank high in the Qualifying Round
to advance to the Knockout Round.
Notes: Competitions all have a set start time. Please note you will be unable to enter any Competitions outside the
specified times.
PRO EVOLUTION SOCCER 2011
BECOME A LEGEND / ONLINE
13
PRO EVOLUTION SOCCER 2011
MASTER LEAGUE / BECOME A LEGEND
12
Advancing through Master League
Master League seasons begin during the August transfer period and last until the middle of the last week in July
of the following year. As matches are held and the schedule progresses, time will advance on a half-week basis.
Team Management
As in the real world, it’s all about money. You need it to pay costs like staff/player salaries and fan club management.
Money can be earned from tournament prizes, fan club fees, sponsors, and other sources. You can acquire new
players, invest in a youth team, and improve the team’s performance with your money.
Note: Staff lineup can be changed during August by selecting the “Hire Staff” option in “Personnel”.
Losing Money & Going Bankrupt
Expenses are calculated in the first week of September. If your funds are in the red at that point, your team will go
bankrupt. Even if the team goes bankrupt, it will still be able to play matches as usual, but the number of times it
goes bankrupt will be recorded in your save data. While your funds are in the red, you will be incapable of conducting
negotiations. So you should quickly try to reduce costs, e.g. through selling players, well in advance of September.
Otherwise, the game will do this automatically.
Transfer Negotiations
Transfer Negotiations are held over the course of the season. There are four major patterns to these negotiations:
Instigating Negotiations, Receiving Negotiation Offers, Releasing Players, and Renewing Contracts. When negotiating
with players, a scout will handle the proceedings. (You can also appoint your scout to perform everything, from
player selection to negotiations and signing. This is turned off by default.)
Check the Youth Team
The Youth Team option in the Club House lets you pick from up to ten talented young players as possible additions
to your team. Because these players don’t need to be negotiated with or require transfer fees to be paid, you can sign
them up anytime during the season. Finally, players signed from the youth team will have great affection for your
team and will be less likely to transfer to other teams in the future.
Become a Legend
Create a player and aim to become the World Player of the Year. Enjoy your career from your professional debut to
your retirement from the game.
Advancing through Become a Legend
Opportunities to play matches will be scarce from your debut. You start o as a youth team graduate of the club
you’ve chosen and must work hard and impress in Reserve Matches to win a place on the bench. Good match
performances will lead to oers from other clubs. After transferring, lead your new team to victory, but also strive to
win personal accolades such as the league MVP or top goal scorer. Titles such as these can often result in oers from
major clubs and even national team call-ups. A player’s career begins at the age of 17 and increases by one year at the
start of the new season. At the age of 27 you can choose to retire or play until age 35 or a few years later, if you still
have an ongoing contract when you reach 35. At that time retirement is forced and “Become a Legend” is concluded.
Note: In PES 2011, you can use your developed Become a Legend player online in the Legends Mode as well as in
Master League. To do so, go to “Options” in the Become a Legend menu. Furthermore, you can now qualify for the
UEFA Europa League and UEFA Champions League within Become a Legend.
Auto-Move: Turn the auto-move function ON/OFF. If ON, your player will move automatically if you keep the Y
button pressed (the cursor above the player will change from solid blue to transparent).
Matches
Starting players, team formation, substitutions etc. Will be decided automatically by the CPU. You control only your
created player. When you are not playing, you can view the match as a spectator (accelerate the match speed on the
“Fast-Forward Menu” if you wish).
Player Development
Playing in matches allows players to acquire experience points, which also increase based on good match
performances. Once a certain amount is acquired, the player’s ability will increase in accordance with the
development curve.
Note: If a certain age is reached, the player’s ability may decrease.

PRO EVOLUTION SOCCER 2011
ONLINE
15
PRO EVOLUTION SOCCER 2011
ONLINE
14
Master League Online
The Master League Online is similar in structure to its oine original, apart from one important fact. You are
competing against fellow Online users! Your objectives are to build and strengthen your team by signing the right
players and raising capital through strong showings in various competitions. Please note that there is an Entrance
Fee when playing matches and this fee becomes greater the more big names you have in your squad. However, the
returns can be just as great!!
Signing Players in Master League Online
To sign players in Master League Online, select [Market] from the menu. From there, all you need to do is to search
the player you want and place your bid. The general rule is that the more popular the player, the higher the fee you
must pay.
Become a Manager!
Choosing Coach Mode in Quick Match allows you to take a dierent look at the game where what counts most is
your tactical guile rather than on-pitch skills.
Legends
Play as your alter-ego from Become a Legend or as a Real Life footballer forging a team with up to 3 Online users.
There is also an option for a 4 on 4 VS. Match!
Chat
To chat, press the ^ button at anytime while in the Match Lobby Menu, Match Room, or when paused during a
match. The contents of your chat may be seen by many different users. Please refrain from behavior or language
that others may find offensive, and help to ensure that everyone can relax and enjoy themselves while chatting.
6 Icons in Network Mode
Player Status Icons
Player Icons
Transmission Status Icons
These icons inform you about the network connection quality:
Manner Icons
If you want to know the manner of an opponent, these icons will reveal this information (assigned from left to right).
The manner reects, for example, if a player is quitting matches early.
Note: Users with poor manners will not be eligible for online rankings.
©2010 Konami Digital Entertainment. KONAMI is a registered trademark of KONAMI CORPORATION.
Ocial Licensed Product of UEFA CHAMPIONS LEAGUE™. All names, logos and trophies of UEFA are the property, registered trademarks and/
or logos of UEFA and are used herein with the permission of UEFA. No reproduction is allowed without the prior written approval of UEFA.
adidas, the 3-Bars logo, the 3-Stripe trade mark and Predator are registered trademarks of the adidas Group, used with permission. adiPURE,
adiZERO and F50 are trademarks of the adidas Group, used with permission. the use of real player names and likenesses is authorised by
FIFPro and its member associations. Ocially licensed by Czech National Football Association Ocially licensed by CFF © 2010, DFB Licence
granted by m4e AG, Grünwald © The Football Association Ltd 2010. The FA Crest and FA England Crest are ocial trademarks of The Football
Association Limited and are the subject of extensive trade mark registrations worldwide. copyright FFF Ocially licensed by FIGC and AIC
© 2001 Korea Football Association Licensed by OLIVEDESPORTOS (Ocial Agent of the FPF) Producto ocial licenciado RFEF © 2002 Ligue
de Football Professionnel ® Ocially Licensed by Eredivisie Media & Marketing C.V. Ocial Licensed Product of A.C. Milan Manchester
United crest and imagery © MU Ltd © Real Madrid (10) Ocial product manufactured and distributed by Konami Digital Entertainment
under licence granted by Soccer s.a.s. di Brand Management S.r.l. Under licence from Tottenham Hotspur Plc Wembley, Wembley Stadium
and the Arch device are ocial trademarks of Wembley National Stadium Limited and are subject to extensive trade mark registrations. All
other copyrights or trademarks are the property of their respective owners and are used under license.
Official Licensed
Product
Official Licensed
Product
Dolby and the double-D symbol are trademarks of Dolby Laboratories.
This software is based in part on the work of the Independent JPEG Group.
(Green) (Yellow) (Orange) (Red) (Blue) (Grey)
Good Poor Very Poor Disconnected Searching Not
Connected
Playing Logged In Logged O
(Red) (Blue) (Gray)
You Friend
Player from your
Blacklist
(Green) (Blue) (Red)
IMPORTANT MESSAGE
Konami reserve the right to penalize or ban any player using the chat function to abuse others. The penalty will be
decided by Konami and may result in a temporary or permanent ban from the chat function or online play with or
without further warning. We thank you for your understanding and continued good sportsmanship.

PRO EVOLUTION SOCCER 2011
WARRANTY / PRODUCT SUPPORT
17
PRO EVOLUTION SOCCER 2011
NOTES
16
LIMITED WARRANTY
Konami Digital Entertainment, Inc. warrants to the original purchaser of this Konami
software product that the medium on which this computer program is recorded is free from
defects in materials and workmanship for a period of ninety (90) days from the date of
purchase. This Konami product is sold "as is," without express or implied warranty of any
kind, and Konami is not liable for any losses or damages of any kind resulting from use of this
program. Konami agrees for a period of ninety (90) days to either repair or replace, at its
option, free of charge, any Konami product, postage paid, with proof of date of purchase, at
its Factory Service Center. This warranty is not applicable to normal wear and tear. This
warranty shall not be applicable and shall be void if the defect in the Konami software
product has arisen through abuse, unreasonable use, mistreatment, or neglect.
THIS WARRANTY IS IN LIEU OF ALL OTHER WARRANTIES AND NO OTHER
REPRESENTATIONS OR CLAIMS OF ANY NATURE SHALL BE BINDING ON OR OBLIGATE
KONAMI. ANY IMPLIED WARRANTIES APPLICABLE TO THIS SOFTWARE PRODUCT,
INCLUDING WARRANTIES OF MERCHANTABILITY AND FITNESS FOR A PARTICULAR
PURPOSE, ARE LIMITED TO THE NINETY (90) DAY PERIOD DESCRIBED ABOVE. IN NO EVENT
WILL KONAMI BE LIABLE FOR ANY SPECIAL INCIDENTAL OR CONSEQUENTIAL DAMAGES
RESULTING FROM POSSESSION, USE OR MALFUNCTION OF THIS KONAMI PRODUCT.
Some states do not allow limitations as to how long an implied warranty lasts and/or
exclusions or limitations of incidental or consequential damages so the above limitations
and/or exclusions of liability may not apply to you. This warranty gives you specific rights,
and you may also have other rights which vary from state to state.
If you experience technical problems with your game, please head to
www.konami.com/support for assistance, here you will have access to many support
materials, as well as our Knowledge Base which is available 24 hours a day, 7 days a week.
All products must be deemed defective by a Konami Customer Service representative and an
RMA number assigned prior to returning the product. All products received not matching
this criteria will be returned if a Konami Customer Service Representative cannot reach you
within three days upon receipt of the unauthorized return.
Konami Digital Entertainment, Inc.
Attention: Customer Service-RMA # XXXX
2381 Rosecrans Ave, Suite 200
El Segundo, CA 90245
USA
Register now at www.konami.com to receive exclusive product news,
special offers and more!
www.konami-pes2011.com
WARRANTY

PRO EVOLUTION SOCCER 2011
GARANTÍA / SERVICIO DE ATENCIÓN AL CLIENTE
35
PRO EVOLUTION SOCCER 2011
TÉRMINOS LEGALES
34
www.konami-pes2011.com
GARANTÍA
Konami Digital Entertainment, Inc. garantiza al comprador original de este producto Konami que los
medios en los cuales está grabado este programa de computadora están libres de defectos en
materiales y mano de obra por un periodo de noventa (90) días a partir de la fecha de compra. Este
producto Konami es vendido "tal como es", sin garantía expresa o implícita de cualquier tipo y Konami
no es responsable de perdidas o daños de cualquier tipo resultantes del uso de este programa.
Konami acepta reparar o reemplazar, sin ningún cargo, cualquier producto Konami por un periodo de
noventa (90) días, con franqueo pagado y con prueba de la fecha de compra, en el Centro de Servicio
de su Fábrica. Esta garantía no es aplicable al uso normal del producto. Esta garantía no será
aplicable y será inválida si el defecto en el producto Konami es originado por maltrato, uso indebido,
abuso o descuido.
ESTA GARANTÍA SUSTITUYE A TODAS LAS DEMÁS GARANTÍAS Y NINGUNA OTRA PROTESTA O
RECLAMO DE NINGUNA NATURALEZA VINCULARÁ U OBLIGARÁ A KONAMI A NINGUNA GARANTÍA
APLICABLE A ESTE PRODUCTO, LAS GARANTÍAS MERCANTILES Y APTITUDES INCLUIDAS PARA UN
FIN PARTICULAR, ESTÁN LIMITADAS AL PERIODO DE NOVENTA (90) DÍAS DESCRITO
ANTERIORMENTE. POR NINGUNA CIRCUNSTANCIA KONAMI SERÁ RESPONSABLE DE DAÑOS
INCIDENTALES O CONSECUENTES RESULTANTES DE LA POSESIÓN, USO O MAL FUNCIONAMIENTO
DE ESTE PRODUCTO KONAMI
Algunos estados no permiten limitaciones en lo que respecta a la vigencia de la garantía implícita y/o
exclusiones o limitaciones de daños incidentales o consecuentes, así que las limitaciones y/o
exclusiones anteriores de responsabilidad podrían no aplicar a usted. Esta garantía le da derechos
específicos y usted podría tener otros derechos que varían entre un estado y otro.
Si usted experimenta problemas técnicos con su juego, por favor dirígete a www.konami.com/support
si requieres asistencia, aquí tendrás acceso a muchos materiales de apoyo, al igual que a nuestra
Base de Conocimientos que está disponible 24 horas al día, 7 días a la semana. Todos los productos
deben ser considerados defectuosos por un representante de Servicio al Cliente de Konami y con un
número RMA asignado antes de regresar el producto, todos lo productos que se reciban sin estas
características serán devueltos si un Representante de Servicio al Cliente de Konami no puede
localizarlo tres días después de recibida la devolución no autorizada.
Konami Digital Entertainment, Inc.
Attention: Customer Service-RMA # XXXX
2381 Rosecrans Ave, Suite 200
El Segundo, CA 90245
USA
Regístrate ahora en www.konami.com y ¡recibe información exclusive sobre
productos, ofertas especiales y más!
©2010 Konami Digital Entertainment. KONAMI is a registered trademark of KONAMI CORPORATION.
Ocial Licensed Product of UEFA CHAMPIONS LEAGUE™. All names, logos and trophies of UEFA are the property, registered trademarks and/
or logos of UEFA and are used herein with the permission of UEFA. No reproduction is allowed without the prior written approval of UEFA.
adidas, the 3-Bars logo, the 3-Stripe trade mark and Predator are registered trademarks of the adidas Group, used with permission. adiPURE,
adiZERO and F50 are trademarks of the adidas Group, used with permission. the use of real player names and likenesses is authorised by
FIFPro and its member associations. Ocially licensed by Czech National Football Association Ocially licensed by CFF © 2010, DFB Licence
granted by m4e AG, Grünwald © The Football Association Ltd 2010. The FA Crest and FA England Crest are ocial trademarks of The Football
Association Limited and are the subject of extensive trade mark registrations worldwide. copyright FFF Ocially licensed by FIGC and AIC
© 2001 Korea Football Association Licensed by OLIVEDESPORTOS (Ocial Agent of the FPF) Producto ocial licenciado RFEF © 2002 Ligue
de Football Professionnel ® Ocially Licensed by Eredivisie Media & Marketing C.V. Ocial Licensed Product of A.C. Milan Manchester
United crest and imagery © MU Ltd © Real Madrid (10) Ocial product manufactured and distributed by Konami Digital Entertainment
under licence granted by Soccer s.a.s. di Brand Management S.r.l. Under licence from Tottenham Hotspur Plc Wembley, Wembley Stadium
and the Arch device are ocial trademarks of Wembley National Stadium Limited and are subject to extensive trade mark registrations. All
other copyrights or trademarks are the property of their respective owners and are used under license.
Official Licensed
Product
Official Licensed
Product
Dolby and the double-D symbol are trademarks of Dolby Laboratories.
This software is based in part on the work of the Independent JPEG Group.
GARANTÍA

PRO EVOLUTION SOCCER 2011
LEGAL
52
©2010 Konami Digital Entertainment. KONAMI is a registered trademark of KONAMI CORPORATION.
Ocial Licensed Product of UEFA CHAMPIONS LEAGUE™. All names, logos and trophies of UEFA are the property, registered trademarks and/
or logos of UEFA and are used herein with the permission of UEFA. No reproduction is allowed without the prior written approval of UEFA.
adidas, the 3-Bars logo, the 3-Stripe trade mark and Predator are registered trademarks of the adidas Group, used with permission. adiPURE,
adiZERO and F50 are trademarks of the adidas Group, used with permission. the use of real player names and likenesses is authorised by
FIFPro and its member associations. Ocially licensed by Czech National Football Association Ocially licensed by CFF © 2010, DFB Licence
granted by m4e AG, Grünwald © The Football Association Ltd 2010. The FA Crest and FA England Crest are ocial trademarks of The Football
Association Limited and are the subject of extensive trade mark registrations worldwide. copyright FFF Ocially licensed by FIGC and AIC
© 2001 Korea Football Association Licensed by OLIVEDESPORTOS (Ocial Agent of the FPF) Producto ocial licenciado RFEF © 2002 Ligue
de Football Professionnel ® Ocially Licensed by Eredivisie Media & Marketing C.V. Ocial Licensed Product of A.C. Milan Manchester
United crest and imagery © MU Ltd © Real Madrid (10) Ocial product manufactured and distributed by Konami Digital Entertainment
under licence granted by Soccer s.a.s. di Brand Management S.r.l. Under licence from Tottenham Hotspur Plc Wembley, Wembley Stadium
and the Arch device are ocial trademarks of Wembley National Stadium Limited and are subject to extensive trade mark registrations. All
other copyrights or trademarks are the property of their respective owners and are used under license.
Official Licensed
Product
Official Licensed
Product
Dolby and the double-D symbol are trademarks of Dolby Laboratories.
This software is based in part on the work of the Independent JPEG Group.
PRO EVOLUTION SOCCER 2011
NOTES
53

Ofcial Licensed Product of UEFA CHAMPIONS LEAGUE™. Ofcial Licensed Product of UEFA EUROPA LEAGUE™. All names, logos and trophies of UEFA are
the property, registered trademarks and/or logos of UEFA and are used herein with the permission of UEFA. No reproduction is allowed without the prior
written approval of UEFA. adidas, the 3-Bars logo, the 3-Stripe trade mark and Predator are registered trade marks of the adidas Group, used with permission.
adiPURE, adiZERO and F50 are trade marks of the adidas Group, used with permission. All other copyrights or trademarks are the property of their respective
owners and are used under license. ©2010 Konami Digital Entertainment KONAMI is a registered trademark of KONAMI CORPORATION.
Windows, el botón Start de Windows, Xbox, Xbox 360, Xbox LIVE y los logotipos de Xbox son marcas
registradas del grupo de empresas Microsoft. “Games for Windows” y el logotipo del botón Start de Windows
se usan bajo licencia de Microsoft.
Windows, o botão Iniciar do Windows, Xbox, Xbox 360, Xbox LIVE e os logotipos do Xbox são marcas
comerciais registradas do grupo de empresas da Microsoft, e “Games for Windows” e o logotipo do botão
Iniciar do Windows são usados sob licença da Microsoft.
Windows, the Windows Start button, Xbox, Xbox 360, Xbox LIVE, and the Xbox logos are trademarks of the
Microsoft group of companies, and “Games for Windows” and the Windows Start button logo are used under
license from Microsoft.
/