Page is loading ...

ONYX Easy Manual_D 09.02.2007 16:45 Uhr Seite 2
C M Y CM MY CY CMY K
DEUTSCH

ONYX Easy Manual_D 09.02.2007 16:45 Uhr Seite 31
C M Y CM MY CY CMY K
Notizen
SEITE 30

ONYX Easy Manual_D 09.02.2007 16:45 Uhr Seite 32
C M Y CM MY CY CMY K
SEITE 31
DEUTSCH

ONYX Easy Manual_D 09.02.2007 16:45 Uhr Seite 1
C M Y CM MY CY CMY K
Batterien können nach Gebrauch
zurückgegeben werden.
Batteries can be returned after use.
Le batterie possono essere restituite dopo l’ uso.
Les piles peuvent être redonnées après usage.
Las pilas pueden ser devueltas después de su uso.
Batterijen na gebruik inleveren.
SIGMA SPORT USA
North America
1067 Kingsland Drive
Batavia, IL 60510, USA
Tel. +1-630-761-1106
Fax +1-630-761-1107
SIGMA EUROPA:
SIGMA Elektro GmbH
Dr.- Julius - Leber- Straße 15
D-67433 Neustadt a.d.W.
Tel. +49-(0)6321-9120-118
Fax +49-(0)6321-9120-34
SIGMA ASIA:
Asia, Australia, South America
7F-1, No. 193, Ta-Tun 6th Street,
Taichung City, Taiwan
Tel. +886-4-2475 3577
Fax +886-4-2475 3563
WWW.SIGMASPORT.COM
2
8
8
3
0
0
/
1

ONYX Easy Manual_GB 09.02.2007 16:52 Uhr Seite 2
C M Y CM MY CY CMY K
ENGLISH

ONYX Easy Manual_GB 09.02.2007 16:52 Uhr Seite 3
C M Y CM MY CY CMY K
Content
PAGE 2
1. Foreword and package contents 3
2.
Basic operation principle 5
2.1 Function summary (tree diagram) 6
2.2 Key occupancy and navigation principle
7
2.3 Fixing the chest belt/
attaching the handlebar holder 8
2.4 Measuring the heartbeat 9
3.
Settings before the first training
-> Main menu Setting
12
3.1 Setting User 13
3.2 Setting Unit 15
4.
Main menu Training 16
5.
Main menu Time 17
6.
Main menu Memory 20
6.1 Total values
21
6.2 Memory 22

ONYX Easy Manual_GB 09.02.2007 16:52 Uhr Seite 4
C M Y CM MY CY CMY K
PAGE 3
7. Other information 23
7.1 Information on heart rate 23
7.2 FAQ
25
7.3 Beep summary 26
7.4 Troubleshooting 27
7.5 Changing the battery/waterproofing
and warranty 29
1. Foreword
and package
contents
Congratulations on choosing a heart rate monitor from
SIGMA SPORT
®
. Your new ONYX EASY will be a faithful
companion for sport and leisure for many years to come.
The ONYX EASY is a technically demanding measuring device.
In order to learn and apply the varied functions of your new
heart rate monitor, please read this user manual carefully.
SIGMA SPORT
®
wishes you a lot of fun using your ONYX EASY.
ENGLISH

ONYX Easy Manual_GB 09.02.2007 16:52 Uhr Seite 5
C M Y CM MY CY CMY K
PAGE 4
Handlebar holder
to use the ONYX
EASY on the bike
with an O ring.
Chest belt with
digitally
coded radio
transmission.
Heart rate
monitor ONYX
EASY.
Special key for
opening the ONYX
EASY battery
compartment.

ONYX Easy Manual_GB 09.02.2007 16:52 Uhr Seite 6
C M Y CM MY CY CMY K
PAGE 5
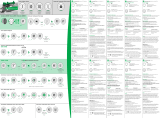
2.1 Function summary
Training 1 zone
training
Time
Clock Date Stopwatch Countdown Alarm
1 Memory
Total Values Per Week Per Month Since Reset
Memory
2. Basic
operation
principle
ENGLISH

ONYX Easy Manual_GB 09.02.2007 16:52 Uhr Seite 7
C M Y CM MY CY CMY K
PAGE 6
2.1 Function summary
Setting
User
Unit
Gender
Language
Birthday
Date
Weight
Clock
HR Max.
Volume
T. zone
(training zone)
Button tones Zone Alarm My Name
The 4 main menus
of the ONYX EASY

ONYX Easy Manual_GB 09.02.2007 16:52 Uhr Seite 8
C M Y CM MY CY CMY K
PAGE 7
2.2 Key allocation and
navigation principle
The ONYX EASY uses three menu levels. When
navigating through the menus and sub-menus of the
ONYX EASY the user can always refer to the tree
diagram in Chapter 2.1 “Function summary”.
The menu navigation on the ONYX EASY is made much
simpler by the navigation level. The navigation level
always appears when you press one of the two upper
function buttons.
The possible button functions for the two upper buttons
are shown in the navigation level in order to:
k Move to the next deeper level (ENTER)
k Go back to the next higher level (BACK/OFF)
k Start training (START)
k End training (END)
Confirm the function shown in the navigation level by
pressing the button again. Use the two lower buttons
PLUS/MINUS to change between the individual menu
options on one level.
Your ONYX EASY is classified into 4 main menus –
“Training”, “Time”, “Memory” and “Setting”.
The symbol and description on the screen indicates
where you are in the main menu. Use the PLUS/MINUS
buttons to change between the individual main menus.
ENGLISH

ONYX Easy Manual_GB 09.02.2007 16:52 Uhr Seite 9
C M Y CM MY CY CMY K
PAGE 8
Connect the
transmitter with
the elastic belt.
Use the adjusting
mechanism to
individually adapt
the length of the
belt.
Ensure that you
set the length of
the belt so that it
sits well but is not
too tight.
Place the belt
such that for
men the
transmitter is
below the chest
muscles and for
women below
the breasts.
The SIGMA logo
must always be
readable from
the front.
2.3 Fixing the chest
belt/attaching the
handlebar holder

ONYX Easy Manual_GB 09.02.2007 16:52 Uhr Seite 10
C M Y CM MY CY CMY K
PAGE 9
Lift the belt slightly
from the skin.
Dampen the
ribbed zones
(electrodes) on
the rear of the
transmitter with
salvia or cardio
gel.
Assemble the
handlebar holder.
Then fix the
handlebar holder
with the O ring
and close the
wristband.
2.4 Measuring
the heartbeat
When you are not training
your ONYX EASY is in
sleep mode and can be
worn as a normal watch.
Before and after training
the screen shows the
date, time and product
name.
You can enter another word with up to 10 characters under the ONYX EASY
font (my name function). Please refer to Chapter 3.2 “Setting unit”.
ENGLISH

ONYX Easy Manual_GB 09.02.2007 16:52 Uhr Seite 11
C M Y CM MY CY CMY K
PAGE 10
To activate your
ONYX EASY hold
down any button
for two seconds.
The clock changes
to active mode and
you enter the
training main
menu.
Note: At the start always refer to the tree
diagram shown in 2.1.
Synchronisation of
Watch and Chestbelt
Your ONYX EASY is equipped
with a digitally coded chestbelt
that enables you to have
interference free training.
Before starting to
train you have to
synchronize the
chestbelt with the
watch once.
Select “Training” in the main menu and press
navigation button -> ENTER.
The
synchronization
starts auto-
matically and
takes just a
seconds.

ONYX Easy Manual_GB 09.02.2007 16:52 Uhr Seite 12
C M Y CM MY CY CMY K
PAGE 11
After successful
synchronization
your ONYX EASY
gives a short
confirmation with
“Sync ok”.
Note: If you do not see this indication on
your watch synchronization has already
been completed successfully.
After your ONYX
EASY has
successfully
synchronized with
your chest belt you
can start training
by pressing
–> START.
Note: please refer to Chapter 7.4
“Troubleshooting” for possible problems with
synchronization.
Switch off
ONYX EASY
The ONYX EASY switches
itself off automatically after
5 minutes if no training is
undertaken. You can also turn
your watch to sleep mode
manually at any time.
To switch off your
ONYX EASY you
have to be in the
Main Menu.
Press the Navigation button –> OFF to
activate sleep mode.
ENGLISH

ONYX Easy Manual_GB 09.02.2007 16:52 Uhr Seite 13
C M Y CM MY CY CMY K
PAGE 12
Your ONYX EASY is
again in sleep mode
and can be worn
as an everyday
watch.
Before the first training session enter your personal settings.
Go to main menu by pressing the PLUS/MINUS button until you
reach the “Setting menu” option. Press the Navigation
button –> ENTER to open the “Setting menu”.
The “Setting main menu” is sub-divided into user, “unit” and “training
settings” (Setting/User, Setting/Unit, Setting/Training). Switch
between these options by pressing the PLUS/MINUS buttons.
Open the relevant menu with the Navigation button –> ENTER.
3. Settings
before the
first training

ONYX Easy Manual_GB 09.02.2007 16:52 Uhr Seite 14
C M Y CM MY CY CMY K
PAGE 13
Now various setting values are displayed
in each menu. Change the setting value
using the Navigation button -> CHANGE.
Increase/reduce the value to be set using
PLUS/MINUS. Confirm the relevant setting
with OK and save the setting when you have
finished using -> SAVE.
Note: The ONYX EASY has an additional memory so that the personal settings in your ONYX EASY are
retained when you are changing the battery.
3.1 Setting
User
In “Setting user”
enter in
succession your
gender, birthday
and weight.
Your maximum
heart frequency
is calculated by
the following
equations.
ENGLISH

ONYX Easy Manual_GB 09.02.2007 16:52 Uhr Seite 15
C M Y CM MY CY CMY K
PAGE 14
The calculated max. HR (heart rate) forms the basis for
determining the upper and lower limits of your preferred
training zone. Selecting and setting the training zone is
done in the “Settings//User//Train. Zone” menu.
Depending on your personal targets, you can choose to
activate one of the following training zones in the ONYX
EASY.
1. Fat Burner Zone:
–> approx. 55 – 70 % of HR max.
When training at a lower intensity and hence longer
period, a bigger percentage of fat than carbohydrate is
used to provide energy. Therefore people who primarily
The recommended training period is 45 - 90 min.
Beginners, who have not done any sport for a long time,
should also start training in this area of intensity at first.
This significantly reduces the danger of over-exertion and
the associated health risks.
2. Fitness Zone:
–> approx. 70 – 80 % of HR max.
Heart-circulation training is predominantly used to improve aerobic
performance.

ONYX Easy Manual_GB 09.02.2007 16:52 Uhr Seite 16
C M Y CM MY CY CMY K
PAGE 15
3.2 Setting
Unit
The “setting unit” menu provides the language
(D ,GB/USA, F, ES, IT), date, clock (12/24 hr. mode)
and various volume settings. The different volume settings are:
Button tones:
Button tones give the user acoustic feedback
each time a button is pressed.
Zone Alarm:
On the zone alarm, an acoustic signal beeps when the user goes above or
below the limits of the training zone.
Please refer to Chapter 7.3 “Beep summary” for a summary of the acoustic signals.
You will find information on the setting principle at the start of this chapter.
3. Personal Zone:
ONYX EASY also gives you the opportunity
to set your own training zone. To do this you
change the upper and lower limits in the
“Settings//User//Train. Zone” menu option
using the navigation button -> CHANGE.
Note: Notes about making settings can be
found at the start of this chapter.
ENGLISH

ONYX Easy Manual_GB 09.02.2007 16:52 Uhr Seite 17
C M Y CM MY CY CMY K
PAGE 16
In the sub menu “setting” you can personalize
the ONYX EASY using the “my name” function.
In sleep mode the watch displays the name or any
font of up to 10 characters in length.
Press the Navigation button –> ENTER to open the
main menu “Training”.
After you have successfully synchronized your
EASY with your chestbelt you can start your training
by pressing –> START. In the upper area of the screen
you can find all the information on your target zone.
You will see your current heart rate in the middle.
4. Main Menu
Training
/