Page is loading ...

PLEASE READ AND SAVE THIS USE AND CARE BOOK.
POR FAVOR LEA ESTE INSTRUCTIVO ANTES DE USAR EL PRODUCTO.
VEUILLEZ LIRE ET CONSERVER CE GUIDE D’ENTRETIEN ET D’UTILISATION.
IMPORTANT / IMPORTANTE /
IMPORTANT
WASH CARAFE BEFORE FIRST USE!
LAVE LA JARRA ANTES
DEL PRIMER USO
LAVER LA CARAFE AVANT
LA PREMIÈRE UTILISATION!
Model/Modelo/Modèle
TCM830
Accessories/Parts (USA/Canada)
Accesorios/Partes (EE.UU/Canadá)
Accessoires/Pièces
(É.-U./Canada)
1-800-738-0245
USA/Canada 1-800-231-9786
Mexico 01-800-714-2503
www.blackanddecker.com
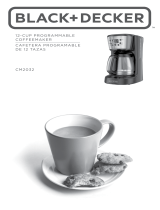
10-Cup Thermal Coffeemaker
Cafetera térmica de 10 tazas
Cafetière de 10 tasses
avec thermoverseuse
TCM830Pub1000001002RV1 4/27/05 2:48 PM Page 1

2
1
IMPORTANT SAFEGUARDS
When using electrical appliances, basic safety precautions should always be
followed to reduce the risk of fire, electric shock, and/or injury to persons,
including the following:
❑
READ ALL INSTRUCTIONS.
❑
Do not touch hot surfaces. Use handle or knobs.
❑
To protect against electric shock, do not place cord, plug or appliance in
water or other liquids.
❑
Close supervision is necessary when any appliance is used by or near
children.
❑
Unplug from outlet when not in use and before cleaning. Allow to cool
before putting on or taking off parts and before cleaning the appliance.
❑
Do not operate any appliance with a damaged cord or plug or after the
appliance malfunctions, or has been damaged in any manner. Return the
appliance to the nearest authorized service facility for examination, repair,
or adjustment. Or, call the appropriate toll-free number on the cover of
this manual.
❑
The use of an accessory not evaluated for use with this appliance may
cause injury.
❑
Do not use outdoors.
❑
Do not let cord hang over the edge of table or counter, or touch hot
surfaces.
❑
Do not place on or near a hot gas or electric burner or in a heated oven.
❑
Keep the lid on the carafe when in use.
❑
The carafe is designed for use with the appliance. It must never be used
on a range top.
❑
Do not clean the carafe with abrasive cleansers, steel wool, or other
abrasives.
❑
Do not use this appliance for other than intended use.
SAVE THESE INSTRUCTIONS.
POLARIZED PLUG (120V Models Only)
This appliance has a polarized plug (one blade is wider than the other). To reduce the
risk of electric shock, this plug is intended to fit into a polarized outlet only one way.
If the plug does not fit fully into the outlet, reverse the plug. If it still does not fit,
contact a qualified electrician. Do not attempt to modify the plug in any way.
TAMPER-RESISTANT SCREW
Warning : This appliance is equipped with a tamper-resistant screw to prevent
removal of the outer cover. To reduce the risk of fire or electric shock, do not attempt
to remove the outer cover. There are no user-serviceable parts inside. Repair should
be done only by authorized service personnel.
ELECTRICAL CORD
a) A short power-supply cord (or detachable power-supply cord) is to be provided
to reduce the risk resulting from becoming entangled in or tripping over a
longer cord.
b) Longer detachable power-supply cords or extension cords are available and
may be used if care is exercised in their use.
c) If a long detachable power-supply cord or extension cord is used,
1) The marked electrical rating of the detachable power-supply cord or extension
cord should be at least as great as the electrical rating of the appliance,
2) If the appliance is of the grounded type, the extension cord should be a
grounding-type 3-wire cord, and
3) The longer cord should be arranged so that it will not drape over the
countertop or tabletop where it can be pulled on by children or tripped over.
NOTE: If the power supply cord is damaged, it must be replaced by the
manufacturer or its service agent or a similarly qualified person in order to avoid
a hazard.
TCM830Pub1000001002RV1 4/27/05 2:48 PM Page 2

4
How to Use
This product is for household use only.
Important: For warranty verification, do not remove line cord sticker.
GETTING STARTED
1. Remove all packing materials and literature.
2. Hand-wash thermal carafe, carafe lid, water reservoir and brew basket in warm
sudsy water; rinse thoroughly. Carafe lid and brew basket can also be washed
in the dishwater, top rack only.
SETTING THE CLOCK (A)
1. Plug in the coffeemaker. The digital displays shows
12:00 blinking.
2. Press the HOUR and MIN buttons until you see the
correct AM or PM hour. The AM and PM indicators
display on the left side of the digital readout.
3. The clock is set. To change the time, repeat step 2.
RUNNING WITH WATER ONLY
Before first use, cycle the unit once with water to help remove any sediment.
1. Grasp both sides of water reservoir and lift out (B).
2. Open lid and pour cold water into water reservoir up to
the 10-cup level mark on the water window (C). Do not
over fill.
3. Replace water reservoir and press down to secure.
Close lid.
4. Insert brew basket pivoting hinge into brew basket
holder (D).
5. Grasp brew basket by small handle and use it to swing
brew basket closed (E).
6. Follow steps 9-11 in "Brewing a Pot of Coffee" (Do not
use coffee grounds or a paper filter.)
7. When cycle is finished, discard water from carafe.
BREWING A POT OF COFFEE
You do not have to set the clock or program the
coffeemaker to brew coffee.
1. Grasp both sides of water reservoir and lift out.
2. Open lid and fill water reservoir with cold water. To
avoid overflow, do not fill above the 10-cup level.
3. Replace water reservoir and press down to secure.
4. Grasp brew basket by small handle and swing brew
basket to open (F).
5. Insert a No. 4 cone-shaped paper filter into the brew
basket.
6. Add ground coffee into filter (we recommend 1 heaping
tablespoon for every 2 cups).
3
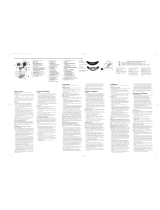
Product may vary slightly from what is illustrated.
1. Water reservoir lid
2. Brew basket holder
†3.Removable water reservoir
(Part #TCM830-01)
4. Brew basket pivoting hinge
†5.Brew basket (Part #TCM830-02)
6. Handle for opening brew basket
7. Water level indicators (on both sides)
†8.Carafe lid with brew-thru
(Part #TCM830-04)
†9.Thermal carafe (Part #TCM830-03)
10. Control panel
† Consumer replaceable
1. Digital display
2. ON indicator light (green)
3. ON/OFF (1/0) button
4. PROG button
5. HOUR button
6. MIN button
7. PROG indicator light
A
B
C
D
E
CONTROL PANEL
F
TCM830Pub1000001002RV1 4/27/05 2:48 PM Page 4

6
5
7. Grasp small handle on brew basket and swing brew
basket closed until you hear a “click” (G).
8. Close thermal carafe lid by pressing down and turning
it until tightly closed (H).
Important: Check that carafe lid is properly in place. Coffee
may overflow if lid is not properly in place.
9. Place carafe into coffeemaker (J).
10. Press the ON/OFF (1/0) button once. On indicator
light turns green. To preset an automatic brew time,
see "Programming the Coffeemaker for Auto-Brew."
Important: Do not open swing brew basket while brewing.
11. When brewing is complete, coffeemaker automatically
shuts off and green ON indicator light goes out.
12. To pour coffee, turn the carafe lid until the POUR
arrow aligns with the arrow on the carafe warm-spout.
Keep lid closed tightly to keep coffee.
Sneak-A-Cup® INTERRUPT FEATURE
You can pour a cup of coffee while coffee is brewing.
1. Remove carafe from coffeemaker.
Important: To avoid a possible overflow after removing
carafe, be sure to place it back under brew basket in
30 seconds or less.
2. Twist carafe lid counterclockwise until pour arrow on lid
aligns with arrow on carafe spout (K).
Important: To prevent the lid from falling off, do not turn
the arrow on the lid beyond the arrow on the spout.
3. When finished pouring coffee, twist carafe lid clockwise
until it is tight.
4. Place carafe under brew basket. The brewing process
continues (L).
USING THERMAL CARAFE
• For best performance, rinse the carafe with warm water before brewing.
This brings up the temperature and improves the carafe’s thermal properties.
• Coffee is brewed directly into carafe through the closed brew thru lid. Always
check that lid is properly in place when brewing. Coffee may overflow if lid
is not properly in place. See instructions in "Brewing a Pot of Coffee."
• The carafe keeps coffee hot up to 4 hours so you can leave it away from
coffeemaker for serving. Always check that lid is properly closed in place
when not in use, this will ensure that coffee stays hot. See instructions in
"Sneak-a-Cup® Interrupt Coffeemaker Feature."
PROGRAMMING THE COFFEEMAKER FOR AUTO-BREW (M)
1. Press the PROG button once; the PROG light blinks red
and BREW appears on the digital display.
2. Immediately, press the HOUR and MIN buttons until you
reach desired brew time.
3. Wait a few seconds for the red PROG light to go out then press the ON/OFF
button once. The green ON light illuminates.
4. Press the ON/OFF button a second time. The red PROG light illuminates and
AUTO appears on the digital display. Your coffeemaker will start brewing when
it reaches the preset time.
Important: You can verify the preset time by pressing the PROG button. However
this will cancel the Auto Brew mode. To activate the Auto-Brew function again,
repeat steps 3 and 4.
Helpful Tips:
•You can cancel the Auto-Brew function at any time by pressing the ON/OFF
button again (the red PROG light goes out).
• If you unplug the unit for a few hours, you will have to program it again for
Auto-Brew.
Care and Cleaning
This appliance contains no user-serviceable parts. Refer service to qualified
service personnel.
Caution: Do not overexpose the control panel to water. It is not waterproof. Water
may cause permanent damage and make coffeemaker inoperable.
CLEANING
1. Be sure the unit is unplugged and cooled.
2. Grasp small handle on brew basket and swing open.
3. To remove brew basket, pull out pivoting hinge from
brew basket holder (N).
4. Discard the paper filter with the grounds.
5. Wash the brew basket and carafe lid in the dishwasher,
top-rack only or hand-wash in warm, sudsy water.
6. Wipe the exterior of the thermal carafe and coffeemaker
with a soft damp cloth. Do not use abrasive cleaners or
scouring pads. Never immerse the coffeemaker in water.
7. Insert brew basket into holder and swing closed.
8. To clean the inside of the thermal carafe (P) and the
water reservoir, wash in warm sudsy water, rinse well
and allow to air dry.
MAINTAINING YOUR COFFEEMAKER
Mineral deposits left by hard water can clog your coffeemaker. Cleaning is
recommended every 3 months.
1. Remove water reservoir, open the lid and pour white vinegar into the water
reservoir up to the 4-cup level mark on the water window. Add cold water
up to the 6-cup line.
2. Using the small handle on the brew basket, swing open.
3. Insert paper filter into brew basket. Swing brew basket closed.
4. Place the carafe with lid secured, all the way into the coffeemaker.
Plug in the unit.
5. Press the ON/OFF (1/0) button twice, green brewing "ON" light illuminates.
6. Let half of the vinegar solution brew into the carafe (until the solution level
in the water window goes down to "3." Press the ON/OFF (1/0) button again
to turn off the coffeemaker and let it soak for at least 15 minutes to soften
mineral deposits.
J
K
L
N
P
H
G
M
TCM830Pub1000001002RV1 4/27/05 2:48 PM Page 6

21
22
6. Essuyer l’extérieur de la thermoverseuse et l’appareil avec
un chiffon doux et humide. Ne pas utiliser de produits
nettoyants ni de tampons à récurer abrasifs. Ne jamais
immerger l’appareil.
7. Insérer le panier dans le porte-panier et le fermer.
8. Pour nettoyer l’intérieur de la thermoverseuse (P) et le
réservoir, les laver dans de l’eau chaude savonneuse, bien
les rincer et les laisser sécher à l’air libre.
ENTRETIEN DE LA CAFETIÈRE
Des dépôts de minéraux dus à la dureté de l’eau peuvent bloquer l’appareil. Il est
conceillé de nettoyer l’appareil aux trois mois.
1. Sortir le réservoir, en ouvrir le couvercle et y verser du vinaigre blanc jusqu’à
la marque de 4 tasses. Ajouter de l’eau froide jusqu’à la marque de 6 tasses.
2. Utiliser la petite poignée pour ouvrir le panier.
3. Insérer un filtre en papier dans le panier et fermer ce dernier.
4. Déposer la carafe avec son couvercle bien en place à fond dans la cafetière.
Brancher l’appareil.
5. Enfoncer l’interrupteur (ON/OFF) (1/0) à deux reprises, le témoin de
fonctionnement vert s’allume.
6. Laisser la moitié de la solution infuser (jusqu’à ce que la solution soit à la
marque de 3). Enfoncer de nouveau l’interrupteur (ON/OFF) (1/0) pour arrêter
l’appareil et laisser tremper pendant au moins 15 minutes pour ramollir
les dépôts de minéraux.
7. Enfoncer l’interrupteur (ON/OFF) (1/0) à deux reprises pour remettre l’appareil
en marche. Laisser infuser le reste de la solution.
8. À la fin de l’infusion de la solution vinaigrée, jeter le filtre, vider la carafe
et la rincer à l’eau propre.
9. Remplir le réservoir de nouveau d’eau froide, déposer un filtre en papier dans
le panier et commencer un nouveau cycle d’infusion pour rincer toute trace
de la solution vinaigrée.
10. Laver le réservoir, le panier, la carafe et le couvercle selon les consignes
de la rubrique relative au nettoyage.
P
NEED HELP?
For service, repair or any questions regarding your appliance, call the appropriate
"800" number on the cover of this book. Do not return the product to the place of
purchase. Do not mail the product back to the manufacturer nor bring it to a
service center. You may also want to consult the website listed on the cover of this
manual.
One-Year Limited Warranty
(Applies only in the United States and Canada)
What does it cover?
• Any defect in material or workmanship; provided; however, Applica’s liability
will not exceed the purchase price of the product
For how long?
• One year after the date of original purchase
What will we do to help you?
• Provide you with a reasonably similar replacement product that is either new
or factory refurbished
How do you get service?
• Save your receipt as proof of the date of sale.
• Check our on-line service site at www.prodprotect.com/applica, or call our
toll-free number, 1-800-231-9786, for general warranty service
• If you need parts or accessories, please call 1-800-738-0245.
What does your warranty not cover?
• Damage from commercial use
• Damage from misuse, abuse or neglect
• Products that have been modified in any way
• Products used or serviced outside the country of purchase
• Glass parts and other accessory items that are packed with the unit
• Shipping and handling costs associated with the replacement of the unit
• Consequential or incidental damages (Please note, however, that some states
do not allow the exclusion or limitation of consequential or incidental damages,
so this limitation may not apply to you.)
How does state law relate to this warranty?
• This warranty gives you specific legal rights, and you may also have other rights
that vary from state to state or province to province.
¿NECESITA AYUDA?
Para servicio, reparaciones o preguntas relacionadas al producto, por favor llame
al número del centro de servicio en el país donde usted compró su producto.
NO devuelva el producto al fabricante. Llame o lleve el producto a un centro
de servicio autorizado.
Dos Años de Garantía Limitada
(No aplica en México, Estados Unidos o Canadá)
¿Qué cubre la garantía?
• La garantía cubre cualquier defecto de materiales o de mano de obra. Applica no
se responsabiliza por ningún costo que excedael valor de compra del producto.
¿Por cuánto tiempo es válida la garantía?
• Por dos años a partir de la fecha original de compra.
TCM830Pub1000001002RV1 4/27/05 2:48 PM Page 22

950 W 120 V 60Hz
R12004/6-15-38E/S/F
Copyright © 2005 Applica Consumer Products, Inc.
Pub. No. 1000001002-RV01
Made in People’s Republic of China
Printed in People’s Republic of China
Importado por:
Applica de México S. de R.L. de C.V.
Blvd. Manuel Avila Camacho 2900 Int. 902
Los Pirules, Tlalnepantla,
Edo. Mex.
C.P. 54040
México
Teléfono: (55) 1106-1400
Del interior marque sin costo
01 (800) 714-2499
Fabricado en la República Popular de China
Impreso en la República Popular de China
Fabriqué en République populaire de Chine
Imprimé en République populaire de Chine
is a trademark of The Black & Decker Corporation, Towson, Maryland, USA
Marca registrada de The Black & Decker Corporation, Towson, Maryland, E.U.
Marque de commerce déposée de la société The Black & Decker Corporation, Towson, Maryland, É.-U.
TCM830Pub1000001002RV1 4/27/05 2:48 PM Page 28
/